
To ensure your golf cart functions properly, it is essential to connect the batteries correctly. Handling wires and battery terminals can be confusing and somewhat intimidating to beginners. Issues such as sparks, loose connections, or a cart that fails to start may occur when tasks are performed improperly. This simple step-by-step tutorial on how to connect golf cart batteries will make it easy to know how to do it. You will also learn how to safely wire golf cart batteries to prevent damage and keep everything running smoothly without strain.
Golf Cart Battery Types You Need to Know About
The selection of the appropriate battery type is critical for performance and durability. Not all golf cart batteries are equal, and each type operates differently. The kind and voltage configuration may have implications for power, charging duration, and overall lifespan. These are some of the basics that one should be familiar with before beginning to learn how to connect golf cart batteries. This part describes the types of batteries, voltage differences, and layouts in a simple and understandable manner.
Lead-Acid and Lithium Golf Cart Batteries
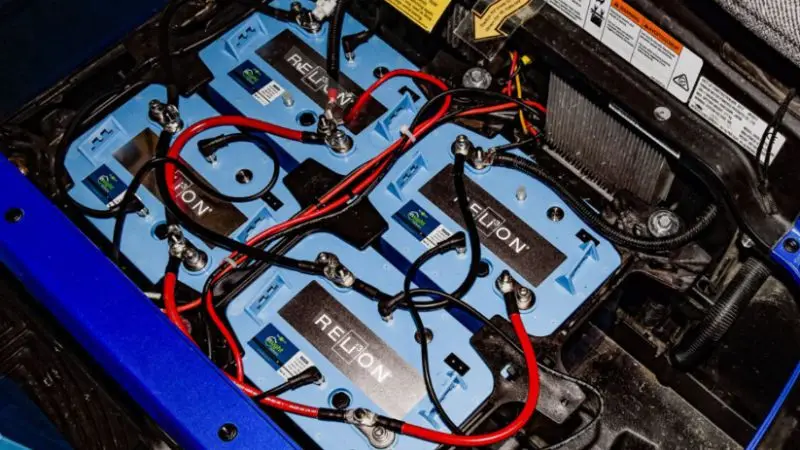
Lead-acid and lithium batteries are predominantly used in golf carts, and each battery has a mode of operation. Lead-acid batteries are more prevalent since they are cheaper initially, but require frequent maintenance, such as adding water and cleaning terminals. Their discharge causes their power to drop gradually, and this may interfere with performance. Lithium batteries, however, deliver constant voltage and do not need any maintenance. They are considerably more expensive to charge and have a considerably longer life, usually in excess of ten years. Lithium is initially more expensive, but it is a superior long-term option due to fewer replacements and greater efficiency.
Difference Between 6V, 8V, and 12V Batteries
Golf cart batteries are available in 6-volt, 8-volt, and 12-volt, and each affects the cart’s performance. Six-volt batteries offer the greatest capacity and have been known to have long-lasting power, but more units are required to achieve the desired voltage. Eight-volt batteries are a good compromise between capacity and efficiency, and are often used in many carts. 12-volt batteries require fewer units, which can be cheaper up front, but tend to have lower capacity and shorter lifetimes than the other alternatives.
How to Identify Your Golf Cart Battery Layout
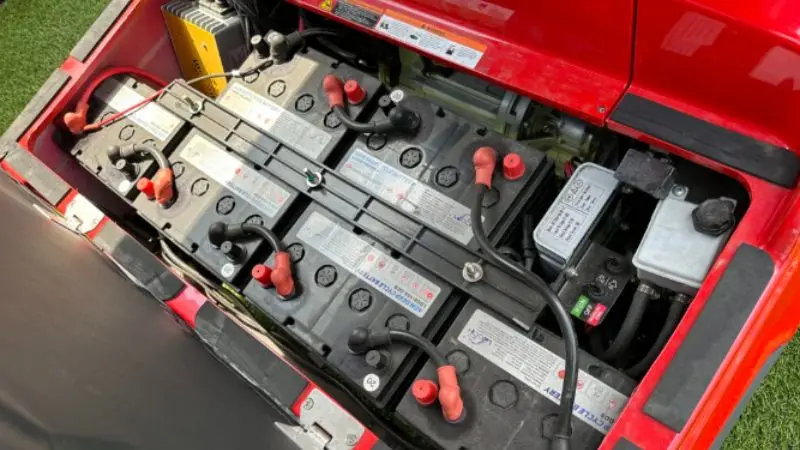
It is necessary to know the battery layout in the golf cart before initiating any wiring. The majority of carts have a common setup depending on the battery voltage. A typical design incorporates 6-volt batteries with more capacity, and there are carts with 6-volt batteries to achieve a balanced performance. In particular systems, others can employ four 12-volt batteries. To find the layout, examine the battery compartment, trace the cable connections, and check the labels for voltage information. This is necessary to connect 8 golf cart batteries for maximum voltage, as well as to make sure that all wires are connected correctly.
Tools and Safety for Connecting Golf Cart Batteries
With the aid of appropriate equipment and safety precautions, the process is risk-free and easy. Numerous issues throughout the process of hooking up golf cart batteries are caused by inappropriate tools or dangerous handling. Proper setup and preparation can prevent sparks, damage, or injuries. In this section, it is described what is required and how to be safe at work.
Tools and Materials You Need Before Starting
Preparation of all the tools prior to commencing work makes the work quicker and more structured. It also minimizes errors in the process.
- Insulated wrenches are used to prevent electric shock when tightening or loosening terminals.
- Powerful battery cords help to maintain appropriate power distribution and minimize the chances of short-circuiting.
- Acid and sparks are prevented with safety goggles and gloves.
- A multimeter is used to test the voltage and battery problems.
The cable thickness should always be checked beforehand. Thick cables are more current-carrying and do not get hot when they are used. The first step that is easy to follow is to place the batteries in place, making the step-by-step guide on connecting golf cart batteries easier to follow.
Safety Gear and Important Precautions
Battery work must be carefully attended to in order to prevent severe issues. Minutiae errors can result in burns, shocks, or damage.
- Wear gloves to avoid battery acid and skin contact.
- Wear safety goggles to ensure that your eyes are not in danger of being splashed.
- Avoid burning or smoking around batteries because of the gas.
- Ensure that the area is well ventilated.
Insulated gloves offer additional safety when working with connections. These are some of the easiest steps involved in the best way to wire golf cart batteries safely and must not be overlooked.
Golf Cart Battery Wiring Diagrams Explained Simply
Working on any golf cart battery system requires a lot of understanding of wiring diagrams. These diagrams show how batteries are connected and how power flows through the system. This assists in avoiding wiring errors and makes the cart secure and effective. Before learning how to hook up golf cart batteries, it is worthwhile to familiarize oneself with the operation of various voltage configurations and systems in practice.
What Golf Cart Battery Wiring Diagrams Show
Golf cart battery wiring diagrams provide the entire connection scheme within a golf cart. They depict the arrangement of batteries, the connection of cables, and the flow of power within the system. Such diagrams are crucial in eliminating errors in installation or replacement.
They usually include:
- Location of the battery within the cart.
- Connection paths: Cables connecting batteries.
- Key positive and negative output points.
- Complete system voltage layout.
These illustrations can be of great use in a step-by-step guide to connecting golf cart batteries, and to novices who wish to have a safe and proper connection.
How 36 Volt and 48 Volt Golf Cart Systems Are Wired
The vast majority of golf carts run on either 36V or 48V systems and are hardwired together in series. A 36 V system typically contains six 6-volt batteries, whereas a 48 V system could contain six 8-volt batteries or eight 6-volt batteries.
Wiring is like the two:
- Connect the positive terminal of one battery to the negative terminal of the next
- Keep on doing so until all the batteries are attached.
- Attach the main positive and negative cables to the two ends.
The 36 V system offers a basic performance, with a 48 V offering more powerful performance, improved hill climbing, and increased range. The difference can be significant in the process of planning to connect 8 golf cart batteries for maximum voltage or in upgrading your system.
Series vs Parallel Battery Connections Explained
Golf carts have two primary battery connections: series and parallel. All types influence the voltage and performance in different ways.
- Connection in series adds to the total voltage but does not change the capacity.
- Parallel connection maintains the same voltage, but the run time is longer.
The most common type of wiring is the series wiring, which is used in golf carts, as it enhances speed and performance. Parallel wiring is not common, but it is primarily used when a longer battery runtime is needed. This difference can be understood to ensure that the golf cart batteries are wired properly to prevent electrical problems.
How to Connect Golf Cart Batteries Step by Step
It is the part most crucial to the whole process since proper wiring determines the safety and smoothness with which a golf cart will operate. Such a minor error may lead to problems with performance or destroy the system. To begin the process of connecting golf cart batteries, one should always have everything in place and take each step in the proper sequence to ensure a safe and secure system.
Step 1: Arrange and Inspect All Batteries
Begin by inserting all batteries properly into the battery tray in order to make each of the terminals easily accessible. A 36-volt system typically employs six 6-volt batteries, and a 48-volt system can have as many as six 8-volt or eight 6-volt batteries, depending on the installation.
Inspect each battery before wiring by checking it carefully for cracks, leaks, or other damage. Identify corrosion on the terminals and clean them accordingly. Ensure that all the cables are well-maintained and long enough to access all the connections without straining. It is important to arrange them properly at this stage so as to follow a stepwise procedure in connecting the golf cart batteries and prevent wiring errors in the future.
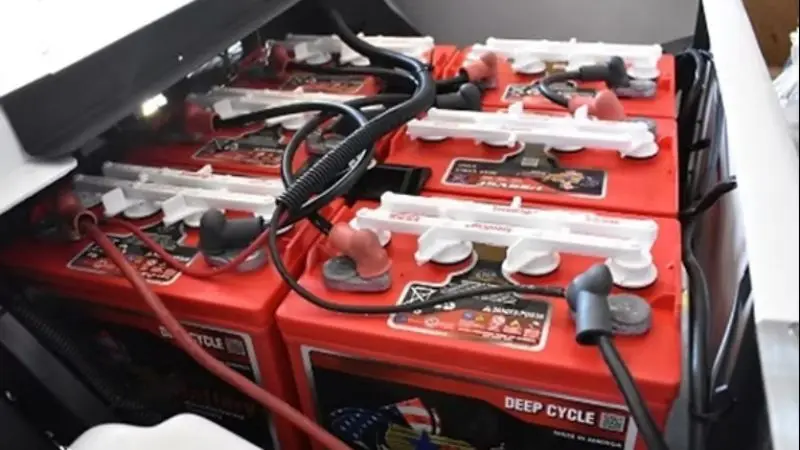
Step 2: Begin Series Connections Between Batteries
Then, begin connecting the batteries in series, the most common configuration in golf carts. Such a configuration adds up the voltage of battery chains.
Connect the positive terminal of the first battery to the negative terminal of the next battery. Repeat this procedure on all batteries until the whole series is finished. All connections should be tight and secure to avoid loose contacts or heat accumulation. This is necessary in the process of knowing how to attach 6-volt golf cart batteries in series.
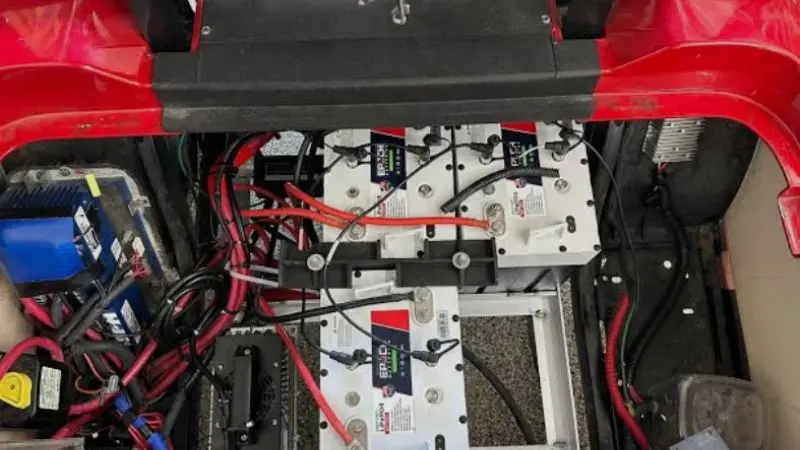
Step 3: Complete the Main Power Connections
After all series connections are made, complete the circuit by connecting the main cables. Both the main positive and the main negative cables are then connected to the positive and negative sides of the first and the last battery, respectively.
Ensure that all connections are in place and are safe. This step should be done with the golf cart off to eliminate any chance of an electrical hazard. This is an extremely important step when connecting 8 golf cart batteries for maximum voltage because it completes the power output of the system.
Step 4: Tighten and Secure All Connections
Once wiring is done, you need to check all the connections thoroughly and make sure that nothing is loose. All terminals are to be tightened to prevent movement when touched. Loose connections may lead to overheating, reduced performance, or even system failure.
Check also for any corrosion on terminals and remove it where required. A tight and clean connection allows a good flow of power and increases battery life. This stage provides the best way to wire golf cart batteries safely and helps ensure system reliability.
Step 5: Verify Polarity and Test the System
The last thing to check is the proper polarity and system output before activating the golf cart. Always ensure that all positive posts are linked to negative posts in series and that the main cables are in the right posts.
Test the total system voltage with a multimeter and ensure that it matches your system, e.g., 36 V or 48 V. In case of any error observed, first disconnect the main cables, rectify the wiring, and again test. This last test is to verify that the system is secure, precise, and operational.
How to Repair Golf Cart Battery Problems (Easy Guide)
Even with proper wiring, there is always a chance of small battery problems, and it is essential to know how to identify and address them as soon as possible. The majority of issues are easy and related to loose wires, dirty terminals, or charging errors. When such problems are not addressed, they may impact performance or even bring the cart to a halt. This segment describes the most typical errors in a very simplistic manner so that you can deal with them without being confused. It also assists in promoting safe procedures for connecting golf cart batteries and maintaining your system, moving along.
Common Battery Connection Problems Made Simple
The majority of the problems with the golf cart battery occur due to loose connections, broken cables, or overcharging. Free terminals may cause heat generation and power loss. Electricity may be blocked due to old or damaged cables, which makes the cart weak or slow. Terminals may also get damaged, become rusty, and/or overheated by overcharging. These issues might appear insignificant, but they can have an impact on the entire system when left unaddressed. Regular inspection of cables and terminals will help prevent these problems and ensure the most appropriate wiring of golf cart batteries for long life.
How to Fix Loose or Dirty Battery Terminals
Any loose or dirty terminals should be repaired immediately since they may prevent the transfer of proper power. To eliminate corrosion, first, wash the terminals with an easy-to-prepare baking soda and water mix. Once cleaning is done, dry the place well and ensure that all cables are firmly attached. The connections are to be stiff but not excessively tightened, since this will break the terminal. A clean and safe contact enables the batteries to work more efficiently and have a longer life. This straightforward attention also aids safe battery wiring and enhances general performance.
What to Do If Your Golf Cart Does Not Start
When the golf cart fails to start, the first step is to check the battery voltage with a multimeter to ensure it is charged. A very common cause of starting problems is low voltage. The second step is to check all the battery connections and ensure that there is nothing loose or unplugged. Check the fuse too; a blown fuse can cause the system to shut down. When the batteries are too low, one might have to give them a temporary boost before charging normally. These procedures are useful in repairing most startup problems in a short time and without risk.
Easy Ways to Keep Golf Cart Batteries Working Longer
Maintaining golf cart batteries will ensure that they last longer and serve better with time. Regular maintenance also helps in avoiding unexpected breakdowns and low power supply. The majority of battery issues occur because of improper charging, improper cleaning, or neglect of early indications. A straightforward day-to-day maintenance can enhance the battery life and maintain the system. Once equipped on how to connect golf cart batteries, maintenance will be of great importance to ensure safety in the long run, improved performance, and smooth running of the golf cart.
How to Charge Golf Cart Batteries the Right Way
It is significant to charge golf cart batteries in a way that enables a long life and good performance. It is advisable to recharge batteries before they are depleted, since deep discharging may weaken them over time. Do not use the wrong charger, as it could damage your battery. Charge regularly to avoid sulfation, which weakens the battery. Keep terminals clean and check water levels monthly using distilled water. Good charging practices enhance efficiency, safe wiring, and contribute to a reliable system post-installation.
@truckintoby Vevor smart battery charger with deaulfation mode, force start, maintain, and charging.. #vevor #batterycharger #mechanic #mechaniclife #truckerlife #trucker #smallengine #automechanic @Vevor_US
♬ Product introduction, commercials, information, summer(1284254) – yutaka.T
Simple Cleaning and Maintenance Routine
Frequent cleaning will maintain golf cart batteries in good operation and safety. Corrosion, dirt, and dust may decrease power flow and influence charging performance. Wipe off with a baking soda and water solution and dry thoroughly to keep them dry. Always leave battery cases clean and dry. Tightness of connection and cracks or leaks. Use distilled water to maintain water levels once a month. Correct cleaning enhances battery life, facilitates smooth working, and after wiring, a stable performance is maintained.
When to Replace Golf Cart Batteries
When a significant drop in performance is noticed, golf cart batteries need to be replaced. The typical symptoms are a short range of driving, slow acceleration, and poor hill climbing. Battery wear is also indicated by longer charging times. Examples of physical damage, such as cracks, bulges, or leaks, imply instant replacement as a safety measure. The battery life varies with usage and typically has a life span of 3-5 years when used every day and 7 years when used on weekends. Timely replacement of old batteries provides a safe, reliable, and enhanced performance in the system.
Wrap Up
When using careful steps, it is not hard to connect and maintain golf cart batteries. Knowledge about battery types to knowledge on wiring, safety checks, and maintenance are all significant in ensuring that the golf cart operates well. Proper installation, charging, and cleaning can be used to enhance the battery life and performance. It is advisable to always use safe wiring practices and never take shortcuts to avoid damage or peril. Through proper maintenance, your golf cart will be stable, effective, and can be used every day.
FAQ
What is the number of times to check golf cart batteries?
Your golf cart batteries should be checked monthly. Check on corrosion, cracks, or low water levels. Periodic maintenance can ensure that you identify issues promptly and maintain your cart in good operation.
What are the key safety aspects of handling batteries?
Always put on gloves and goggles. Use insulated tools. Operate in a well-ventilated place. Avoid open flames. These safety factors ensure that you are not exposed to acid spills, shocks, and fire hazards.
Why does your golf cart battery not charge?
Do not charge the battery, then verify the charger, cables, and connections. Ensure that you have the right charger. Wipe terminals and test fuses that have blown. Replacement of damaged cables when necessary.
How do you know when it’s time for a golf cart battery replacement?
Indications that you require a golf cart battery replacement include when your cart runs out of range, the cart charges slowly, or you can even see visible damage, such as cracks or leaks. Should your cart get stuck in the hills, new batteries can help.
Are you able to install golf cart batteries?
Golf cart batteries can be installed yourself, provided you follow the correct instructions. Wear the correct equipment and protective clothing. Test wiring diagram. Take your time and double-check each connection.


