
It may be overwhelming to relate to golf cart batteries at first, but it is easy once you follow the right procedure. There is a clear golf cart battery wiring diagram that outlines the steps for each connection to avoid mistakes. It demonstrates how each battery is connected to the others in a safe and proper manner. By making time to check every connection twice, you save yourself and your golf cart. No haste, no worry. With practice and the right advice, anyone can learn to install golf cart batteries safely and keep their cart running smoothly for a long time.
Types of Golf Cart Battery Wiring Diagrams
Learning battery wiring is crucial when you begin working on any golf cart system. A golf cart battery wiring diagram is a clear diagram that assists you in viewing how each battery is connected in the correct sequence. It also helps prevent wiring errors that could destroy the system.
Learning wiring types step-by-step will help you know how voltage flows and how to set up batteries. This part will take you through the most popular types of wiring used in golf carts today.
36-Volt Golf Cart Battery Wiring Diagram Explained
Older golf carts are typically powered by 36 volts and often use a chain of smaller batteries. The 36V golf cart battery wiring diagram shows the connection of six 6-volt batteries in series. The positive terminal of each battery is connected to the negative terminal of the next battery, making it a continuous loop. This configuration raises the total voltage but does not affect the battery capacity.
By the right diagram, you can find it easier to avoid erroneous associations. A lot of individuals look at how to wire a golf cart battery since a slight error can render the cart inactive. In this system, each connection counts since any single broken connection disrupts the entire system.
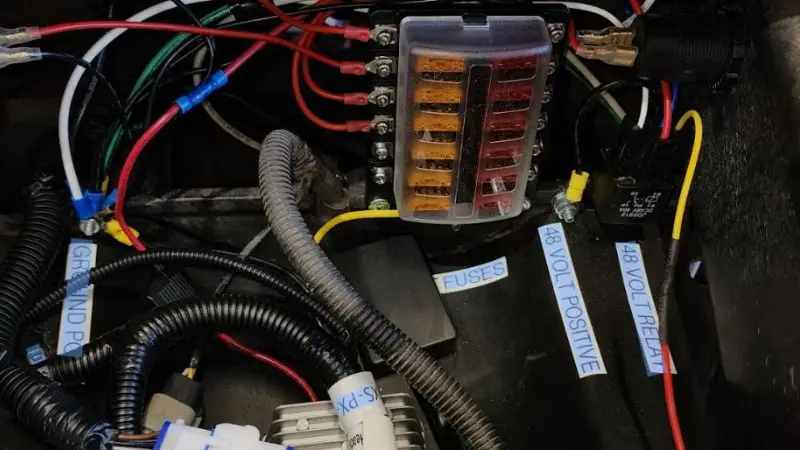
48-Volt Golf Cart Battery Wiring Diagram Explained
A 48-volt system is more powerful and is typically found in newer golf carts. The 48V golf cart battery wiring diagram provides instructions for using either eight 6-volt batteries or four 12-volt batteries in series. This design helps generate more energy (voltage), enhancing speed and performance on other terrains.
The connections made have to be in the order as indicated in an electric golf cart battery wiring diagram. The batteries are installed in a specific sequence to ensure the voltages add up. When the wiring order is incorrect, the system does not deliver the correct power. This is why users use diagrams to see how each battery fits into the entire circuit.
Series vs Parallel Wiring in Golf Carts
In dealing with battery systems, it will be important to know the types of wiring. The majority of individuals concentrate on the series connection of golf cart batteries since this will enhance the total voltage. In a series connection, the batteries are connected to each other, positive to negative, ensuring a robust power flow throughout the system. This is the most popular arrangement of the typical golf carts.
Parallel wiring, on the other hand, links all positive terminals together and all negative terminals together. This arrangement maintains the same voltage but enhances battery capacity. Knowing the difference will enable you to know how to wire a golf cart battery, based on the performance requirements.
Key Differences Between 36V and 48V Systems
Systems with 36 V and 48 V might look alike; however, they do not work in reality. A 36V golf cart battery wiring diagram typically accommodates simple power requirements, whereas a 48V system provides greater performance and increased range. The 48V setups are more popular in modern carts due to this difference.
A golf cart battery wiring diagram for a 48V battery compares the two systems and indicates a more sophisticated design with additional batteries or higher-voltage units. This has a direct impact on speed, torque, and energy efficiency. To be able to install a golf cart battery wiring diagram, many users use it to know these differences before installation. Higher-voltage systems generally have smoother acceleration, greater total power control, and are appropriate for heavier loads and longer distances of travel.
How to Read a Golf Cart Battery Wiring Diagram
Once you know the fundamental structure of a wiring diagram, it is easy to read it. A golf cart battery wiring diagram is created to demonstrate how each battery is connected within the system as a simple visual representation. When you get familiar with the symbols, terminals, and color codes, you can trace any wiring system without any difficulty.
In this section, you will be assisted in dissecting the diagram to connect the batteries safely and correctly. It also simplifies the real-world flow of power through the system.
Understanding Symbols and Labels in a Wiring Diagram
Each wiring diagram incorporates straightforward symbols that depict electrical components. In a golf cart battery wiring diagram, a rectangle is customarily used to indicate a battery, and straight lines are used to indicate its connection to the other batteries. The positive terminal is labeled with a plus sign (+), and the negative terminal is labeled with a minus sign (–). These signs will give you the idea of the complete circuit even without the technical expertise.
The diagram includes labels indicating where each battery is to be placed. These symbols need to be followed in a step-by-step manner when learning how to wire a golf cart battery. A minor misconception can result in improper wiring.
How to Identify Positive and Negative Battery Connections
In any wiring, it is quite important to know that there are positive and negative terminals. The positive terminal is commonly denoted by a plus sign ( + ) and is commonly red in color. The negative terminal is denoted by a minus sign (–) and tends to be black. Any electric golf cart battery wiring diagram will clearly display these markings so that it is not confused during installation.
In a series connection, the negative terminal of the battery is connected to the positive terminal of the other battery. This is usually observed in the series connection of golf cart batteries. When these connections are mixed up, then the system may not even work and may even cause damage to the batteries.
Understanding Wire Colors in Golf Cart Battery Wiring
Wiring diagrams are created using wire colors to allow one to be able to follow connections. Mostly, red wires are positive and black wires are negative. Additional accessories or control systems may also be shown in some diagrams with blue or yellow wires. Such color codes help users follow the correct route in the wiring system.
These colors allow you to quickly find the correct point of placement of each wire when viewing a 36V golf cart battery wiring diagram or a 48V golf cart battery wiring diagram. If colors are not displayed, you should use labels and terminal markings as alternatives.
Step-by-Step Guide to Wiring Golf Cart Batteries
@dwscustoms vevor agm battery 12 volt 200ah best deal #vevor #agm #200ah #solar #batteries #dwscustoms @Vevor_US
♬ original sound – King Scoot
Golf cart batteries need to be wired with great care since each connection will have an impact on the performance of the cart in general. An appropriate golf cart battery wiring diagram helps you understand how each step fits in a secure, organized manner. You can minimize the risk of errors and ensure a smooth flow of power by using a clear process.
The tools, safety regulations, and proper placement of the batteries should be known before commencing the wiring process. In this section, we are going to take you through every step in an easy, practical manner so you can complete the wiring without any problems.
Tools and Materials You’ll Need for Battery Wiring
The process must be made safe and easy by first collecting all the necessary tools before you set out. The system requires a wrench, a screwdriver, a voltmeter, and battery cables. Wearing gloves and goggles should also be considered in order to protect yourself during installation. Cleaning equipment, such as a wire brush, is useful for removing corrosion from terminals to improve contact.
When dealing with an electric golf cart battery wiring diagram, the right tools will allow you to trace each connection on the diagram without losing track. Proper preparation will save time and prevent mistakes when installing. It is also more efficient and safer to keep all in order prior to beginning the wiring, particularly when a full system is involved and several batteries are involved.
Step 1: Inspect and Position the Batteries Correctly
Begin by closely examining every battery to identify cracks, leaks, and damage. Always clean terminals with a wire brush to have good electrical contact. After putting together the batteries, install them into the golf cart in the exact order as illustrated in the golf cart battery wiring diagram. The correct positioning is significant since it will influence the ease with which the wires will be interconnected at the subsequent stages.
Ensure that all positive and negative terminals are visible and facing the correct direction. The proper layout will make wiring installation easy and minimize confusion. In this step, it is advisable to take your time and create a stable base for the entire battery system to avoid wiring problems later in the process.
Step 2: Connect Batteries in a Series Setup
Now start to connect the batteries in series. Connect the positive post of the initial battery to the negative post of the second battery. Continue doing this until you have linked all batteries in a continuous chain. The process is referred to as a series connection of golf cart batteries, and it enhances the overall voltage of the system.
Connect each wire in the order of the wiring design. Proper flow of power in a cart requires a proper series setup. When one of these connections is malfunctioning, the whole system will not work. That is why it is highly significant to check every link on your way to make sure you perform well and steadily.
Step 3: Secure All Battery Connections Properly
Connect all the batteries, then tighten each terminal with the wrench to ensure a strong, stable connection. The loose cables may lead to loss of power or even breakdown of the system, and therefore, all connections should be tight. Ensure that all wires are well secured and that they do not swing when pulled.
At this point, it is a good idea to review the wiring diagram of a golf cart battery using a golf cart battery wiring diagram to ensure that all connections are as per the layout. Safety is also enhanced by proper tightening, and energy transfer between batteries is improved. The secure system will minimize the chances of overheating or failure during the operation and ensure the golf cart operates efficiently and reliably over time.
Step 4: Test the Battery Voltage Output
After all this is connected, apply a voltmeter to check the overall system voltage. Connect the probes to the main terminals of the battery pack and check whether the reading meets your system requirements. As an example, a system with a design of 36V or 48 V should display the appropriate output.
In case of the reading being wrong, reexamine the wiring with a 36V golf cart battery wiring diagram or a 48V golf cart battery wiring diagram according to your installation. Testing is performed to verify that all connections are correct and that the system is ready for safe operation. This last process ensures that the installation has been done correctly and the golf cart can be used.
Golf Cart Battery Wiring Diagram for a 36V System (Example)
One of the most common is a 36V installation found on older golf carts. The diagram below of the 36V golf cart battery wiring system is provided to help you understand the operation of six 6-volt batteries in combination to form the entire system voltage. The system provides a stable, reliable power supply to smooth the cart’s performance when all batteries are properly connected.
This section describes the layout, flow of connections, and errors that are often made so that you can have the complete description of the structure of wiring in a practical and easy manner.
Layout Overview of a 36V Golf Cart Battery System
In a typical 36V system, six 6V batteries are used to achieve the overall voltage. According to the design of the golf carts, these batteries can be arranged in a straight line or in a compact rectangular formation. Every battery has a positive and a negative terminal, and it must be placed so that it is easy to wire and service.
A battery wiring diagram for a golf cart effectively illustrates how the batteries are fitted and in what order they are connected. The main negative and main positive terminals have to be placed at opposite sides of the battery pack so that they complete the circuit. This layout is also significant to understand since it will be the basis of the whole electric system. It is also possible to follow the wiring steps without confusion and errors when properly arranged and installed.
Connection Breakdown for a 36V Battery Wiring Setup
In a 36V system, all the batteries are stacked to add up the voltage. The procedure begins with the first battery, where its positive terminal is connected to the negative terminal of the second battery. The same is repeated until the six batteries are connected with one another, forming one continuous chain. This technique is also known as the series connection of golf cart batteries.
The last arrangement ensures that the negative terminal of the last battery becomes the main negative, and the positive terminal of the first battery becomes the main positive. This is a necessary feature in any how to wire a golf cart battery guide since it regulates the entire power flow. A properly connected system guarantees the proper voltage output and stable operation. It is worth using strong, safe cables to ensure a reliable, durable connection throughout the battery pack.
Common Mistakes to Avoid in a 36V Wiring Setup
There are numerous wiring issues caused by minor but significant errors. Confusion about the positive and negative terminals is one of the common problems that can prevent the system from functioning properly. Another error is leaving connections loose, as they may cause power loss or overheating. Individuals also often forget to clean the battery terminals before wiring them, which can cause poor electrical contact.
To prevent such problems, all connections should be verified when using a 36V golf cart battery wiring diagram. The incorrect cable size may also influence the performance and safety. All bolts should be tightened, and the links of the chain should be checked twice. A careful, gradual approach will make the battery system safe and provide a steady power supply to your golf cart.
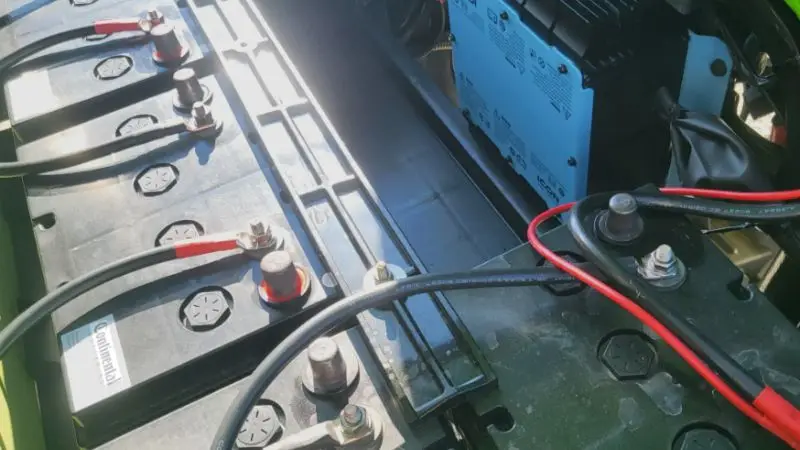
Golf Cart Battery Wiring Diagram for a 48V System (Example)
Contemporary golf carts are usually powered by a 48V system that provides increased performance and range. An easy-to-follow 48V golf cart battery wiring diagram can make you see how several batteries can be combined to form a stable power supply. Regardless of whether your cart is powered by eight 6-volt batteries or four 12-volt batteries, there should always be a proper and safe wiring configuration.
This part describes how the layout, connection process, and troubleshooting work, so you can understand how the entire system operates in practice.
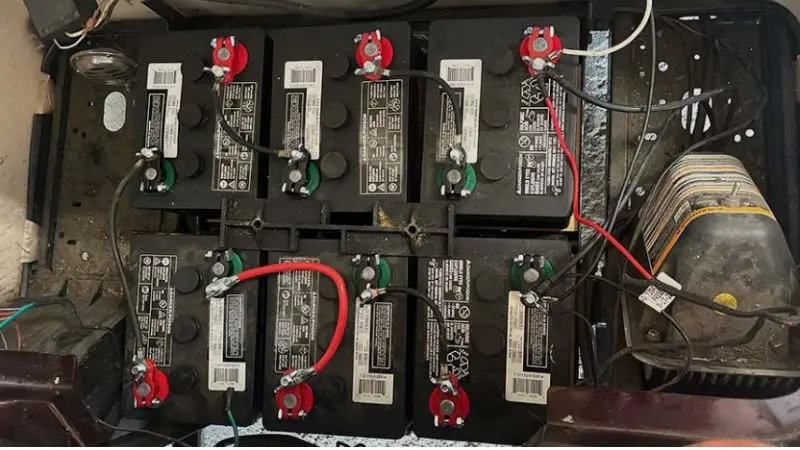
Layout Overview of a 48V Golf Cart Battery System
The battery system is designed to be more powerful (48V) and to operate more smoothly. The majority of installations use eight 6-volt batteries or four 12-volt batteries, depending on the cart model. They fit in the compartment in either a straight or a fitted arrangement, depending on the available space. Batteries have a positive (+) and negative (–) terminal, and it is essential to use the correct terminals when wiring them.
A battery wiring diagram of an electric golf cart illustrates the manner in which the batteries are to be wired in series. One side of the pack has the main positive terminal, and the other has the main negative terminal. This design helps ensure proper circuit completion and balances power flow across the system. Adhering to the diagram can help avoid wiring mistakes and streamline the system setup process.
Step-by-Step Connection Guide for a 48V System
In order to wire a 48V system properly, you need to take a step-by-step process. To install the batteries, first insert all the batteries in the compartment as indicated in the golf cart battery wiring diagram. Ensure that all batteries are placed so that their terminals are easily accessible and properly aligned.
Then, start the series connection by connecting the positive terminal of the first battery to the negative terminal of the second battery. Repeat this operation with the batteries in the chain. This is referred to as series wiring of golf cart batteries and is necessary to achieve the appropriate voltage level.
After connecting all the batteries, there would be two free terminals, one negative and the other positive. Connect the main positive and negative cables to the free positive and the free negative terminal, respectively. Once the wiring is completed, verify each connection by ensuring that it is tight, clean, and properly fitted. An adequately installed system guarantees consistent power output and performance.
Troubleshooting Common Problems in 48V Systems
There are still problems that can arise in a 48V system, even with proper wiring. The first step should be to ensure that there is no loose or dirty connection, after which the golf cart will start. This may disrupt performance due to poor contact that influences power flow. Wiring order is yet another problem that is likely to halt the system from providing proper voltage. Damaged or weak batteries may also decrease the total output.
A 48V golf cart battery wiring diagram will assist you in rechecking every connection in sequence. The total voltage can be measured using a voltmeter, with probes on the main positive and negative terminals. The voltage ought to be nearly 48 volts. When the voltage is low, check each battery separately and clean up any corroded terminals. Proper tightening of all the connections is likely to resolve most of the problems and resume normal functioning.
Wrap Up
Knowing how a golf cart battery wiring diagram works is crucial for efficient and safe golf cart operation. The proper voltage flow and long battery life are guaranteed by the appropriate wiring process regardless of whether working with a 36 V or a 48 V system. You can prevent the most common wiring errors by learning how to connect batteries in series, identifying terminals, and following step-by-step instructions. Frequent monitoring of connections and battery conditions also helps prevent problems such as power loss or system failures. Always use the correct tools and follow the diagram. Your golf cart will perform well, smoothly, reliably, and for a long time with the right knowledge and attention.
FAQ
How often do you have to check golf cart battery connections?
The battery connection should be examined in a month. Clean off terminals and re-tie cables. Such a practice would help prevent power loss and ensure your golf cart operates smoothly.
Are you able to mix battery brands in your golf cart?
It is not advisable to blend brands. You ought to use the same brand, voltage, and age of batteries. This habit will help prevent uneven charging and improve battery life.
What will be the result of connecting batteries in the wrong way?
If you wire batteries incorrectly, your golf cart may not start. You may destroy the batteries or the electrical system. Always follow the wiring diagram and double-check each connection.
Is it safe to use a voltmeter on golf cart batteries?
Wearing gloves and goggles, you may safely use a voltmeter. Insert the probes on the key terminals. Read the voltage and do not touch both terminals at the same time.


