
Dive into the efficient and effective world of ultrasonic cleaning with our detailed guide on the VEVOR Ultrasonic Cleaner. This instruction manual is your comprehensive guide to mastering the art of ultrasonic cleaning. Inside, you’ll find detailed steps on setting up your cleaner, tips for efficient usage, and solutions for common troubleshooting scenarios. We also delve into the best practices for maintaining your device to ensure its longevity and optimal performance. Whether you’re tackling intricate jewelry, mechanical parts, or delicate instruments, this manual is designed to enhance your cleaning process and results.
Get ready to unlock the full potential of your VEVOR ultrasonic cleaner and achieve professional-grade cleaning effortlessly. Let’s dive in!
Table of contents
Application:
Electronic factories, car workshops, industrial and mining areas, laboratories, hospitals, dental clinics, watch shops, optical shops, jewelry shops, mobile phone repair shops, and household use.
Cautions
- Thanks for purchasing the ultrasonic cleaner. Please read the instruction manual carefully before operation to avoid damage to the machine or any danger to personal safety. And please keep it for reference.
- Ensure the power supply is in the rated range before the power cable is connected. Refitting is strictly prohibited! Attention! The control panel will be eroded by organic solution, strong acid, and strong alkali!
- Ensure the earth wiring is well-connected before starting.
- Ensure the power key or knob is ON the ‘OFF’ place before starting.
Do not operate if the tank is empty, or the ultrasonic generator will be damaged. If heating is needed, the water level shouldn’t be less than 2/3. - Please close the lid to reduce noise and pay attention to water and steam in case of burning skin while open the lid.
- Do not relocate the machine when fluid is in the tank in case of overflow.
Suggest using water-soluble liquid for benchtop ultrasonic cleaners. Strong acid or flammability cleaner is forbidden. - Do not use the machine in severe environments:
- Where temperature changes fiercely:
- Where the humidity is too high and is easy to produce dew;
- The place where vibration or impact is strong;
- The place where exists corrosive gas or dust;
- The place where water, oil, or chemicals splash;
- The place where is filled with explosive and flammable gas.
- Shorten the daily working time. A suggestion is to stop for a few minutes for heat dissipation after working over 30 minutes.
▲ Heater is forbidden when using flammable liquid (such as alcohol, solvent cleaner, etc.) to clean objects. The cleaning effect will be much better if using the machine together with the proper solvent.
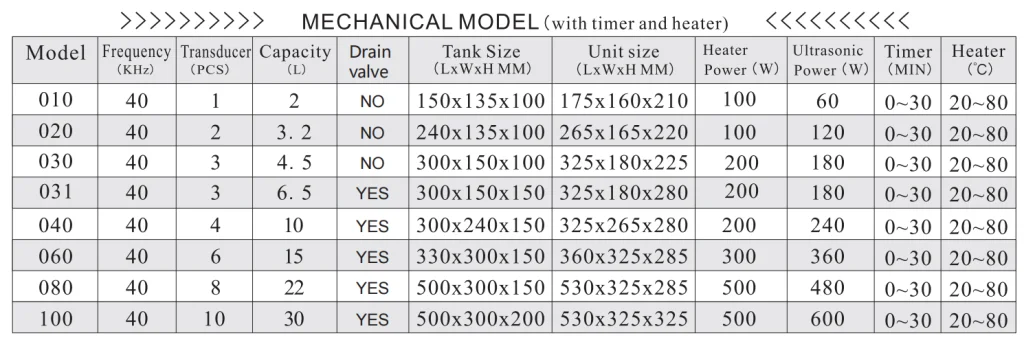
Specifications
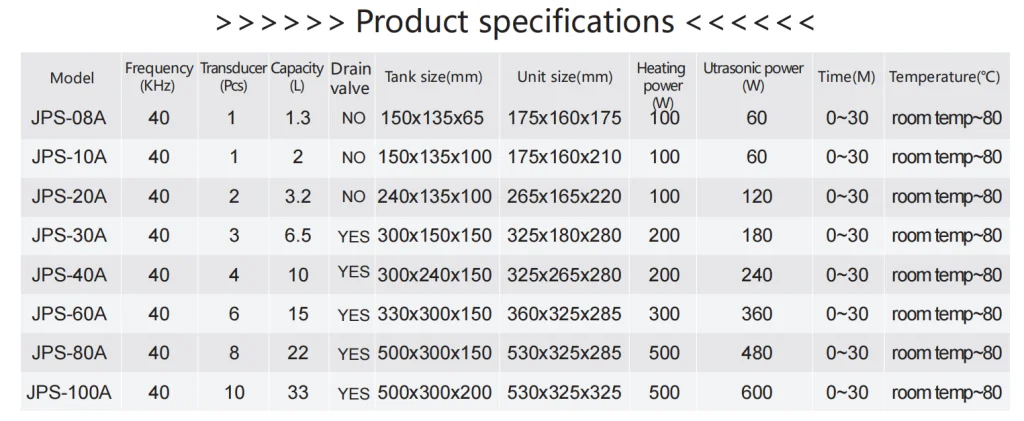
Application
PCB, jewelry, electronic components, car parts, hardware, metal tools, computer parts, Laboratory instruments, clocks & watches, eyeglasses, contact lenses, dentures, dental tools, DVD & VCD, golf, table-ware, printer inkjet, seal and comb, toothbrush, coins, etc.
| Industry | The Cleaning Products & Materials | Clear Dirt |
| Integrated circuit, power tube, silicon wafer, diode, lead frame, capillary, tray, etc. | Tube parts, cathode ray tube, printed circuit board, quartz parts, electronic components, telephone switching equipment, speaker components, power meter, LCD glass, core iron parts, computer floppy disk, video parts, hoop parts, head, photo die mask, etc. | Hards, etching oil, stamping oil, polishing wax, dust particles, etc |
| Electrical & electronic machine | Fingerprint, powder, cutting oil, stamping oil, iron filings, polishing materials, walnut powder, polishing wax, resin, dust, etc. | Fingerprint, powder, cutting oil,stamping oil, iron filings, polishing materials, walnut powder, polishing wax, resin, dust, etc. |
| Precision machine | Glasses, lenses, prism, optical lenses, filter lenses, glass devices, film, optical fiber, etc. | Machine cutting oil, iron filings, polishing powder, oil, grease, dirt, etc. |
| Optical device | Medical instruments, dentures, etc. | Plastic, resin, paraffin, fingerprinting, etc. |
| Hardware &machinery parts | Iron filings, polishing powder, oil, stamping oil, dirt, etc. | Iron filings, polishing powder, oil, stamping oil, dirt, etc. |
| Medical instrument | Bearing, gear, ball, metal shaft parts, tools, adjustable valve and cylinder parts, burner, compressors, hydraulic press, gun and ultracentrifuge, city water faucet, etc. | Piston ring, carburetor, flow meter housing, compressor shell, electrical components, etc. |
| Electroplate | Galvanized parts, mold, stamping parts, etc. | Chemical colloid, glue, and other solid material, dust, etc. |
| Car parts | Chemical or artificial fiber nozzle filter protector chemical fiber texture, etc. | Bearing, sewing machine parts, typewriters, textile machines, optical-mechanical devices, gas valves, watches, cameras, metal filter elements, etc. |
| Chemical fiber | Polishing scrap iron, oil, blackiron shell, rust, oxidation shell,scrap iron, polishing powder, stamping oil, dirt, etc. | Polishing scrap iron, oil, blackiron shell, rust, oxidation shell, scrap iron, polishing powder, stamping oil, dirt, etc. |
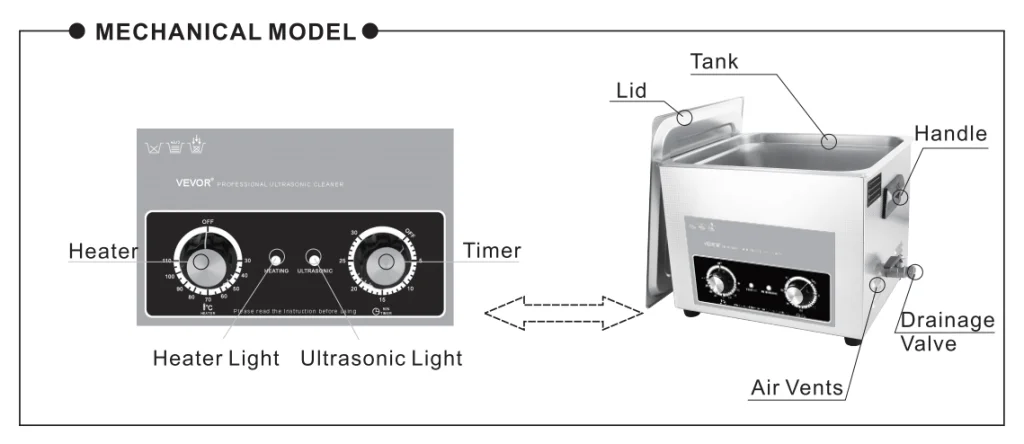
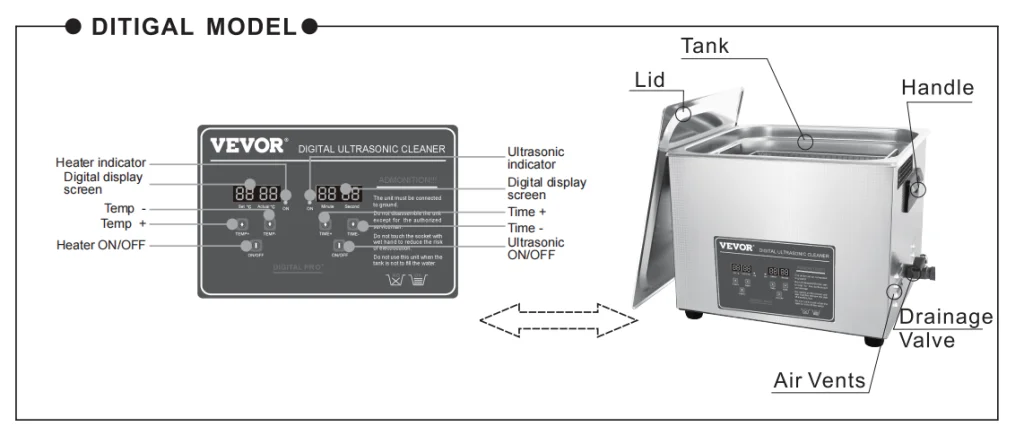
Product Drawing & Indication
Operation Procedure
- Before starting the equipment, check the machine to see if there are loosened parts.
- Keep the unit on a stable and flat working platform in a dry and cool environment.
- According to the size and quantity of washing objects, add a little bit of detergent in the tank, which can help improve the cleaning effect. (Empty tank working is forbidden!)
- Ensure the correct power and switch connection before starting the equipment.

■ Operation Instructions:(Mechanical models)
◇ Start (ULTRASONIC), clockwise rotate to choose the time you require between 0~30 min. When the indicator light is on and makes a “ZI ZI” sound, it shows ultrasonic operation works OK.
◇ If needs heating, start (HEATING)to adjust the required temperature, normally 40~60℃ is the best. (Heating is optional upon need)
◇ To stop cleaning;
① Press OFF once, the ultrasonic stop runs, and the indicator light will also be off.
② Rotate the heating control knob to“OFF”, the indicator light will also be off.
③ Then switch off the unit and disconnect the power.
④ Empty the liquid and clean the tank and the unit with a clean cloth for next use.
■ Operation Instructions:(Digital models)
◇ Timer setting: When power is connected, the default setting is“05:00”. Press TEME+once will increase time by 1 min; Press TEME+once will decrease time by 1 min. (Free choice and digital countdown control).
◇ Temperature setting: (heating is optional upon needs): When power is connected, the default setting is “50℃” and the Actual is room temp., press TEMP+once, will increase temperature by 1℃; Press TEMP-once, will decrease temperature by 1℃. If the setting temperature is slower than the actual tank temperature, the operation will stop automatically. When the temperature rises to the setting temperature, the indicating light goes off. When ultrasonic work, two temperature screens show the set temperature and actual temperature that has been reached.
◇ After setting the time and temperature, press ON/OFF once, the equipment will work automatically. Press ON/OFF again, and the work process will stop. Then switch off the unit and disconnect the power supply, empty out the liquid, and clean the tank and the unit with a clean cloth for next use.
■ Adjusting power:
◇ The function is only available for power-adjustable models! Rotate SLOWLY the power knob clockwise to increase the power from 40% to 100%, and counter-clockwise SLOWLY to decrease sonic power.
Maintenance
Maintenance
■ The unit must be opened by an authorized specialized person only for maintenance and care of it.
■ Clean the contaminant in the tank frequently.
Trouble clearing
| No. | Problems | Possible causes | Solutions | Remarks |
| 1 | No ultrasonic | A. Loosen or tighten the screw. B. Replace timer or digital panel.C. Inquiry our after-service engineer. |
A. Loosen or tighten the screw. B. Replace the timer or digital panel. C. Inquiry our after-service engineer. |
|
| 2 | A. Check the heating plug and connect it well, check the outlet line with the multimeter: if OK and the resistance value is a few hundred OHMs.B. Change the same specification fuse.C. Replace the bad heating pad if the open circuit. D. Check the broken part and change it. E. Inquiry our after-service engineer. | Time control failure | A. Check the heating plug and connect it well, check the outlet line with the multimeter: if OK and the resistance value is a few hundred OHMs. B. Change the same specification fuse. C. Replace the bad heating pad if the open circuit. D. Check the broken part and change it. E. Inquiry our after-service engineer. |
|
| 3 | No heating | A. Heater power switch badlinkage. B. Fuse burnout. C. Heating pad burnout. D. Digital display board out of control. E. Other reasons |
A. Check the heating plug and connect it well, check the outlet line with the multimeter: if OK and the resistance value is a few hundred OHMs. B. Change the same specification fuse. C. Replace the bad heating pad if the open circuit. D. Check the broken part and change it. E. Inquiry our after-service engineer. |
Suggestion50-60℃ |
| 4 | Temperaturecontrol failure | Temperature control failure | A. Fasten the thermostat header. B. Replace the thermostat. C. Check the broken part and change it. D. Inquiry our after-service engineer. |
|
| 5 | Not well cleaning | A. Connect the ultrasonic button and adjust. B. Adjust the liquid to the best surface. C. Adjust the temperature to the most fitted. D. Stop and switch off the power supply, and replace suitable liquid after the previous liquid cools down. E. Inquiry our after-service engineer. |
A. To ensure grounded. B. Check if the machine earth wire loosen. |
Suggestion50-60℃ |
| 6 | Electric leakage | A. Customer side not grounded. B. Machine not grounded |
A. To ensure grounded. B. Check if the machine earth wire loosens. |
|
| 7 | Other problems |
FAQs About VEVOR Ultrasonic Cleaner
Q1: How do I set up my VEVOR Ultrasonic Cleaner for the first time?
A1: Begin by placing your cleaner on a stable, level surface. Fill the tank with water, ensuring it’s within the recommended level. Add the appropriate cleaning solution, set the temperature and timer, and you’re ready to start.
Q2: What items should I avoid cleaning in the ultrasonic cleaner?
A2: Avoid cleaning delicate items like pearls, emeralds, and items with loose settings or cracked surfaces. Always check the item’s compatibility with ultrasonic cleaning before proceeding.
Q3: How can I troubleshoot common issues with my ultrasonic cleaner?
A3: If you encounter issues, ensure the cleaner is properly plugged in and the settings are correctly adjusted. Check for any obstructions in the tank and ensure the cleaning solution is appropriate for the items being cleaned.
Q4: How often should I change the cleaning solution in my ultrasonic cleaner?
A4: Change the solution after every cleaning session or when it becomes visibly dirty. Regular changing of the solution ensures optimal cleaning efficiency.
Q5: Can I use tap water in my VEVOR Ultrasonic Cleaner?
A5: Yes, tap water can be used, but for enhanced cleaning performance, especially for more delicate items, using distilled water is recommended.
Final Words
The VEVOR Ultrasonic Cleaner Instruction Manual is your go-to resource for leveraging the full potential of your ultrasonic cleaner. From setup to maintenance, this guide ensures a seamless and effective cleaning experience. Remember, regular care and correct usage are key to the longevity and efficiency of your VEVOR Ultrasonic Cleaner. Ready to experience the ultimate cleaning solution? Explore our range of VEVOR Ultrasonic Cleaners and elevate your cleaning standards today.


Hello, I enjoy reading through your article post. I wanted to write a
little comment to support you.
I like the helpful info you provide in your articles.
I’ll bookmark your blog and check once more right here frequently.
I’m rather certain I’ll be told lots of new stuff
proper here! Good luck for the following!
I like it whenever people come together and share ideas.
Great website, stick with it!
Thanks for finally talking about >VEVOR Ultraschallreiniger Bedienungsanleitung mit PDF – VEVOR Blog <Liked it!
Wow, this article is good, my sister is analyzing these things, therefore I am
going to inform her.