
Welcome to the VEVOR 5-in-1 Heat Press Manual! This guide includes detailed instructions on how to assemble and operate the VEVOR 5-in-1 Heat Press. We highly recommend reading the manual thoroughly before using the heat press to ensure proper usage and avoid any accidents.
Thank you for choosing VEVOR!
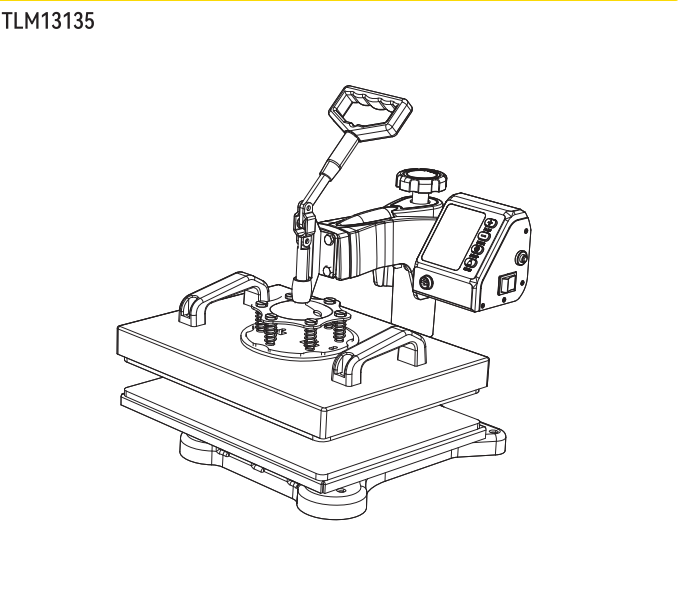
Table of contents
- Introduction of Heat Press Machine
- Internal Parts
- Operation of Intelligent Temperature Controller
- Switching between Fahrenheit and Celsius
- Assembly and Uses of Cap Press
- Assembly and Uses of Mug Press
- Assembly and Uses of Conical-shaped Mug
- Assembly and Uses of Plate
- Method of Use
- Treatment of Quality Defects in Transfer
- Warnings
- Dispose
Introduction of Heat Press Machine

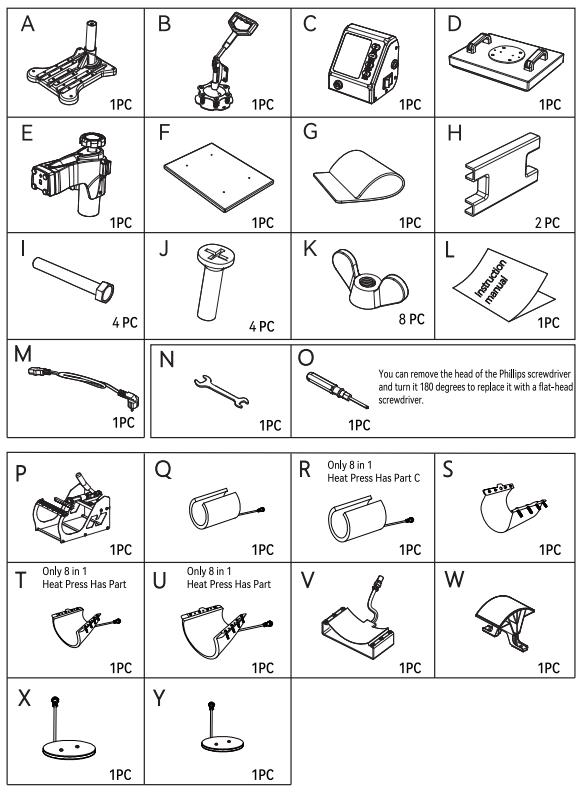
Internal Parts
Assembly and Disassembly of the Machine
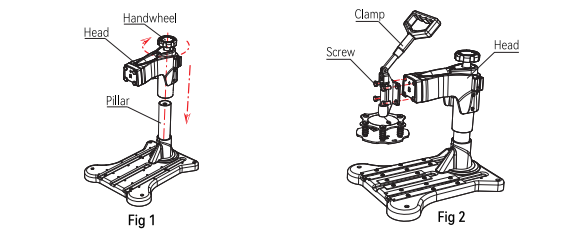
1. Put the head into the pillar and rotate the handwheel 10 times clockwise, which indicates that the head is installed (as shown in fig1).
2. Pass the four screws through the quick clip and adapter, then screw them securely to the machine head, and use a wrench to lock the screws (as shown in figure 2).
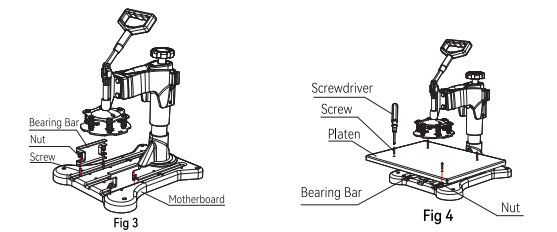
3. Use 4 screws from the bottom up, through the bearing bar from the back of the backplane, and then lock it with hand screws (as shown in figure 3).
4. Place the table platen flat on the bearing bar, align the platen with the hole in the bearing bar, place the screw, and lock it with a screwdriver (as shown in figure 4).

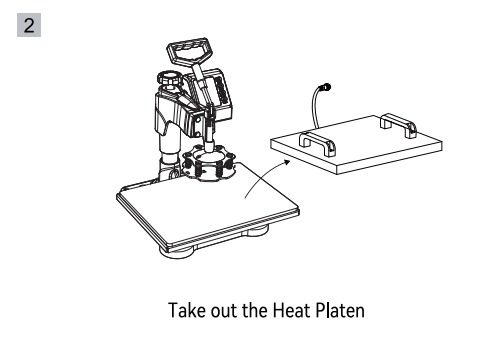
5. Swing the head away and put the sponge and the heating platen on the top of the table platen in order (as shown in figure 5).
6. Place the pressure platen flat on the heating platen, align it with the hole, take 4 flat head screws, and tighten them with a screwdriver. Take 2 cup head screws and lock them to the hole in the middle of the pressure platen. at this time, do not lock the cup head screws; reserve 5-7mm for the next installation step (as shown in figure 6).
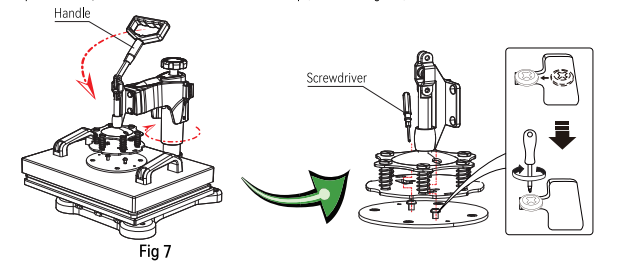
7. Rotate the head back to the original position and gently press down the handle so that the cup cap of the cup head screw above the pressure platen snaps into the slot and then lock it in place with a screwdriver (as shown in fig 7).
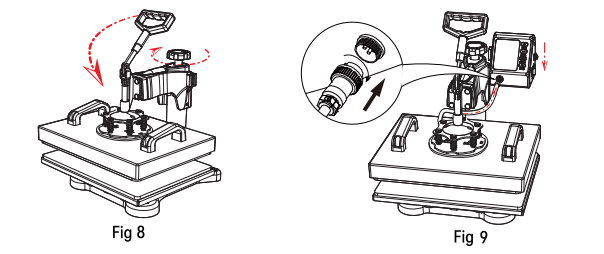
8. Rotate the handwheel and try to press the handle several times until it is adjusted to the appropriate pressure (as shown in figure 8).
9. Clip the controller into the head slot from top to bottom, connect the male head of the heating platen with the female head of the control controller, and lock the nut to complete the installation (as shown in figure 9).
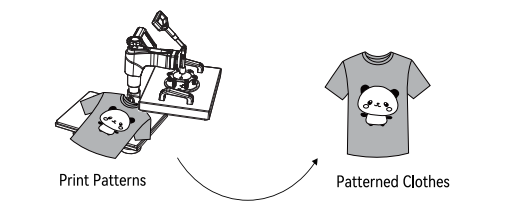
How to press T-shirts

Operation of Intelligent Temperature Controller
1. Prepare Before Use
a. Check the connection between the power PIug ofthe controller and the eIectrical socket. Be sure to use a safety grounding wire while operation!
b. Before turning on the machine, the heating eIements must be frmly inserted into the machine. Turn on the power bylipping the ON/OFF Switch.
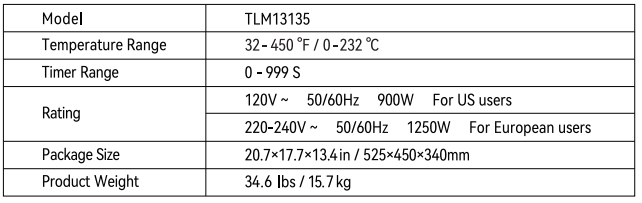
(Maximum voltage: 220v; Input power 1250w) .
2. Temperature set Reuirement
| Objects | Temperature (F) | Recommended Heating Time (s |
| Cup | 330 | 40 |
| ceramics | 330 | 40 |
| Metal Board | 300 | 40 |
| wood | 355 | 150 |
T-shirt | 355 | Polyester Materials: 30 – 50 |
| Cotton Materials: 10 – 20 |
1 . Heating Temperature Setting (Range: 0 -450F)
Press the “SETUP” button once. The Temp light will turn into red. Then press the “+/- key to set the heating temperature.
2. Heating Time setting ( Range: 0 -999s)
Press the “SETUP” button a second time. The Time light will turn red. Then press the “+/- key to set the heating time.
3. Finish Setup and Prepare to Work
Press the” SETUP” button a third time to finish the setting. The indicator will be on, and the temperature will continue to rise. When the set temperature is reached, press C to start a countdown. After the countdown is complete, a “Didi” sound will be heard; the indicator will go out. Lift the handle to take out clothes.
Note: Turn off the power. It is recommended to wear insulation gloves to pull out the accessories or wait for 2-3 minutes.
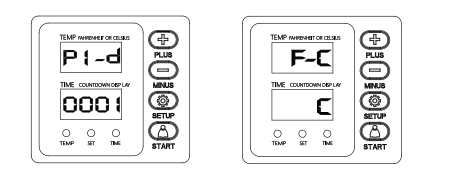
Switching between Fahrenheit and Celsius
Long press the ‘+” and ‘-” buttons at the same time and wait for 4 seconds until the interface shown in the left picture appears, then click the button
“SETUP” to get the interface shown in the right picture, then click the “+* button to set it to Fahrenheit, or click the ‘-• button to set it to Celsius. Click the “SETUP” button again to exit the temperature switch mode.
Assembly and Uses of Cap Press

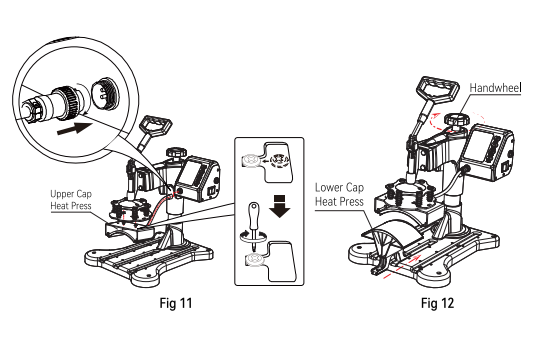
1. Take 2 cup head screws and lock them into the hole in the middle of the cap press.
Do not lock the cup head screws, leave 5-7mm, then clip the cup head screw into the slot along the indicated route and lock it with a screwdriver. Insert the male head of the cap press plug into the female head of the controller and tighten the nut (as shown in Figure 11).
2. Push the lower cap heat press into the bottom platen along the guide groove. Rotate the handwheel to adjust to an appropriate working pressure (as shown in figure 12).
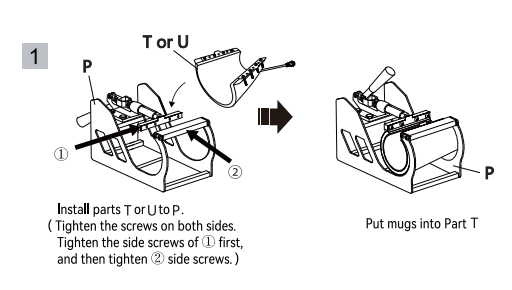
Assembly and Uses of Mug Press
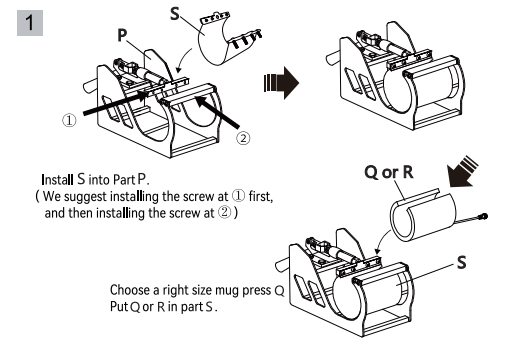
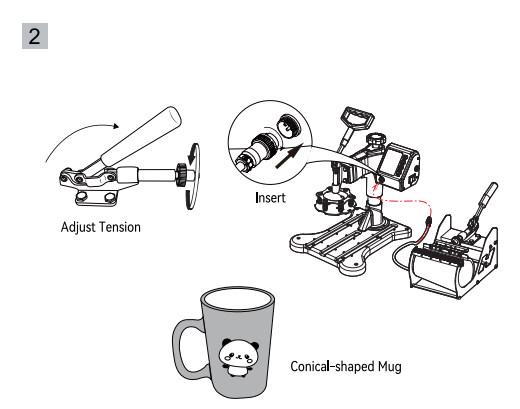
Assembly and Uses of Conical-shaped Mug
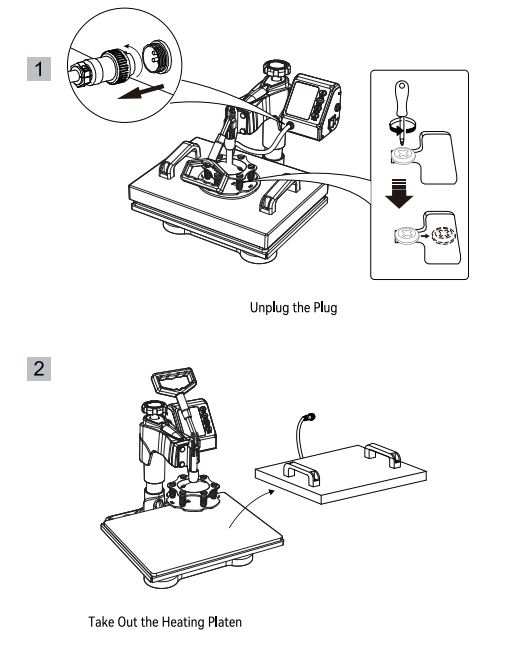
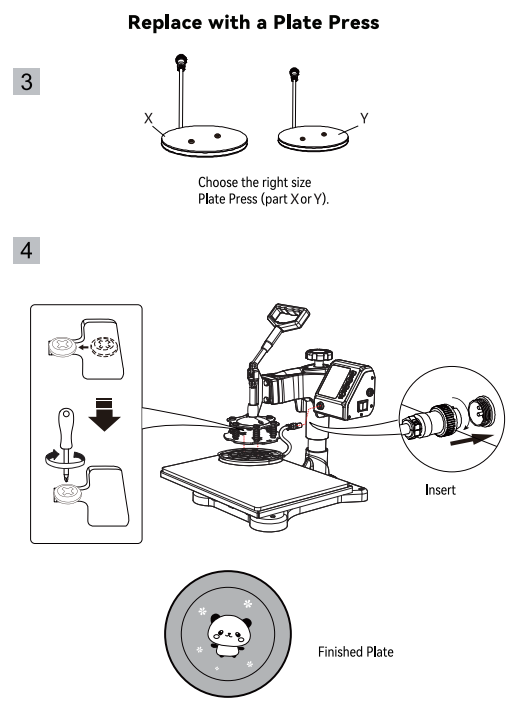
Assembly and Uses of Plate
Method of Use
1. Adjust the pressure as needed (not too tight or too loose) , plug in the power cord, and turn on the power switch.
2. At this point, the temperature will begin to rise. set temperature and working time.
3. When the temperature rises to the transfer temperature, the buzzer will make a “drip” sound.
4. Press the button then spread the object (T-shirt) lat on the press, and pull down the handle to press the T-shirt.
5. Once the countdown ends, it will be accompanied by the sound of a long buzzer.
(Note: Buzzer will sound for 5 seconds to inform you that the work is done) .
6. Finish the work and take out the items.
7. Turn of the power switch.
Treatment of Quality Defects in Transfer
1. Light color or Faded Image: Insufficient Temperature / Incorrect pressure / Insufficient Time.
2. Fuzzy Image: pressing time is too long
3. Part of the pattern Blurred: The heat is not being distributed correctly through the heating plate, So the working time can be increased appropriately. lt may also be the cause of uneven pressure distribution, which can be set on four board regulators. please note that the four board regulators have been set up before they leave the factory and should not need to be adjusted normally.
4. Dim pattern: Too much pressure or temperature.
5. scarred pattern: Transfer time is too long ·
6. Different pattern colors: Incorrect pressure or poor quality of transfer paper.
7. scorched pattern: High temperature or poor ink.
Warnings
Please check the voltage before use. Ensure that a reliable grounding protection connection is used
- First, please turn off the machine, then disconnect the power supply, and finally replace the heating unit. If the equipment is still at a temperature, wear insulating gloves.
- Avoid long-term burning of heating parts during use. If you don’t want to cut off the power supply, please place a heat transfer object (scrap can be used repeatedly) especially to prevent empty burning. Be careful not to let the sharp parts of hot stamping objects damage the heating parts.
- During use, avoid unprotected contact with heating parts and springs when the fuselage may be damaged, which may cause burns.
- If you feel it is hard to press down the handle, please rotate the hand wheel to lock screws to lessen spring pressure; otherwise, it will damage the strength of the machine.
- When lifting the head, please lock the head with the rotary locking screw and loosen the handle (the rotary locking screw should not be too tight). In addition, when you reach the machine’s closing limit, you will feel resistance on the hand wheel, indicating that it is at its lowest point.
- Don’t let minors touch the machine without supervision, even when the heating press is not in use!
- Do not try to heat press products that are not intended for transfer, and avoid empty burning.
- lf the SUPPLY Cord is damaged, it must be replaced by a special cord or assembly available from the manufacturer or its service agent.
This device complies with part 15 of the FCC Rules. operation is subject to the following two conditions: (1)This device may not cause harmful interference, and (2) this device must accept any interference received, including interference that may cause undesired operation.
Dispose
This product is subject to the provision of European Directive 2012/19/EC. The symbol showing a wheelie bin crossed through indicates that the product requires separate refuse collection in the European Union. This applies to the product and all accessories marked with this symbol. Products marked as such may not be discarded with normal domestic waste but must be taken to a collection point for recycling electrical and electronic devices.
Importer: WATCHX
Address: 250 Bis Boulevard Saint-Germain 75007 Paris
Importer FREE MOOD LTD
Address: 2 Holywell Lane, London, England, EC2A3ET
Manufacturer address: Fuyuan Energy, Shengda Street, Chenxi Industrial Zone, Yiwu city, Zhejiang province, china.
EC REP: EUREPGmbH Unterlettenweg 1a, 85051 Ingolstadt, Germany
eurep@eurep-gmbh.com +49841 88697744
UK REP: Acumen BC Ltd Ground Floor 940ckstreet, Abingdon, Ox145DH
info@ukacumen.com +44 1235200526


that’s really an awesome work… super cool 😉