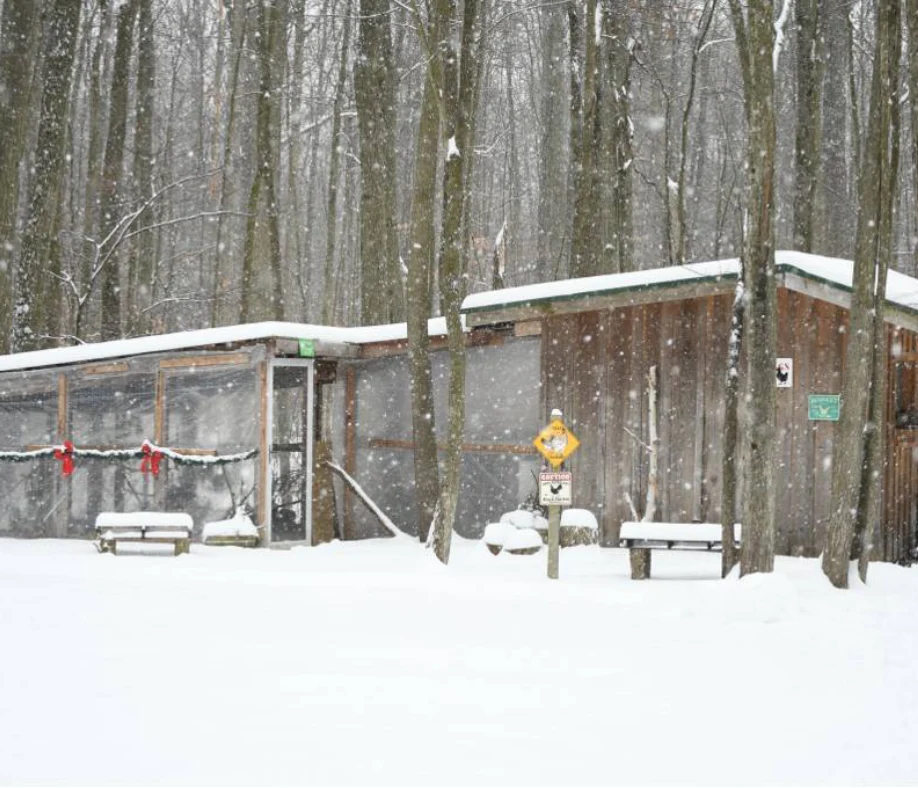
Winterizing a chicken coop is an essential part of preparing your flock for the colder months. As the temperatures drop, chickens can be susceptible to cold stress, frostbite, and other health issues. By taking the necessary steps to winterize your coop, you can create a comfortable and safe environment for your feathered friends to thrive even in the harshest of winter conditions.
In this comprehensive guide, we’ll cover everything you need to know about winterizing your chicken coop effectively. From creating a wind block to providing heat and lighting, we’ll explore the best practices for keeping your flock healthy and happy throughout the winter.
Do not forget to check VEVOR’s chicken coop which will take all your worries of winterizing a coop away!
Table of contents
Lessons from experts
Winterizing a chicken coop requires careful planning and attention to detail to ensure the well-being of your flock during the colder months. Here are some lessons that can help you winterize your chicken coop:
Lesson 1: Inspecting and Repairing the Coop Structure
Before winter sets in:
- Conduct a thorough inspection of your chicken coop.
- Check for any cracks, gaps, or holes that could let in cold drafts.
- Ensure that windows and doors are sealed tightly, and replace any damaged or missing insulation.
- Patch up any leaks in the roof to prevent rain or snow from seeping in.
- A well-maintained structure is the foundation for a warm and secure chicken coop during winter.
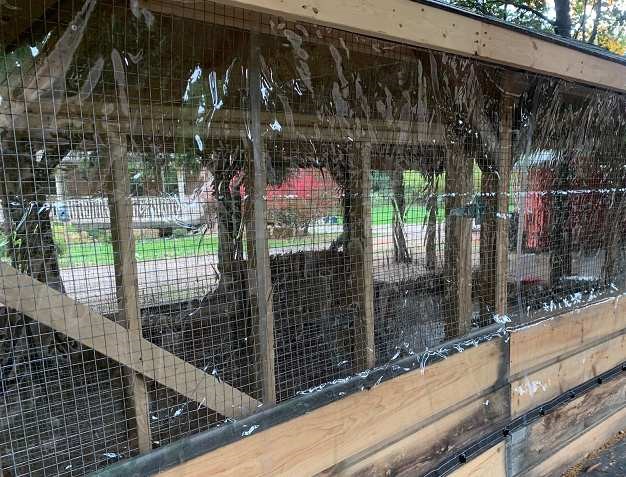
Lesson 2: Providing Adequate Ventilation
While sealing gaps is essential, proper ventilation is equally crucial. Ventilation prevents moisture buildup inside the coop, which can lead to respiratory issues for your chickens. Install adjustable vents to regulate airflow, ensuring a balance between fresh air and warmth. The strategic placement of vents will keep the coop dry without exposing your feathered friends to chilling drafts.
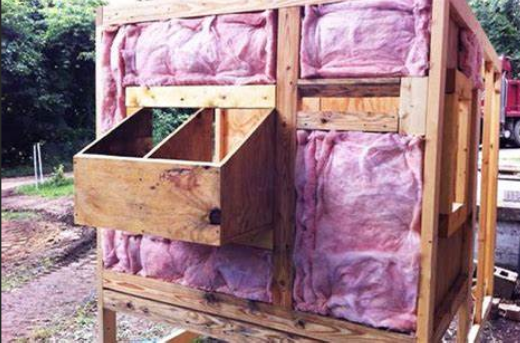
Lesson 3: Adding Extra Insulation
Enhance the insulation in your chicken coop to create a cozy haven for your birds. Consider adding extra layers of insulation in the walls, ceiling, and even the floor. Materials like straw, hay, or recycled denim work well. Insulating the coop helps trap heat generated by the chickens and provides an additional barrier against the winter cold.
Lesson 4: Employing Artificial Heat Sources
In extremely cold climates, supplement natural heat with artificial sources. Heat lamps or ceramic heaters designed for poultry can be strategically placed in the coop. Ensure these devices are securely installed and positioned away from flammable materials. Maintain a balanced temperature, as excessive heat can be as harmful as the cold.
Lesson 5: Securing Adequate Lighting
Shorter days and longer nights in winter can impact egg production. Provide additional lighting to simulate longer days and encourage egg-laying. LED lights with a low wattage are energy-efficient and emit less heat, making them suitable for the coop. Aim for 14-16 hours of light per day to maintain egg production during the winter months.
Lesson 6: Implementing Cold-Weather Feeding Strategies
Adjust your chickens’ diet to meet the increased energy demands of winter. A well-balanced and nutrient-rich diet helps chickens generate more body heat. Supplement their feed with grains, seeds, and additional protein sources. Ensure they have access to fresh, unfrozen water at all times, as dehydration can be a significant risk during winter.
Lesson 7: Protecting Against Frostbite
Chickens’ combs and wattles are susceptible to frostbite in cold temperatures. Apply petroleum jelly or a similar protective substance to these areas to create a barrier against the cold. Additionally, consider providing roosts with flat surfaces to minimize direct contact with cold surfaces and reduce the risk of frostbite.
Lesson 8: Regular Maintenance and Monitoring
Winter conditions can be unpredictable, so regularly monitor your chicken coop throughout the season. Check for signs of drafts, inspect insulation, and ensure all heating equipment is functioning correctly. Address any issues promptly to maintain a warm and comfortable environment for your chickens.
By mastering these lessons, you’ll be well-prepared to winterize your chicken coop effectively, providing a safe and comfortable space for your feathered friends during the colder months.
Assessing Cold Weather Challenges
The Impact of Cold Weather on Chickens and Their Coop
Winter brings along a myriad of challenges for both poultry keepers and their feathered companions. Chickens, being naturally hardy birds, can endure cooler temperatures to some extent, but prolonged exposure to extreme cold poses significant risks to their health and well-being.
The Cold Stress on Chickens
Cold weather can stress chickens in multiple ways. Exposure to low temperatures can lead to decreased egg production, increased vulnerability to diseases, and even frostbite on combs and wattles. Understanding the physiological responses of chickens to cold stress is crucial for implementing effective winterization strategies.
Impact on Egg Production
Cold weather in chicken coops often results in a decline in egg production. Chickens may reduce laying or stop altogether as their energy is diverted towards maintaining body heat. This decline underscores the importance of providing a warm and comfortable environment to encourage consistent egg production throughout the winter months.
Frostbite and Respiratory Issues
The extremities of chickens, such as combs and wattles, are susceptible to frostbite in freezing conditions. Additionally, cold and damp environments can contribute to respiratory issues. Addressing these concerns involves not only insulating the coop but also managing ventilation to prevent moisture buildup, a key factor in respiratory problems.
Addressing Potential Risks and the Necessity of Proactive Winterization
Understanding the challenges posed by cold weather allows poultry keepers to take proactive measures to safeguard their chickens and coop. Recognizing potential risks is the first step towards effective winterization.
Drafts and Cold Spots
Identifying areas in the coop where drafts occur or cold spots persist is essential. These chilly areas can be detrimental to the health of your chickens. Experts often recommend a meticulous inspection of the coop, sealing any gaps, and ensuring proper insulation to create a draft-free and evenly heated environment.
Moisture Management
One of the often-overlooked risks in cold weather is excessive moisture. In a closed coop with poor ventilation, moisture from chicken droppings and respiration can accumulate. This not only leads to a damp environment but also increases the risk of respiratory issues. Balancing ventilation is critical to prevent moisture buildup while maintaining a comfortable temperature.
Preventing Frostbite
Frostbite primarily affects exposed areas such as combs and wattles. To mitigate this risk, providing additional insulation and considering the application of safe, non-toxic frostbite prevention measures becomes essential. This proactive approach helps in averting potential health issues caused by extreme cold.
Recommended For Your Project
How to Insulate a Chicken Coop: A Step-by-Step Guide
Effective insulation methods offer several benefits, including:
Temperature Regulation
Insulation in your chicken coop helps regulate the temperature inside the coop, preventing extreme cold and providing a comfortable environment for your chickens.
Energy Efficiency
A well-insulated chicken coop requires less heating, promoting energy efficiency and reducing heating costs.
Moisture Control
Insulation in chicken coop plays a role in managing moisture levels. By preventing condensation, it helps avoid damp conditions that can lead to respiratory issues in chickens.
Comfort and Well-being
Proper insulation in chicken coop contributes to the overall comfort and well-being of your chickens, minimizing stress and promoting optimal health.
Step-by-Step Guide on the Essentials of Winterizing a Chicken Coop:
If you are confused about how to insulate your chicken coop, follow this step-by-step guide to effectively insulate your chicken coop and create a cozy winter retreat for your flock:
Assess Current Insulation
Begin by evaluating the current insulation in your chicken coop. Identify any gaps, cracks, or areas where cold air may seep in. Address these issues before adding new insulation.
Choose the Right Insulation Material
Opt for insulation materials such as fiberglass, foam board, or even recycled denim insulation. Additionally, consider using straw as a supplementary insulation material. Straw provides excellent insulation and helps create a warm bedding environment for your chickens.
Insulate Walls and Ceiling
Apply the chosen insulation material to the walls and ceiling of the coop. Ensure thorough coverage, paying attention to corners and edges. This will create a barrier against cold drafts. For instance, Place straw bales along the coop walls, stacking them to create a barrier against the cold. The bales act as excellent insulation, providing warmth and preventing drafts.
Floor Insulation with Straw
For added warmth, insulate the chicken coop floor with a thick layer of straw. Straw acts as a natural insulator, providing a cozy and comfortable surface for your chickens to roost on.
Seal Gaps and Cracks
Use weather-resistant tarps or plastic sheeting to cover any gaps or cracks in the coop. Secure the material with a staple gun, ensuring a tight seal. This prevents cold air from infiltrating the coop.
Ventilation Management
While insulation in chicken coop is vital, ensure that ventilation is still maintained to prevent moisture buildup. Consider installing adjustable vents that can be regulated based on weather conditions.
Monitor and Adjust
Regularly monitor the temperature and adjust insulation inside the coop as needed. During milder days, you may need to provide less insulation to maintain a comfortable temperature.
Consider Supplementary Heat Sources
In extremely cold climates, consider using supplementary heat sources, such as heat lamps or panels. Place them strategically to provide warmth without creating hazards.
BHeating Strategies: Best Ways to Heat a Chicken Coop
Effective heating methods play a crucial role in achieving this goal. Some best way to heat chicken coop include:
Space Heaters
Electric or propane space heaters can provide targeted warmth in specific areas of the coop. Ensure proper ventilation and follow safety guidelines when using heaters.
Heat Lamps
Heat lamps suspended above roosting areas can offer direct heat to keep chickens warm. Opt for lamps designed for poultry use, and secure them safely to prevent accidents.
Radiant Heaters
Radiant heaters emit heat directly to objects and surfaces, creating a cozy environment. They are efficient and can be a good option for small to medium-sized coops.
Heated Roosts
Installing heated roosts can provide chickens with a warm surface to perch on during cold nights.
Factors to Consider When Choosing the Best Heating Option
When deciding on the best heating option for your chicken coop, consider the following factors:
Coop Size
The size of your coop influences the choice of heating method. Larger coops like VEVOR large coop may require more powerful heating solutions, while smaller ones may benefit from compact options.
Safety
Prioritize safety when selecting a heating method. Choose options designed for poultry use, follow installation guidelines, and regularly inspect equipment for any signs of wear or malfunction.
Energy Efficiency
Opt for heating solutions that are energy-efficient to minimize electricity or fuel costs. Programmable timers can help regulate heating periods based on your chickens’ needs.
Ventilation
Ensure that the chosen heating method doesn’t compromise ventilation. Proper airflow is crucial for preventing moisture buildup and maintaining a healthy coop environment.
Ultimately, the most suitable heating option depends on your specific circumstances. Consider factors such as your budget, the severity of winter in your region, and the number of chickens in your coop. Combining heating methods, such as using a radiant heater alongside heated roosts, can provide a comprehensive solution.
FAQs
How can I prevent frostbite in my chickens during winter?
To prevent frostbite, ensure your coop is well-insulated and draft-free. Provide roosts with flat surfaces, and consider applying petroleum jelly to combs and wattles during extremely cold nights.
What should I feed my chickens in winter for optimal health?
Adjust their diet to include a higher percentage of grains, as they generate more heat during digestion. Supplement their feed with vitamins and minerals to support overall well-being.
Are there specific lighting requirements for chickens in winter?
Yes, maintaining consistent daylight hours is crucial for egg production. Consider installing artificial lighting with timers to ensure your chickens receive adequate light during the shorter winter days.
Can I use straw for insulation in the chicken coop?
Yes, straw is an excellent insulator. Use it on the coop floor to provide additional warmth, and consider adding layers over nesting boxes for extra insulation.
Is it necessary to heat the chicken coop during winter?
Heating may be necessary in extremely cold climates. Options include space heaters, heat lamps, and heated roosts. Ensure safety measures are in place, and monitor temperature regularly.
Last words
Mastering how to winterize a chicken coop effectively involves a combination of insulation, ventilation management, and thoughtful preparation to shield your flock from the harsh winter elements.
By implementing the comprehensive strategies and tips outlined in this guide, you’ve equipped yourself with the knowledge to create a cozy and secure environment that safeguards your chickens from chilly temperatures and adverse weather conditions. VEVOR’s commitment to quality and innovation aligns with the principles of effective coop management, ensuring your flock thrives even in the coldest months. Invest in a VEVOR coop today to elevate your winterization efforts and provide the best possible care for your cherished chickens.


