
Raising your chickens offers fresh eggs and a deeper connection to your food, but the butchering day can quickly turn into a feathery fiasco. The daunting task of plucking poultry often sends shivers down even the most seasoned homesteader’s spine. This is why most people turn to the convenience of chicken pluckers, which help pluck chickens in seconds without causing a mess all around. But chicken pluckers can be a bit expensive, making homesteaders and DIYers look for homemade chicken plucker options.
You can make a DIY chicken plucker without breaking the bank and transform your chicken plucking chore into a breeze. But making a DIY chicken plucker can be a challenging task, especially if you are not a DIY enthusiast. But worry not. In this comprehensive guide, we are going to discuss all about how to make a homemade chicken plucker machine.
We will learn if you can convert your old washing machine into a DIY chicken plucker and list all the tools and materials needed for the project. We will also provide a step-by-step guide for you to follow to make a DIY chicken plucker machine. Moreover, we will be sharing safety guidelines for you to follow when working on this chicken plucker DIY project and share a couple of bonus affordable alternatives.
So, let’s get started!
Table of contents
Can You Make a Chicken Plucker Out Of a Washing Machine?
Maybe, and that too with some serious elbow grease.
A washing machine, with its motorized agitating mechanism and rotational capabilities, can be a good foundation for a homemade chicken plucker. But know that not all washing machines can be converted into homemade chicken plucker machines.
Consider the following factors to determine whether your washing machine can be repurposed into a DIY chicken plucker or not:
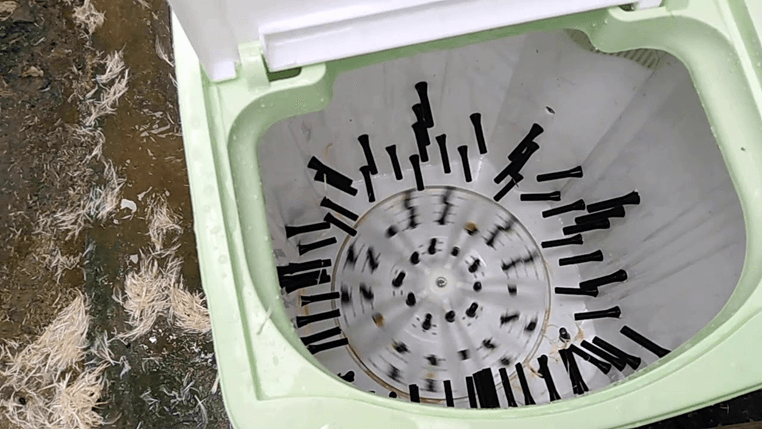
1. Drum: The heart of your DIY plucker lies in the drum. Ideally, it should be stainless steel or another rust-resistant material with ample space for a plump chicken to twirl without bumping into the sides. Hefty top-loaders would be more suitable for the job than compact apartment models.
2. Motor Power: The plucking process requires some serious spin, so a powerful motor is crucial. Look for machines with a minimum of 1.5 horsepower, as weaker motors might struggle to maintain the necessary speed for effective feather removal.
3. Drainage: Proper drainage is essential to facilitate easy cleaning and removal of feathers and water. The machine should have a system in place to allow water and waste to drain efficiently, preventing clogs and ensuring hygiene.
4. Electrical System: Depending on the existing electrical system of the machine, you may need to make modifications to ensure compatibility with the chicken plucking mechanism.
So, can your washing machine be repurposed into a homemade chicken plucker machine or not? If yes, let’s find out which tools and materials you will need for this DIY adventure.
Tools and Materials Needed
Now that you’ve assessed your washing machine’s plucking potential, it’s time to gather the tools and materials to make your chicken plucker DIY dream a reality.
Essential Equipment
Here are a few essentials that you will need for this DIY project:
- Washing machine: Make sure it meets the criteria outlined above for drum size, motor power, drain functionality, and electrical compatibility.
- Safety gear: Protective gloves, goggles, and a dust mask are your allies against flying feathers and potential electrical hazards.
- Socket wrench set: For disassembling and reassembling the washing machine components.
- Wire cutters and strippers: For modifying the electrical wiring.
- Drill and drill bits: For creating holes to attach the plucking fingers.
- Pliers and screwdrivers: For general assembly and adjustments.
- Plucking fingers: Depending on the size of the drum of your washing machine, you will need around 100 plucking fingers made of food-grade, flexible, and durable rubber. If you want to DIY the plucking fingers as well, you can consider using recycled materials like old bicycle tires or conveyor belts.
Additional Materials
Besides the essential equipment, you might also need the following additional materials for the DIY chicken plucker project:
- Silicone sealant: To waterproof any electrical modifications.
- Zip ties: For securing loose wires or temporary fixes.
- Heavy-duty trash bags: To contain the feathery fallout during the plucking process.
Step-by-Step Guide to Building a DIY Chicken Plucker
With your tools and materials gathered, it’s time to transform that washing machine into an efficient plucker. Remember, safety is paramount, so work in a well-ventilated area and wear your protective gear throughout the process.
Ready? Let’s dive in!
1. Unplug and Unload the Washing Machine
Before you even touch tools, disconnect the washing machine from the power outlet and drain any remaining water. Remove all laundry items and give the interior a good wipe-down.
2. Disassemble Washing Machine
Following your washing machine’s manual or online resources, remove the agitator (the central post) and any other components that might interfere with the plucking process. Consider taking pictures and even notes every step of the way. This will help you reassemble later, making sure that you put everything where it belongs without stressing.
3. Crafting Plucking Fingers
If you have chosen to make your own plucking fingers as well, you need to get the material that you will be using for your finger and wash it thoroughly. Make sure that you only use food-grade material for making the plucking fingers. Also, ensure the fingers are flexible enough to brush against the chicken without tearing the skin.
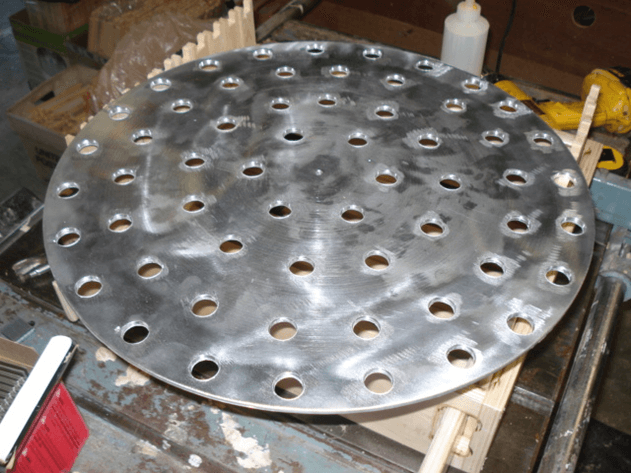
4. Drilling Holes For Fingers
Once you have removed the drum from the machine and got the plucking fingers, it’s time to drill holes into the drum. Choose a drill bit that is suitable for the thickness of the fingers and start drilling. Drill one and check if the finger fits properly. Once you have confirmed that the finger sits well into the hole, go ahead and create an array of equidistant holes.
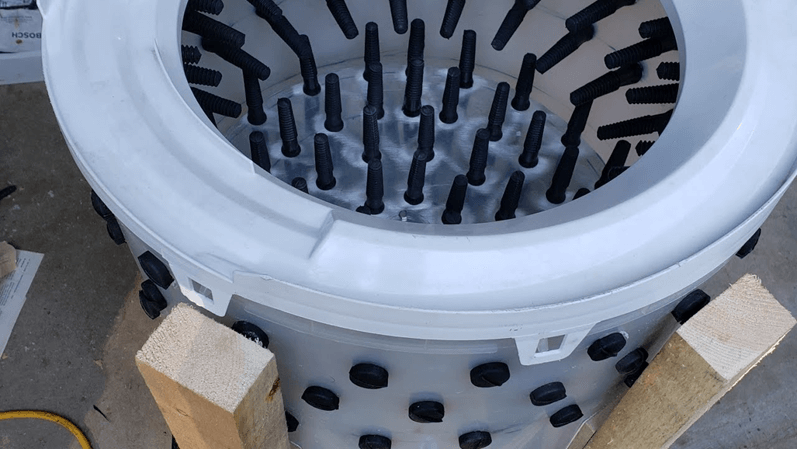
5. Putting in the Fingers
Once you are done drilling the holes, it is time to put in the fingers. Make sure that each finger sits well into the wholes. If you are having difficulty putting in the fingers, consider oiling the fingers closer to their rear ends. Consider using vegetable oil, as whatever you use will be getting on the first few chickens that you pluck with it.
6. Electrical Tweaks
This step is crucial, so if you’re not comfortable with electrical work, consult a qualified electrician. You’ll need to bypass the spin cycle timer and create a direct switch for manual control of the drum’s rotation. Remember, safety comes first!
7. Waterproofing Electrical connections
Use silicone sealant to waterproof any electrical connections and prevent potential moisture damage. Let the sealant dry completely before proceeding.
8. Reassembling the Machine
With all modifications in place, carefully reassemble the washing machine, following the reverse steps of disassembly. If you get stuck at any point, consider referring to the pictures and notes that you took during disassembly. Don’t forget to reconnect the drain hose!
9. Preliminary Test Run
After reassembling, double-check that you have put everything where it belongs. After that, you can go ahead and plug it in and give your plucker a test run without putting a chicken or anything into it. Listen for any unusual noises or vibrations and adjust accordingly.
10. Final Test Run
Finally, prepare your first chicken (properly bled and scalded) and place it inside the drum. Turn on the plucker, hold onto your hat, and witness the satisfying dance of feathers flying. Remember, start with shorter plucking times and adjust as needed to avoid damaging the skin. If need be, consider repositioning the chicken with your hand.
Congratulations! You’ve successfully transformed your washing machine into a homemade chicken plucker. You have not only saved money but will also be saving loads of time in the long run, as the DIY chicken plucker will help make the poultry plucking a less time-intensive task.
Safety Guidelines for DIY Chicken Pluckers
Plucking is fun, but if you are not cautious around your DIY chicken plucker, there could be safety risks. Therefore, before you whir your homemade chicken plucker into action, make sure that you take these safety measures:
- Remember, we’re dealing with water and electricity, a potentially hazardous combo. If you’re not comfortable with electrical modifications, don’t hesitate to take the help of a qualified electrician. Also, double-check that all the electrical connections are waterproof.
- To prevent electrical shocks, ensure that your washing machine is properly grounded.
- Always work with your protective gear on. Goggles, gloves, and an apron will shield you from flying feathers, potential sparks, and any unexpected splashes.
- Never open the machine while it’s running. Wait for the drum to come to a complete stop before reaching in.
- Ensure proper drainage. Make sure that the drain water does not disturb the electric motor.
- Ensure your plucker is stable and won’t tip over during operation. A wobbly washer is a recipe for disaster, both for feathers and fingers.
- Be mindful of any exposed blades or sharp edges on your plucking fingers. If you notice any damage on plucking fingers, consider replacing them before the next cycle.
- For efficient plucking, start with shorter plucking times, gradually increasing as you get comfortable. Overdoing it can damage the bird’s skin, so patience is key to plucking chicken feathers without damaging its skin.
- After each plucking session, thoroughly clean your machine with a disinfectant solution. This keeps feathers at bay and promotes hygienic poultry processing. Also, make sure that your work area is properly cleaned.
- Scalding can make plucking easier, but make sure that you do not overcook the chicken. For perfect scalding, dip the chicken in hot water (140°F/60 °C) for only about 30 to 60 seconds. To check if the chicken has been scalded properly, pull a few feathers from its tail and wings. If they come off easy, they are scalded, and if they are still hard to pull, dip for a few more seconds.
Remember, a little caution goes a long way in ensuring safe and enjoyable chicken-plucking operations.
Bonus: Alternative Options for Effective Chicken Plucking
While DIY chicken pluckers offer a budget-friendly and satisfying challenge, they’re not the only way to deal with the feathery poultry challenge. For those seeking convenience or specific needs, here are some alternatives to DIY chicken plucker:
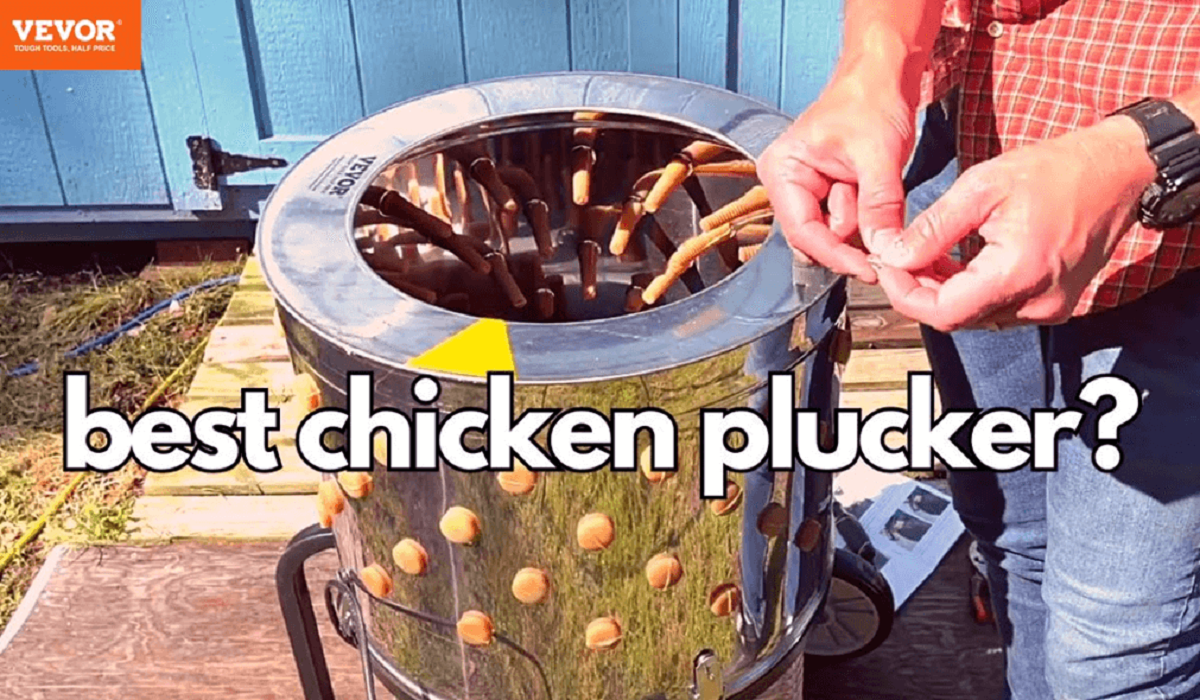
1. VEVOR Chicken Plucker: Makes De-feathering a Breeze
If the DIY route seems too daunting, consider getting yourself a chicken plucker from a reputable brand such as VEVOR. At VEVOR, we have recently added a new and modern chicken plucker model to our chicken plucker collection. This modern VEVOR Chicken Plucker Machine is compact and features two large, sturdy rubber tires for maneuverability—you can easily pull it around on the grass as well. It has 108 fingers (10 fingers for replacement) and a 550W motor that whirs at a speed of 280 RPM, making plucking chores a breeze. It can easily pluck six chickens in under a minute.
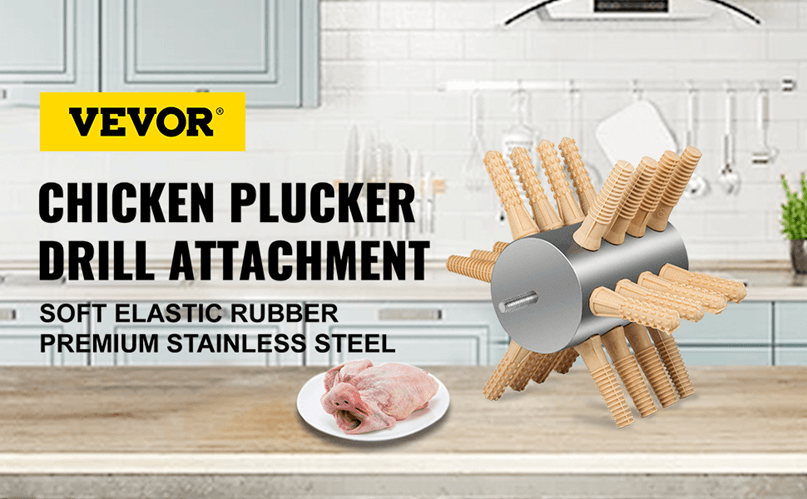
2. Chicken Plucker Drill Attachment: Cheaper Yet Effective
For those who already own a drill, a chicken plucker drill attachment can be a game-changer. These attachments, like the VEVOR Chicken Plucker Drill, typically come with a few rubber fingers (18 in the case of VEVOR) and a rotating head that attaches to your drill. The compact and lightweight design makes them perfect for de-feathering small chickens, quail, pigeons, doves, pheasants, and other poultry.
Conclusion
DIY chicken plucker can be a bit difficult but can be achieved with some elbow grease. In the end, the struggle is all worth it. With a homemade chicken plucker, you not only save big on expenses (eliminating the need to purchase an expensive chicken plucker) but also make the once-daunting poultry plucking chore a breeze.If you have an old washing machine lying in your garage or storage, follow the steps discussed above to repurpose it into a homemade chicken plucker machine. If a chicken plucker DIY project seems like too much for you, you can consider investing in chicken plucker drill attachments.
If you have already got a drill machine, this would be a convenient yet cost-effective alternative to DIY chicken plucker and chicken plucker machines


