
If you’ve ever wondered about how to make your hat look unique and professional, then read on. In the process of this journey, you will unveil different techniques where you can have complete control over customization. Picture the process of turning a boring hat into an ingenious show-stopper that is all yours. You will analyze the sequence of transforming your favorite hat. Know the different strategies on how to heat press a hat that can take your hat game to greater heights. You will also have a summary of pro tips that guarantee professional results. So, get your favorite hat and let’s onboard a journey of style using heat pressing.
Table of contents
How to Heat Press a Hat with an Iron?
Gathers Tools and Materials
Here is the list of tools and materials you need on how to heat press a hat with an iron:
- Iron
- Hat
- Heat Transfer Vinyl/Transfer Paper
- Pressing Cloth
Step By Step Process
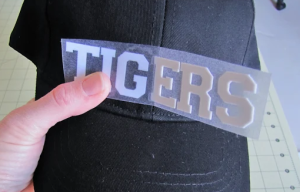
Step 1: Position Your Design
Begin by placing your selected design on the hat. Put it down exactly as you would like the heat transmission to occur. The first step establishes a solid ground for an adequate design.
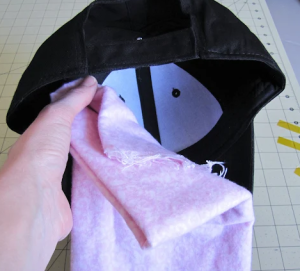
Step 2: Protect the Hat
Shield your hat by covering it with a pressing cloth. The protective layer here does not allow direct contact between the iron and the material of the hat. So that heat transfers in an equal manner without causing any damage.
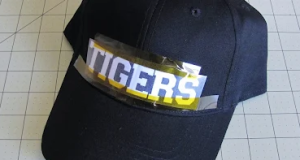
Step 3: Start Pressing
Turn on your iron to the recommended heat setting for the transfer material being used. Securely hold the iron down onto the area with a design. Use even pressure and cover the entire design to facilitate adhesion.
Step 4: Repeat and Check
Repeat the pressing process and make sure every aspect of your design receives enough heat. Check for any peeling or lifting of the transfer material from time to time. If necessary, press further into the trouble spots to make sure that the design is secure.
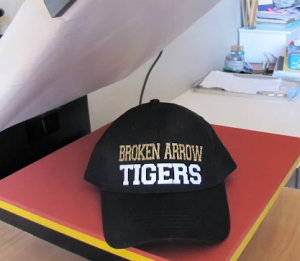
Step 5: Peel Carefully
Wait for the hat to cool down a little bit, and then gently peel away the transfer material. Peel off gradually, making sure that the design adheres well to the hat’s surface. Be careful not to distort or damage the newly pressed design.
With these simple steps, you will be proficient in heat-pressing a hat using an iron. The personalized and professionally crafted headgear is now ready to take center stage. Share your one-of-a-kind style with confidence!
How to Heat Press a Hat without Attachment?
Gathers Tools and Materials
The following tools and materials will assist with “How to heat press a hat without attachment”:
- Heat Tape
- Hat
- Heat Transfer Vinyl
- Oven Mitts/ Thick Fabric
- Heat Press
- Teflon Sheet
- Scissor
Step By Step Process
Step 1: Prepare your hat
Begin by examining the hat, ensuring that it is clean of any dirt or debris. Proper adhesion of the heat transfer vinyl (HTV) depends on a clean surface. Arrange the hat in a convenient position that gives you access to the parts where you plan customization. This phase lays down the ground for a perfect and permanent design.
Step 2: Pre-heat your Heat Press
Set your heat press to pre-heat with the Teflon sheet on. To achieve the secure attachment, use the magnet trick. This initial stage is essential in attaining the desired temperature and obtaining uniform heat distribution throughout the pressing process.
Step 3: Position the design
Select your desired HTV design and trim and weed it. Finding the center of a design by folding it in half, pinning and marking. It should match precisely with the hat’s center seam. This accurate alignment ensures balancing in customization, giving a professional appearance.
Step 4: Apply pressure
Keep the design in place with specialty heat tape to avoid any undesirable inclinations during pressing.
Use a folded oven mitt or thick fabric to protect your fingers from the heat. Push the design onto the hot press plate to apply pressure.
In each position, hold for 5-7 seconds from the center to the edge. This secures optimum attachments and longevity of your personalized construction.

Step 5: Cool down and peel
Be patient while waiting for the pressed design to cool down. If you’re using cold-peel materials such as flocked HTV, apply the design after it has reached an appropriate temperature. After cooling, carefully remove the transparent film, and your design will be revealed. If using several shades or patterns, apply the procedure to every one of them, providing a clean and precise result.
How to Press a Hat with a Heat Press/with Attachment?
Gathers Tools and Materials
With the below-mentioned materials and tools, you can begin with “how to heat press a hat with heat press:
- VEVOR Heat Press
- Heat Tape
- Scissor
- Hat Attachment
- Heat Transfer Vinyl
Gathers Tools and Materials
The Plethora of features plays a key role in making VEVOR Heat Press the best one. Some of the key ones are as follows:
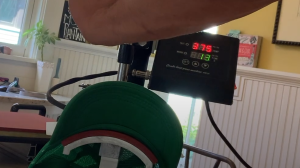
- Precise Display and Digital Control: It offers a simple dual-screen LCD controller. Have a pleasant soft-touch feel from the silicone buttons. Press (+/-), and change between ℃ & °F.
- Dual Tube Heat Technology: Feel the new level of technology using the VEVOR heat press. Dual-tube heating provides a low-temperature difference between the center and edge (just about 5 °C). On the other hand, a single tube heating leads to more than 10 degrees centigrade variation.
- 360 360-degree swing Design: Improve the quality of transfer with the swing-away arm that directly and equally applies pressure to a sublimation machine. This design reduces accidental touch because it also enables the heating element to swing.
- Safe and Secure: Operate safely with the VEVOR heat press. To keep the surface temperature at a controllable 50-70℃ when the operating temperatures are as high as 210 Celsius, two layers of insulation technology have been utilized. The traditional shirt press machine has an upper temperature that goes up to 70-100℃.
- Five In One: The 5-in kit is designed to enhance your creativity. Stability is provided by the big Teflon-coated platen that prevents sticking. Ideal for printing letters, numbers and patterns onto a wide range of objects like caps, T-shirts, and mug plates, among others.
Step By Step Process on How to Heat Press A Hat Using Heat Press
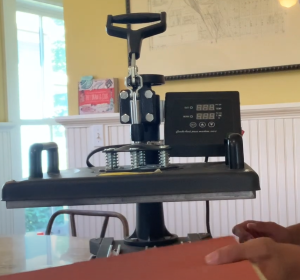
Step 1: Prepare Heat Press
Turn on your VEVOR Heat Press and preheat to the temperature specified for the heat transfer vinyl type. Let it heat up until the achievement of the required temperature.
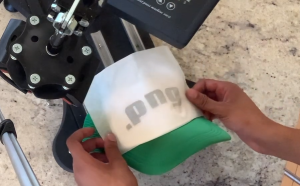
Step 2: Prepare and Position Your Design
Using sharp scissors, trace your selected design from the heat transfer vinyl onto it. Place the hat firmly on the attachment and make sure it fits well. Now, carefully put your vinyl design onto the hat where you want it to appear.
Step 3: Secure Design with Heat Tape
Use heat tape to attach the edges of your design to the hat. This step is essential to avoid any movement during pressing for an accurate transfer of vinyl onto the hat fabric with maximum cleanliness.
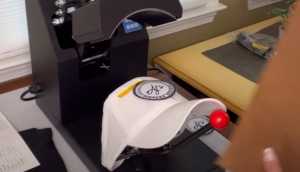
Step 4: Apply Pressure
Lower the heat press that has the detachable hat positioned at this point, a hat and vinyl. Refer to the specific times indicated in your heat transfer vinyl guidelines and apply firm, even pressure as directed. This guarantees a good attachment of the vinyl to the material.
Step 5: Cool Down and Peel
When the pressing time is over, slowly remove the heat press and let it cool for a few secons. After the hat cooling down, carefully remove the backing from the heat transfer vinyl. This shows your particular design is now stuck to the hat fabric.
Following these steps, you will perfect the process of heat pressing a hat with a heat press/attachment. Make sure to adhere strictly to the heat press and vinyl preservation requirements as specified. Now, please display your uniquely customizable hats in style!
Pro Tips for Best Practices
By acting upon these tips, you can get the maximum out of “how to heat press a hat effectively and efficiently”:
- Choose the Right Hat Material: Select a hat made of suitable material for heat printing if you want to achieve success. Cotton and polyester blends are okay.
- Preheat Your Heat Press: First, preheat your heat press. It eliminates the problem of evaporation because all moisture and wrinkles are dried to provide a flat surface for your design.
- Use the Correct Heat Transfer Paper: Use heat transfer paper for hats. This ensures sharp and permanent impressions. Consider the suitability of that particular type for your hat.
- Positioning is Key: Precision matters! Your design should be perfectly aligned with the hat. For an aesthetic outlook, measure and mark a middle.
- Protect the Hat’s Structure: Guard against misshaping. On the contrary, adding a heat-stable pad into that hat to hold shape during pressing is even more vital for shaped hats.
- Mind the Pressure: Adjust your heat press’s pressure. This disparity may lead to such transfers, but if much is applied, it can destroy the hat. Identify the point of greatest impact.
- Test on a Scrap or Spare Hat: It is advisable to pretest with a leftover hat or some spare one before embarking on your large project. This lets you adjust your settings so that everything is possible to bear.
- Optimal Temperature and Time: Follow the instructions on “how to heat press a hat” from the manufacturer regarding heat and time. It is also critical to strike the right balance so that professional hat pressing can be achieved.
- Peel Carefully: Then, slowly remove the transfer paper after pressing it. This minor modification enhances the quality of your design. To prevent any form of injury, turn it into a step–by–step process.
- Post-Pressing Care: After it has cooled, you can touch the hat. The holding of your design and combination is wholly dependent on the post-pressing process.
- Consider Hat Type and Style: Change the strategy according to hat type and appearance. Although each hat may require special skills, the ability to be flexible is a key point for being successful.
FAQs about How to Heat Press a Hat
1. How long to heat press a hat?
For the best results, you should put your heat press timer at 10-15 seconds. Such a short length allows heat transfers to occur very fast without destroying the integrity of the hat or its material.
2. What are the settings for heat press on hats?
The heat press temperature should be around 325 degrees Fahrenheit. This is the best heat transfer temperature in such a way that the integrity will not be compromised. The second is that the design should be fixed on all sides of the medium here to firm pressure.
3. Can you press a hat with a regular heat press?
Yes! While there are different heat presses for hats only, you can also make use of a long flat-pressure heater. In contrast, use a hat press attachment or pad for the dome of derby hats to ensure that heat is applied evenly during pressing.
4. How do you prevent wrinkles when heat-pressing a hat?
A flat finish should be emphasized by setting the hat on a press. Before ironing, make sure that the material is straight and wrinkle-free to ensure there are no creases left. The processed surface and proper placement play a major role in achieving the perfect, wrinkle-free end on your custom hat.
Conclusion
Finally, you have insights on “how to heat press a hat”. Now, you can transform the common hat into something uncommon. Dive headlong into self-made creation and discover your true identity. Challenge yourself to begin this voyage in which every hat has an artistic freedom upon it. To start with, open up the VEVOR products line. Enhance your journey of crafting and share the perfect world vision for hat designs. Use VEVOR to make yourself different by customizing every hat.


