
It is possible to safely clean golf cart batteries provided that you have the appropriate tools and that you go through the correct process. The job can be done in an easy way without any misunderstandings. Regularly cleaning golf cart batteries enhances performance, prevents corrosion, and extends the life of your cart. It is also useful for prolonging battery life and minimizing the risk of unexpected problems. This maintenance can be done at home, and you do not require any special skills. A small measure of care and attention can help you keep your battery intact and ensure your golf cart is ready to deliver a good, reliable, and efficient performance on every ride.
Tools and Supplies Needed for Cleaning Golf Cart Batteries
All necessary tools should be prepared before cleaning golf cart batteries. Being prepared also assists you in working in a safe and comfortable environment free of setbacks. It also expedites and streamlines the cleaning process. Knowing what should be used and what the safety things are, the entire process becomes more manageable. We will prepare step-by-step what you will require.
Essential Cleaning Materials Checklist
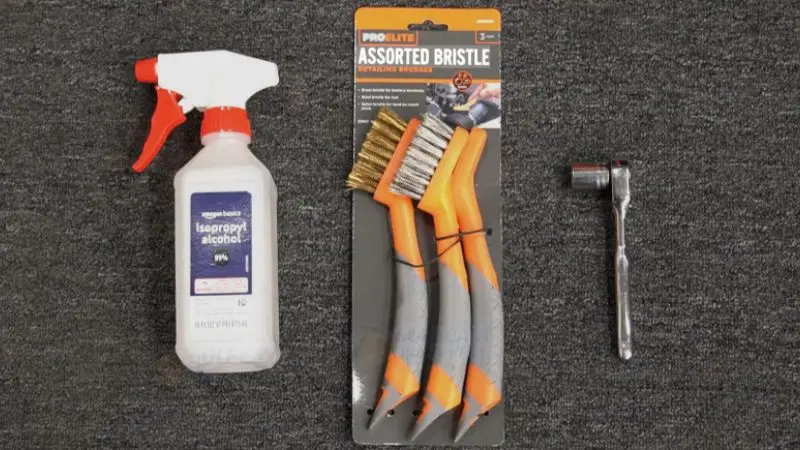
To start with, how to safely clean golf cart batteries at home, you should first have basic cleaning materials that are readily available and safe to use. These products avoid damaging battery surfaces and remove dirt, corrosion, and deposits. You should always have your workspace prepared prior to cleaning the place.
The following will be required:
- Baking soda to neutralize acid build-up.
- Detergent water to wash down surfaces.
- A toothbrush-sized brush to clean tight spots.
- Wiping/drying a rag or soft cloth.
- Cleaning solution mixing container made of plastic.
- Wrench or socket set to take out battery cables.
All these materials are significant in effective and safe cleaning. The soda and water solution assists in dissolving the corrosion, and the brush and cloth ensure that the surface is clean and dry. The maintenance will be easier with proper preparation, which will minimize the chances of damaging it in the process.
Safety Gear You Should Never Skip
Safety should always be the first consideration when handling batteries since they contain harmful acids and residues that can cause injuries. By using appropriate protective equipment, your hands, eyes, and clothing will be safe during the procedure. This is notably essential when undertaking tasks such as preventing corrosion on golf cart batteries, where the corrosion cleaning activity is in direct contact with battery surfaces.
Always use:
- Fully covered gloves that cover your wrists and hands.
- Tight-fitting goggles to keep your eyes dry.
- An apron (not mandatory) to ensure that your clothes are not spilled.
Gloves are necessary since they will avoid contact with the acid residue on the skin. Goggles safeguard your eyes against accidental splashes, particularly during cleaning of tight or corroded places. An apron is not obligatory, but can be handy in case you want to protect your clothes better. Never let the safety gear slip down when working; always ensure it fits. Wash your hands properly after cleaning is done, regardless of the usage of gloves.
Optional Tools for Deep Cleaning
To clean more thoroughly, you may use additional equipment to help eliminate tough dirt and severe corrosion. These are not necessary in general maintenance, although they can do wonders when the batteries are highly charged. They also come in handy in using a step-by-step guide on how to clean up golf cart battery terminals to get deeper into maintenance work.
Optional tools include:
- Safe cable removal battery terminal puller.
- Hard corrosion scrubbing wire brush.
- Battery post cleaner for small and intricate places.
- Rinse the spray bottle.
- Shop vacuum for removing dust and dry debris
The tools will help you reach hard-to-reach places and clean areas that are not easily accessible with basic brushes. Stubborn corrosion can be tackled with a wire brush, and a terminal puller can be used to avoid damage when removing cables. A spray bottle is more controlled in the rinsing process, and a shop vacuum ensures the workspace is clean. With these tools, the entire maintenance process will be more efficient, and they will sustain long-term battery care, particularly when cleaning the golf cart batteries with the help of the Best products to achieve better outcomes.
Safety Precautions Before Cleaning Golf Cart Batteries
Safety should be the first consideration when cleaning golf cart batteries to prevent harm and injury. Batteries are dangerous because they are electric and include acid; therefore, even a small error can be fatal. That is why it is not only about cleaning the golf cart batteries at home, but it is also about making the correct preparations before you start cleaning.
The following precautionary measures will help you work confidently and reduce the risk of accidents. These safety practices also contribute to the long-term health of the battery and streamline the entire maintenance process into a more controlled and smoother process.
How to Safely Turn Off and Disconnect Batteries
The first thing to do before you begin any step-by-step guide to cleaning golf cart battery terminals is to turn off all the batteries and unplug them. Start by turning off the golf cart and taking the key out. Next, use the parking brake to prevent the cart from rolling while cleaning. This is a crucial measure in terms of your safety and stability.
Then, with the wrench, first remove the negative cable and then the positive cable. It is always necessary to use this order since it will avoid sparks or short circuits. When removed, keep the two cables out of the way of the battery terminals to make sure they do not come into contact with anything metal. When working, make sure your tools are kept in place and not near the battery.
Safe maintenance includes proper disconnection, which must not be overlooked even in situations where the cleaning task may seem easy.
@dwscustoms vevor agm battery 12 volt 200ah best deal #vevor #agm #200ah #solar #batteries #dwscustoms @Vevor_US
♬ original sound – King Scoot
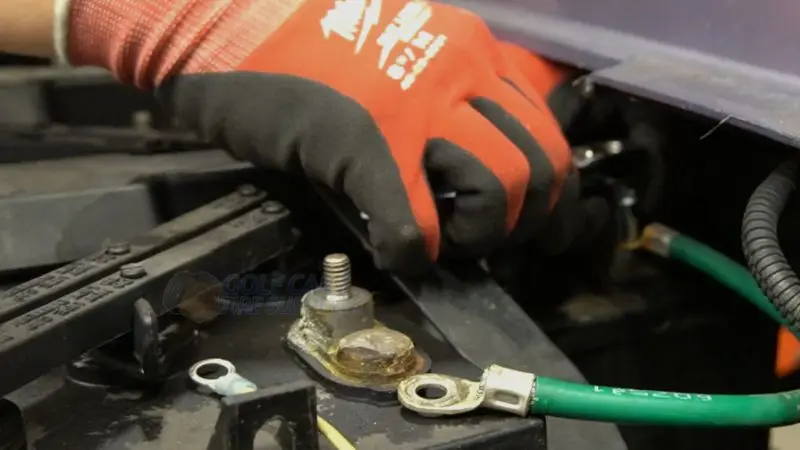
Handling Battery Acid and Corrosion Safely
Corrosion and battery acid may be dangerous when not treated properly, particularly when preventing corrosion on golf cart batteries. Corrosion can also be in the form of a white or bluish powder around the terminals and must not be touched with bare hands. Put on gloves and goggles prior to beginning any cleaning job to prevent skin and eye irritation or burns.
In case you observe corrosion, wipe it off with a brush without touching it. It is best to use a soft or medium brush that does not add to the accumulation but breaks it down. Should there be an accidental spillage of acid, clean the area immediately with a baking soda and water mixture to neutralize the acid.
These materials are very fragile and should be handled with caution to prevent injury and to ensure the battery is not damaged during cleaning.
Proper Ventilation and Work Environment Tips
Proper airflow is a significant element of how to safely clean golf cart batteries at home, particularly when it comes to the fumes and cleaning reactions. Always operate in a well-ventilated or open area, like a garage with doors open, or outside. Fresh air helps in minimizing any exposure to harmful gases emitted during cleaning.
Preferably, ensure that no kids or pets are in the vicinity when you start. Do not smoke or use open fires near the batteries, either, as it can be deadly. A clean and tidy workspace will keep you focused and minimize the possibility of errors.
A good environment is not only conducive to safety, but also to enhanced outcomes when it comes to the best products to use in cleaning golf cart batteries during maintenance.
Step-by-Step Guide to Cleaning Golf Cart Batteries
Once you are ready with your tools and know about safety, the next step is a definite procedure for cleaning golf cart batteries. The correct step-by-step approach will help you avoid mistakes, preserve battery life, and enhance performance. When properly done, it also contributes to long durability and minimizes the possibility of corrosion deposits. The following steps will help you in a safe and efficient cleaning process.
Step 1: Inspect the Batteries for Damage
Before beginning, inspect each battery and note any obvious damage. Examine the surface for cracks, leaks, bulges, or other unusual features. When you notice any of these issues, cease at once since broken batteries may be dangerous to work with.
Test the terminals, too, to see if there is corrosion or loose connections. One of the first checks that will allow you to assess the state of the battery and make sure that you are not working with unsafe equipment. This primary action preconditions safe maintenance and avoids severe threats in the cleaning process.
Step 2: Disconnect Battery Cables Properly
Switch off your golf cart and take out the key first, and then touch anything. This ensures there is no electrical current during cleanup. Then tighten the negative cable first with a wrench, then the positive cable.
This order is extremely significant as it minimizes the chances of sparks or short-circuiting. After removal, keep the cables out of the way of the battery terminals to prevent accidental contact. One of the essential components of a step-by-step guide to cleaning golf cart battery terminals is proper disconnection, which should be done carefully.
Step 3: Prepare a Safe Cleaning Solution (Baking Soda Mix)
A basic and safe cleaning solution is made using the items that are at home to clean. In a plastic container, add one cup of clean water and one tablespoon of baking soda. Combine the mixture and stir until the baking soda is dissolved.
This solution is popular in cleaning golf cart batteries as it aids in counteracting the formation of acid and loosening corrosion without damaging battery components. Never apply the mixture to the terminals or surfaces without making sure it is well prepared.
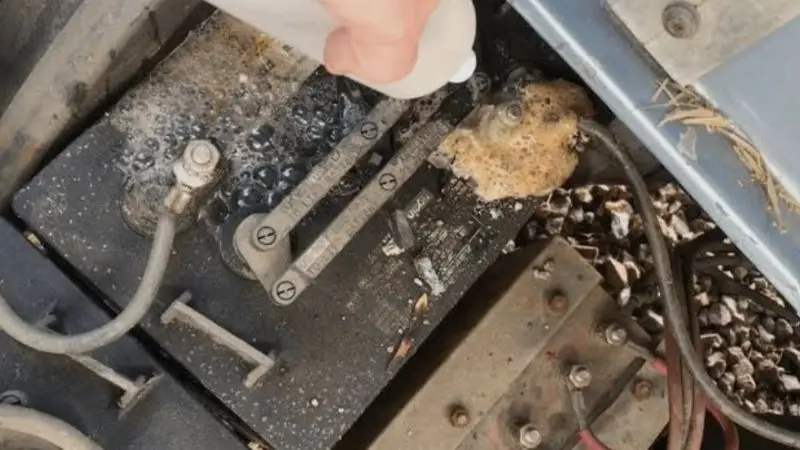
Step 4: Remove Corrosion from Battery Terminals
Wipe the battery terminals with a small brush dipped in the baking soda solution. Pay attention to those places where corrosion is manifested as white or bluish deposits. Use unnecessary force, since the deposits can be removed by gentle scrubbing.
Clean the brush regularly to prevent corrosion from spreading. This measure is critical in preventing corrosion on golf cart batteries since it aids in ensuring good electrical connections and enhances the performance of the battery.
Step 5: Clean the Battery Surface and Casing
Once the terminals have been cleaned, use a damp cloth to wipe all of the battery surface and casing. Clean up any remaining dirt, dust, or cleaning solution. Wipe off all surface residue.
This is done to maintain a clean and tidy battery area to minimize accumulation in the future. Such frequent care helps maintain a smooth functioning and is an important element of clean-up golf cart battery care.
Step 6: Rinse and Dry Thoroughly
After cleaning, damp-clean the area of the battery with clean water to wash off any remaining solution. Be careful not to soak the components excessively. Rinse and then clean up with a soft dry cloth.
Drying should be strongly considered, as water can cause corrosion or loose connections. The entire battery surface should be dry, which ensures higher performance and a longer battery life.
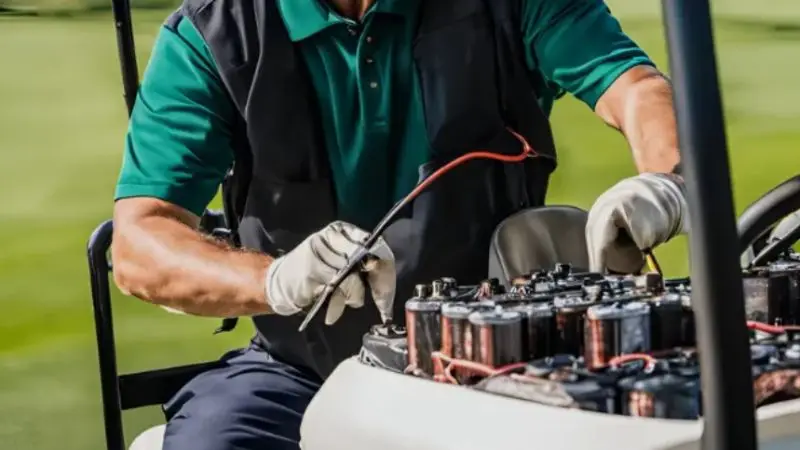
Step 7: Reconnect Batteries and Test Performance
Reconnect cables in the order of removal in reverse order. It should be positive first, followed by negative. Ensure that both connections are tight and secure to prevent loose contacts.
When everything has been reconnected, start your golf cart and check its performance. When it is carried out properly, your cart will be able to run efficiently. To maintain the battery safely and reliably in the long term, proper reconnection is necessary. Routine maintenance and handling of cleaning golf cart batteries will not only enhance performance but also assist you in preventing future troubles.
How Often Should You Clean Golf Cart Batteries?
One of the simplest ways to extend battery life and ensure good performance is to maintain a routine of cleaning the golf cart’s batteries. Daily cleaning of your batteries will help prevent corrosion buildup, improve charging efficiency, and reduce the risk of unexpected failure. An easy routine will also assist you in remaining regular with how to safely clean golf cart batteries at home, and will make maintenance simpler and more foreseeable.
A proper schedule will ensure that your golf cart is at its best performance, particularly when it is frequently used or in cases of long rides.
Recommended Cleaning Schedule
You ought to use a regular cleaning schedule to ensure consistent performance. This will assist in preventing corrosion and ensuring your battery system is well-maintained. Periodic check-ups and washing are major components of preventing corrosion on golf cart batteries, particularly in dusty or moist circumstances.
The easiest timetable that you could adhere to is:
- Inspect batteries: Once every month.
- Clean terminals and casing: Every month
- Deep clean (removal of cables): Every 3 months.
When you drive your golf cart in wet, muddy, or dusty weather, you might have to clean your cart more frequently. Even minimal traces of dirt or corrosion must be removed as soon as possible in these situations to prevent permanent damage.
Another routine that helps improve the outcomes is the step-by-step guide to cleaning golf cart battery terminals. Because the maintenance is carried out regularly, there will be less to accumulate over time.
Signs That Your Batteries Need Immediate Cleaning
Your batteries might require an emergency sometimes, even with a schedule. You are supposed to be watchful of warning signs of accumulation or performance problems. Early identification aids in avoiding major damage and ensuring that your cart runs smoothly.
The typical indicators are a slow start, faint lights, or strange smells emitted by the battery pack. These symptoms can be a pointer to corrosion or deposits that need cleaning.
In case you observe any of the following problems, discontinue normal use and examine your batteries immediately. A fast response helps to keep you healthy in the long run and makes sure that your cleaning of golf cart batteries is successful.
Why Regular Cleaning Matters for Battery Life
Having a cleaning regimen is not only about the looks; it has a direct impact on the battery performance and life. Routine maintenance assists your batteries in charging up more effectively and lessens the load on the system.
By remaining active on the best products to clean golf cart batteries, you are also able to reduce corrosion and maintain electrical connections. This will result in a smoother ride, less break downs, and general reliability.
A properly maintained battery system can save money over time as it will require less replenishment and will be more efficient. You can do this by making cleaning a habit so that you can always be guaranteed that your golf cart is always ready to use without any surprises.
Wrap Up
Golf cart batteries are easy to maintain and clean, provided it is done routinely and safely. It is possible to achieve a longer battery life and better overall performance by taking the correct actions, utilizing the appropriate tools, and having a regular schedule. Small routines, such as checking on corrosion, wiping down terminals, and keeping connections tight, can go a long way. With the emphasis on safety and regular maintenance, your golf cart can remain dependable enough to be used on a daily basis. The maintenance is also beneficial as it ensures that you do not have to pay a lot of money to fix your battery, and it will last longer.
FAQ
What is the best way to know whether or not your golf cart battery needs cleaning?
On the terminals, you see a white or blue powder. Your cart can be slow, or the lights can appear dark.
Will vinegar work instead of baking soda to clean batteries?
Vinegar should not be used. Baking soda is the best as it neutralizes battery acid and eliminates corrosion safely.
What to do in case battery acid comes into contact with your skin?
Immediately rinse your skin with plenty of water. Take off soiled clothes. Notice an adult or take medical action when you experience pain.


