
The conversion of an egg into a chick is an incredible process, and the period immediately following hatching is as important. You need to get all the timelines correctly, and understand the perfect time to move the new chicks from the incubator to the brooder.
While timing is of essence, you should also know that successful incubation for healthy fledglings is only possible with a good incubator. From the many options in the current market, we recommend the VEVOR model. The VEVOR Egg Incubator is designed to meticulously prepare each chick for their next adventure; the brooder—by maintaining regular humidity levels and precise temperature control.
Be sure to keep an eye on the chicks as they start to explore their immediate surroundings while their feathers dry. They need to be moved to the brooder at just the right time since they are strong but also vulnerable. Please understand that relocating your chicks too quickly exposes them to the cold. Also, the incubator’s limitations may stifle their curiosity if they wait too long.
Table of contents
The Incubation Journey: When to Take Chicks Out of the Incubator
Incubators are essential for successful new chicks because they mimic the careful watchfulness of a mother hen. This section details why incubators are necessary and when to transfer your chicks.
Essential Role of Incubators in Chicken Maturation
Incubators provide a controlled environment during the crucial early stages of embryonic development. An egg incubator is important for consistent embryonic development, and the VEVOR Egg Incubator stands out in this regard with its 360° air circulation design to accomplish just that. Its built-in sensors maintain a constant temperature, and the automatic egg-turning function imitates the nesting motions, creating an ideal environment for hatching healthy chicks.
Identifying the Right Time to Transition Chicks from Incubator
As the chicks make their way into life, it’s essential to know when to transfer them from the incubator to the brooder. Be on the lookout for these signs as they indicate it’s time to move the chicks from the incubator:
- Dry and fluffy feathers: When the chicks’ feathers are dry and fluffy, usually about 18 to 24 hours after hatching, you can move them.
- Alertness: The degree to which the chicks move about and their level of alertness is another sign of their readiness. When the chicks show a great sign of alertness, it means they are ready.
- Stability: Chicks that are able to stand steadily on their own two feet are strong enough to make the changeover.
- No more pipping: Make sure there aren’t any other eggs about to hatch. Opening the incubator can affect the humidity and temperature, which are vital for the other hatchlings.
Timing and Techniques: When to Remove Chicks from the Incubator
Chick hatching is a delicate process; every second counts as you attempt to use the incubator to bring new life into the world. The incubator is the first environment these young birds have ever known, a place of constant warmth and protection, and you must ensure the birds are ready before moving them from this haven. Here, meticulous scheduling and methods are required as the eggs transform from embryos to hatchlings.
Immediate Post-Hatch Care Inside the Incubator
Chicks are at their most vulnerable just after they hatch. They need somewhere warm and dry to rest because they’re fatigued and drenched from their activity. The VEVOR incubator has features like precise temperature control and humidity adjustment that ensure the most comfortable initial few hours for the chicks,
Prior to being securely placed in the brooder, the down feathers of the chicks must have dried entirely, which can take up to a day. The VEVOR incubator provides a natural setting where the chicks can develop throughout this time.
Observing Hatchling Progress for Optimal Transition Timing
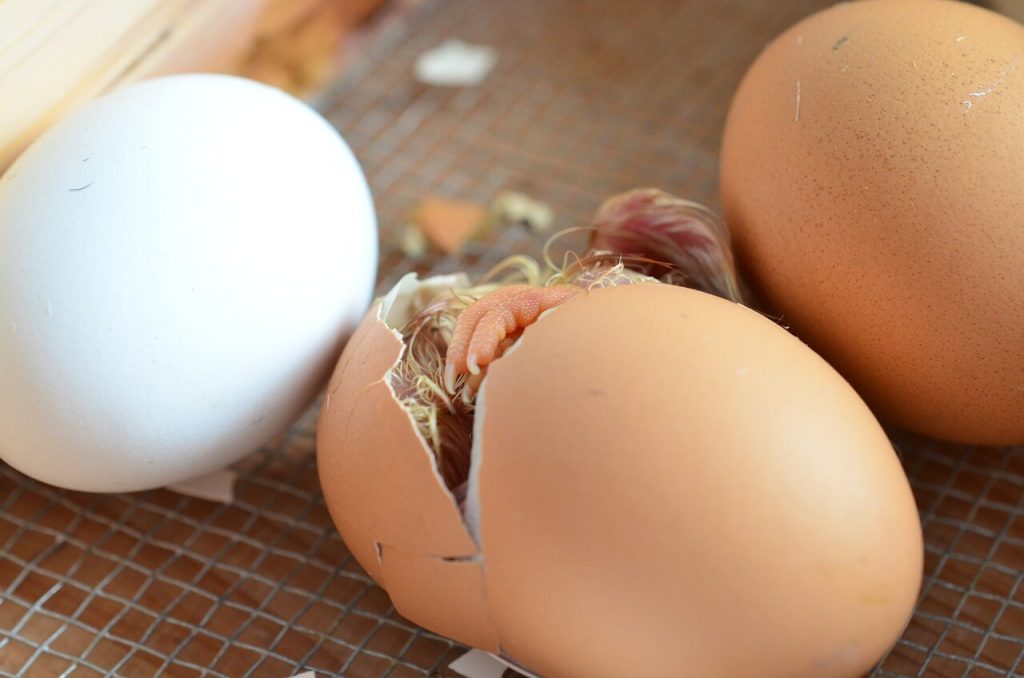
In the first of many steps that define the development of an egg into a chick, known as “pipping,” the young bird uses its egg tooth to crack open the egg’s shell. Once they’ve rested, the next step is to “zip” the shell, which involves turning and pecking around it to make a bigger hole from which to emerge.
With the VEVOR Egg Incubator’s ABS shell, you can examine these stages up close without compromising the fragile environment. This visibility is essential to finding the best time to move the chicks to the brooder. By keeping an eye on their pipping and zipping progress, you can ensure that every chick is prepared to fly without undue stress.
Navigating Hatching Challenges
Though it’s worth the effort, hatching chicks isn’t an easy task. Every step, from the moment the egg is cracked open until the chick takes its first steps, is vital. If you want your new flock to be healthy and robust, you need to know what to expect during hatching and how to prevent the most common problems that come with the process.
Common Hatching Difficulties and Solutions
The hatching process isn’t always smooth sailing. A “sticky” hatch may result in the chicks being covered in egg yolk; a “draggy” hatch also causes them to emerge slowly. Temperature imbalances, inaccurate humidity levels, or inadequate ventilation are the major causes of these problems.
The VEVOR incubator overcomes these obstacles and guarantees a trouble-free hatching process by precisely controlling the temperature and humidity. Uniform embryonic growth is encouraged by its 360° air circulation design, increasing hatching success rates and decreasing the danger of developmental disorders.
Preparing for Brooding: When Chicks are Ready to Leave the Incubator
When the chicks have hatched, you must determine if they are ready to be placed in the brooder. Dry and fluffy feathers, attentiveness, and movement are common signs that the new chicks are ready to be moved.
Because of its see-through construction, the VEVOR incubator makes it easy to keep an eye on the chicks without disturbing them as you wait for the perfect moment to move them. With this highly functional incubator, you can be sure that your chicks will be well-prepared for their transition to the brooder and ready to flourish in their new home.
Preparing the Brooder Environment
We already established that hatching is only the beginning of the journey of raising chicks. The brooder is a whole new environment for the chicks as they emerge from the safety of the incubator. They will develop, play, and become used to life in the flock here, so it must exude the same warmth and security as the incubator.
Crafting the Ideal Brooder Environment After Incubation
The primary goal of building an ideal brooder is to improve the chicks’ living conditions outside the incubator. The goal is to create an atmosphere that they can call home. The ideal conditions for a brooder include a warm, dimly lit, and risk-free environment. It needs to be spacious enough to let the chicks go about and discover their environment.
A heat lamp or heating plate is integral to any proper brooder arrangement for keeping the chicks warm. In addition to an easy-to-clean brooder, you’ll need bedding to maintain a soft and absorbent floor. Ensure that the young chicks have easy access to a sufficient supply of food and water.
In the same way the VEVOR incubator ensured that the eggs were consistently heated to the correct temperature and flipped regularly, your brooder must do the same for the growing chicks. This is the next phase of their growth, and you can ease their transition if you set it up correctly.
VEVOR Egg Incubator: Your Ally from Incubation to Brooding

From the first day of incubation, until your chicks are ready to be placed in the brooder, the VEVOR Egg Incubator is a reliable tool there to help you achieve your goals, just like a reliable friend. Ideally, the incubator facilitates a trouble-free hatching process.
Why Choose VEVOR for Your Incubation Needs
The cutting-edge technology, dependability, and ease of use of the VEVOR Egg Incubator makes it stand out from the crowd. The incubator has a level playing field that ensures each egg gets the same treatment. This improves both the hatching rate and the life quality of the young chicks. By controlling the temperature and humidity as well as automatically flipping the eggs, the VEVOR Incubator removes every element of surprise from the hatching process.
Many users, including poultry farmers and hobbyists, have provided feedback on how the VEVOR Incubator improved their hatching efficiency. One user claimed that hatch rates significantly increased due to the precise environmental control the incubator offered. Another user emphasized how simple it is to use the incubator and how much relief there is in knowing that the eggs are receiving careful nurturing thanks to its sophisticated design.
Summary and Conclusion
Having examined the process of chick-hatching and the overall developmental cycle, it is clear that timing plays a crucial role. From the start of incubation all the way through to the transfer to the brooder, timing is everything.
Essentially, it is worthy to mention that the success of this sensitive process depends on using a high-quality incubator, such as the VEVOR Egg Incubator. The incubator creates the ideal environment for the eggs to develop into strong and healthy chicks. The dependable incubator helps at every step, flipping the eggs at exact intervals and keeping the temperature and humidity at a steady, ideal level.
As a poultry farmer who is deliberate about getting their eggs to hatch efficiently, while having healthy and strong chicks, we advise that you invest in the VEVOR Egg Incubator. Its user-friendliness and robust set of functions will assist you in achieving your hatching goals.


