
Incubators provide the ideal environment for hatching chicks. Hence, from the day the viable eggs are placed in the incubator, ensure you mark the date on your calendar as the incubation process takes about 21 days before chicken eggs hatch.
Chicks that have just hatched lack the ability to control their own body temperature and must have access to a clean and draft-free environment with adequate ventilation in order to thrive. Food and water must be readily available to them at all times in their surroundings.
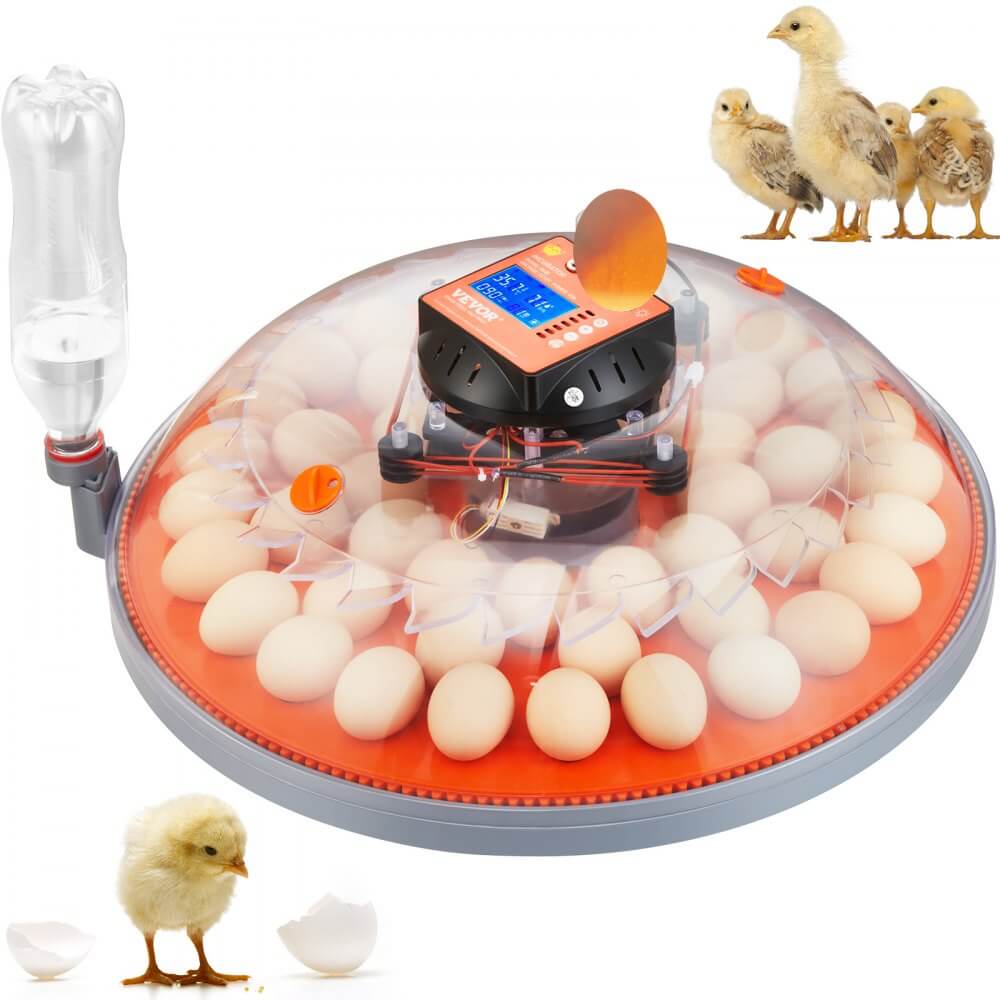
For a seamless and successful hatching, you need a quality incubator, and we recommend the VEVOR Egg Incubator due to its amazing features. The incubator guarantees a dependable, effective, and efficient way to hatch eggs, improves hatchability rates, and maximizes production.
Table of contents
What to Do After Chickens Hatch: The First 24 Hours
The first 24 hours are very crucial for newly hatched chicks. This is why breeders must pay a great deal of attention to this period.
The process of hatching begins with the chicks pecking their way out of the egg. Chicks that have just hatched have feathers that are damp, but are able to see and walk. A chick’s plumage will double in size only a few times after hatching. The young chicks are carefully transferred to specially made trays after hatching, after being removed from their shells.
Hatching chicks in an incubator simulates the natural behavior of a broody hen. The eggs laid by a broody hen are vulnerable while they are incubating because they are exposed to predators like wild animals. However, the ideal environment for an egg to incubate and hatch is precisely what an incubator provides.
In order to prevent the embryo from adhering to one side of the egg while it develops, the VEVOR Egg Incubator is engineered to control the incubation temperature (about 99.5 degrees Fahrenheit), and humidity (35 to 45%) until the final two days. The humidity should be increased to (65 to 75%) for hatching which ensures a smooth transition to the brooder for baby chicks.
Transitioning from Incubator to Brooder
Everything surrounding the egg incubation process must be perfectly timed to achieve the desired result. After a successful hatching, the next step is to move the new chicks from the incubator into the brooder. However, this transition must be done at the right time.
Before moving the chicks from the incubator to the brooder, make sure they are ready for the move. You are allowed to transfer the chicks to the brooder once 48 hours have elapsed since the last egg hatch. Always keep track of the time as each chick has at most 72 hours before they need food and water. Gently place the chicks in the brooder. Before placing them under the heat lamp, gently dip their beaks into their waterers to teach them to drink.
Use the VEVOR Egg Incubator for a Stress Free Transition
Investing in a VEVOR Egg Incubator is advisable for the best possible incubation and hatching results. The incubator provides the ideal conditions for the hatchlings which includes a steady temperature and just the right amount of humidity. Also, by simulating the environment a mother hen provides, you are in full control of the hatching process to a greater extent and this produces healthy chicks.
Essential Post-Hatch Care Tips
Now that your chicks are hatched, it is important to provide the necessary care for them. A smart breeder understands that the chick production process doesn’t end at the hatching phase, in fact, it is the beginning of the journey. These helpful tips will ensure that your fledgling chicks are nurtured properly and sufficiently till they mature.
Pay a Great Deal of Attention to Temperature and Humidity
Once a chick hatches, it needs extra heat in a controlled setting until it grows big enough and has enough feathers to withstand typical brooding temperatures. Hatchlings need a steady environment with just the right amount of humidity and light for optimal growth.
Ensure You Feed and Water the Baby Chicks Properly
Adhering to the stipulated scientific water and feed ratio will provide a boost to the immune systems of the chicks after hatching. You can’t afford to compromise here as the quality of feeding and water will determine their overall health and size. Consider these tips to feed and water baby chicks properly:
- Get the feed started by putting it in the tray or trough. There shouldn’t be any less than 19.5% crude protein in the diet, and it should be high protein overall.
- As soon as the chicks are placed in their cages, water should be provided. The preferred method is using cold, boiling water. Mix with some multivitamins and 5% glucose.
- Four meals a day are necessary for chicks’ nutrition. Water is essential during this period too. They should not be deprived of water.
Conduct Regular Health Checks
Your fledgling chicks are still vulnerable and likely to experience some health issues at this stage. Hence, you must always conduct regular checks for health risks and other common issues. Some of the things you must look out for include:
- Dehydration: You are strongly advised to dip their beaks into water to encourage them to hydrate. Dehydration is a major issue that could harm your chicks.
- Splayed leg: During brooder breeding, do not use newspaper or slippery surfaces. Until the chick is able to stand alone, its legs should be hobbled and given physiotherapy.
- Coccidiosis: Coccidiosis is a major disease in poultry farming, and it often causes deaths in chicks. Please, ensure to check the chicks for symptoms of this deadly disease. Make sure brooders are kept dry and clean at all times. Also, ensure the waterers do not contain droppings and beddings.
How to Care for Baby Chicks After They Hatch
To be a successful breeder, you must understand the various stages of development of your flocks. This will allow you to understand the required care and strategies needed to keep the chicks healthy at all times. Provided below are some of the key milestones you must be aware of to properly care for your chicks at all developmental stages.
Key Milestones in the First Weeks of Life
1-2 Weeks: The chicks add weight and develop muscles. However the brooder should be lined with strips of paper towel since the legs of the chicks will be delicate and frail.
2-4 Weeks: In place of strips, the chicks can now walk on shredded paper since their legs are strong enough.
4-6 Weeks: By week six the chicks would have almost tripled in size and will have a full body covered in feathers.
How to Support Healthy Growth and Development
The first week after hatching is the most delicate, so it’s best to keep them under the most intensive care. Provide the needed temperature and humidity needs in this stage.
At week two, you may gently put their heads into the feeders and waterers to keep them hydrated. This is also the stage where you may begin allowing them brief periods outside of the brooder.
How the VEVOR Egg Incubator Helps in Monitoring and Managing Chicks Development
The VEVOR Egg Incubator ensures that every development stage for your chicks is managed through its humidifiers, ventilators, and heating components. All of these features provide a regulated environment that allows you to monitor and manage the health of your flocks effectively.
Cleaning and Maintenance Tips for Your Incubator
The right quantity of carbon dioxide, together with a consistent temperature and a humidified atmosphere, creates an ideal environment for cell development in an incubator. Hence, to ensure your incubator functions optimally, it’s crucial to maintain and care for it appropriately. Essentially, cleaning your incubator regularly is required for the health of future batches of eggs.
Recommended Tips for Cleaning Your VEVOR Egg Incubator
Ensure you follow these cleaning and maintenance tips for a healthy incubator that delivers optimal functionality and results at all times.
Daily: Wipe off surfaces while disinfecting the incubator; if spills do occur, use 70% ethanol or isopropanol right away.
Weekly: Drain the water tray, wash and wipe it off with 70% alcohol to make it germ-free. Then fill it up with clean water—ideally, use distilled water that has been sterilized.
Monthly: Using a lint free cloth, clean the interior of the chamber with soapy water and rinse with clean water.
Maintenance Tips to Extend the Life of Your VEVOR Egg Incubator
These maintenance tips will go a long way in extending the life-span of your VEVOR Egg Incubator.
- Service it once every twelve months
- Clean the incubator’s exterior regularly
- Steer clear of electrical outlets while cleaning.
Common Questions Answered
You probably still have a few questions regarding the chicken egg hatching process. Here, we have provided answers to some frequently asked questions regarding the process.
How long can chicks stay in the incubator after hatching?
Chicks can usually remain in the incubator for 24 to 48 hours. After the first twenty-four hours, you may observe the chicks’ general health before deciding on moving them to the brooder. Ensure the chicks appear less soggy and far more adorable and fluffy on the second day before moving them.
What to do if a chick doesn’t hatch on time?
After incubation, if the egg shows no symptoms of pipping or hatching, it is quite unlikely that it will hatch. Candle the eggs that did not hatch after removing them from the incubator. See if the embryo is moving about or whether it fills the egg completely, both of these signs indicate that the egg has reached full development. If there’s an internal pip but no movement then the embryo didn’t make it beyond the hatching stage.
What causes premature hatch and how can it be prevented?
Premature egg hatch is due to the high incubation temperatures or poor egg storage, and can result in bloody navels. To prevent such a situation, keep eggs at a temperature of 50-60° F with a relative humidity of 60% and protect the incubator from electrical surges and excessive heat.
Why Choose the VEVOR Egg Incubator?
If you still haven’t chosen an egg incubator yet, we advise that you invest in the VEVOR Egg Incubator. However, you will probably want to know why you should make this decision. This section has got you covered.

The VEVOR Egg Incubator boasts several key features that make it an outstanding choice for poultry breeders. It is ideal for a wide range of poultry birds, including little birds, fowl, ducks, and even some strange reptiles.
The egg incubator’s 360-degree air circulation design promotes uniform temperature and humidity throughout the chamber. The incubator features an integrated temperature & humidity sensor that ensures that every embryo grows up healthily. This means all eggs are constantly monitored for temperature and humidity.
Testimonials and Success Stories from Users
Every quality product will attract several positive ratings and feedback from users. This is the case with the VEVOR Egg Incubator. We have highlighted some testimonials from its users below.
- Amanda (5 Stars – Great Incubator) Feb 26, 2024; U.S.A
“I like that it has a light to candle the eggs and that it turns the eggs and that you can add water from the outside of the incubator…”
- John Harmon ( 5 stars – Great Hatch Rate) Mar 25, 2024; U.S.A
“We have done quail, ducks, and chickens in this incubator. Each time we have had great hatch rates…”
The VEVOR Egg Incubator Supports Both Beginner and Experienced Poultry Keepers
Convenience is the crucial significance of egg incubators. For instance, chickens spend around three weeks tending to their eggs as they hatch. This means the hatching process takes a lot of time. The VEVOR Incubator guarantees a steady supply of eggs while saving both time and money.
Conclusion
Incubation is fundamental, and one of the most essential aspects of breeding chicks. However tending to the chicks after they’ve hatched is also equally important, especially as it relates to temperature, humidity, and feeding. This is why you need an incubator with the perfect conditions and features to simplify all these processes and deliver quality results. This is where the VEVOR Egg Incubator comes into the equation.
The incubator has specially constructed hatching crates that optimize humidity and ventilation. Its hatching baskets are manufactured with high density materials. In essence, you need not worry about the safety and health of your chicks. When you choose the VEVOR Egg Incubator, you will get a brooder full of cute little chicks, and all the time and effort spent incubating the eggs will have been well worth it. Visit the website or any of their affiliated merchants today to order for your VEVOR Egg Incubator.


