
Welcome to the VEVOR Safe Box User Manual – your ultimate guide to mastering the use and maintenance of your VEVOR Safe Box. Renowned for its robust security features and user-friendly design, the VEVOR Safe Box is an ideal solution for safeguarding your valuables. This manual provides detailed instructions and simple usage tips to ensure you get the most out of your digital safe. Whether you’re a first-time user or looking to enhance your safe’s functionality, this guide is tailored to meet all your needs.
Table of contents
- Instructions
- Technical Parameters
- Parts List
- Opening Your Safe for the First Time
- Personal Password Setting
- Manage Password Settings
- Open the Safe
- How to Remove the Shelf
- Low Battery Alert
- Alarm Function
- System Initialization
- Noise Elimination Function
- How to Wall or Floor Mounting
- Safety and Compliance
- Warmly Reminder
- After-sales Service
- FAQs about the VEVOR Safe Box
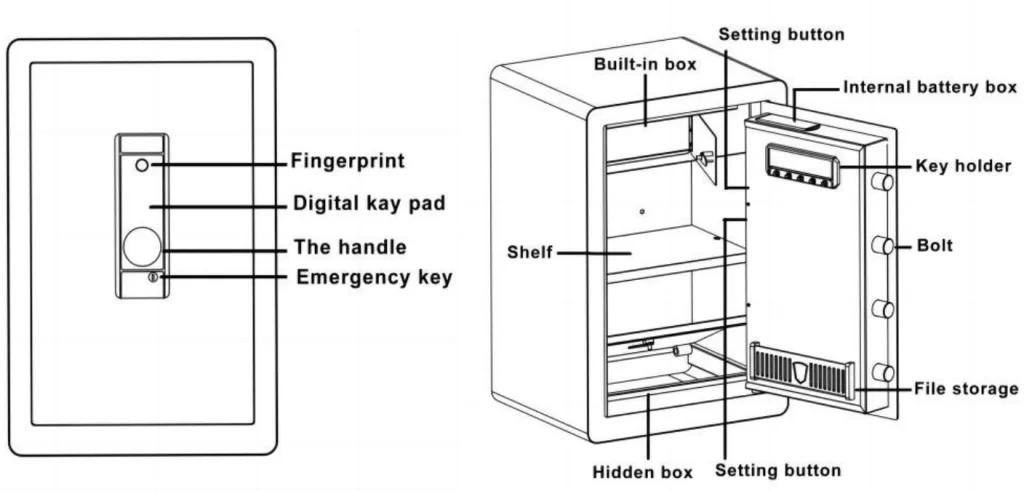
Instructions
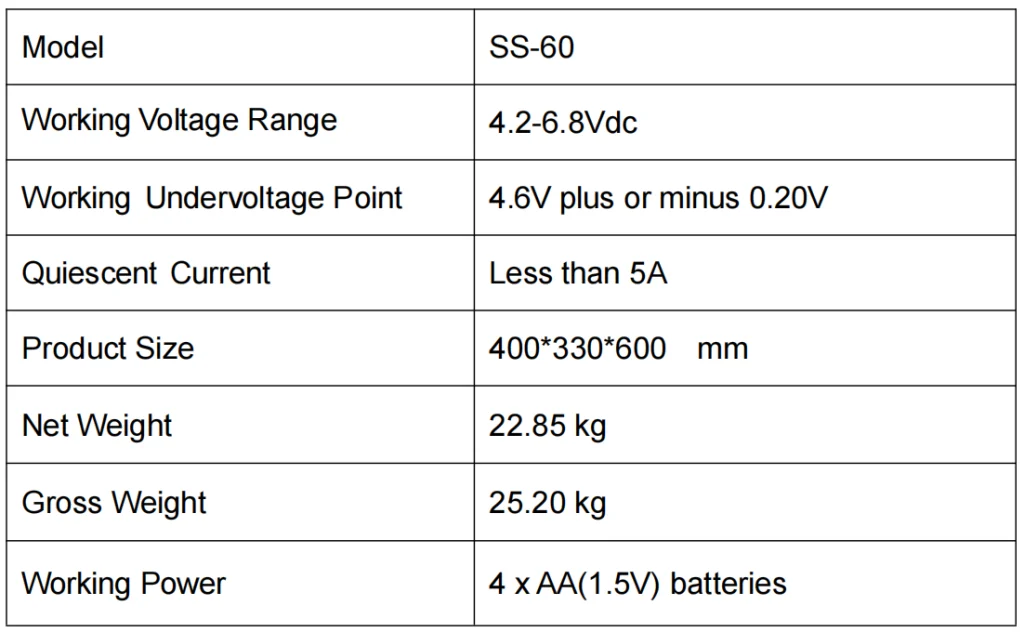
Model: SS-60
Thank you very much for choosing this safe box. Please read all of the instructions before using it. The information will help you achieve the best possible results.
Technical Parameters
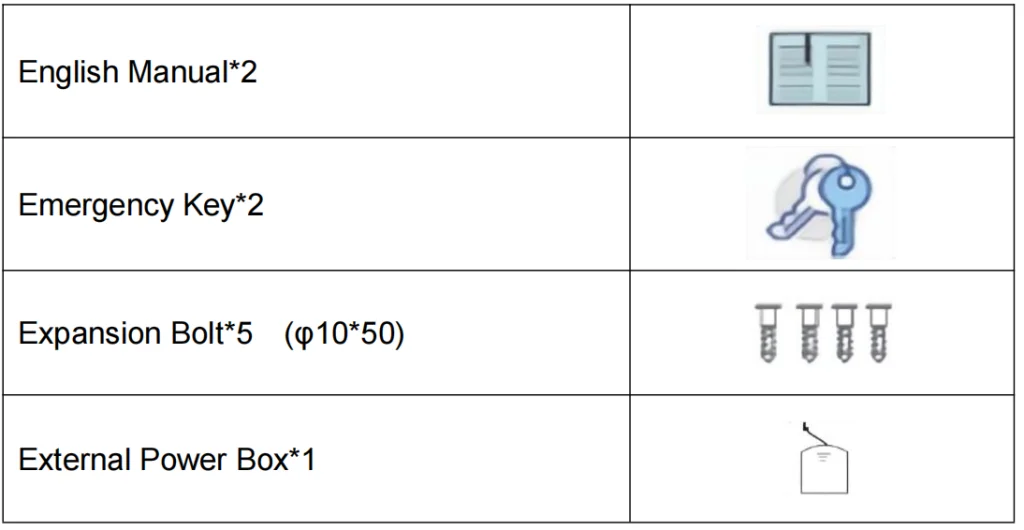
Parts List
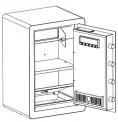
Opening Your Safe for the First Time
Open the door for the first time, use the configured emergency key to open the door. The operation steps are as follows:
- Slide down to open the emergency lock cover.
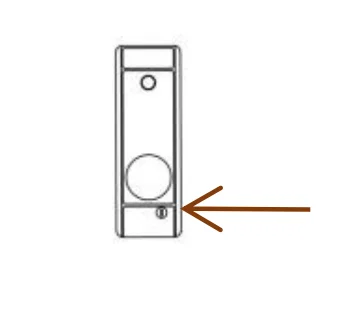
- Insert the emergency key into the keyhole and push it to rotate 65° counterclockwise.
- Turn the handle clockwise to open the door.
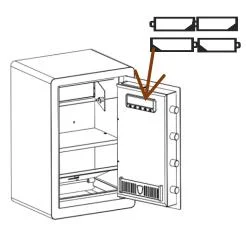
- Open the battery box and install batteries.
- Make sure the battery matches ‘+’ and ‘-’ in the box. (not including 4 alkaline 1.5V batteries)
- Weak power, emergency method start: Emergency key
DESCRIPTION:
- This product has 2 sets of passwords. Factory original password: “123456”, factory management you need to set it up yourself.
- None of the fingerprints can unlock the safe in factory settings.
Personal Password Setting
- After opening the safe, touch the screen to wake it up.
- Press ‘00’, then press the setting button inside the box, enter a new password and press # to confirm.(The password has 3–12 digits)
Tip: If the operation is wrong, the buzzer will sound “beep” three times. Please reset it. Note that the battery is weak and cannot be operated.
Manage Password Settings
- After opening the safe, press the setting button inside the box. When you hear two short sounds of “beep”, the lock light blinks. At this time, collect fingerprints on the scanner for four times.
- One more “beep”, followed by a long “beep” sound, indicating successful fingerprint registration
- Other fingerprints can be registered in this way. Up to 30 pieces can be registered.
Tip: If the operation is wrong, the buzzer will sound “beep” three times. Please reset it. Note that the battery is weak and cannot be operated.
Open the Safe
- Using fingerprint: Verify with a registered fingerprint, and put your finger on the scanner. If the recognition is successful, a long “beep” will be heard. If the identification fails, mismatched rings are heard and the panel displays that the lock is not enabled.
- Using digital: Touch the screen and enter a 3-12-digit password. If the recognition is successful, a long “beep” will be heard. If the identification fails, mismatched rings are heard and the panel displays that the lock is not enabled.
How to Remove the Shelf
Gently push 4 bendable small iron strips under the shelf, when strips are showing a vertically, you can easily take them out.
Low Battery Alert
- If the battery voltage is below 4.8V, the red light will flash.
- If the battery voltage is below 3.8V, user operation is prohibited. 6 beeps will indicate that the battery is low and needs to be replaced.
Alarm Function
- In the sleep state, touch the screen to wake it up. Press * and hear a sound of “beep”. The light of the digital touchpad turns off, indicating that the touchscreen has entered an alert state. At this time, the safe will alarm if it vibrates.
- If the wrong fingerprint and password are input more than 3 (5) times, the alarm system will sound for 30 seconds.
Tip: Enter the correct fingerprint or password. The alert status is lifted automatically. If the correct fingerprint is not entered, the alarm will automatically stop after 30 seconds, but the alarm will not be lifted.
System Initialization
Long press the green button on the mechanism for 5 seconds. The system will restore the initial settings and clear all fingerprints and passwords.
Noise Elimination Function
- Enter “11#” is the mute switch button.
- Enter “11#” turn on the sound.
How to Wall or Floor Mounting
- Drill the appropriate size holes for the anchors you are using
- Mount the safe by running screws from inside of the safe and securing to anchors
- Use proper drill tools depending on the type of floor you are mounting the safe (wood, tile, or concrete)
Safety and Compliance
- Reduce the risk of theft, the safe must be posted on the wall or floor to ensure safety.
- Please take good care of the emergency key and store it in a secret place away from the safe. Do not put the emergency key into the safe, or the emergency key will not be used to open the safe when the battery runs out.
- Do not place the product on an unsafe overhead to avoid falling, damaging the product, or injuring people.
- Do not spill liquid on the control panel, or it may cause electric shock to the internal electronic components and prevent them from working properly.
Warmly Reminder
- Because it is purely handmade, inside solder joints or rust stains are a normal phenomenon.
- Please keep emergency keys, secret cabinet keys, and external power supply box safe.
- The emergency key cannot open the safe of other brands or the same brand, which is unique. (Please do not try, to avoid damage to the safe and the unmatched key cannot be taken out)
- The protective film on the knob cover can be torn off.
- Before closing the door, do not remove the emergency key or adjust its direction, which can avoid the lock bolt from jamming, and knob operation will be more smooth.
- The door won’t shut: Make sure there are no obstructions. If the door bolts are extended, re-enter the user code and turn the knob clockwise to retract them.
After-sales Service
- If the product you received has other problems such as usage problems, please feel free to contact us, and reply to online customer service within 24 hours to serve you.
- Our products support 90 days for no reason to return or exchange.
- We wish you a happy online shopping.
FAQs about the VEVOR Safe Box
Q1: How do I set up my VEVOR Safe Box for the first time?
A1: Setting up your VEVOR Safe Box involves choosing a secure location, installing batteries, and setting a personal code. Follow the step-by-step instructions in the manual for a hassle-free setup.
Q2: What maintenance routines should I follow for my safe box?
A2: Regularly check battery levels, ensure the locking mechanism is clean, and avoid exposing the safe to extreme temperatures or moisture for optimal performance.
Q3: How can I troubleshoot common issues with my VEVOR Safe Box?
A3: Common issues like a non-responsive keypad or locking difficulties can often be resolved by resetting your code, replacing batteries, or ensuring the door is properly aligned.
Q4: Can I change my safe box’s code, and how often should I do it?
A4: Yes, you can change your safe’s code for enhanced security. It’s advisable to change it every 6 months or after sharing it with others.
Q5: What should I do if I forget my safe box’s code?
A5: If you forget your code, refer to the emergency access procedures in the manual. Keep your emergency key in a secure, accessible location.
Summing Up
In conclusion, the VEVOR Safe Box stands as a testament to security and reliability, offering peace of mind in safeguarding your valuables. This user manual serves as your comprehensive guide to maximizing the potential of your digital safe. We encourage you to adhere to the instructions and maintenance tips provided for optimal performance. Should you have any further queries or need additional support, our team at VEVOR is always ready to assist. Don’t miss out on the ultimate security solution for your valuables.
Visit the VEVOR website now to purchase your own VEVOR Safe Box and experience unparalleled security today!


Hi there, I enjoy reading all of your article post.
I wanted to write a little comment to support you.