When it comes to working on the CJ2 or any other vehicle, one crucial aspect that often requires attention is bleeding the brakes. Properly bleeding the brakes is of utmost importance as it ensures optimal braking performance and safety on the road. To facilitate this essential task, the VEVOR Hydraulic Flaring Tool Kit emerges as a valuable tool for automotive enthusiasts and professionals alike.
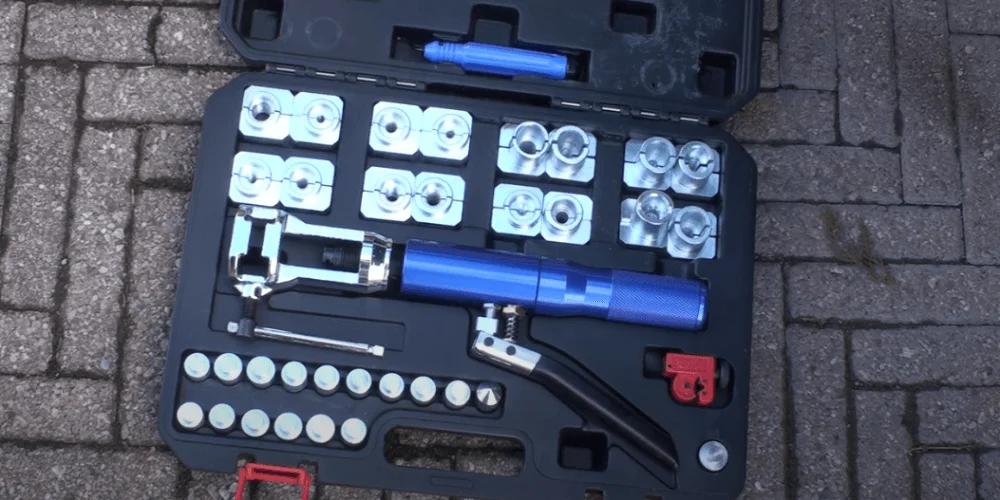
The VEVOR Hydraulic Flaring Tool Kit offers a comprehensive solution for brake bleeding and more. This kit not only allows for the precise and efficient bleeding of brakes but also provides a range of capabilities for various flaring requirements. With its versatile functionality, the VEVOR kit supports flaring options from 3/16″ to 1/2″ sizes, including double flares, bubble flares, and push connect fittings.
By incorporating the VEVOR Hydraulic Flaring Tool Kit into your automotive toolkit, you gain the necessary tools and equipment to perform brake bleeding effectively and tackle various flaring tasks with ease. Discover the compatibility and versatility this kit offers and elevate your brake maintenance and repair endeavors to a whole new level.
Bleeding the Brakes: DIY Approach
When it comes to working on automotive brake systems, bleeding the brakes is an essential task to ensure proper functionality and safety. If you have a dual master cylinder, which is a common upgrade in many vehicles, you might consider bleeding the brakes yourself. This DIY approach allows you to take control of the process and ensure a thorough and effective bleed.
While you can purchase pre-made bleeding kits for master cylinders, creating your own kit offers several advantages. It gives you the flexibility to customize the kit according to your specific needs and preferences. Additionally, assembling your own kit can often be more cost-effective than buying a ready-made one. It also allows you to familiarize yourself with the components and gain a better understanding of the brake system.
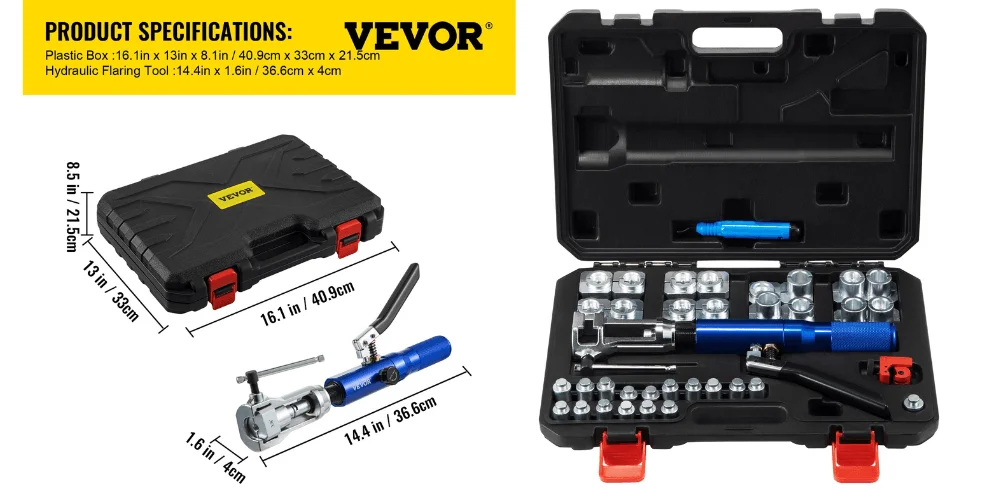
A hydraulic flaring tool is a valuable tool for working on brake lines and other hydraulic systems. It offers precise and consistent flaring capabilities, making it a preferred choice for many automotive enthusiasts and professionals. One such tool is the VEVOR Hydraulic Flaring Tool Kit, which offers a range of features to simplify your flaring tasks. The kit includes expanding dies and adapters for various flare types, including double flares, ISO bubble flares, and push connect fittings. This versatility allows you to work on different types of brake lines, fuel lines, and transmission cooling lines.
Introducing the VEVOR Hydraulic Flaring Tool Kit
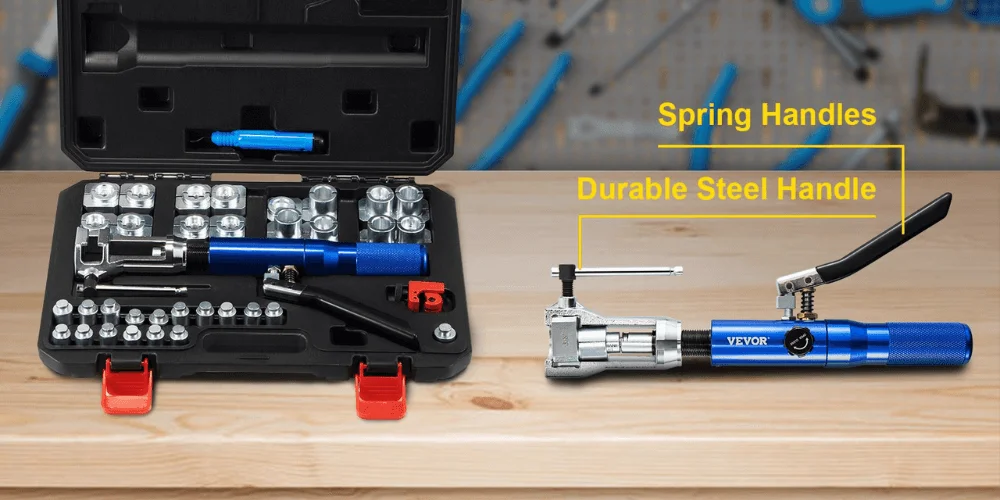
The VEVOR Hydraulic Flaring Tool Kit is a comprehensive and versatile solution for all your flaring needs. With its exceptional capabilities and user-friendly design, this kit is a valuable addition to any professional workshop or DIY enthusiast’s toolbox. Let’s explore the features that make the VEVOR kit stand out.
Features
● Equipped with 45° flaring cone and expanding dies (φ 3/16″ to 1/2″) for various flares.
● Effortless pipe expanding with hydraulic mechanism, pressure relief valve, and no-leakage oil cylinder.
● Includes mini pipe cutter (1/8″ to 5/8″) and deburrer for clean cuts and smooth tubing.
● Made of durable 40 CR steel, stored in compact plastic toolbox.
● Wide Application: Suitable for expanding copper piping, ideal for automotive and refrigeration industries.
The VEVOR hydraulic flaring tool is equipped with a 45° flaring cone and φ 3/16 – 1/2 inch expanding dies and adapters, allowing you to work with various tube sizes. Whether you’re dealing with push connects, GM fuel lines, GM transmission cooling lines, 45° and double flares, or ISO bubble flares, this kit has you covered. The expansive range of capabilities ensures compatibility with a wide array of applications.
Step-by-Step Guide: Making 3/16″ Double Flares
Creating 3/16″ double flares is a crucial process in automotive applications, ensuring secure connections and leak-free performance. In this step-by-step guide, we will walk you through the process of making 3/16″ double flares using the VEVOR hydraulic flaring tool kit.
Step 01. Introduction to the 3/16″ double flare process
The VEVOR hydraulic flaring tool kit is designed to make flaring tasks easier and more efficient. One of its capabilities is creating 3/16″ double flares, which are commonly used in automotive applications. The double flare provides a secure connection between the brake or fuel line and the fittings, ensuring a reliable and leak-free connection.
Step 02. Assembling the VEVOR hydraulic flaring tool
Start by assembling the VEVOR hydraulic flaring tool according to the instructions provided. Make sure all the components are properly connected and secured. The tool’s manual hydraulic mechanism allows for precise control and ease of operation.
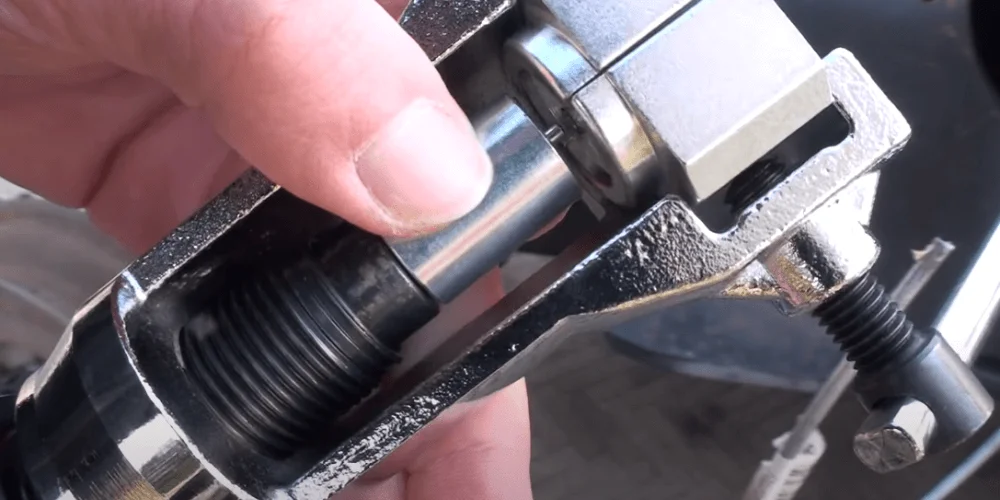
Step 03. Preparing the line nut and selecting the appropriate dies
Take the line nut that fits the 3/16″ line and place it on the hydraulic flaring tool. The VEVOR kit provides a selection of expanding dies and adapters. Choose the appropriate dies for creating the double flare on the 3/16″ line. The dies are marked for easy identification.
Step 04. Inserting the die into the hydraulic tool
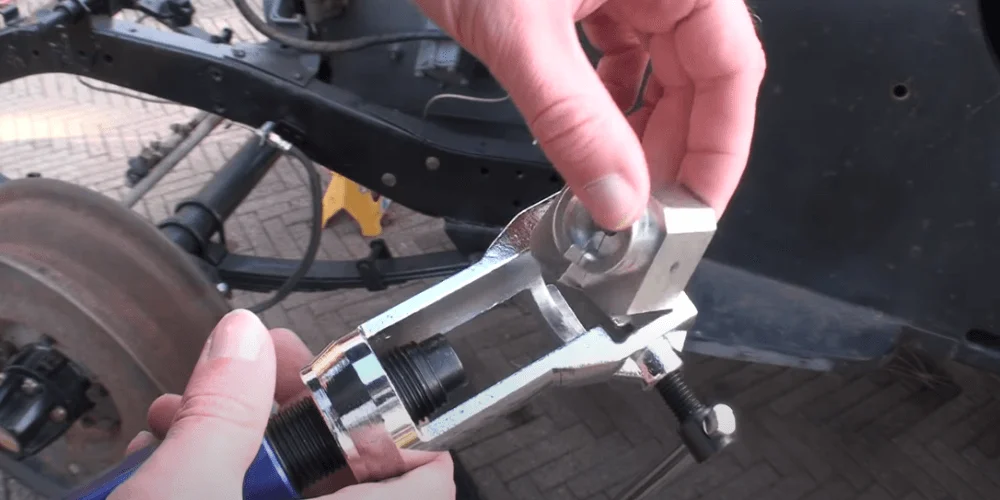
Drop the selected die into the hydraulic flaring tool, ensuring that the longer portion of the die faces down. This ensures proper alignment and optimal results.
Step 05. Positioning the line and tightening the handle
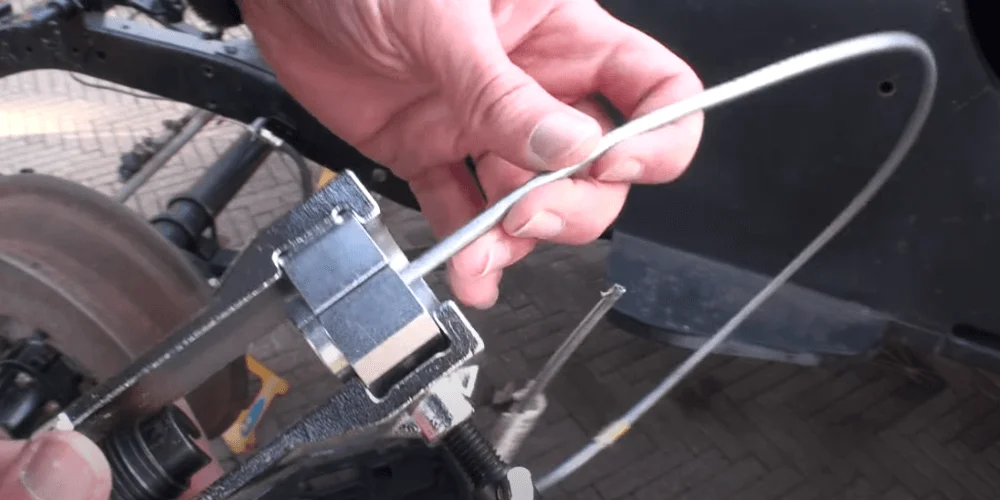
Feed the 3/16″ line through the back of the hydraulic flaring tool until it is flush with the die face. Adjust the line position slightly, if needed, to suit your requirements. Once positioned, tighten the handle on the side of the tool to hold the line securely in place.
Step 06. Executing the first step of the double flare
Identify the tool marked for the first step of the double flare. Drop this tool into the hydraulic flaring tool, aligning it with the line and die. Rotate the entire body of the flaring tool to bring it closer to the line. Once in position, close the valve on the tool.
Step 07. Performing the last step of the double flare

Now, get the cone for the last step of the double flare and drop it into the hydraulic flaring tool. Rotate the body of the tool to bring it closer to the line. Ensure the valve is closed. Begin pumping the hydraulic handle slowly, allowing the die to press into the pipe. Continue pumping until you feel the die bottom out against the line. At this point, you don’t need to pump anymore.
Step 08. Checking and verifying the quality of the flare
Open the valve to release the hydraulic pressure. The die will retract automatically. Remove the die from the tool, and you will see that the first step of the double flare is complete. Repeat the process with the second tool for the last step of the double flare. Pump the handle while aligning the tool with the line, creating the final flare shape. Once done, release the valve and inspect the quality of the flare. It should be smooth, even, and free from any imperfections.
By following these step-by-step instructions using the VEVOR hydraulic flaring tool kit, you can achieve precise and professional-quality 3/16″ double flares. The kit’s durable construction, ease of use, and wide range of flaring options make it a versatile and reliable tool for various applications, including automotive repairs and the refrigeration and air conditioning industry.
Customizing Brake Lines for the Master Cylinder
When customizing brake lines for the master cylinder, there are several steps involved to ensure proper fitment and functionality. Let’s go through each step in detail:
Step 01. Releasing the cap from the master cylinder
To begin customizing the brake lines, you need to remove the cap from the master cylinder. This will allow you to access the fittings and determine the number of lines needed.
Step 02. Determining the number of lines needed for the fittings
Inspect the fittings on the master cylinder and identify how many lines you will need to connect. Depending on the setup, you may require multiple lines to connect to different ports on the master cylinder.
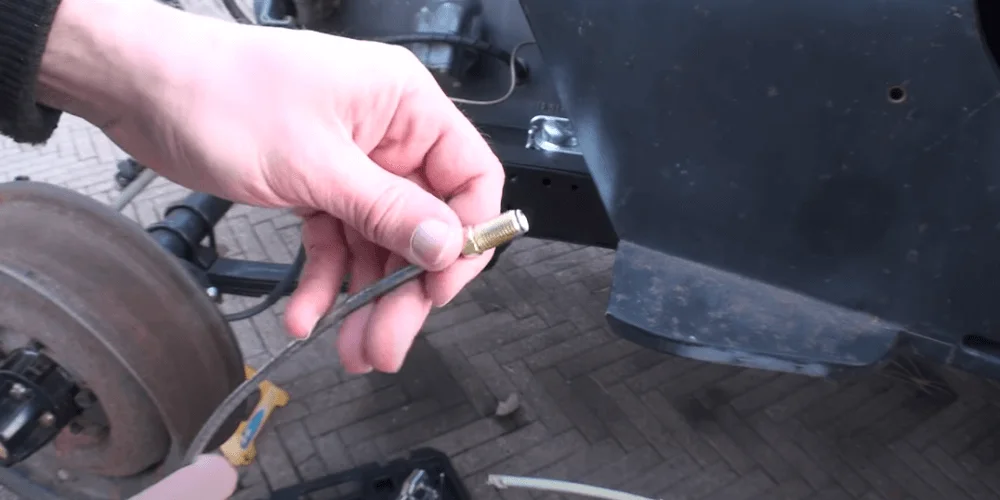
Step 03. Measuring, cutting, and bending the brake lines
Measure the required length of the brake lines based on the distance between the fittings and the master cylinder. Use a tube cutter, which often comes included in the VEVOR Hydraulic Flaring Tool Kit, to cut the brake lines to the appropriate length. Ensure a clean, square cut for optimal results.
After cutting the lines, bend them using a tubing bender or by carefully manipulating the lines to fit the desired shape. Take into consideration the routing and clearance requirements, ensuring the lines do not interfere with other components.
Step 04. Fitting the brake lines into the master cylinder
Once you have measured, cut, and bent the brake lines, it’s time to fit them into the master cylinder. Start by inserting one end of the brake line into the appropriate fitting on the master cylinder. Ensure a snug fit, but avoid overtightening.
Continue this process for each line, connecting them to their respective fittings on the master cylinder. Double-check the fittings to ensure they are securely fastened and leak-free.
Practical Considerations for Brake Line Bleeding
When it comes to bleeding brake lines, there are a few practical considerations that can help ensure a successful and effective process. Let’s address some important points to keep in mind:
Debunking the misconception of needing clear lines
Contrary to a common misconception, you don’t necessarily need clear lines to effectively bleed brake lines. While clear lines can provide a visual aid in spotting air bubbles, it’s not a requirement for the process. Pumping the brake fluid is the key factor in identifying air bubbles and removing them from the system.
Importance of fluid pumping to identify air bubbles
To effectively bleed brake lines, you need to pump the brake fluid through the system. As the fluid flows, any air bubbles present in the lines will be dislodged and forced towards the brake calipers or wheel cylinders. This pumping action helps to purge the air from the lines and replace it with brake fluid.
Understanding the significance of bubbles at the bottom of the line
During the bleeding process, it’s crucial to observe the presence of air bubbles at the bottom of the brake line. As you continue to pump the brake fluid, any air bubbles trapped in the system will rise to the highest point, which is typically the brake calipers or wheel cylinders. By monitoring the bottom of the brake line, you can easily identify if any air bubbles are being expelled from the system.
By understanding these practical considerations and utilizing the right tools, such as the VEVOR Hydraulic Flaring Tool Kit, you can ensure a smooth and effective brake line bleeding process. Remember to pump the brake fluid to dislodge air bubbles and observe the bottom of the line for any signs of bubbles being expelled from the system.
Conclusion
The VEVOR Hydraulic Flaring Tool Kit is a reliable and practical solution for a wide range of applications in the automotive and refrigeration industries. The manual hydraulic mechanism ensures effortless operation, allowing users to achieve precise and accurate tube expanding with ease. The inclusion of a pipe cutter and deburrer further enhances convenience and efficiency in the flaring process.
Moreover, the compact and portable design, along with the plastic toolbox for storage, adds to the overall user-friendliness of the kit. Whether you’re a professional or a DIY enthusiast, the VEVOR Hydraulic Flaring Tool Kit provides the versatility, durability, and performance required for successful flaring tasks.


