
If you are looking for a comprehensive guide on operating the VEVOR hat heat press machine, you have come to the right place. With its user manual and PDF guides, you’ll have all the information you need to get started with your hat printing needs. In this article, we’ll take a closer look at the VEVOR hat heat press instructions and how you can use them to produce high-quality prints on your hats. So, let’s dive in!
| Have product questions? Need technical support? Please feel free to contact us: CustomerService@vevor.com |
| This is the original instruction, please read all manual instructions carefully before operating.VEVOR reserves a clear interpretation of our user manual. The appearance of the product shall be subject to the product you received. Please forgive us that we won’t inform you again if there are any technology or software updates on our product |
When using electrical appliances, basic safety precautions should always be followed including the following:
WARNING – To reduce the risk of injury, the user must read the instructions manual carefully and save these instructions.
Table of contents
Description of the symbols
| This device complies with Part 15 of the FCC Rules. Operation is subject to the following two conditions: (1) This device may not cause harmful interference,and (2)this device must accept any interference received, including interference that may cause undesired operation. | |
| This device complies with Part 15 of the FCC Rules. Operation is subject to the following two conditions: (1) This device may not cause harmful interference, and (2)this device must accept any interference received, including interference that may cause undesired operation. | |
| FC | This device complies with Part 15 of the FCC Rules. Operation is subject to the following two conditions: (1) This device may not cause harmful interference, and (2)this device must accept any interference received, including interference that may cause undesired operation. |
Warning
- Warnings must be followed carefully to avoid body injury, Improper use may result in electric shock, fire, personal injury, and other damage:
- Keep unplugged when moving the machine.
- Place on a flat and stable platform and operate under ventilated conditions.
- Wear special protective equipment when operating the machine
- Do not use this machine in a hazardous location.
- Do not use when the machine is not working properly.
- Do not disassemble and repair this machine.
- Do not use an unsuitable AC outlet.
- Do not touch the heating plate when the machine heating
- Do not use in humid environments or in contact with water. Do not infiltrate liquid in the machine to prevent fire or electric shock caused by short circuit.
- Do not use the power supply that does not meet the rated voltage, The power supply that does not meet the specified voltage may cause fire or electric shock.
- Ensure that the machine is grounded so as not to cause harm to the body.
- Do not touch the rotating rod or bearing part with your fingers during use in case of injuries.
- If the machine is not in use for a long time, please unplug the power cord from the socket.
- Do not use the machine during thunderstorms or lighting to avoid damage to the machine.
- Place the machine smoothly on the flame-retardant table and keep away from inflammable and explosive items.
- If the machine smokes, emits a peculiar smell, becomes noisy, and other abnormal conditions, please stop using it.
- This appliance can be used by children aged 8 years and above and persons with reduced physical, sensory, or mental capabilities or lack of experience and knowledge if they have been given supervision or instruction concerning the use of the appliance in a safe way and understand the hazards involved. Children shall not play with the appliance.
- Cleaning and user maintenance shall not be made by children without supervision
- Type X attachment: If the supply cord is damaged, it must be replaced by a special cord or assembly available from the manufacturer or its service agent.
- To avoid a hazard due to inadvertent resetting of the thermal cutout,this appliance must not be supplied through an external switching device, such as a timer, or connected to a circuit that is regularly switched on and off by the utility.
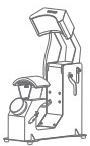
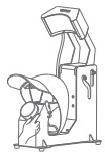
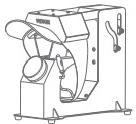
Introduction
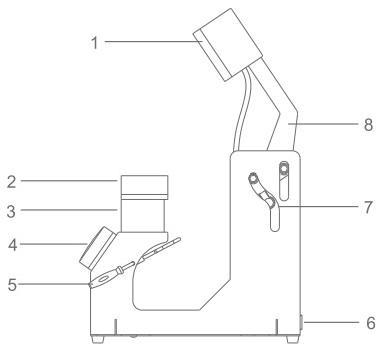
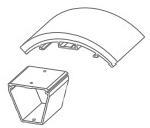
1. Heating plate 2. Cap support 3. Cap support seat 4. LED switch 5. Cap holder 6. Power socket 7. Guide wheel 8. Bracket
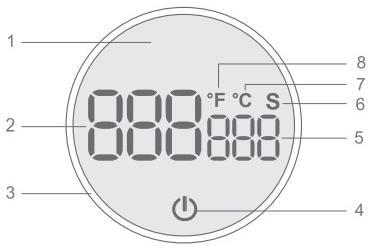
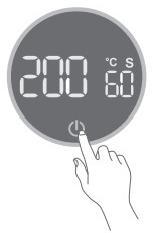
1. LOGO 2. Temperature display 3. Knob switch 4. Start button 5. Time display 6. Time unit 7. Centigrade 8. Fahrenheit
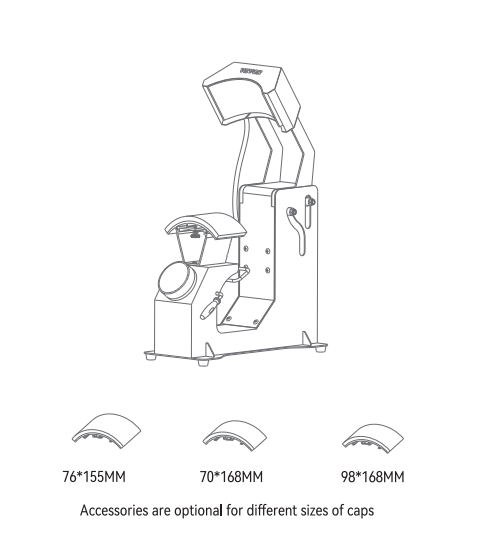
Accessories list
Main Machine

76*155MM
70*168MM

User Manual
Power Cord

98*168MM
Getting Started
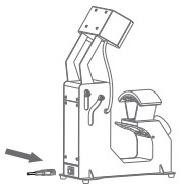
Connect the power cord the power cord to the power port on the side of the machine and insert the other end into the AC socket.
Startup
After powering on, short press the power button to start the machine.
After startup, the machine will automatically heat up.
Shutdown
Press and hold the power button for 3s to shut down.
Auto shutdown
The machine will automatically shut down if there is no operation within 30 minutes.
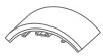
Replacement of cap support
1. Select the cap support to be replaced
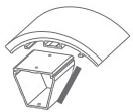
2. Insert into the seat slot
3. Fix with screws
170 °C 20S
- Transfer material: PET film
- Turn the switch to the right to set the temperature to 170℃.
- Turn the switch to the left to set the time to 20s.
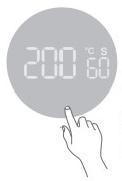
200°C 60 S
- Transfer material: Heat transfer paper
- Turn the switch to the right to set the temperature to 200℃.
- Turn the switch to the left to set the time to 60s.
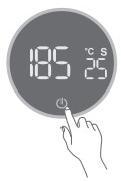
Temperature unit conversion
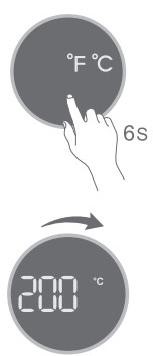
°F →°C
In a shutdown state;
- Press and hold the start button for 6s.
- Turn the switch to select the required temperature unit.
- Short press the start button to start the machine.
Temperature setting
- Turn the display half a turn to the right.
- Enter the temperature setting mode after a beep sound.
- Turn the switch to the right to increase the temperature (+)
- Turn the switch to the left to reduce the temperature (-)
Normally, the temperature will be slightly higher when the machine works for the first time.
Time setting
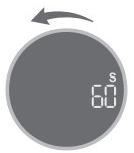
- Turn the display half a turn to the left
- Enter the countdown setting mode after the beep sound
- Turn the switch to the right to increase the time(+)
- Turn the switch to the left to reduce the time(-)
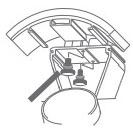
1. Cap to be printed
2. Turn on the heating plate to increase the temperature
3. The heating plate automatically presses
4. The machine automatically opens after the countdown
Electrical diagram
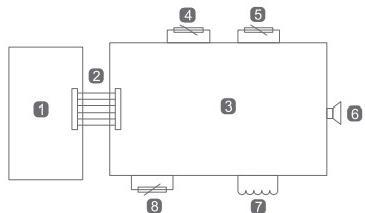
1. Main control circuit board
2. Connecting flat cable
3. Power board
4. NTC temperature
5. Magnetic switch
6. Buzzer
7. Heating coil
8 Thermal Fuse
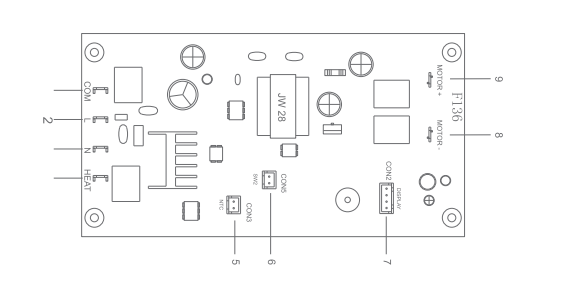
- Output zero line
- Input zero line
- Input live line
- Outputlive line
- Temperature probe
- Sensor switch
- Display
- Motor-
- Motor+
| Name: | Cap heat press machine |
| Heating method: | Mica |
| Rated voltage/frequency: | 220-240V~50Hz 310W For European users |
| Rated voltage/frequency: | 120V~60Hz 350W For US users |
| Temperature range: | 40°C-210°C(104°F-410°F) |
| Time range: | 1-999s |
| Model: | F13G |
| Net weight: | 7.2kg |
| Gross weight: | 8.1kg |
| Outer box size: | 420*200*395MM |
| Press pad size: | MAX: 98*168MM |
Warranty
| Type | Items | Period |
| Whole machine | Parts of machine (excl.accessories | 1 year |
| Fault phenomenon | Reason1: The aviation connector wire is not properly inserted.Reason2:The electic power of the mug pad is broken. Replacing the mug The main board has no current output (the main board does not supply power to the toast coaster). Replace the motherboard. |
| Machine temperature does not rise | Reason1: The aviation connector wire is not properly inserted.Reason2:The electic power of the mug pad is broken. Replacing the mug The main board has no current output (the main board does not supply power to the toast coaster).Replace the motherboard. |
Display error | Reason1:Is that the aviation connector is not inserted properly.Reason2:Is the aviation joint temperature probe wire broken |
Conclusion
In conclusion, having access to user manuals and guides for complex equipment and machinery is crucial to ensure proper and safe usage. The VEVOR Hat Heat Press Instructions are essential resources for anyone operating this equipment.
By following the instructions provided in these resources, users can use the VEVOR Hat Heat Press safely and effectively, minimizing the risk of accidents, and ensuring the longevity of the equipment.


