
| Difficulty | Cost | Time Taken |
| Intermediate | $200 | 5 hrs |
Building your polytunnel door frame can save you hundreds of bucks in construction costs. But how to make a polytunnel door? All you need is basic DIY skills and helpers, which are ideal for this project. With a durable polytunnel frame, add the best access point to your polytunnel. Building a sturdy polytunnel door can protect your vegetables and fruits throughout the year. Furthermore, you don’t need to leave the open area every time, and it can keep predators from invading your plants and vegetables at night. But for all of this, you need to build a door frame for polytunnel to fit the door to the frame.
Learn how to make a door frame for a polytunnel and add a luxurious feel to your property without costing a fortune.
Table of contents
Why is the Door Frame Crucial for a Polytunnel
The polytunnel doors are vital in ventilation and keep the inner area well-balanced. This, however, requires building a door frame that assists in constructing a polytunnel. It is used to hold the plastic in one place. The door and door frames of polytunnel don’t come pre-built. However, it needs to be constructed according to the fittings.
After constructing polytunnel door frames on scorching days, you can open the door left day and night, but in spring, it’s better to close the door in the evenings when the temperature drops. If you don’t have a door, polytunnels can heat up fast and cause problems for your plants in a couple of minutes. But depending on weather conditions, you can slightly open a door instead of opening it fully.
Tools and Materials You’ll Need
Tools
- Drill Machine
- Screw gun
- Hammer
- Shovel
Materials
- Wooden Blocks
- Polytunnel Kit
How to Make a Door Frame for a Polytunnel: A Step-by-Step Process
A warm day is perfect for installing the polytunnel cover, as plastic becomes more pliable and easily stretches over the frame. Before starting out:
- Ensure your site is level. If your site is exposed, you can put fences, screens, and hedging.
- Read the instructions carefully on your polytunnel kit before starting.
- Look at the step-by-step process to know how to make a polytunnel door.
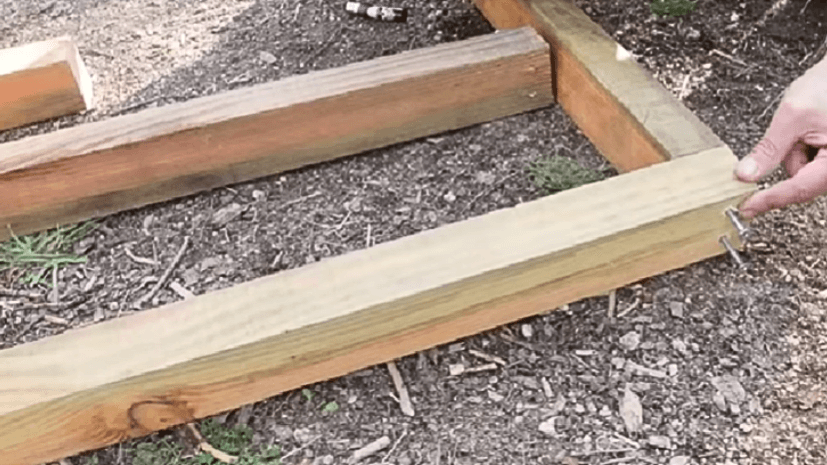
Step 1-Draw holes and screw up the frame to tighten them together; you need two screws on the edges and bottom.
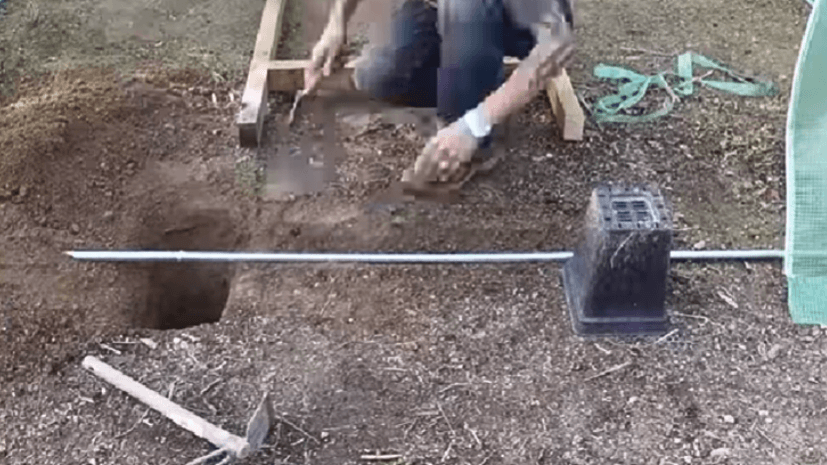
Step 2- Mark the position and make all spaces even. Furthermore, check all the angles of square holes. With the help of a shovel, straight down on it, step firmly, side to side rock, wiggle the shovel, and loosen the dirt forward to back with the help of shovel go in it. When it comes to hole width, it’s best to err on the side of the hole to make it manageable.

Now insert the frame in the holes and cover the digging holes with the soil gently.
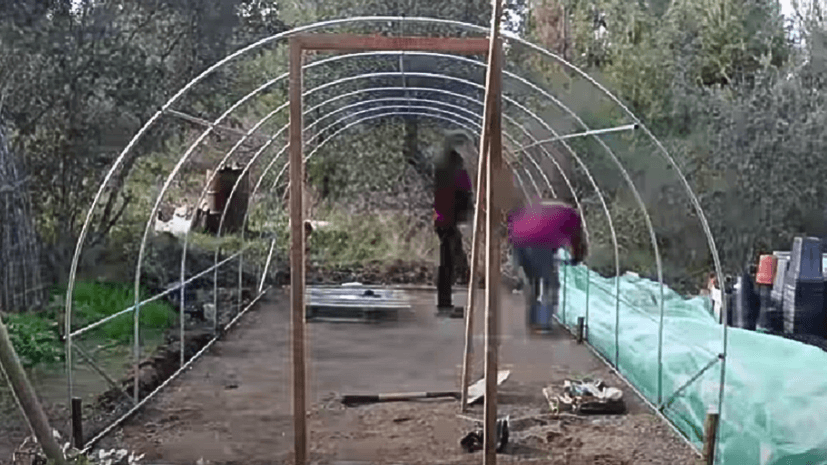
Step 3- Again, dig the holes to fix the polytunnel. First, connect the hope section separately, then slide them over the foundation tubes. You can also use the cement. To fix the polytunnel tube correctly, place the wooden sticks to ensure the stability of your polytunnel. Before attaching the polytunnel, check the bolt positioning and fittings so they don’t rub together and cause a tear. After that, carefully check that the hoops are straight and inline, and tighten the joints.
Step 4- Before placing the cover, you can use anti-hot spot tapes to add a layer of protection between metal hoops and the polythene covers. It can become hot in summer, protecting the cover from heat degradation and increasing its life span. Slide the cover over the hoops to place it evenly over the frame after unrolling it. You can put it in a trench or fix it to the base rail. While fitting keeps the plastic taut.

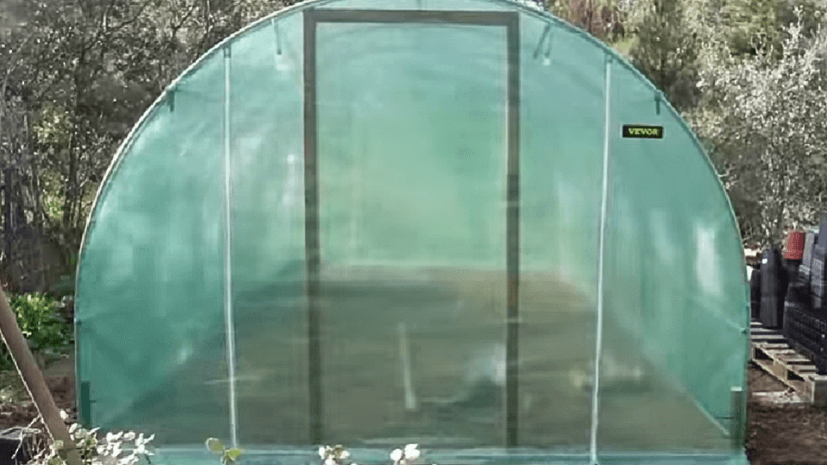
Step 5- Attach the other side of the frame with the previous frame and turn it into a door. Screw them again tightly to the door frame of the polytunnel to enhance stability. Of course, you need to go out the door. For this, add the door spring closer to the door frame of your polytunnel and get easy access. Lastly, add the handle for opening and closing the doors.
Common Mistakes and How to Avoid Them While Installing Polytunnel Frame Door
To avoid common mistakes while installing a polytunne doorl frame, you should consider many things like:
Tunnel Size
Firstly, think about the walk-in tunnel size you need. The ideal size is between 14 and 18 feet in many situations. The length is usually 6ft multiples due to the construction method. The short feet are ideal for growing vegetables like lettuce, aubergine, celery, and peppers.
Polytunnel Doors and Access
Usually, access doors are at the ends, but commercial tunnels can have side access doors. Measure the size and build according to your needs. You don’t need to build them too-small and full-width doorways. Use hooks and pins to remove them easily when you need a foot access or tractor.
Consider Polytunnel-type Choices
According to the weather conditions and uses, choose your polytunnel type. If you’re living in a colder region, snow can be a problem, as many polytunnels collapse under thunderstorms and snow. It’s good for crops and vegetables in small quantities, but in large amounts and weeks without sunlight, it can harm them. But the question is, why can’t the crops survive if the grass in your lawn can survive?
Before the snow freezes and slides off the plastic, affecting its quality, make sure to remove it with the help of a broom.
FAQs About Making a Polytunnel Door
1- In how much time you can build a polytunnel?
It all depends on your skills and experience. However, the average size of the polytunnel may take around 10 to 18 hours.
2- What’s the lifespan of the polytunnel covers?
A polytunnel cover can go for a long years. But you can consider to use them for 4-5 years. But it depends on how you maintain it, as many of them can go longer than ten years.
3- What is the height of a door frame?
To get the exact measurements of the polytunnel, you can multiply doors with the two and then count 2. For height, you count two and a half. The rough opening will be 62 inches if you want a 30-inch wide and 80-inch tall door.
4- Can you build your polytunnel and its door?
Yes, you can construct your polytunnel, including its frame door. Building a polytunnel is a two-person job. So whenever you want to build a polytunnel and its door, invite your friend over to your property and get stuck.
Summing Up
Working on a budget is good advice for building your polytunnel door. Polytunnel doors provide easy access to your plants and better crop ventilation. It only takes basic skills and a few hours to build in. So, why spend hefty when you can do this work efficiently and efficiently? Make sure the polytunnel you will buy is weather-stiffy and made up of heavy-duty materials. With VEVOR, you can get your polytunnel at a discounted rate if you shop it now. So, don’t wait before it gets out of stock.


