
Did you ever manage to hatch eggs and everything went great? But then suddenly you found out that there was a humidity problem that became a hindrance? Don’t stress, you’re not the only one. The spotless process of egg incubation relies also on humidity control which is an important factor. Thus, it is imperative that you know how to decrease humidity in an incubator.
That’s where the VEVOR egg incubator is coming to the rescue. It has features that make it easier than ever to handle humidity accurately. Through this guide, we will be taking you through the essentials of how to lower humidity in the incubator for optimal hatching.
Table of contents
Understanding Humidity in Incubation

Let’s dive right into the technicalities of humidity control in egg incubation, shall we? Humidity is like the favorite comfort blanket, which the eggs wrap up in during the incubation. It has a very important job of providing an ideal developing place for the embryos. Therefore, you need to know how to decrease humidity in the incubator.
Then, what happens if the humidity is too high? When it’s too humid, it feels like being in a flooded basement, and that’s not good for the eggs. Interestingly, if it is too dry it will be like drying out in the desert. This condition is also not good either.
Now, let’s talk numbers. Different stages of incubation demand different levels of humidity. During the first 18 days, when embryos are developing, the humidity will be around 40-50%. This does not let the eggs lose too much moisture.
In the last few hours before chickens begin hatching, you can increase humidity levels a little to make it easier for them to break through the eggshells. It should be around 65-75% of the total humidity. Think of it as tuning in the thermostat. In other words, keeping the temperature right is paramount to a successful birth.
Common Humidity Issues and Their Effects
Let us discuss the magnitudes of humidity in egg incubators. In case your hatchery’s humidity is too high in an incubator, you might just notice water drops forming on the walls or even on eggs. The extra moisture results in the growth of bacteria and the embryos located inside the eggs to be suffocated.
But if the humidity levels are low, you can observe the eggs looking shriveled or cracked. Thus, the eggs are dehydrating too fast, and the hatching fails.
If you don’t keep humidity under control then it could be detrimental to your entire hatch. Higher humidity can result in rotten eggs or even mold growth. Whereas, in lower humidity, the embryos may dry out, and hatching them may become impossible.
Therefore, it is essential to keep a close eye on humidity levels and make adjustments when needed.
How to Lower Humidity in Your Incubator
Now we have learnt all about the importance of humidity and how it affects your chicks. It is detrimental to the correct hatching process. So we shall now look at some useful strategies for how to lower humidity in an incubator.
Increasing Ventilation
The first thing on our list is ventilation. It is rarely mentioned but it is still very important. Just as air conditioners circulate the air in buildings, ventilation works as an exhaust system for the eggs. Through better management of the air within the incubator, you can remove the moisture and have an ideal place for the eggs to hatch.
The question now is how can one achieve higher ventilation. It’s easier than you could even imagine. First of all, make sure your incubator vents are properly open. Are they open? Is there any blockage? If so, briefly check and clean them to prevent stuffing from accumulating and obstructing airflow.
In addition, you may also change your incubator’s settings to increase the amount of fresh air if it is possible. Also, do not miss out on the aspect of the placement. The incubator should be located in a place where it gets enough fresh air to avoid stuffiness.
Reducing Water Usage
Moving on, we shall now speak about water management. We all know that water plays a key role in forming humidity inside the incubator. However, an excessive amount of it is the cause of danger. It is, therefore, necessary to find this balance.
Start off by tracking your water usage. Does it always get full when you fill it up? If your answer is yes, that means you are likely exceeding your limitations. On the contrary, the tank could be filled with only a small quantity of water.
The humidity level is monitored to observe how it adjusts. Another thing you can try is to explore different types of water containers. Smaller containers will evaporate less water, meaning that the humidity level decreases.
Using Absorbent Materials
Now, onto absorbent materials. These devices are like sponges for unwanted moisture that soaks it up and dries your eggs. There are different materials you can use like simple paper rolls, all the way to absorbent pads made for that purpose.
Please make sure whatever you select to use is safe for use in an incubator and isn’t going to damage anything by releasing harmful chemicals. Position the absorbent medium locations carefully around the incubator, especially at the places near the moist zone.
Also, remember to check on them from time to time. Replace them at once when they are not working properly.
The VEVOR Advantage: Tackling Humidity with Ease
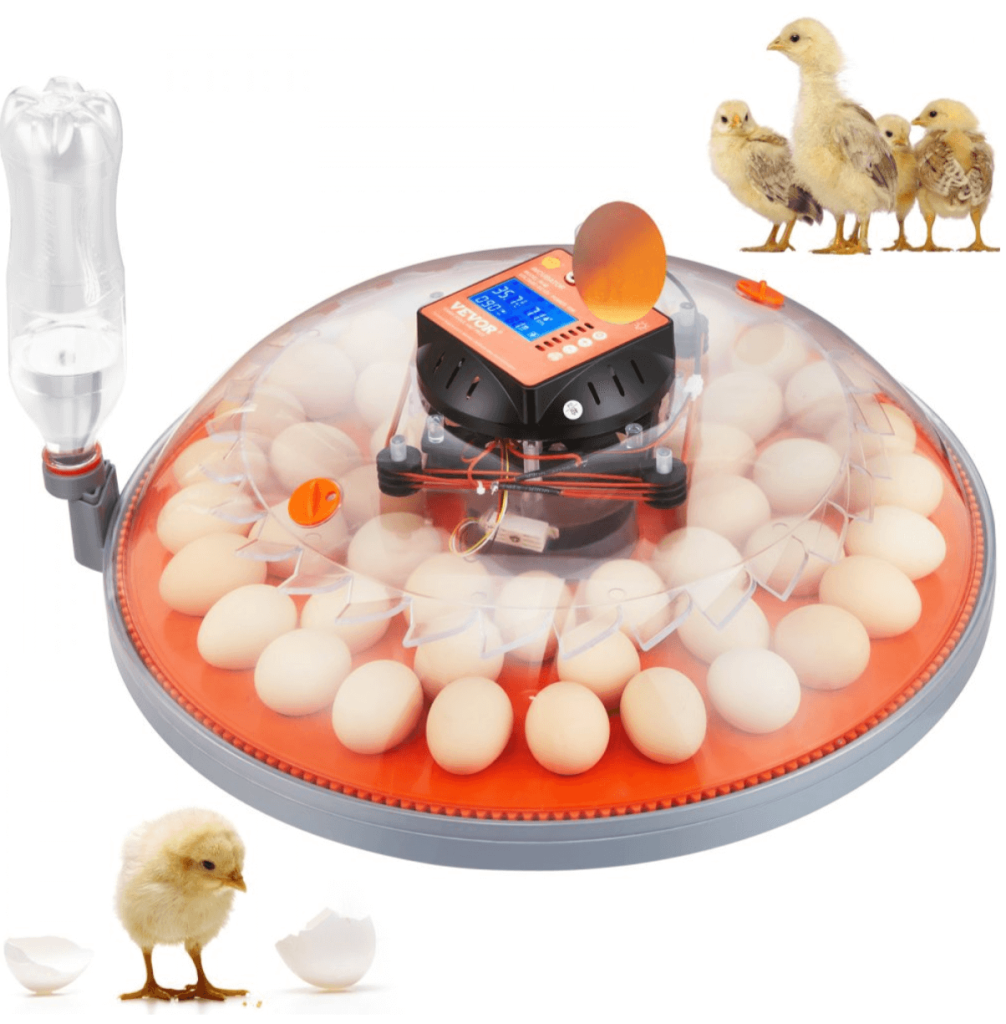
All right, let us dig in and understand why it is that the VEVOR egg incubator is the best in the bunch when it comes to the issue of humidity control.
First and foremost, it is good to know that this clever tool has everything you need to help you accomplish your daily chores effectively.
It has a digital control knob that enables you to set your desired level of humidity. It also watches and adjusts your humidity levels online. With a click or two, these devices automatically change settings to ensure that they will be the most suitable for your eggs.
Now we contrast this with the old ways. Take a moment to reminisce back to the time when humidity control meant adjusting the humidity levels manually. And then you had to hope that there wouldn’t be any swings. Not the best time, is it?
The VEVOR incubator is the tool you need to kiss those times of uncertainty goodbye. It eliminates the guesswork, so you can devote your energy to more significant things such as watching the babies hatch.
However, it is not just our opinion. Customers love the VEVOR egg incubator for its exceptional size and features. User Lov2u2 showed satisfaction with the eggs’ ample capacity storing as many as 24 of them. Which is a very advantageous thing when you want to restock your chickens. They were impressed by the machine. They liked the way it operated, kept the temperature steady, and gave precise humidity control. They discovered that the machine was quite stable and solid, opening the door in the spring to hatching.
Another user, Kenneth Jackson, considered the incubator extremely convenient. He mentioned its automatic temperature regulation, access to the optimum relative humidity level, and having a backup battery for power issues.
Finally, Kyle listed what he likes about incubators. Describing their simplicity to assemble and mentions the automatic egg turner as his #1 feature about the incubators’s effectiveness, especially so for raising quails. All these testimonials highlight the reputation of the VEVOR brand as the most trustworthy and user-friendly device for egg incubation purposes.
Whether you’re a professional breeder or just want to try egg incubation, there is no need to doubt VEVOR’s egg incubator. The tool is perfectly designed with its innovative features, functionality, and long history of successful uses.
Thus, it is the best option for dealing with humidity with ease. So, give the VEVOR a try and you will see that new choice for a much better buying experience.
Additional Tips for Managing Incubator Humidity
Here are a few easy-to-follow tips to keep your incubator’s humidity levels in check. Learn other ways how to lower the humidity in an incubator.
Monitoring Tools and Techniques
Hygrometers and thermometers will help you in keeping the level of humidity under your control. Such smart gadgets monitor the humidity and temperature inside hatching egg incubators. They make sure everything is in order and eggs don’t lose their potential.
Regularly check the settings of your devices and do not hesitate to make modifications if things don’t add up. Sometimes it feels like tuning an instrument. A tiny bit of alteration now and then is capable of yielding huge results.
Ambient Humidity Considerations
Let’s take a step back then and talk about the big picture now. Ambient humidity, we can say, is the level of moisture in the air of your incubator. It has the stealthy control over hatching success.
The outside air humidity might come to your incubator and spoil the ideal conditions that you previously created. As such, regularly check the weather forecast and position yourself to account for any changes in the incubation procedures. It’s all about being a step ahead so that the eggs stand a great chance of hatching in the shortest time.
These are the various tips with which you now know how to get humidity down in an incubator. The story of having healthy hatchings and easy work will only become more prominent.
Summary
As depicted, we have presented the main reasons for the necessity of a flexible humidity control system for optimum egg incubation. And we have shown you several ways to lower the humidity levels. Now you know how to lower humidity in an incubator for successful hatching.
Always keep in mind that ventilation is a key factor, as well as water control and absorbent materials. If you are looking for hassle-free humidity control with advanced settings to control the perfect hatching then VEVOR’s egg incubator is for you. With VEVOR you can start hatching your chicks today with ease.


