Introduction
Retaining walls is a big deal for the engineers and constructors. Soil erosion and seeping of water during the rainy season are pretty standard. But how to prevent it? How do I get better support?
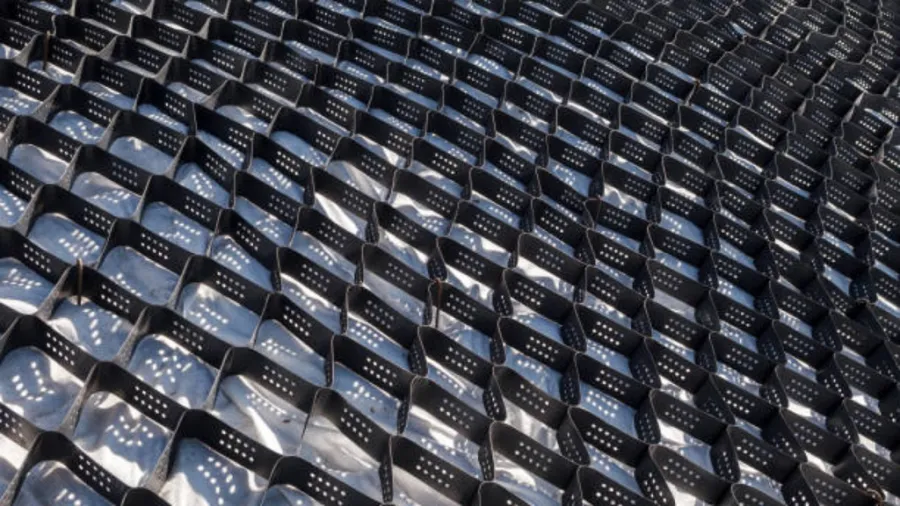
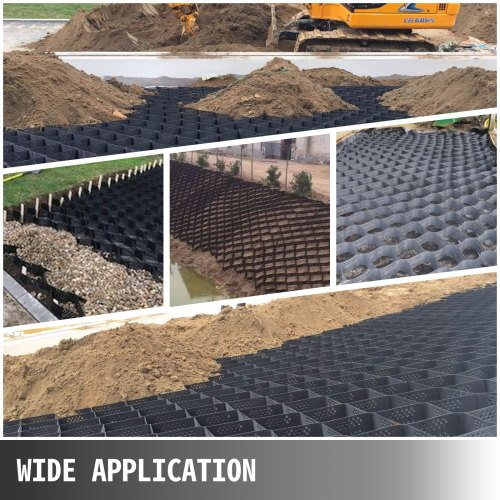
Geogrid for retaining wall does wonders in such a case. It not only has robust strength but also provides an aesthetic look. Guess what? You’ll get forever support.
Do you want to know what exactly geogrid is? Then, this guide is for you. Today, we will deep dive into the geogrid for retaining walls and understand how you can install it.
Table of contents
Part 1: Geogrid Basics
What is Geogrid for Retaining Wall?
Geogrid is a synthetic material that has a robust structure and stabilizes the soil. In retaining walls, it provides structural support and prevents soil erosion.
Types of Retaining Walls
There are two critical types of retaining walls.
- Gravity Retaining. In such a retaining wall, the whole construction relies on the mass of retaining wall blocks.
- Reinforced Retaining. In reinforced walls, geogrid is an additional supporting factor for robust design.
Why Should You Install Geogrid for Retaining Walls?
Geogrid for retaining walls is a total marvel. It comes up with various benefits. These include:
- No soil erosion. Ground grid 9x17ft prevents soil erosion and gives a better backing without much excavation in the soil.
- Protective during the rainy season. The best thing about the geogrid is the protection. No matter if it is a storm or rainy season, it provides structural support.
- Excellent support. Geogrid acts as a critical support for your wall. So you don’t have to worry much about its safety.
- No more sinkholes. Rain or water seeping creates sinkholes. Geogrid keeps it away with its structural support.
- Eco-friendly system. Don’t worry. It is an eco-friendly material. You can even grow plants on the surface.
- Looks great. Aesthetic look increases the beauty of your retaining walls.
- Reduce maintenance costs. Less erosion. Less sinkholes. And with less damage, you are safe from extra expenses.
Part 2: Three Ideas Of Geogrid For Retaining Wall
There are tons of ideas for a retaining wall, but we have made it easier by listing the top three ideas for a retaining wall. Try them!
Retaining wall with reinforced soil
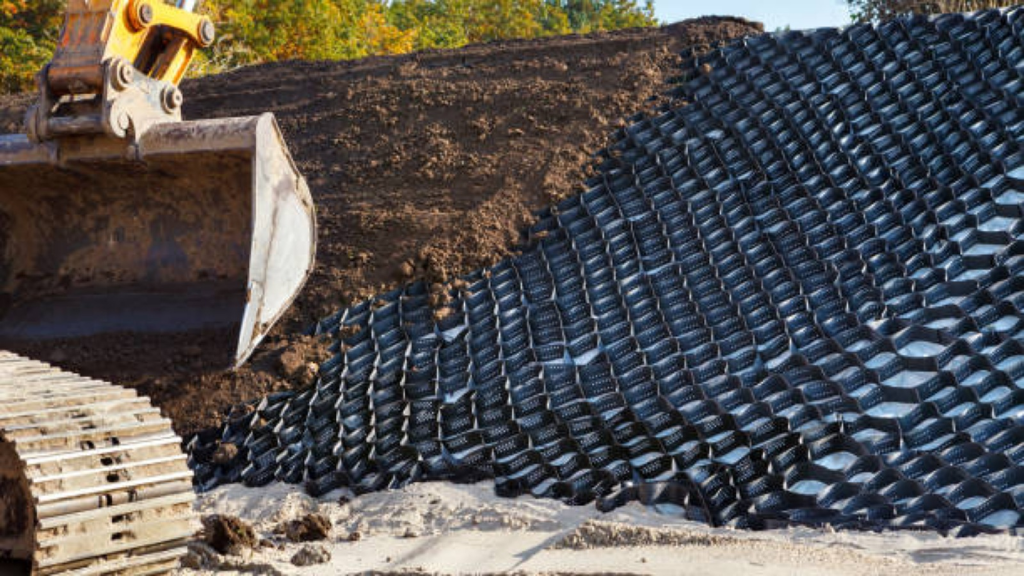
Retaining walls with the geogrid support offer excellent tensile strength to the soil wedge. The installation is sound when your wall can’t support the soil pressure and is on the verge of destruction. Moreover, in these cases, a slight seep of water due to rain can further decrease the wall strength.
A horizontal installation of geogrid-reinforced soil gives a tremendous structural aid. If you have a large wall, installation of multiple horizontally stacked layers of geogrid is a better option with good support.
Always consider the geogrid installation based on your wall length. A tall wall requires in-depth digging and more geogrid layers than a smaller one.
VERSA-Grid soil reinforcement
If you do not want to use the geogrid for retaining walls, you still have another best option for installation. It is the VERSA-grid.
It is a lightweight material used for residential and commercial wall installation processes. Different VERSA-grid types offer different levels of strength, allowing better wall support.
For example, VERSA-grid 1.5 is a good option for residential walls with a length of 6 feet at maximum. It features almost the same properties as the geogrid for the wall retaining.
Retaining wall with unreinforced soil
Another potential option you have is the retaining wall with unreinforced soil. It also backs the unstable soil wedges and better supports your walls.
You must keep an eye on the type of soil, slopes, and shape of your walls. Minimal weight provides better backing for your soil.
There is one potential limitation for such walls. You can’t build them more than 3-4 feet tall. For taller walls, you must either input the Geogrid or VERSA grid for practical support.
Part 3: 7 Installation Steps Of Geogrid For Retaining Walls
Let’s get to the installation steps for a geogrid for retaining walls.
Step 1: Planning Your Retaining Wall
The very first thing to do is make up a plan. Think about the place where you are going to install a retaining wall. Follow the below points to consider whenever you are planning a retaining wall.
- Point out the top and bottom of the retaining wall. It must include the excavation points. You can mark it with stakes or use paint sprays.
- Consider the boundary of your wall, whether 3 feet or 4 feet. Mark the points above the ground levels and exact at the excavation levels.
- Keep the material ready and safe for the backfilling zones. Don’t expose it to external fluctuating weather conditions.
Step 2: Excavate the retaining wall
It is time to start work! Excavation is the first step in the construction of your retaining walls.
Before you dig out, be on the safe side and excavate a trench. Assess how deep you can dig. Moreover, you already have plans about how deep you will mine the soil.
Usually, the excavation must be more than 6 inches. You can go for 10-12 inches or more based on your plans. Make sure it meets the criteria of 6 inches for better support for your wall.
Step 3: Cut Geogrid
Do you have Geogrid ready for your retaining walls? Let’s end what we have done already: building a reinforced wall.
Cut your geogrid material based on the length of your wall. Double-check the alignment of the geogrid with the layout.
There are often two types of geogrid alignment— Uniaxial and biaxial. In the uniaxial direction, your grid has maximum strength in one direction. You have to keep it perpendicular to your soil layout for adequate support.
If you use a biaxial geogrid, one direction must be perpendicular while others should be lengthwise.
Place your geogrid in a parallel direction to one another. There must be no overlap of the geogrid materials. It gives better support and an excellent grounding experience. Your wall will be much safer and easier to handle.
Step 4: Install Geogrid
Once you have cut down the correct length of the geogrid, take a second look. Is it the best fit for your installation? Remember, slight ups and downs in the length decide the support of Geogrid. You might look puzzled in case of wrong cutting.
Lay your geogrid material on the retaining wall precisely in the right direction. Set all the sections you’ve cut earlier until a complete line of geogrid materials fills it out. You can install a second of geogrid material over the first one.
But ensure the connections are tight and you get the ultimate support. Cut the extra portions of the geogrid until the whole alignment looks perfect.
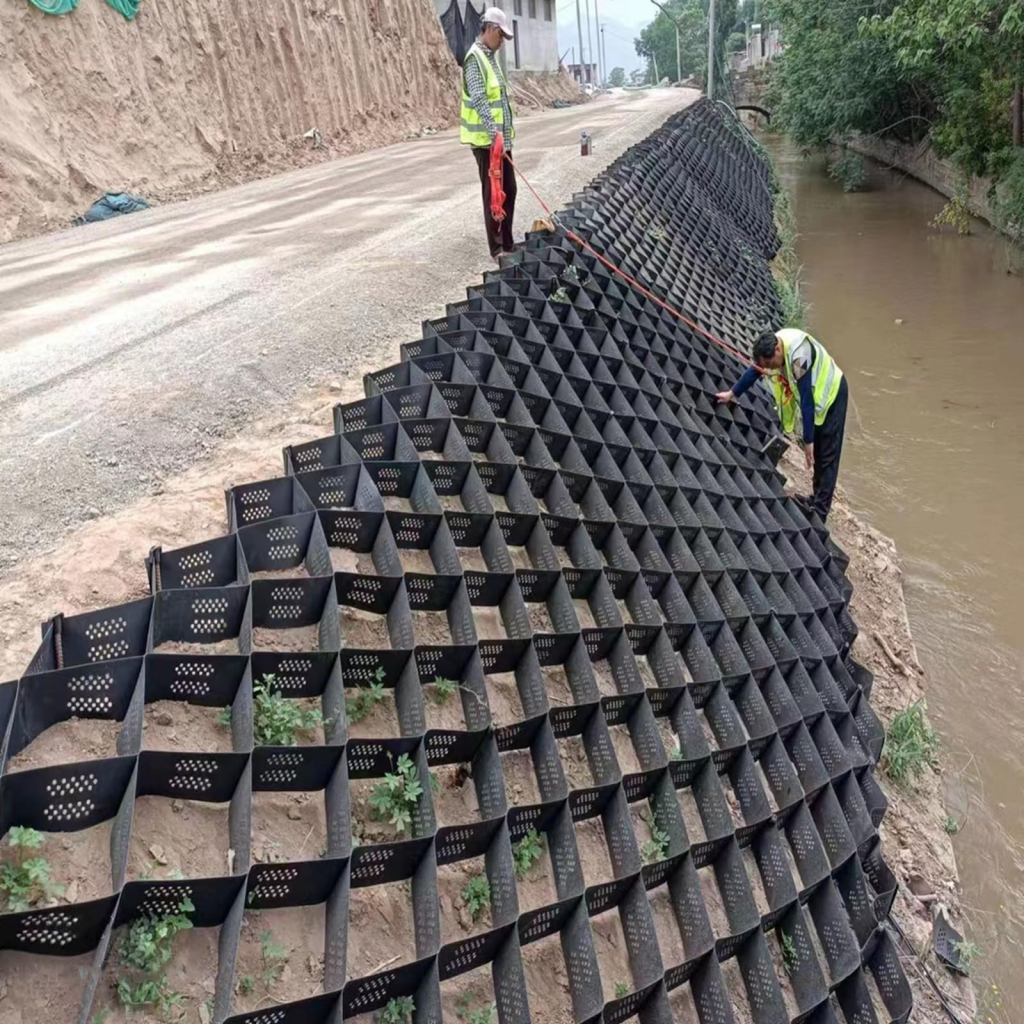
Step 5: Compaction and Backfill
Is your installation perfect? Pull the taut and secure the geogrid in the place. Now, you can start filling.
Keep the rule of 6 inches at least in mind. Less than 6-inch filling causes loose support. Your heavy objects’ placement on the retaining wall can destroy it.
Compact your retaining by placing material from the back of the wall till the end of the geogrid in the given position. Do all the tasks until the back portion is covered with strengthened material.
Step 6: Wall Drain Pipe
Once you have backfilled with the material, water management is necessary. It will prevent soil erosion. Install the wall drainage pipes. Keep one end of the water outlet system and ensure a sloped area that doesn’t collect the water.
Place your drain in the horizontal direction that allows safe water to shift through the pipes.
Install the geogrid material above the drain for practical support. Check all the compaction points. Test the drain and water flow. Maintain the clearance of the drain.
Step 7: Final Grading
Check all the joints, backfill materials, and connections. Here are some key remainders.
- Geogrid alignment is smooth and effective.
- The drain is working perfectly. You can seep the water through the wall to check for soil erosion.
- Test the strength by running some heavy objects over the wall after some time.
- Do the final grading on the top and bottom. Confirm the best quality of the material and test the strength as well.
All good? Congrats! You have installed your first DIY geogrid for retaining walls.
Part 4: Frequently Asked Questions about Geogrid For Retaining Walls
How many years does Geogrid last?
Probably for 100 years or forever. Various tests have shown tremendous strength and resistance to degradation of the geogrid. If you expose it to the environment, it does not degrade quickly. So, consider it your one-time investment.
Can I use Geogrid in concrete?
Yes. You can use the geogrid in concrete because of its excellent support. Sometimes, steel is not available. Then, geogrids provide the ultimate reinforcement on the driveways or roads.
How powerful is Geogrid?
Geogrid has a quite immense tensile strength of 1885 lbs/sq ft. It can handle almost all types of traffic, including trailers, trucks, and other heavy vehicles. Such a high power allows better support for the retaining walls.
When should I use Geogrid for retaining walls?
You can use the geogrid when you need extra support for your retaining walls. Don’t limit its use to retaining walls. Instead, it is all good for the driveways, walkways, or patios.
Conclusion
Geogrid can be a magic tool not just for your retaining walls but also for driveways, lawns, and patios. But whenever you are purchasing it, make sure you get the best quality and affordable costs.
VEVOR has superior geogrid that offers a long life and excellent support for retaining walls. Expect a fair cost and the best performance from the geogrid. Grab the best geogrids right away!


