
You can create a DIY outdoor pizza oven anytime with simple tools, a bit of patience, and a lot of excitement. No special skills are required – anyone can make a centre piece for the backyard that will bring friends and family together. The process is fun and rewarding, and teaches new skills as well as allowing you to design an oven that perfectly fits your space. Once finished, you’ll have fresh, hot pizzas any time at all with all the authentic flavor of a wood-fired pizza oven. From crispy crusts to delicious toppings, every bite is a fragrant, worth it. Your backyard will be the ultimate pizzeria.
Why Create a Build-Your-Own Outdoor Pizza Oven?
Building a DIY outdoor pizza oven is not only a cooking project, but it can also help turn your backyard into a fun and flavorful space. As long as you are building your own oven, you are in charge of the design, size, and style of your oven. You can match it up perfectly to your outdoor area while learning new skills along the way.
Advantages of a DIY Outdoor Pizza Oven
When you make your DIY outdoor oven, you’ve not just got pizza. It’s a rewarding experience that includes a lot of creativity, learning, and delicious results. With your own oven, you enjoy:
- Fresh, hot pizza any time you like
- A fun project to spend time with family and friends
- Unique cooking with authentic wood-fired flavor from a wood-fired pizza oven
- A sense of pride every time you use your oven
Pizza isn’t the only food your oven can bake. Try artisan bread, roasted vegetables, or even desserts. This versatility makes a DIY outdoor pizza oven a great addition to any backyard cooking situation.
Cost Comparison: DIY vs Store Bought Pizza Ovens
One of the biggest reasons to contemplate a DIY outdoor oven is the cost. Store-bought pizza ovens can be very costly; even some models sell for over $1,000. Building your own DIY outdoor pizza oven lets you save money and also gives you exactly what you want.
For example:
- Store-bought ovens often will be $800 – 2500
- A DIY outdoor pizza oven may cost $200 to $600
By creating your own, you’re not only saving money, but you’re also having full control over the materials, size, and final design.
Perfect for Backyard Cooking & Entertaining
A portable pizza oven or a wood-fired pizza oven becomes the centerpiece of your backyard. It’s not about cooking – it’s about making experiences. Hosting pizza nights, family dinners, or casual gatherings becomes more fun if everyone has the opportunity to watch the pizza cook and feel the warmth of the oven.
Your DIY outdoor oven promotes socialization and eating together. Fresh, homemade pizza, the smell of a wood-fired pizza oven, and the fun of cooking outside make your backyard a favorite for your friends and family.
Types of DIY Outdoor Pizza Ovens You Can Create
Building a DIY outdoor pizza oven gives you the freedom to choose a style that suits your backyard and your cooking style and skills. Each type has unique advantages, ranging from traditional designs to quick and portable options. Understanding these options will help you determine which oven is best for your space and lifestyle.
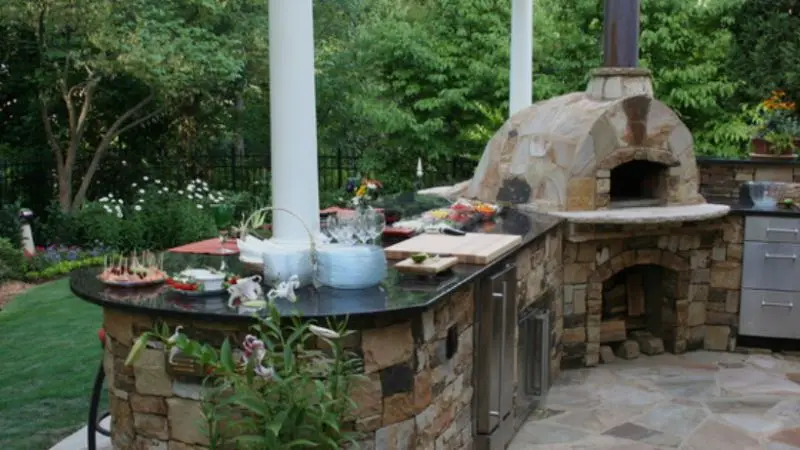
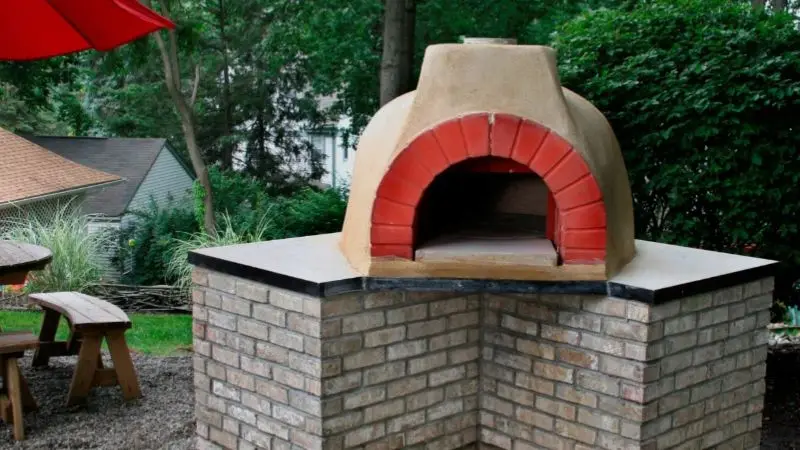
Brick Outdoor Pizza Oven
A brick outdoor pizza oven is the traditional choice of many enthusiasts. Imagine a regular dome or arch with fire bricks. These bricks retain the heat very well, which means that your oven will be kept hot for hours. This means you can cook pizza after pizza without having to wait for the oven to reheat. Beyond function, brick ovens add an ageless, rustic appearance to your backyard. Although it takes more time and effort to build with bricks, the result is a durable and well-performing wood-fired pizza oven that becomes the centerpiece of your outdoor cooking area.
Concrete/Cement Pizza Oven
An option that is very versatile is a concrete or cement pizza oven, which allows you to form the oven in the shape you wish. Many builders use molds to make smooth domes or unique designs. Concrete ovens are good at retaining heat, and they are designed to withstand years of use, making them a tough choice for backyard chefs. You can also either paint or decorate the exterior to fit your outdoor space. While it may take some planning and a mold to get the perfect shape, a concrete DIY outdoor oven has both performance and flexibility in design.
Metal Drum/Stainless Steel Pizza Oven
If you are looking for something faster and cheaper to build, a metal drum or steel pizza oven is perfect. You can make a small oven with a clean metal barrel or a steel box that is easy to move around. This type heats up fast and can be shifted around your backyard, which makes them perfect for an outdoor cooking session for fun or your first DIY outdoor pizza oven project. While it doesn’t retain heat as long as brick or concrete, it has the advantage of convenience and speed, especially if you would like a smaller, temporary setup for pizza nights.
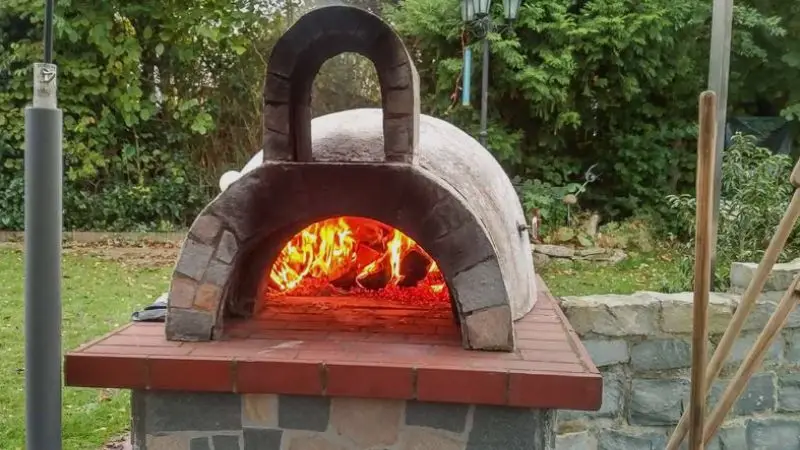
Wood-Fired vs Gas Powered Pizza Ovens
When building your oven, one of the most important choices is the way you want to heat your oven. A wood-fired pizza oven allows pizzas to have a smoky, authentic flavor and a crispy crust that’s difficult to mimic when using other methods. On the other hand, gas-powered ovens heat up quicker and are easier to manage, providing convenience and evenness of cooking temperatures. Both options are great for cooking in the backyard, but your preference will depend on whether you’re more interested in flavor or speed. Many individuals blend design and heat selection to make the most effective outdoor pizza experience for the family and friends.
Materials and Tools Required to Build a DIY Outdoor Pizza Oven
The right materials and tools are necessary to ensure it is safe and durable, as well as cooks evenly. Gathering everything before you start makes it a smoother project, and you get to enjoy the process without interruptions.
Essential Materials You Need to Make a Strong and Durable Oven
For a DIY outdoor oven to last for a long time, you will need to find materials that will stand up to high temperatures and retain the heat well. Fire bricks are very important because they are resistant to heat and provide a stable cooking surface. Cement or mortar to bond the bricks and insulation such as ceramic fiber blanket, perlite to keep the heat inside. Fireproof materials such as fire clay or refractory cement provide additional safety and durability. Using the right materials makes sure your wood-fired pizza oven will cook evenly and retain heat for hours, so you’ll be cooking the real deal.
Basic Tools You Will Need To Create Your Oven
You do not need fancy tools to build a DIY outdoor pizza oven, just some simple but essential tools to make the construction very precise and safe. You will need a trowel to spread the mortar, a level to keep the bricks straight, and a tape measure to keep things to the proper dimensions. A rubber mallet can be used to subtly adjust bricks into position, and a wheelbarrow is useful for mixing cement. Don’t forget safety gloves and goggles to protect yourself. These tools make life simple for anyone to build a working portable pizza oven without any frustrating headaches and delays.
Optional Upgrades for Heat Retention and Baking Ability
After making your oven, you may make some improvements in order to make it more efficient and effective. Adding additional insulation under the floor of the oven or constructing a thicker dome helps the heat to linger. Some even use double-layered bricks for storing extra warmth. These upgrades ensure that your best outdoor pizza oven stays hot for a longer time, so you can cook many pizzas row without having to re-heat. Small construction tweaks can turn your wood-fired pizza oven for sale style project into a professional-quality backyard-cooking experience.
How to Make an Outdoor Pizza Oven Step by Step
Building your own DIY outdoor pizza oven is a fulfilling DIY project that turns your backyard into a pizza oven. What we all need is to follow step by step, and you will be able to prepare an oven that lasts for years and cook perfect pizzas every time.
Step 1: Select the Best and Safest Location in Your Backyard
The first step in constructing a wood-fired pizza oven is choosing the correct location. Choose a flat area that has space around it to cook. Keep the oven away from trees, fences, or anything that can be burnt. Consider which way the wind blows and how close it will be to your kitchen for convenience. A well-chosen location not only brings safety, but it also makes using your DIY outdoor oven easy in order to retain a constant heat and bake cooked pizzas perfectly every time.
Step 2: Create a Strong and Level Saucer for the Oven
A solid and level base is a must-have for a durable DIY outdoor pizza oven. Use concrete blocks or poured cement to make a base to support the heavy weight of the oven. Making sure the base is perfectly level is really important, as the structure and performance of the oven can be affected by a non-level foundation. A good foundation is a guarantee of years of stable use in your backyard, and it’s one of the most important steps in any how to build an outdoor pizza oven guide.
Step 3: Lay the Oven Floor with the Fire Bricks
The oven floor is the cooking surface for your pizzas, and as such, it has to be built carefully. Lay fire bricks in a close, even fashion so the lay is a smooth, long-lasting surface. This floor retains heat well and provides your pizza with the crispy crust that is known from a wood-fired pizza oven. Properly laid bricks will also keep hotspots from occurring and ensure even baking. Proper floor completion ensures a solid foundation for the dome, as well as helping your DIY outdoor pizza oven deliver professional-quality results.
Step 4: Build the Dome or Oven Chamber for Even Cooking
The dome or the oven chamber is the core of your DIY outdoor pizza oven. Shape bricks or cement into a dome to trap in the heat and evenly distribute it around the pizza. The curved design cooks the pizzas quickly without burning the crust or the toppings. It is good to follow a step-by-step guide to the dome to get the right shape and thickness. A well-built dome guarantees the best pizza oven outdoors and makes great pizzas every single time.
Step 5: Add Insulation and Outer Layers for Heat Retention
Adding insulation is key to keeping your DIY outdoor oven hot for longer periods of time. Use blankets of ceramic fiber, perlite, or other insulating materials under the dome and the oven floor. Cover the insulation with bricks or cement to protect the insulation and to give it a finished appearance. Proper insulation lets the oven be kept at a high temperature for several pizzas at a time without the need to reheat. A well-insulated wood-fired pizza oven makes it easier and more fun to cook pizza for backyard dinners with the family or pizza nights with friends.
Step 6: Install a Chimney and Ventilation for Safe and Efficient Cooking
A chimney is a must, both from a safety and performance standpoint, for a wood-fired pizza oven. Install it at the top of the dome to allow smoke escape and proper air circulation. Good ventilation controls heat, stops a build-up of smoke building and keeps cooking safe. After proper chimney placement, your portable pizza oven is set to operate at an efficient capacity, providing your pizza with an evenly baked crust and the smoky taste any pizza enthusiast dreams of every time you cook.
Step 7: Cure Your DIY Outdoor Pizza Oven for Long-Lasting Use
Properly curing your DIY outdoor pizza oven helps prevent it from cracking and helps it to last. Let the oven dry slowly, on small fires for a period of several days. Gradually raise the heat to let off moisture and condense the structure to bed and level. After curing, your oven is ready for full-size pizzas. Taking the time to cure your DIY outdoor oven carefully ensures consistent cooking performance and will give you years of backyard pizza-making enjoyment.
How Long Does It Take to Make a DIY Outdoor Pizza Oven
Many individuals are curious to know how much time to make a do-it-yourself outdoor pizza oven. The total time depends upon your experience, the style of oven, and how much help you have. If you understand the timeline for each step, you can plan for your project and enjoy the process without rushing. From forming the base to curing the oven, each one has its own time and its own pace.
Time Estimates for Beginners Building a DIY Outdoor Pizza Oven
If you are new to backyard projects, expect to spend a weekend or two on your DIY outdoor oven. Most beginners manage to complete it in three to five days if they work a couple of hours every day. Some of the steps, such as laying down the floor of the oven, go quickly, but some of them, like shaping the dome, require patience and care. Curing the oven takes time as well (gradually heating the oven prevents cracks). Taking your time to do it ensures that your wood-fired pizza oven will work perfectly and for years to come.
Typical time for each task:
- Building the base: 1 day
- Setting the oven floor: half a day
- Constructing the dome/chamber: 1 – 2 days
- Lighting, addition of insulation, and outer layer: 1/2 day
- Installing chimney and ventilation: half a day
- Curing in the oven with small fires: 3 -5 days
Factors That Can Influence The Time It Takes For Your DIY Oven
There are a number of factors that go into the overall build time for a do-it-yourself outdoor pizza oven. Weather may slow drying or curing, especially if it’s cold or rainy. The type of oven makes a difference, too – metal drum ovens rise faster than brick or concrete domes. Your skill level, the number of helpers, and how much time you have available daily are also factors. Other considerations are the size of the oven and the thickness of the insulation layers. Every project is different, but the reward is the same: A fully functioning portable pizza oven you made yourself that you can use for countless backyard pizza nights.
Wrap-Up
Building your own outdoor pizza oven is a fun and rewarding project in the backyard. From selecting the appropriate location to curing your oven, every step brings satisfaction and a delicious end product. You can have fresh, hot pizzas at any time, dazzle friends and family, and experiment with bread, roasted vegetables, or desserts. Whether you opt for a brick, concrete, or portable wood-fired pizza oven, the process teaches great skills and creates a 7-brick centerpiece for your backyard. With patience, the right materials, and planning, your DIY outdoor oven will give you years of great flavor-garbage, not to mention fun and memorable get-togethers.
FAQ
How hot does my home-made pizza oven get?
Your oven can reach 700°F or more. This high heat allows you to have crispy crusts, and makes pizza cook in just a few minutes.
Can I use normal bricks in place of a fire brick?
You should not use ordinary bricks. Fire bricks are more tolerant of high heat. Regular bricks can break or crack due to the heat.
What is the best type of wood for a wood-fired pizza oven?
Use dry hardwoods such as oak, maple, or hickory. These woods burn hot and clean. Do not use softwoods or treated wood.


