
You can handle plumbing projects with ease when you learn how to use PEX tubing. It’s flexible, affordable, and beginner-friendly—perfect for quick home repairs or full installations. With just a few basic tools and clear steps, you can create strong, leak-free connections that last for years. No special training or pricey gear is required. Once you get the hang of it, you’ll see why so many homeowners and pros choose PEX for reliable plumbing work. Ready to start? Let’s go step-by-step and learn how to install PEX tubing the simple, confident way.
What Is PEX Tubing?
If you’re planning to update your home plumbing, you’ve probably heard about PEX tubing. It’s become one of the most popular choices for water lines because it’s flexible, durable, and easy to install. Let’s take a closer look at what makes it so practical.
Overview
PEX tubing is a plastic cross-linked polyethylene flexible pipe. You will see them very often too in red and blue or white–colours which will make you distinguish between hot and cold water lines. The material is easily bendable and works well in tight or inaccessible spaces.
PEX tubing can be cut with a special cutter, and the edges connect easily due to their smoothness. Stickers, solder, and complex devices are unnecessary. One only needs to have fittings and rings to connect the pieces. It is its strength and flexibility that make it usable in water supply lines. Radiant heating, and even outdoor snow-melting systems. Having the ability to install the PEX tubing to supply water will help save time and energy the next time you plumb.
Benefits of Using PEX Tubing
PEX tubing offers many advantages that make it a favorite choice for both DIYers and professionals. It’s flexible, strong, and easy to handle, which makes PEX tubing installation step-by-step simple to follow even for beginners.
Here’s why many people prefer PEX for home plumbing:
- Flexibility: You can bend PEX around corners, reducing the number of fittings and lowering the risk of leaks.
- Durability: It resists corrosion, scaling, and freezing damage, ensuring long-term reliability.
- Easy installation: You don’t need special tools—just basic equipment to learn how to connect PEX tubing quickly and securely.
- Cost savings: PEX costs less than copper or PVC, helping you save on both materials and labor.
- Quiet operation: Water flows smoothly through PEX, so you hear less noise in your pipes.
With these benefits, PEX has become one of the most trusted materials for plumbing projects. Once you know how to install PEX tubing for water supply, you’ll appreciate how efficient, leak-free, and affordable it can be for your home.
Tools and Materials You Require for Installation
Before you start your PEX tubing installation step by step, it’s important to gather the right tools and materials. The best part? You don’t need any complicated or expensive equipment. Just a few basic items will help you get clean cuts and tight, leak-free connections.
Essential Tools
The following tools will be essential to work in the most efficient and safe way:
- PEX cutter: It provides you with smooth cuts and no ragged ends. It is the most efficient method of cutting PEX tubing, which gives an easy and neat fitting.
- Crimp or clamp tool: This is a tool used to tighten the ring around the fittings and make tight seals.
- Go/No-Go gauge: The gauge that ensures that your crimp connections are firm and tight.
- Deburring tool: Flattens the tubing where they have been cut so as to provide a better leak-free connection.
- Measuring tape: Assists you in cutting and measuring tubing to be installed correctly.
Such basic tools can vary widely when you get to know how to install PEX tubing to supply water. Several hours of practice will make you capable of coping with the majority of plumbing tasks with ease.
Types of Tubing and Fittings
PEX tubing comes in three main types—each with its own flexibility and best use. Choosing the right one ensures better flow and easier bends.
- PEX-A: The most flexible type, ideal for tight spaces and curved layouts. It’s also the best way to bend PEX tubing without causing kinks.
- PEX-B: Offers moderate flexibility and is commonly used in home plumbing systems.
- PEX-C: The least flexible type, best for straight runs and simple layouts.
You’ll also need fittings to join your tubing securely:
- Crimp fittings: Work with copper rings for strong, traditional connections.
- Clamp (cinch) fittings: Use stainless steel clamps for easy sealing.
- Push-fit fittings: Simply snap together without any special tools.
- Press fittings: Require a press tool for fast, professional connections.
Knowing how to connect PEX tubing properly depends on the type of fitting you choose. Pick the one that matches your tools and project needs, and you’ll have a durable system ready for years of reliable use.
How to Use PEX Tubing for Water Supply
Learning how to install PEX tubing for a water supply is easier than you might think. You just need to follow a few simple steps to measure, cut, smooth, and connect the tubing correctly. These steps will help you build a strong, leak-free plumbing system that lasts for years.
Step 1: Measure and Cut PEX Tubing
Prepare your project by measuring the tubing length that you will require in each run. To be on the safe side, always add a few extra inches. Now you get to cut out your measurements.
A PEX cutter would be the best and most effective for cutting PEX tubing. It is a tool that leaves straight cuts on the pipe without crushing or deformation. Do not use a scissor or saw, on which jagged edges can remain and hence cause a leak. Squeeze the handles slowly and make a clean cut each time, holding the tubing at a steady rate. The basic principle of a leak-free installation is accurate measuring and clean cuts.
Step 2: Deburr the Ends of the Tubing
After cutting, check both ends of the tubing carefully. You may notice small pieces of plastic or uneven edges. These can prevent fittings from sealing tightly, which can lead to leaks.
Use a deburring tool or a utility knife to gently smooth out the ends. This small step protects the O-rings inside your fittings and ensures a tight, reliable seal. When learning PEX tubing installation step by step, deburring is one of the easiest ways to make sure your connections last. Smooth edges make the installation cleaner and prevent future plumbing issues.
Step 3: Choose and Prepare the Right Fittings
Selecting the right fittings is an important part of knowing how to connect PEX tubing. Each fitting type works differently depending on your tools and the size of your project.
Here are the most common types you’ll find:
- Crimp fittings: Use with copper rings; great for standard home plumbing projects.
- Clamp (cinch) fittings: Use stainless steel clamps for quick and easy repairs.
- Push-fit fittings: Snap together without tools, perfect for fast installations.
- Press fittings: Use a press tool for larger or professional plumbing setups.
Before you connect, mark the depth on the tubing to show how far it should slide into the fitting. This ensures a secure, watertight seal. Taking time to prepare your fittings properly is one of the best ways to guarantee strong, leak-free joints.
Step 4: Combine the Steps for a Perfect Installation
When you measure, cut, deburr, and connect with care, you master how to use PEX tubing efficiently. Each step builds on the last, helping you create a reliable and easy-to-maintain water system. The secret to success is taking your time and doing each step correctly. When you know the best way to bend PEX tubing, you can guide it smoothly around corners without kinks or damage. Clean cuts and tight fittings prevent leaks and make your work look neat. With proper tools and patience, your PEX tubing installation step-by-step will look professional and last for many years.
Step-by-Step Installation Guide for PEX Tubing
Ready to connect your plumbing lines? Learning how to install PEX tubing for a water supply is simple once you know the right steps. With just a few basic tools and a little patience, you can achieve strong, professional-looking results. Follow this PEX tubing installation step-by-step guide to get leak-free and long-lasting connections.
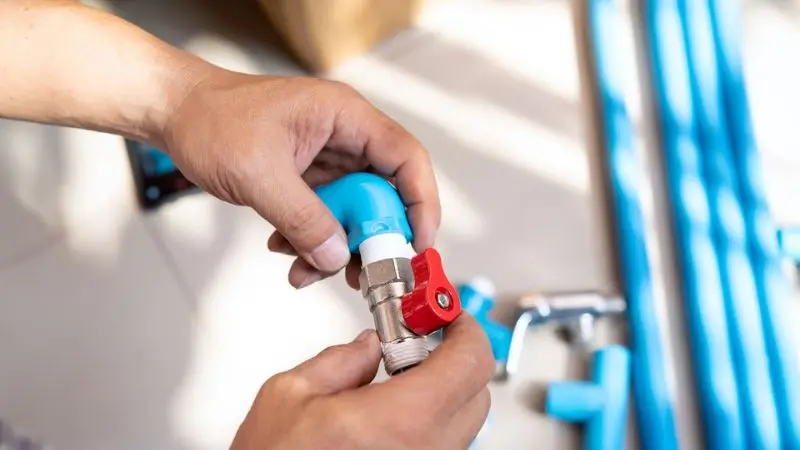
Step 1: Slide on the Crimp or Clamp Ring
Start by pushing a crimp ring or clamp ring over the end of your PEX tube. Keep a distance of 1/4-1/8 inch between the edge of the tubing and the medium. This opening provides space to fit the fitting accordingly and provides a tight fit.
Ensure that the ring is in a straight and flat position. In case it is tilted or imbalanced, slide it off and put it back. Leakage and wasted effort can be avoided by simply taking time to fix the ring in the proper position. The initial step to a good, reliable, and lasting bond is to place an appropriate ring.
Step 2: Insert the Tubing into the Fitting
Next, take your chosen fitting and insert it into the end of the tubing. You’ll feel slight resistance—keep pushing until the tubing touches the fitting’s shoulder. This ensures the connection is secure.
If you marked the depth earlier, align the tubing end with your mark to confirm full insertion. A smooth, firm push makes all the difference in preventing leaks. If the tubing feels stiff, twist it gently as you insert it. This simple motion helps the fitting slide in more easily and ensures your PEX tubing installation step by step goes smoothly.
Step 3: Secure the Connection with the Tool
Once the fitting is in place, use your crimp or clamp tool to tighten the ring. Position the tool’s jaws over the ring and squeeze the handles until they stop or click. This tightens the ring evenly around both the tubing and fitting, forming a secure seal.
After crimping, check your work with a go/no-go gauge. If the gauge fits over the ring, your connection is perfect. If not, remove the ring and try again. Always follow the tool’s instructions carefully, as each model works a bit differently. Proper tool use is essential when learning how to connect PEX tubing and ensures a leak-free result.
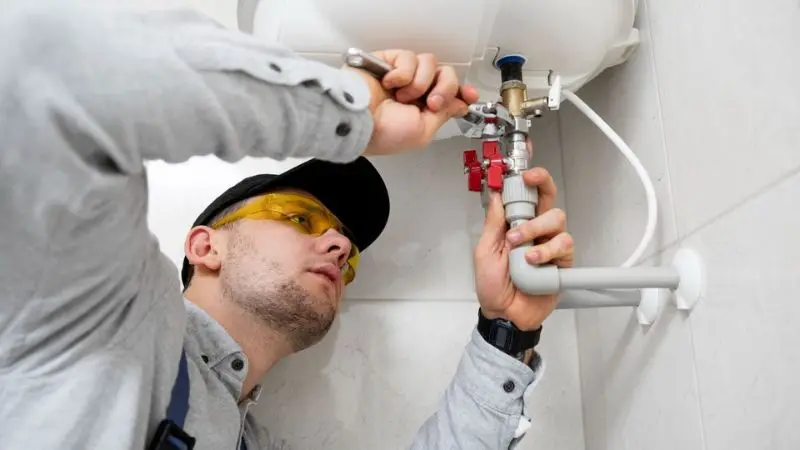
Step 4: Test the System for Leaks
When everything is fitted in, it is now time to test. Turn the water slowly and check all connections. Make sure that there are no drips or leaks around the fittings. In case of any leakages, turn off the water, regulate, and check again.
Allow the water to flow for a few minutes to make sure that everything is tight and secure. Smooth curves are also vital—kinks should not be there so that curves work out and supports are appropriate. It is well known that the most beneficial thing is to know how to bend PEX tubing in order to keep your lines intact and to keep the flow healthy. Once your system is dry after testing, you have installed a durable system that will serve your house for a long period of time.
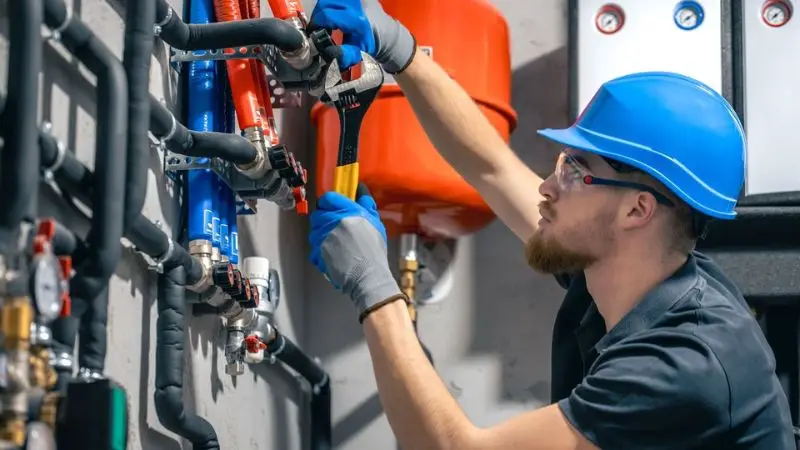
How to Install PEX Press Fittings
If you’re looking for a fast and dependable way to join your pipes, PEX press fittings are a great choice. This method saves time, avoids messy materials, and gives your plumbing a clean, professional look. Let’s break it down into simple steps so you can master how to install PEX tubing for a water supply using press fittings.
Step 1: Press Fitting Basics
Press fittings create a tight, leak-proof connection without glue, solder, or open flames. You simply slide the tubing into the fitting and use a press tool to squeeze the metal sleeve securely in place. This method is quick, consistent, and ideal for both new installs and repairs.
Here’s how to do it:
- Cut your tubing: Use a PEX cutter for clean, even edges. It’s the best way to cut PEX tubing without causing kinks.
- Insert the tubing: Push the PEX tubing into the press fitting until it stops.
- Position the tool: Place the press tool over the metal sleeve.
- Press the fitting: Squeeze the handles until the tool completes the press and locks the sleeve.
High-quality fittings make a big difference—using durable PEX press fittings ensures fewer leaks and long-lasting performance. The finished result looks neat, smooth, and professional.
Step 2: When to Use PEX Press Fittings
You should use PEX press fittings when you need speed, reliability, and precision. They’re especially useful for large projects where you must make multiple connections quickly or in areas where space is tight.
They work best for:
- Remodelling projects where plumbing runs behind walls or ceilings.
- Tight spaces where other tools might not fit easily.
- Jobs that need a clean finish and minimal visual clutter.
Because the press tool does most of the work, you save time and reduce errors. Once you press the fitting, you can move on to the next step with confidence. This simple approach fits perfectly into any PEX tubing installation step-by-step process, giving you strong, leak-free joints that last for years.
Follow Best Practices for a Smooth PEX Installation
You do not want your PEX plumbing project to fail, right? Begin with the fundamentals and go gradually step by step. Proper work implies fewer leakages and solid bonds. To keep everything in check, follow these best practices:
- Always measure before cutting to avoid wastage.
- Always use a PEX cutter on clean edges.
- After every cut, burr smooth.
- Keep bends soft such that there are no kinks and weak spots.
- Long tubing is supported by clamps or hangers.
Additionally, it is important to keep in mind that local plumbing regulations should be adhered to. They ensure that your installation is safe and of standard.
Avoid Common Mistakes During Installation
Even a small error can cause leaks or weak joints, so it’s important to avoid common mistakes. You’ll save time and money by doing it right the first time.
- Cutting with a saw can leave rough edges that leak — always use a PEX cutter.
- Skipping deburring leads to poor seals — smooth out every edge before connecting.
- Over-bending tubing can cause cracks — use supports and keep bends wide.
- Wrong ring placement weakens joints — keep it about 1/8 inch from the end.
- Ignoring plumbing codes may fail inspections — check your local rules.
Never force a fitting. If something doesn’t fit easily, check your tubing and try again. When you follow these steps and stay patient, you’ll master how to install PEX tubing for a water supply that works efficiently for years.
Wrap Up
You can master how to use PEX tubing for a water supply with the right tools, patience, and attention to detail. Each step—from cutting and bending to connecting—plays a big role in making your system leak-free and long-lasting. Take your time, follow the proper techniques, and always double-check your work. When you know how to connect PEX tubing the right way and understand the PEX tubing installation step by step, you can handle plumbing projects confidently. Whether it’s your first time or you’re improving old lines, PEX makes your job easier, faster, and more efficient for years to come.
FAQ
Is hot and cold water PEX tubing susceptible to it?
Alexis, you may use PEX to use it with both hot and cold water. Red tubing marks hot lines. Blue marks cold. White works for either.
Are there any special tools or small tools needed to install PEX?
You require a PEX cutter and either a crimp or clamp. These accessories are used to get clean cuts and establish connections. PEX tools are available in all hardware stores.
What is the way to repair a leak in PEX tubing?
Cut out the leaking section. Use new tubing and fittings. Ensure that you cut the connection to check leaks.


