
Installing outdoor kitchen doors is more than just a practical upgrade—it’s the key to making your outdoor space look complete and stylish. A well-installed door not only adds charm but also keeps your kitchen protected from weather, pests, and theft.
Wondering how to install outdoor kitchen doors easily and correctly? You’re in the right place! With clear, simple steps, you’ll learn how to fit a door that works smoothly and lasts long. Be ready to transform your outdoor kitchen! Let’s jump in and make your space both beautiful and functional.
Tools and Materials for DIY Outdoor Kitchen Door Installation

Before you start your DIY outdoor kitchen door installation, it’s important to gather the right tools and materials. Having everything ready will save you time and make the process much smoother. To keep things simple, we’ll break down the essentials into three main groups. This will help you know exactly what you need before jumping into the installation steps.
Essential Measuring Tools
Accurate measurements are the foundation of a successful installation. To get started, make sure you have:
- Measuring tape: Measure the width and height of the door opening carefully. Double-check to avoid small mistakes that can cause bigger issues later.
- Level: The level helps ensure the door will sit straight. If the door is tilted even slightly, it may not open or close properly. This is crucial when installing stainless steel outdoor kitchen doors, which require precise alignment.
- Square: A square checks if the corners of your door frame are perfect 90-degree angles. If they’re not, the door may not fit snugly. Making sure the corners are right gives your door a clean and proper fit.
Always double-check your numbers before making any cuts or drilling holes. This extra step helps you avoid mistakes and wasted materials.
Cutting Tools for Precision
Once you have the measurements, you’ll need to cut the opening for your door carefully. Using the right tools helps you make clean and precise cuts, crucial when following any outdoor kitchen doors installation guide.
- Jigsaw or Circular Saw: These are ideal tools for cutting wood or composite panels to fit your door frame. A jigsaw works well for curved or detailed cuts, while a circular saw is better for straight lines.
- Utility Knife: Useful for trimming rough edges or making fine adjustments to insulation, weatherstripping, or sealing materials. It’s great for finishing touches that need precision.
- Clamps: These help hold your materials steady while cutting or assembling. Keeping everything in place improves safety and ensures cleaner, more accurate cuts.
Always wear goggles and gloves when cutting to protect your eyes from flying debris and your hands from sharp edges.
Installation Tools and Hardware
After preparing the opening, it’s time to secure your door. These tools and hardware will make the installation easier:
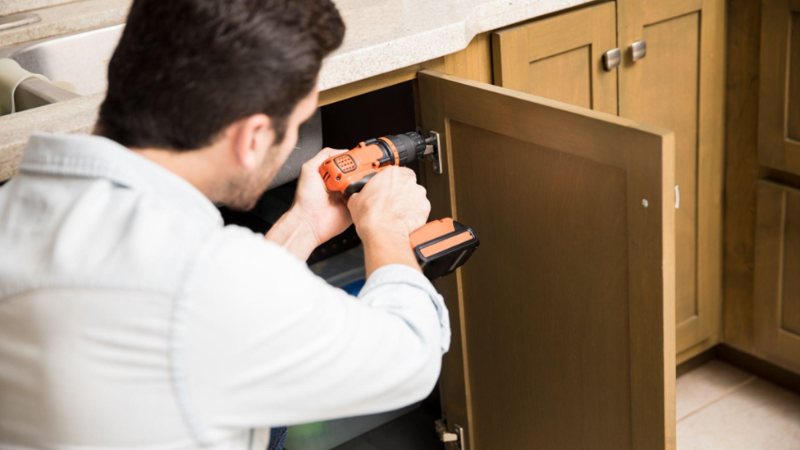
- Drill and screwdriver: A drill and screwdriver are essential for securely attaching hinges and screws to your door and frame, ensuring everything stays firmly in place.
- Hinges and screws: Use high-quality, rust-resistant hinges and screws—especially for stainless steel outdoor kitchen doors—to ensure a strong and weatherproof installation.
- Rubber mallet: A rubber mallet helps you gently tap the door frame into position without damaging the materials, making adjustments easier and safer during installation.
Be sure to read the instructions that come with your door, as they may recommend special tools or techniques.
Additional Materials for Finishing
Once your door is installed, finishing touches will enhance its look and protect your outdoor kitchen from weather damage. Here’s what you’ll need:
- Weatherproof sealant: Seal all door edges to block moisture, prevent rust, and increase the lifespan of your outdoor kitchen doors.
- Paint or stain: For wooden doors, a fresh coat can improve appearance and durability. Choose a color that complements your kitchen style for a polished look.
- Sandpaper: Use fine-grit sandpaper to smooth rough spots and prepare the surface properly before painting or sealing.
- Decorative hardware: Upgrade to sleek, corrosion-resistant handles or knobs—perfect for giving your outdoor kitchen cabinet doors a custom, stylish look.
- Cleaning supplies: Clean the surface thoroughly with a damp cloth or mild cleaner to remove dirt and dust before applying finishes.
With all your tools and materials ready, you’re set to begin the installation. Next, we’ll walk you through the step-by-step guide to ensure your outdoor kitchen doors are installed the right way, the first time.
Step-by-Step Installation Process for Outdoor Kitchen Doors
Installing your outdoor kitchen door involves several important steps. Following these carefully will help ensure your door fits perfectly, works smoothly, and lasts for years. Let’s walk through the process, from measuring to the final sealing, so you can handle it confidently.
Step 1: Measuring and Marking the Space

The first step of DIY door installation is measuring and marking the exact spot where the door will be installed. Accurate measurements are crucial to prevent errors and ensure a proper fit. Start by using a measuring tape to find the height and width of the door opening. Then, check that the edges are level by placing a level tool along them.
Use a square to confirm that the corners form right angles. Lightly mark the door dimensions on the surface with a pencil, making sure to leave a small gap of about 1/8 inch around the edges. This gap allows for easy adjustments during the installation process. Taking your time here will guide your cuts and installation, making the entire process smoother and more efficient.
Step 2: Cutting the Opening for the Door
Once marked, it’s time to cut the opening using the right cutting tools for precision. This is especially important when installing stainless steel outdoor kitchen doors, where clean lines matter. Before starting, prepare your jigsaw or circular saw, clamps, and safety gear. Use the clamps to secure the surface and prevent any movement while cutting.
Follow the marked lines carefully, moving slowly and steadily to avoid mistakes. After cutting, use sandpaper to smooth any rough edges, which helps the door fit snugly and prevents splinters. Don’t forget to wear goggles and gloves for protection throughout this step.
Step 3: Installing the Door Frame
Next, position and secure the door frame into the cut opening. This is a crucial step to create a solid and level foundation for your door. Place the door frame into the opening and check that it fits snugly. Using a drill, attach the frame by starting with screws at the top, then moving to the sides and bottom. Use a level to make sure the frame is straight before fully tightening the screws.
Open and close the door to test its operation and make sure it moves smoothly. If you notice any gaps around the frame, fill them with weatherproof sealant to keep moisture out. A well-installed frame will ensure your door functions properly and stays secure over time.
Step 4: Securing and Adjusting the Door
With the frame in place, it’s time to attach and adjust the door itself. Align the hinges with the pre-drilled holes on the frame and fasten them securely using a screwdriver or drill. Then, hang the door on the hinges by sliding the hinge pins into place. Check that the door swings freely and doesn’t scrape or stick to the frame.
Install the lock or handle according to the manufacturer’s instructions, and test the mechanism several times to ensure smooth operation. If the hinges feel stiff or squeaky, apply a small amount of lubricant to keep them moving smoothly and prevent wear and tear.
Step 5: Final Touches and Sealing
Finally, it’s time to finish and seal the door to protect it from weather damage and complete the look of your outdoor kitchen. Apply weatherproof sealant evenly around the edges of the door frame to prevent moisture and rust. Smooth out any rough spots or splinters with sandpaper before painting or staining.
Choose a weather-resistant paint or stain that complements your outdoor kitchen’s design to add a fresh and polished appearance. These finishing touches will not only protect your door but also are the best way to install outdoor kitchen doors for long-lasting durability and visual appeal.
Troubleshooting Issues During the Door Installation Process
Even when you follow every step carefully, some challenges can show up during the installation of your outdoor kitchen doors. However, the good news is that most of these issues have straightforward solutions. Here’s how to handle common problems smoothly and efficiently.
Fixing Misalignment Problems
A misaligned door might stick, hang unevenly, or refuse to close properly. Slight shifts in the door frame or hinges often cause these issues. Luckily, they’re easy to fix with a few adjustments.
Start by checking the door hinges and frame:
- Tighten loose hinges using a screwdriver. Make sure they are aligned evenly.
- Adjust the frame if it’s not level. Loosen the mounting screws, straighten the frame using a level, and tighten it again.
- Place shims under the frame if the surface underneath is uneven.
Once adjusted, test the door by opening and closing it a few times. A level door ensures smooth operation and a clean finish.
Addressing Gaps Around the Door
Gaps around your outdoor kitchen cabinet doors aren’t just unattractive—they can allow water, dust, and pests to sneak in, damaging your setup over time.
Here are a few practical solutions:
- Apply weatherstripping along the inside edges of the frame to block small gaps.
- Use foam sealant for wider openings. Spray carefully, as the foam expands when drying.
- Reposition the frame if necessary. Loosen the screws, adjust the fit, then retighten them.
To check for hidden gaps, shine a flashlight from one side of the door. Any visible light will reveal exactly where the door needs extra sealing.
Resolving Sealing Issues
Even when you know how to install outdoor kitchen cabinet doors, poor sealing can still lead to rust, warping, or water damage. A secure seal is essential for keeping your doors weather-ready and protected year-round.
To fix sealing problems:
- Inspect the existing sealant for cracks or missing spots. Remove any damaged sealant with a utility knife.
- Reapply a weatherproof sealant using a caulking gun. Work slowly and evenly to create a smooth line.
- Wipe away any extra sealant with a damp cloth before it dries to ensure a clean, neat finish and prevent unsightly buildup around the edges.
Always use an outdoor-grade sealant designed for temperature and moisture resistance. A well-sealed frame keeps your door secure, durable, and looking its best.
When everything is done, step back and enjoy your finished outdoor kitchen door—now built to last and ready to use.
Wrap Up
Installing outdoor kitchen doors can seem challenging at first, but breaking the process into simple, clear steps makes it easier to manage. From taking accurate measurements and cutting materials precisely to securely attaching hinges and sealing edges, each step is important for a smooth, functional, and attractive result.
Accuracy is your best friend throughout the process because it saves time and prevents mistakes. Always take your time and double-check your work to avoid problems later on. Don’t skip the sealing step, as it is crucial for making the door durable and weatherproof, protecting your outdoor kitchen from the elements.
FAQ
Which material should I use for the doors in an outdoor kitchen?
Steel is the material most people go for. You won’t have to worry about damage, rain, or cleaning it. Aluminum is easy to move because it’s lightweight and won’t rust, but wood has a natural appearance but may need regular sealing. Select a material that looks good in your kitchen and can deal with the weather outside.
What should I do to care for my outdoor kitchen door?
Regularly use mild soap and water to clean the clothes. Because of its smooth design, stainless steel should only be cleaned with soft products. Review and tighten any hinges and screws at least every few months. Annually apply a new layer of weatherproof sealant to preserve your decks.
Is it possible to install outdoor kitchen doors on my own?
Yes, you can! Everything you need to do is covered in this guide. Proper tools and patience make it easy for anyone to handle installing the system. Make sure to read the directions and recheck all your quantities.
How can I solve the problem of a door that doesn’t close correctly?
Check the hinges to start. Replace loose screws or re-align the parts that need it. Put shims under the frame legs if it is not level. When there are cracks, cover them with weatherstripping or foam sealant. After every adjustment, try opening and closing the door to check that it runs smoothly.
Should the door be sealed, or is it not really necessary?
Absolutely! Sealing stops moisture, rust, and damage that the weather may cause to a door. It also makes sure pests and dirt stay away from your outdoor kitchen. If this step is missed, there is a risk of warping or corrosion, which are often permanent concerns.


