
The popularity of the VEVOR vinyl cutter and its accuracy has revolutionized the cutting processes. Cutting-edge solutions provide fast work with guaranteed safety. All this is possible when you know how to use VEVOR vinyl cutter.
If you are a beginner without expertise, the VEVOR vinyl cutter manual pdf is enough to disclose all the facts. By reading this, you’ll know how to assemble different parts and use the vinyl cutter. As a bonus, we have added some safety tips for you. Let’s go through the usage instructions of the VEVOR vinyl cutters and understand how they can help you out in hard times.
Table of contents
Part 1: What We Will Get from the VEVOR Vinyl Cutter Manual?
What is the function of the VEVOR Vinyl Cutter?
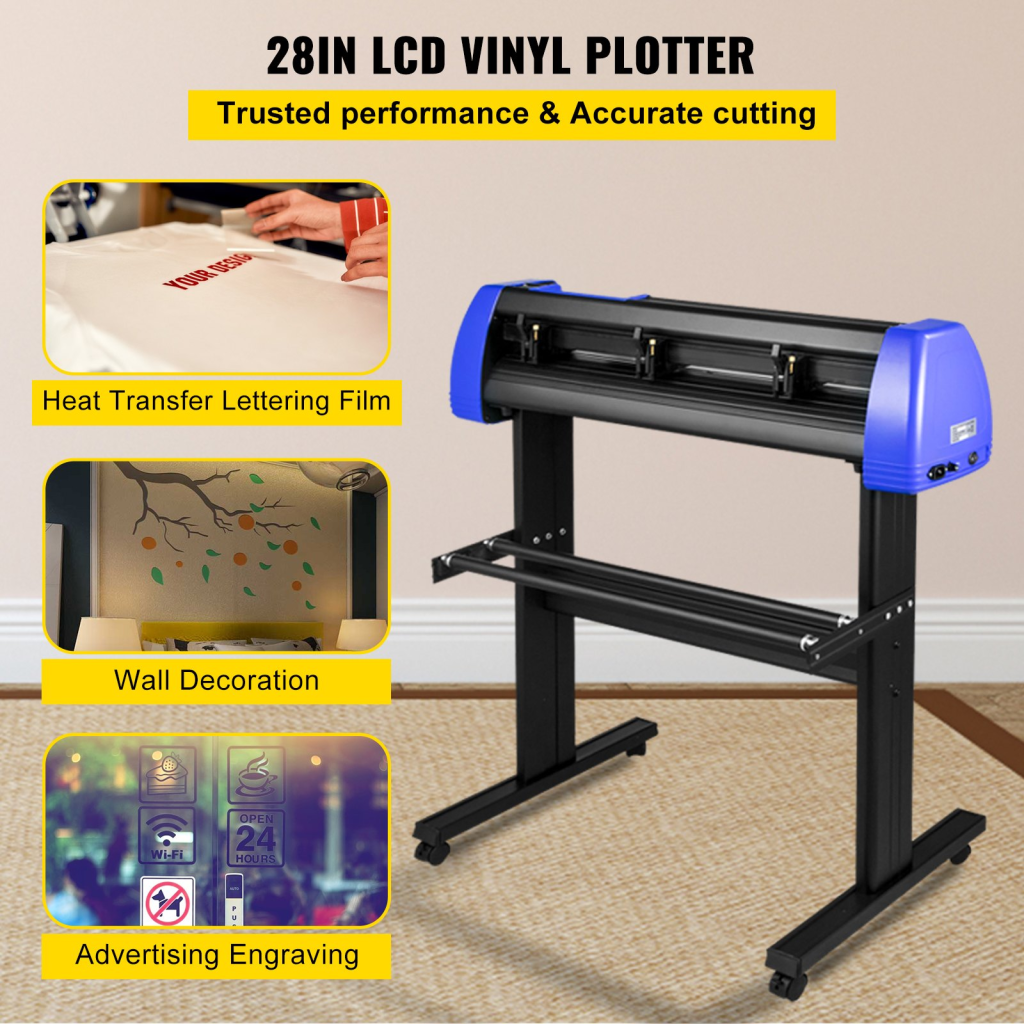
VEVOR vinyl cutters are a matchless choice that serves you in various promotional tasks. These include:
- Cut stickers and make them perfect for use.
- They help design custom T-shirts for the POD companies.
- If you are looking for excellent wall art, it is not a big deal for a VEVOR vinyl cutter.
- Nothing comes close to the sign and banner-making efficiency of the VEVOR vinyl cutter.
- Have fun and create custom gifts for your friends and family, too.
What does the VEVOR Vinyl Cutter manual pdf conclude?
VEVOR vinyl cutter manual pdf guide is the epitome of the perfect use of vinyl cutters. Amplify your work efficiency with the guidance on the following parts.
- It guides over all the components of products and parts associated with the VEVOR vinyl cutters.
- Get a complete specification list, including the technical parameters of the vinyl cutters.
- A quick handbook on the precautions and assembly of the different parts is the best thing.
- Grip the main parts with the operation instructions to ease up your work.
- Know how to use the product with its different components and functions.
- Connect the tool with the software to ensure better work efficiency.
Part 2: How to Assemble a VEVOR Vinyl Cutter?
There are three key things you need to assemble in the VEVOR vinyl cutter instructions. These include:
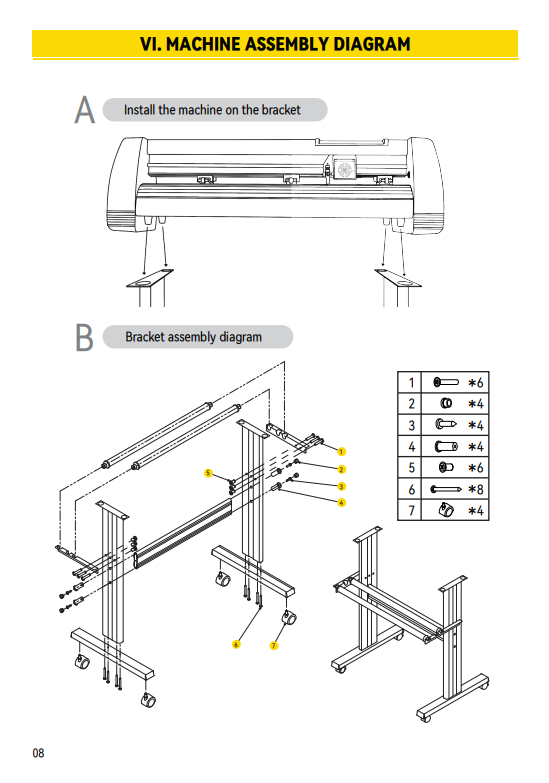
Install the machine on the bracket
- Set a bracket.
- Fix your VEVOR vinyl cutter on the bracket.
- Tighten up the nuts and bolts.
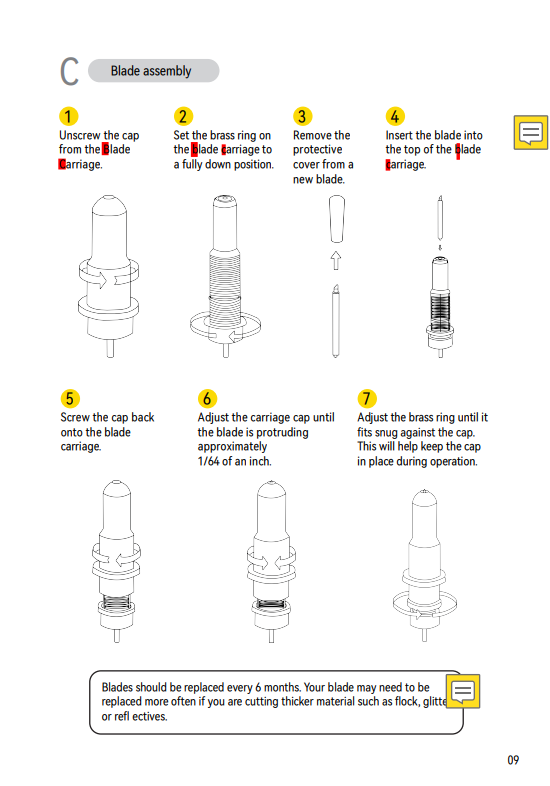
Assemble blade
- Unscrew the blade carriage and adjust the position of the brass ring.
- Remove the protective cap from the blade carriage and insert the blade into it.
- Screw all the things back, ensuring 1/64th of the blade is visible on the top. Adjust the brass ring until it fits the place.
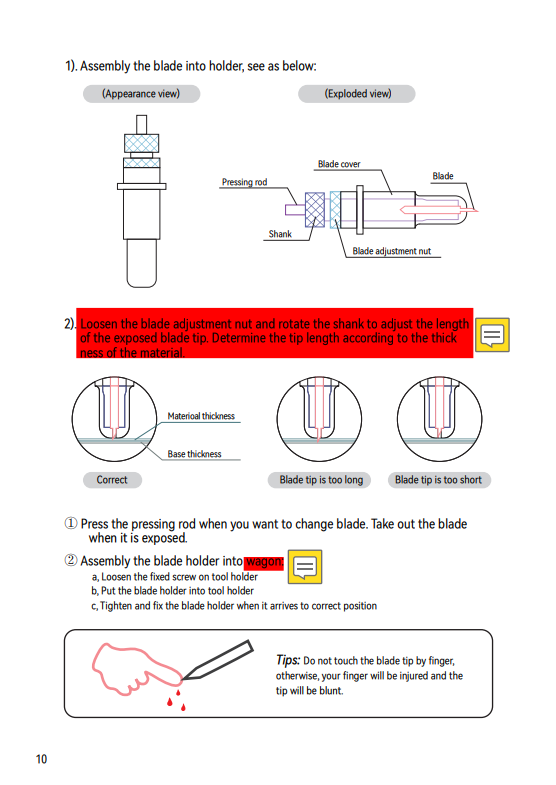
Adjust the blade length
- Assemble the blade into the holder.
- Loosen blade adjustment and rotate the shank based on your needs for needle exposure.
- Press the rod to change your blade. Usually, you need to change it every six months.
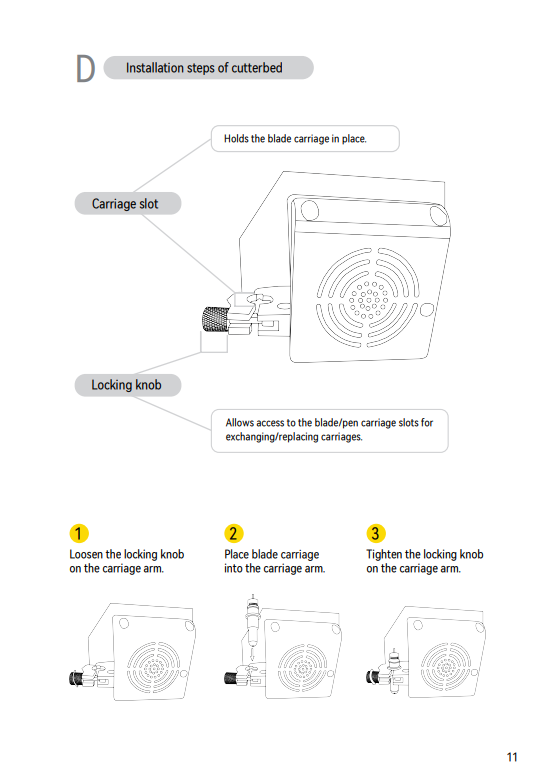
Install a cutter bed
- Loosen the lock knob.
- Place the blade carriage into the vinyl cutter arm carriage.
- Tighten up the knob and boom!
You have completed the VEVOR vinyl cutter assembly.
Part 3: How to Use VEVOR Vinyl Cutter? Step-by-step Guide
Using a VEVOR vinyl cutter needs the accurate assembly of parts and usage. Here are different steps to understand and use the VEVOR vinyl cutter.
Step 1: Understand the Display Buttons
Before you install and use the product, know about different buttons and display setups. These include:
- Reset button. Sets the settings to the original position.
- Offline/Leave/ Option button. It ignores all the changes that have been made earlier.
- Test/Move button. You can test the functionality.
- Origin button. It accepts the changes made earlier.
- V+ / V- buttons. Move the feed roller to adjust the material position.
- F+ / F- buttons. It helps move the carriage and reposition the blade.
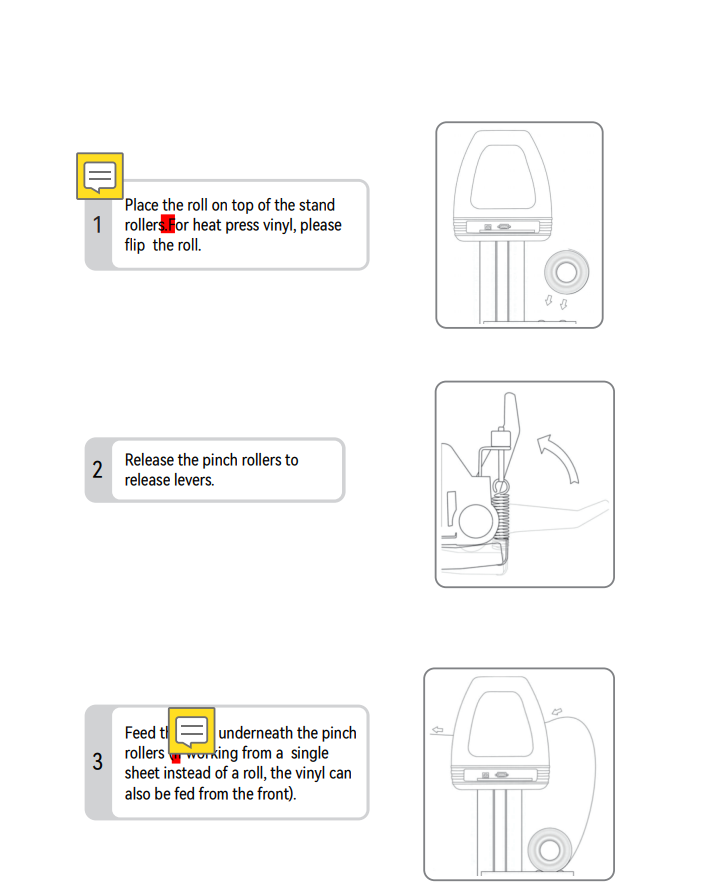
Step 2: Install the Roll
Roll is the main thing that offers the high accuracy of the vinyl cutter. Here are some steps to install the roll into your VEVOR vinyl cutter.
- Place your roll on the top of the stand roller. If you have the heat press vinyl cutter, flip the roll for better work output.
- Now, you can release the pinch rollers that will release the levers.
- You can cut your first vinyl. To do so, feed it beneath your pinch rollers. If you have a single sheet, you can also provide the vinyl from the front.
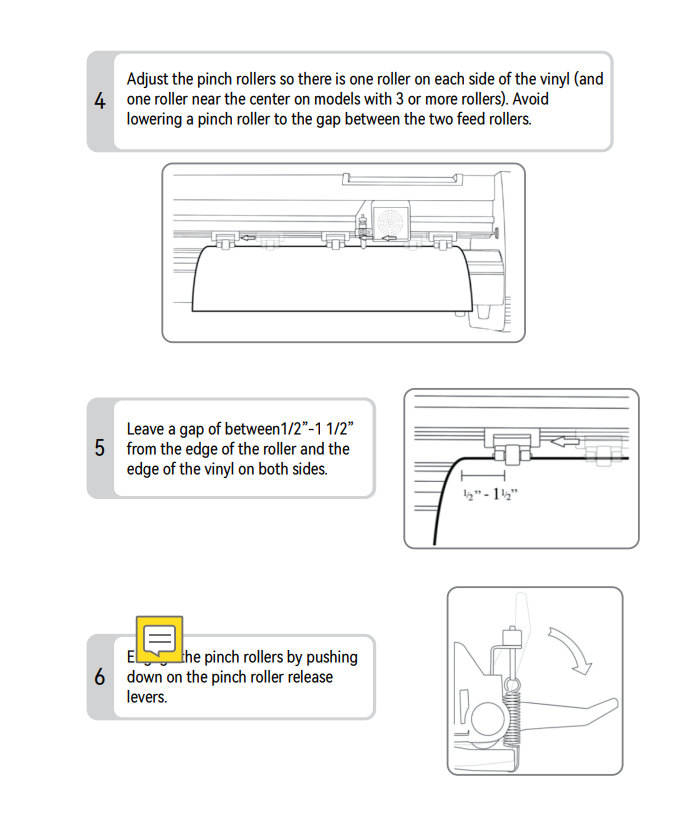
Step 3: Adjust Pinch Roller
Implement some efforts in adjusting the pinch rollers. Here are some steps to accomplish your first experience with the pinch roller adjustment.
- If you have three or more rollers, adjust one roller on each vinyl side and one on the center. Don’t lower the pinch roller between the two feed rollers to avoid any accidents.
- Keep a definite gap of at least ½ inch to 1 ½ inches between the edge of the roller and the edge of the vinyl on either side.
- Pushing down the pinch rollers gets the lever down to the original position. It also closes the lever.
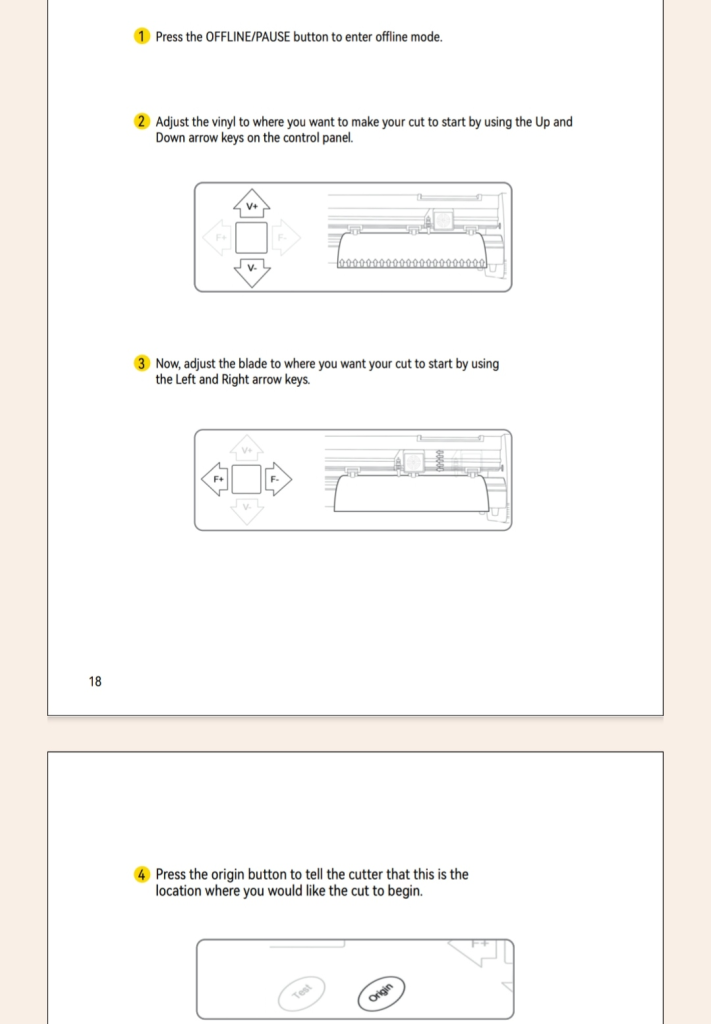
Step 4: Turn On and Do the Adjustments
You can turn on and off the settings before and after the operation.
- Pressing the offline or pause button will halt all the activity on the vinyl cutter. Even if your vinyl is midway on the pinch roller, it will go offline.
- Up and down control allows you to settle the cutting position on the vinyl cutter. V+ is the up position where you can settle on the upside of the vinyl, while V- is the down position with opposite effects.
- If you want to adjust the blade position, F+ and F- negative guide you through the process. Cut accordingly based on your needs and change the settings.
- Do you want to start cutting? Go on and hit the origin button. The cutter will start cutting the vinyl from the specified position.
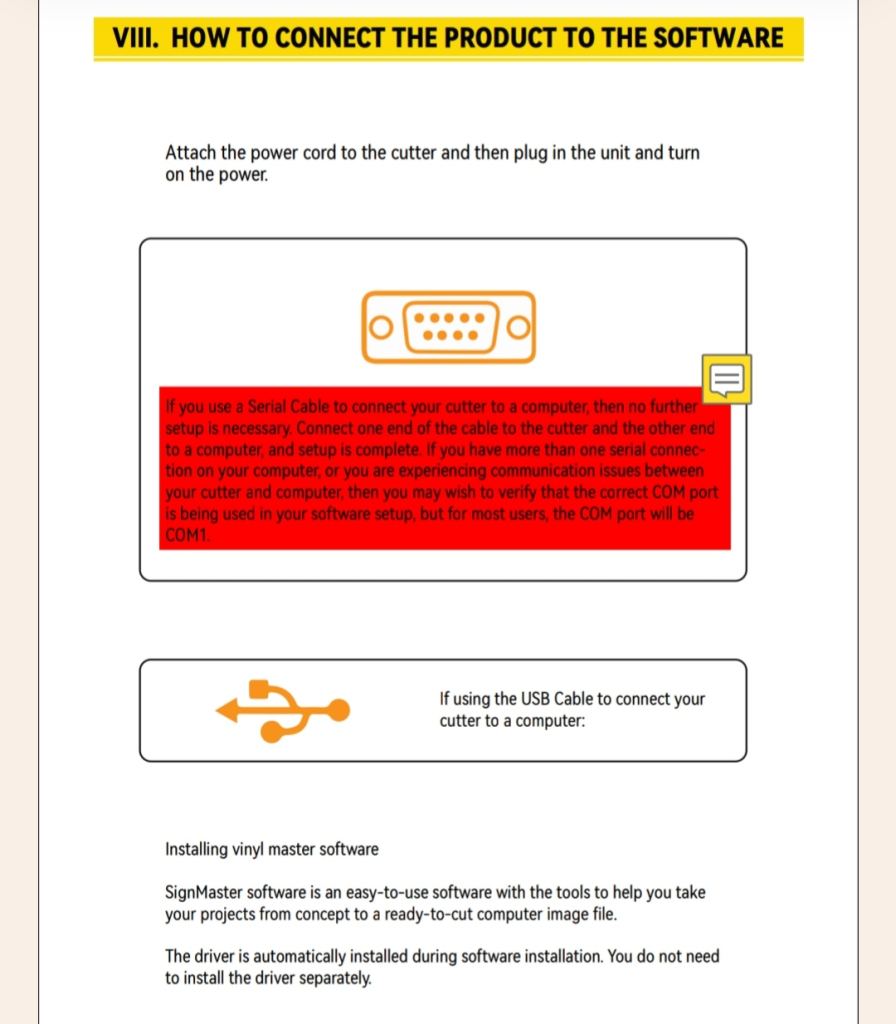
Step 5: Connect with Software
Be the brain of your vinyl cutting by controlling all the activities through the software. From designing and printing a design to cutting, you can open a print-on-demand shop this way.
- Plug the cord into the power source and turn on the computer.
- Connect the computer with the VEVOR vinyl cutter with a cable having one end in the computer and the other in the vinyl cutter.
- If you do not have a cable, a COM port can help you connect the vinyl cutter to the computer.
- Install the SignMaster software and link it with your vinyl cutter. Control all the printing and cutting activities quite efficiently. Remember, once you’ve installed the software, it is unnecessary to install the driver as it comes with it.
Step 6: Cut the First Design
SignMaster software helps you prepare the signatures and images or do the graphics. Do it all simply with your beginner’s skill and command the vinyl cutter to adjust the pinch roller position and cut the shape out of your design. Print them on your T-shirts or prepare custom gifts for your friends.
All is possible with the outstanding VEVOR vinyl cutters.
Part 4: Vital Tips Before Cutting Vinyl
Before you cut the vinyl, check out the following tips for rapid insights into the VEVOR vinyl cutters.
Choosing suitable vinyl materials
Choosing the suitable vinyl material is 100% crucial for efficient functioning. Consider the compatibility factors and think about the durability of your work. Not all the vinyl materials are suitable. So, deem about this aspect.
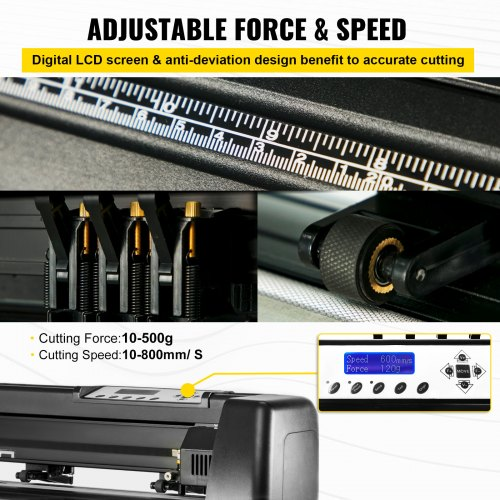
Understanding blade depth and pressure
Cutting blades have a varying depth and pressure. Accuracy considerations are pretty significant at such a point. Therefore, assimilating the knowledge of blade depth and pressure. Set the correct parameters for the highest efficiency.
Proper storage and handling of vinyl rolls
Vinyl rolls are often heat and light-sensitive. Tackle this issue by placing them away from the heat in a dark place. Avoid contact with moisture, too.
Utilizing software features effectively
Basic to advanced software is available. First, consider the compatibility of the software with your vinyl cutter and understand all the features. Make sure you install software that has all the required features.
The best setting for a vinyl cutter
Install it in a place with plenty of space. You must have the right tools to operate the cutter with the exact temperature and pressure demands on the place. Set the vinyl at a speed of 10 to 70 and test the functionality before you do your first task.
Part 5: Why Choose a VEVOR Vinyl Cutter?
VEVOR vinyl cutter is a top choice for all consumers worldwide. Wondering why VEVOR is so popular? It is because of the following benefits.
- Precision cutting. VEVOR vinyl cutter deploys a fast stepper build with quality materials. Double-spring pinch rollers with an aluminum knurling stick don’t let the paper slip. The latest technology allows a quick and precise cutting job within minutes.
- Customization and personalization. Do you have some requirements to set? Get full-fledged customization as per your needs and enjoy the accuracy of cutting.
- Versatility in applications. Don’t just rely on sticker cutting but also harness the versatile applications. Consider decal vinyl, scrapbook papers, card stock, vinyl lettering, pinstriping, and general signage.
- Ease of use. No rocket science is involved. As a beginner, you can operate it like a pro. Moreover, installation is accurate and time-saving.
- Efficiency and speed. Everyone appreciates the fast stepper motor that works even in low-noise conditions. Expect the high performance of cutting.
Conclusion
Vinyl cutters can be a handy tool to transform all your work into an art piece. From cutting your art accurately to designing your next custom T-shirt, it is a one-stop solution. Therefore, you can’t even think of buying such a precious thing with a blind eye. Always target quality.
VEVOR has some of the best quality vinyl cutters with many impressive features. Accuracy. Durable construction. Fast cutting. You get all the fantastic features in one place. Go on and shop the best vinyl cutters now!


