
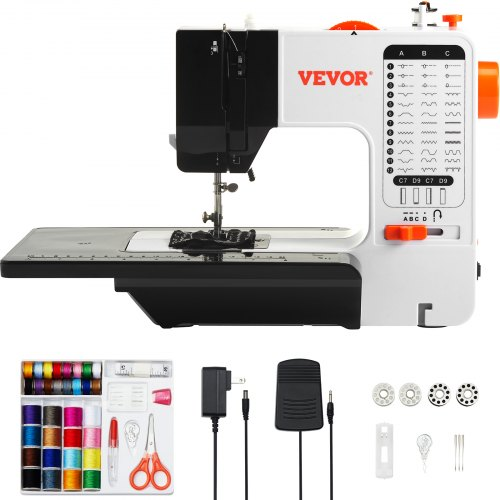
Have you purchased a brand new VEVOR sewing machine? The first question that pops up in your mind is, how do I use it? If so, relax! VEVOR does not only bring the machines but also a seamless usage experience with detailed guides.
You get not only access to the downloadable pdf file of the VEVOR sewing machine manual but also detailed DIY guides on the VEVOR sewing machine assembly instructions. Do you want to know in detail? This article will elaborate on the VEVOR sewing machine assembly with a guide on tackling the troubleshooting solutions.
Table of contents
Part 1: Specifications of VEVOR Sewing Machine
Specification
VEVOR sewing machine comes up with the following built-in features.
| Features | Light Weight Model | Medium weight model | Heavyweight model |
| Applications | General fabric, lightweight and medium-weight materials | lightweight and medium-weight materials | Medium-weight and heavyweight materials |
| Sewing speed | 5000 rpm | 4000 rpm | 3500 rpm |
| Max Stitch Length | 4mm | 5mm | |
| Needle | DBx1#9~#11 | DBx1#9~#11 | DBx1#20~#21 |
| Presser for lit | 10mm(standard)13mm(Max.) | 9mm(Max) | 10mm(standard)13mm(Max.) |
| Lubricating oil | Defrix Oil No. 10 | ||
Why choose VEVOR?
VEVOR sewing machine comes up with various pros. These include;
- Quick and Easy installation. Speed up the installation process with the easy methods. Mechatronics designs save you extra space as well.
- Versatile stitching. From a silky to flat seam stitch, you can try various stitching options.
- Smart Start and Shutdown Features. Minimize the power consumption by up to 35%. Astonishing, right? All thanks to the intelligent turn-off that automatically turns off, saving extra energy.
- Touch Display. Ease up your monitoring with a detailed display. Understand multiple tasks and keep your work one touch away.
- Quality results. Precise stitching with quick adjustment does nothing but save your time and ensure higher work efficiency. Stitch with confidence like a pro!
Part 2: Assembly and Usage of VEVOR Sewing Machine
Arrange all the parts of the VEVOR sewing machine. Join them and show off your sewing skills with the machine. Here is how exactly you can turn on the mysticism.
1. Installing the undercover
- Keep the oil pan on the four corners of the machine table groove.
- Fix two rubber seats on the operator’s side using nails. Fix two others on the hinged side with an adhesive. Place your oil pan on the seats.
- Before placing the machine on the cushions, connect it to the hinge in the machine bed.

2. Adjusting The Height Of The Knee Lifter
- The standard height of the foot presser is 10mm. Using screws, you can change it up to 13mm or 9mm for A type.
- Use the screw to adjust it up to 10mm. Ensure the needle is in the lowest position without hitting the presser foot.
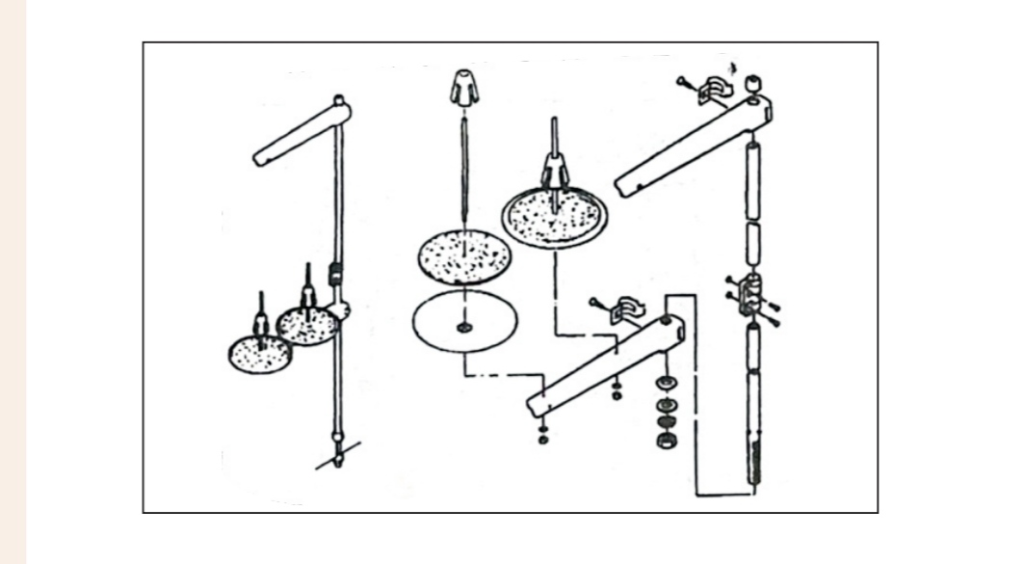
3. Installing the Thread Stand
- Place the thread stand on the machine.
- Fix it with the hinges and stabilize on the given position.
4. Lipin and Lubrication
- Understand the function of the lipin with the thread take-up crankshaft.
- For lubrication, fill up the machine oil up to the high mark levels on the machine.
- The low mark shows the need for oil, and you need to pour the oil.
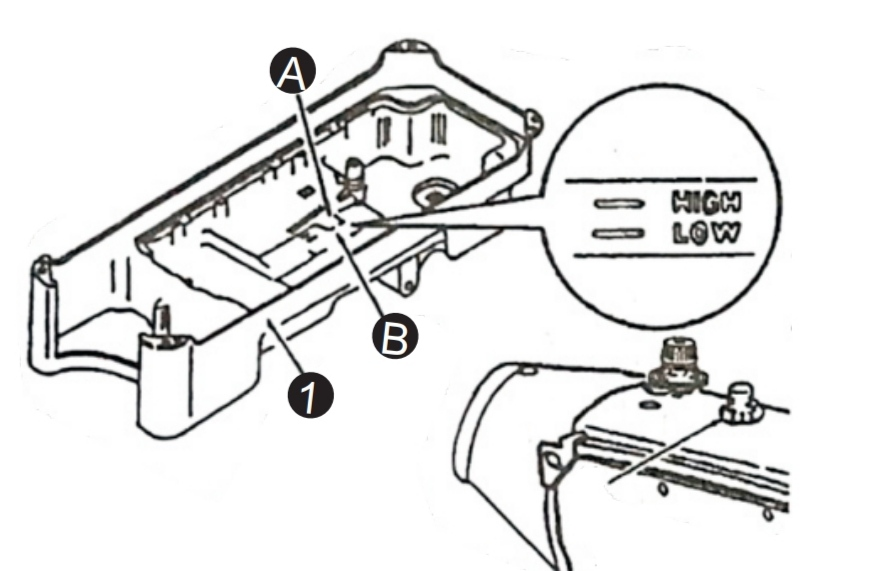
- Always operate the machine after lubrication. Check the splashing oil through the oil window.
- Before you adjust the lubrication in the hook, go for a warm-up of your machine.
- Place a piece of paper below the machine to check the amount of lubricant while the machine is running.
- Check within 5 seconds of placing the paper. Also, check the HIGH and LOW levels of the lubricants.

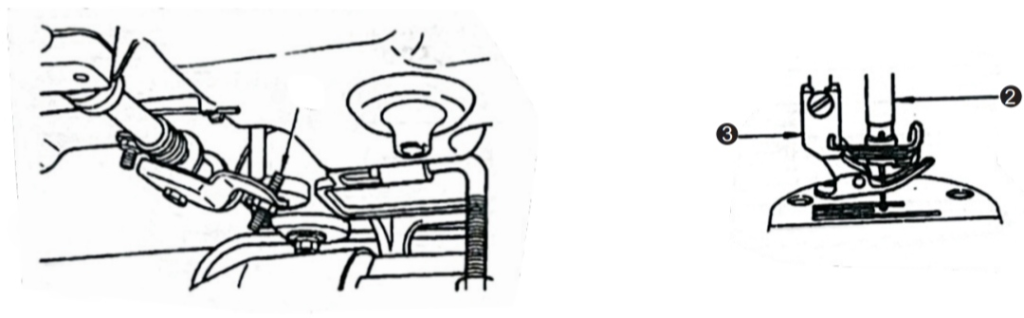
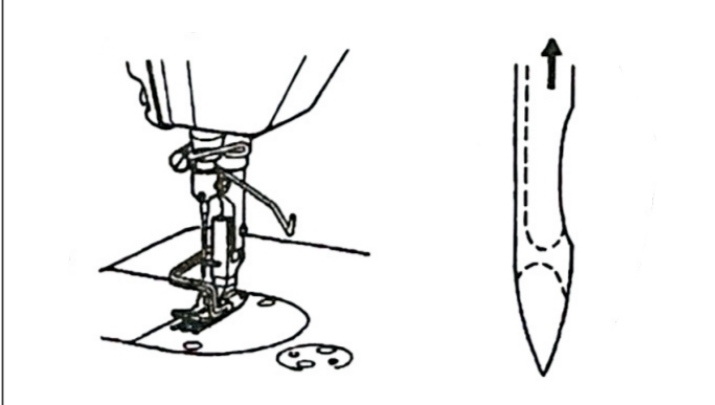
5. Attaching the Needle
- Loosen the needle set screw.
- Find the right place for the needle attachment.
- Attach the needle to the screw set and check if it functions effectively.
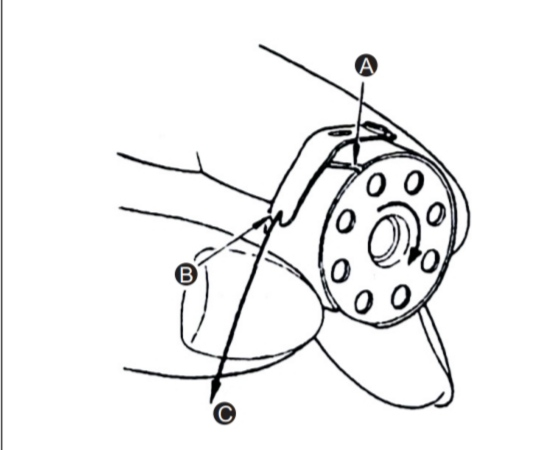
6. Setting The Bobbin Into The Bobbin Case
- Locate the thread slit and pass it through the slit and pull.
- Now, test the bobbin rotation when you pull the thread. You’ve done right when the rotation of the bobbin occurs.
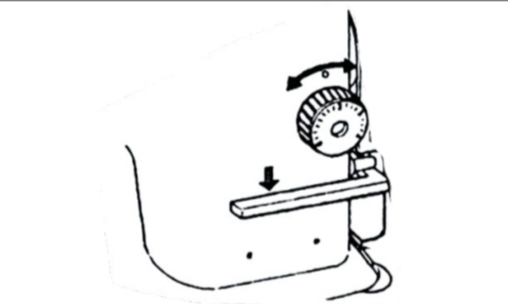
7. Adjusting The Stitch Length
- Adjust stitch length as needed by bringing down the dial.
- Move the marker on the machine to the required length. Usually, it is in the millimeters, but you can adjust it per your stitching requirements.
- Do the same but in the opposite direction by moving the dial and marker.
8. Presser Foot Pressure
- First of all, loosen the nut.
- Increase or decrease the pressure by moving the presser spring regulator. Moving it in a clockwise direction increases pressure while reducing pressure in an anti-clockwise direction.
9. Hand Lifter
- Use the hand lifter with an upward movement of 55 millimeters to stop the machine.
- Bring it back to the original position when working on the machine.
- Moving the up and down of the hand lifter also moves the presser foot and acts opposite in function.

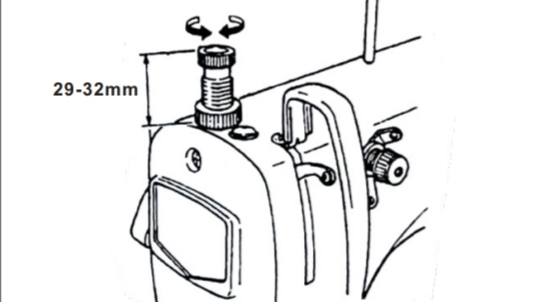
10. Adjusting The Height Of The Presser Bar
- Loosen the screw set and adjust the height of the presser.
- Once you have reached the required levels of settings, tighten the screw set on the given settings.
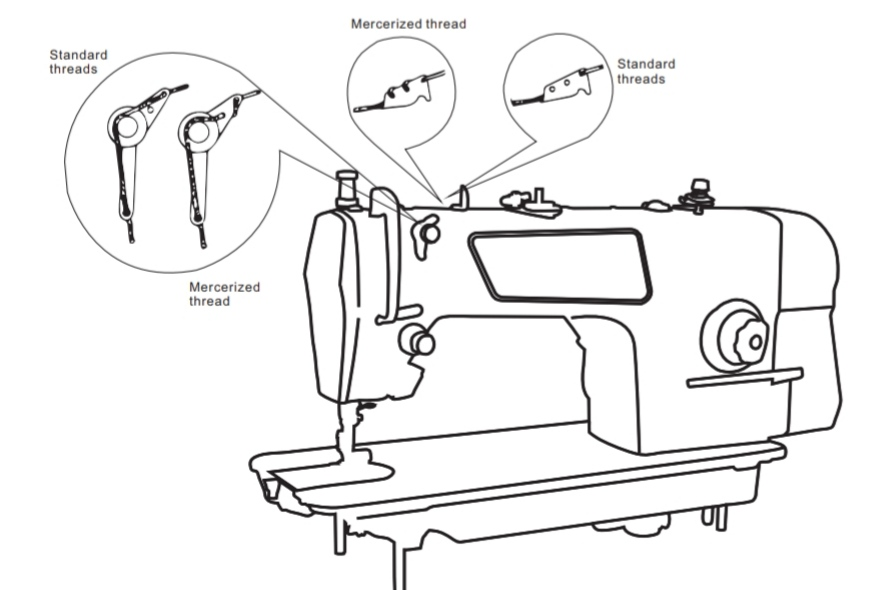
11. Threading The Machine Head
- There are two main types of threads. Standard threads and mercerized threads.
- Adjust them in the given loops and work accordingly when sewing.
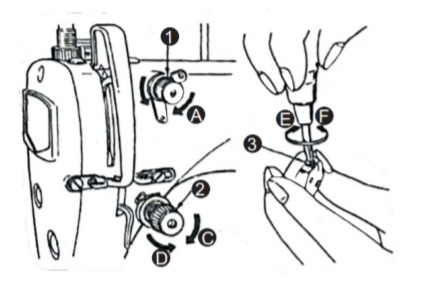
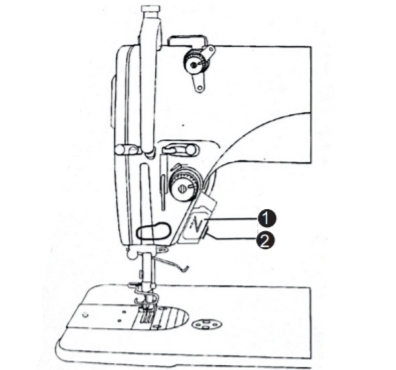
12. Thread Tension
- The thread tension number one increases and decreases the trimming.
Moving it in the clockwise direction decreases the thread length.
Moving it in an anticlockwise direction increases the thread length.
- Thread tension number two settles the thread tensions.
Moving it clockwise increases the thread tension.
Moving it anticlockwise will decrease the tension.
- You can adjust the bobbin thread tensions.
Moving in a clockwise direction will increase the thread tension.
Moving in the anticlockwise direction decreases the thread tension.
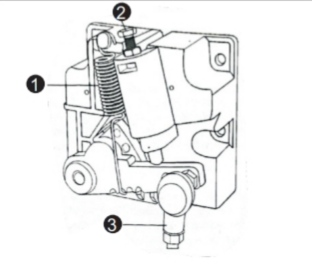
13. Thread Take-up Spring
- Change the stroke of the thread take-up spring.
Loosen screw set.
Moving it clockwise will increase the stroke, and the opposite will occur in the anticlockwise direction.
- Change the pressure of the thread take-up spring.
Loosen the screw set and remove the thread tension.
Moving in clockwise increases the pressure.
Moving in an anticlockwise direction decreases the pressure.
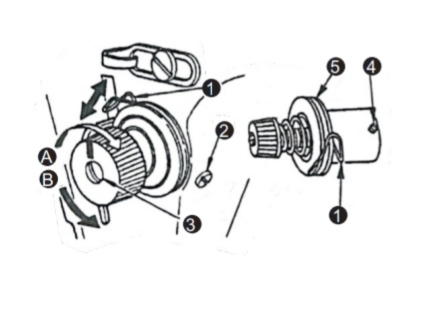
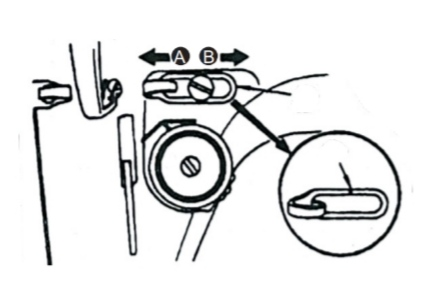
14. Adjusting The Thread Take-up Stroke
- Sewing heavyweight/lightweight material needs a different stroke.
- For heavy weight, increase the thread length by moving it in the left direction.
- For lightweight, move it in the right direction.
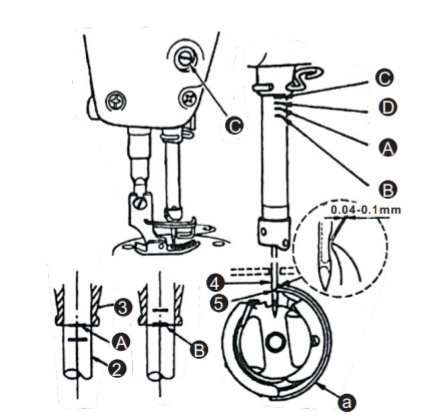
15. Needle-to-hook Relationship
- Adjust the timing of the needle and hook by turning the handwheel.
- Adjust needle bar height by different alignment positions while tightening up the screw.
- Whenever making adjustments, align the hook and blade and tighten the screw to fix the required position in place.
16. Height Of The Feed Dog
- Adjust the height of the feed dog by loosening the screw and changing the different heights.
- Once you have done that, tighten up the screw in position.
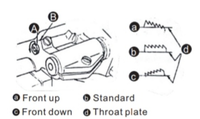
17. Tilt Of The Feed Dog
- To prevent puckering, tilt feed dog with its front up!
Loosen the screw set.
Use the screwdriver.
Move the feed bar shaft in a 90° direction.
- To prevent uneven surfaces, tilt feed dog with its front down!
Move the feed bar shaft at 90° in the opposite direction.
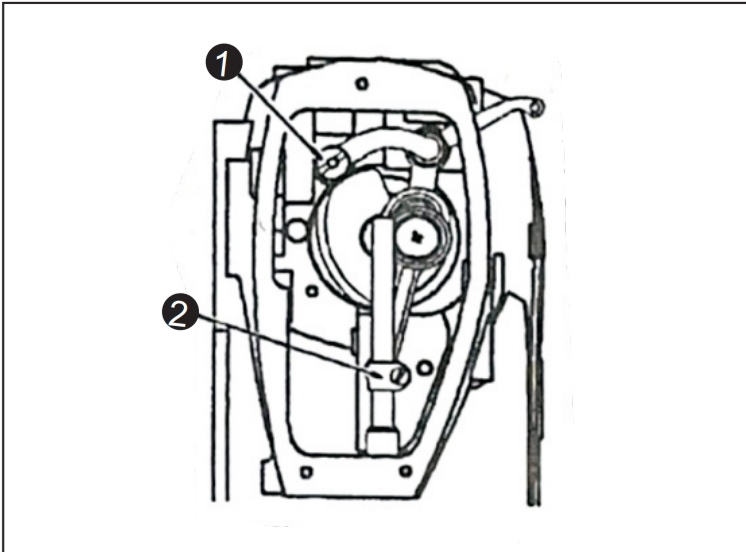
18. Adjusting The Feed Timing
- Loosen screws 2 and 3 in feed eccentric cam 1.
- Keep the standard adjustments with needle eyelets flush with a throat plate whenever the feed dog descends.
- For advance adjustments, move the eccentric cam in the arrow direction.

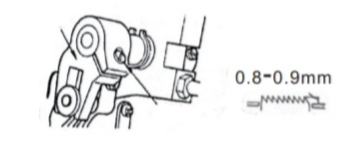
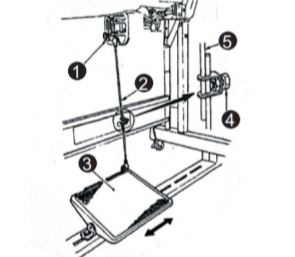
19. Pedal Pressure And Pedal Stoke
- Change the pedal pressure by two methods. Either way, you can hook the spring adjustment on the right and left sides.
- Hooking on the right side decreases pressure, while on the left side increases pressure.
- On the back part of the pedal, you can also increase pressure with a regulator screw in or decrease it by a regulator screw out.
- Increase pedal stroke by inserting the connecting rod into the right hole.
20. Adjustment Of The Pedal
- Move the pedal to the right and left until the connecting rod and lever become straight.
- Adjust the pedal angle by changing the length of the rod. Loosen and adjust the screw to change the size.
21. Pedal Operation
- Pedal operation from the back or front is quite crucial for speed adjustment and thread trimming.
- A slight press from the front will keep the stitching at a low speed.
- If you want to increase the speed, press further and confirm the gain in speed.
- If you bring the pedal to its original position, the machine resets and stops the work.
- If you press on the back of the pedal, the thread trimming will occur instantly until you stop it manually.

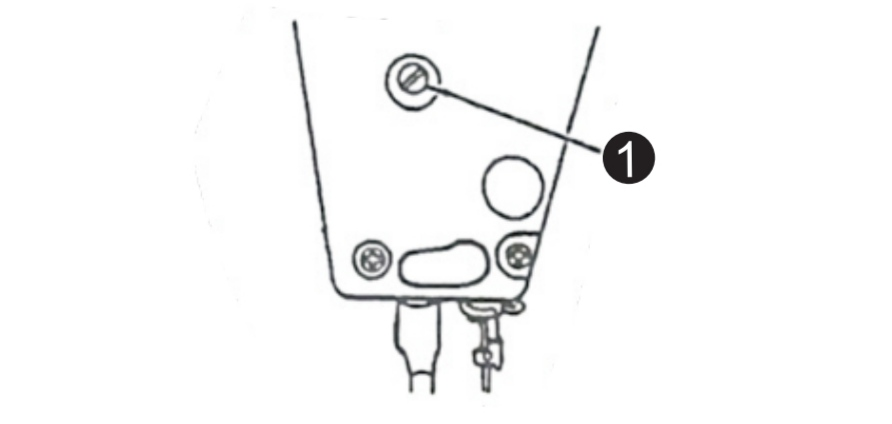
22. One-touch Type Reverse Feed
- Hold button number 1, as shown in the image. Doing so will do the reverse feed stitching.
- Once you release it, the normal stitching process will turn on. You can do the reverse stitching whenever needed.
Part 3: VEVOR Sewing Machine Troubleshooting
VEVOR sewing machine manual discloses many troubleshooting issues. Here are nine main matters you can interact with in your operation.
1. High voltage
If the system voltage is too high, there can be issues with the incoming line voltage. Check it and fix it to avoid any accidents. Confirm that the system voltage detector is also working correctly.
2. Pedal ID failure
Loose pedal joints can cause such a failure. Tighten up the joints and avoid any issues in the future.
3. Operation box communication is poor
It happens when the communication of the head operation box is lost. You can make good contact with the head operation plug or replace the device with a new one if it does not correct after multiple attempts.
4. Motor overload
Overloading occurs when the motor is blocked. Check the system is showing the accurate data. Make good contact with the motor plug. If the machine head is stuck, correct it also.
5. Motor signal failure
Motor signal failure occurs due to improper positioning. Good contact with the motor encoder interface can ease this trouble. Consider the needle-stop substrate, too, to handle this issue.
6. The motor current is high
Abnormal running of the motor causes a high current. Correct the motor or confirm the normal working of the detection system. Feed the compatible current.
7. Flip switch failure
Is your flip switch effective? Turn down the machine head or consider the flip switch checking. Correct the flip switch failure on time to avoid more problems.
8. OZ loop failure
OZ loop failure is usually a detection failure. Verify the standard detection by the system. Sometimes, the OZ circuit fails. You need to set the circuit to work with the proper steps.
9. The encoder signal is abnormal
Sometimes, the encoder signal fails due to sensor signal problems or damaged power cables. Maintain good contact with the motor or encoder interface.
Part 4: Frequently Asked Questions about the VEVOR Sewing Machine Manual
What is a sewing machine?
The sewing machine is used to stitch fabric and material with the help of thread. It has global applications in the sewing process. From the stitching of a T-shirt to sewing the curtains, sewing machines ease up the job.
Is hand sewing better than machine sewing?
Hand sewing is good for one or two sewing jobs. If you are looking for bulk jobs, machine sewing is a peerless choice. It saves time and endorses the better precision of the job.
Which is the best sewing machine to buy?
Many brands advertise their sewing machines. But VEVOR has some of the best options available to you. You get cheaper rates with world-class quality. Expect the 100% accuracy of work with our sewing machines.
How do you change the needle in the sewing machine?
Loosen up the needle set screw and pull the needle in a downward direction. Once the needle comes downward, pull it out and replace it with a new one. Maximize your safety by turning off the machine, and don’t touch the sharp end of the needle.
Conclusion
The VEVOR sewing machine manual has all the necessary assembly features. From a single thread attachment to the needle replacement, it is a full-fledged opportunity to do the DIY work.
VEVOR has nurtured years of warranties to the consumers. Why do you even waste money on expensive solutions when VEVOR offers affordable costs? Save money and enjoy the premium sewing machines. Get on now!


