
Introduction
Are you struggling with the accurate placement of your carport? Confused with installation? You’re not alone. Lots of people find pitching tents harder. But fear not! This step-by-step VEVOR carport Instructions Guide is designed to simplify the installation procedure. We provide a comprehensive guide with step-by-step instructions that will make the entire process a breeze and spare you time and trouble. No more wondering and making mistakes. We provide user-friendly instructions in accordance with your preferences. Get ready to enjoy the coziness of a versatile portable carport in any place. Get cozy and in charge with a straightforward setup.
Table of contents
Part 1: What is a Metal Carport?
A brief overview of metal carports
You can define a metal carport as a structure that helps you park vehicles in a shelter. Wondering what is carport? It is nothing but a shelter featuring a metal structure and comprises beams and posts. This way, you can save your vehicle from harsh weather conditions. Carports made of metals are purchased for their long life, affordability, and flexibility of use. They can be set up easily and many are customizable to accommodate your specific requirements.
Types of metal carports
Steel carports:
Steel carports are durable and strong which is what makes them perfect for heavy-duty protection. They provide better resistance and stability being able to stand up to inclement weather and give secure shelter to your cars.
Aluminum carports:
The aluminum carports are featherweight, nonetheless, very durable corrosion-resistant and they easily maintained. They are ideal for coastal areas or places exposed to rusting. In addition, aluminum carports are very customizable and may be built to match your personal taste and at the same time offer reliable shelter for your vehicles.
Part 2: How to Install a Metal Carport – VEVOR Carport Instructions
VEVOR Carport Introduction
Elevate your vehicle reservation with the VEVOR Carport, Heavy Duty 12×20ft Car Cover in Dark gray. This carport extra-large provides the much-needed space that can accommodate different kinds of vehicles from cars to boats and cargo. Its sidewalls and doors can be removed according to the demands of such outdoor events, including parties, weddings, or commercial exhibitions.
Have smooth airflow all through the year with 4 waterproof double-curtain vent windows, praising air circulation and solid wind resistance. Durable and heavy-duty metal frame making use of 8 sturdy galvanized steel pipes with a rust-proof powder coating and 8 stiffeners for added stability, even in bad weather.
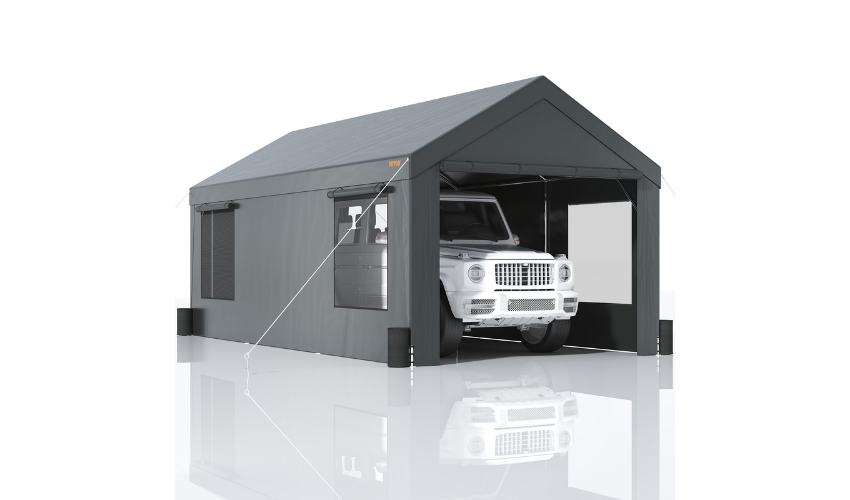
The 180g 3-ply PE fabric cover shedding canopy is waterproof, UV-resistant, and tear-resistant. Fix the securely with elastic balls, support feet, sandbags, nylon ropes, ground nails, and windproof nails for the last protection level.
Assembling without requiring any additional tools is a piece of cake. Every piece is allocated a number, and manual and video tutorials offer quick installation by 2-3 adults. If the consumer has any questions, VEVOR customer service is available to help immediately. Ditch the hassle of parking with our convenient carport that offers both durability and versatility.
Step-by-step VEVOR Carport Instructions Guide
The following section will guide you on step-by-step installation VEVOR carport instructions. By following these steps you can smoothly and swiftly end up your carport installation:
Step 1: Top Slope Overlooking Plan:
Determine the slope of your carport’s roof to design a proper drainage system. Evaluate the location where you are locating the carport and then calculate the direction of water flow. The goal should be achieved with a slope of at least 1/4 inch per foot to enable proper drainage. It keeps the water away from forming puddles on the roof, which over time can result in various damages. Properly installed slippery slope will direct rainwater away from a carport which makes it dry and safe.
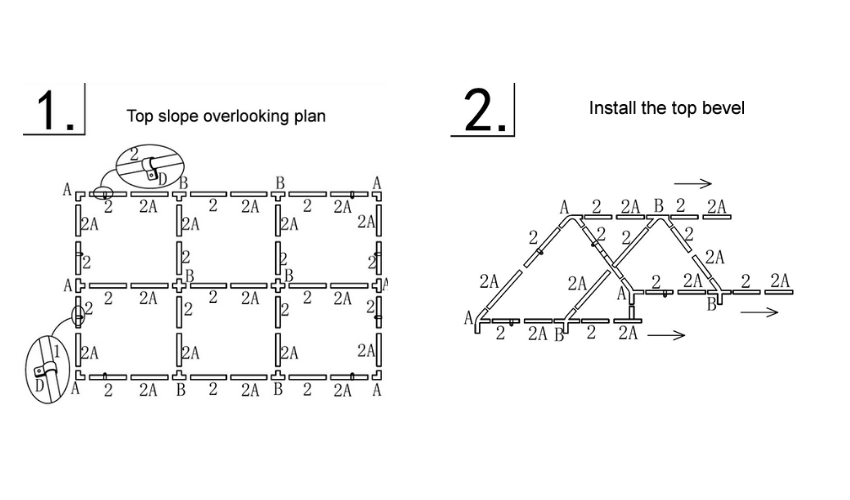
Step 2: Install the Top Bevel:
Fasten the top bevel to the top point of the garage frame using bolts or screws. The top bevel, which provides serious structural support, should be properly aligned with the frame. By making sure that the upper bevel is tightly secured, the footings of the whole installation process becomes a strong base. This means that the roof of your carport will always be steady and will be able to handle whatever weather comes in.
Step 3: Top Stiffener Installation:
With the primary stiffener pointed upward, install it properly into the frame by using the included hardware. The last stiffener also shares the weight of the roof equally by load sharing. The top stiffener also gives the framework of the carport a strong structural feature, which in turn makes it less vulnerable to sagging or bending as time passes by.
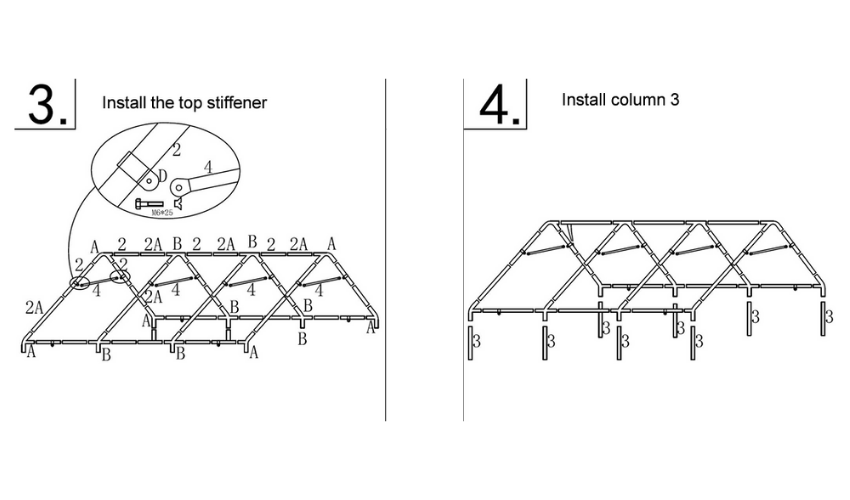
Step 4: Column 3 Installation:
Screw the column into the frame making sure that it is aligned horizontally with the plan. Apply appropriate fixings so that column is properly anchored and supports the carport structure. The column 3 is the most important step in securing the strength and stability of your carport, therefore assuring its longevity.
Step 5: Install a Tarp:
Establish the tarp on top of the frame in such a way to cover the whole space of carport. Cover any creases or wrinkles so that the cut bevelled edge is clean and even. Installing the tarp creates an essential barrier against weather elements dangerous to vehicles or equipment, including sun, rain, and snow.
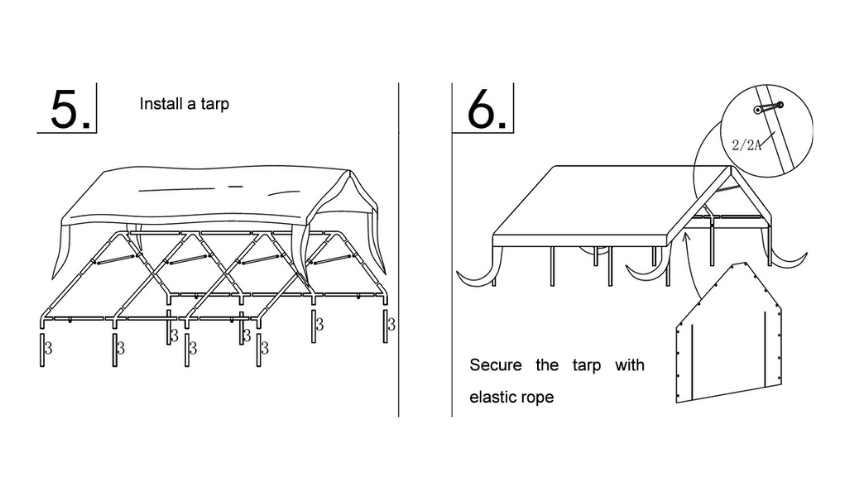
Step 6: Secure the tarp with elastic rope
Use elastic ropes or bungee cords to tightly attach the tarp to the frame, starting from one corner and proceeding to the whole perimeter Make sure the rope is tightened properly to resist the tarp shifting or coming off. The elastic rope is used to fasten the tarp which prevents it from getting blown off when the wind is blowing strongly or during heavy rain.
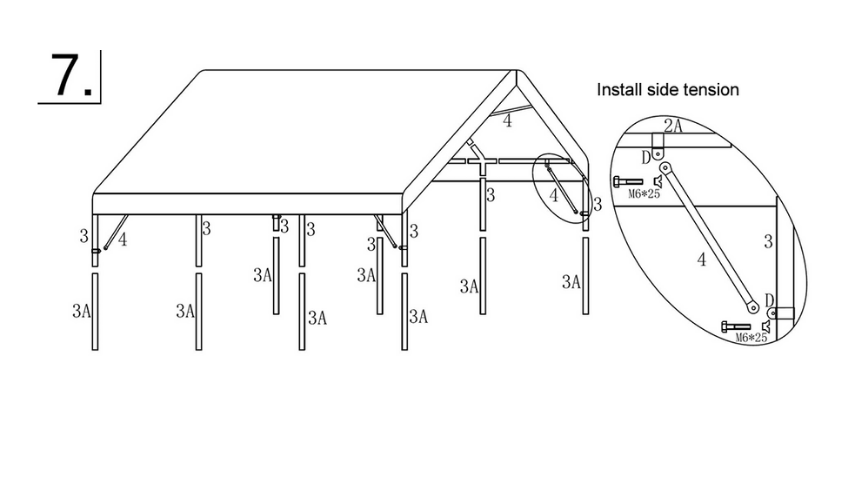
Step 7: Install Side Tension:
Add tension bars or cables to the sides of the carport to stop sagging and preserve the strength of the tarp. Tie these elements tight to the frame and make sure they are properly aligned and are not loose. When tensioning the carport on the side you are raising the stability and reliability of the carport so that can resist different weather conditions.
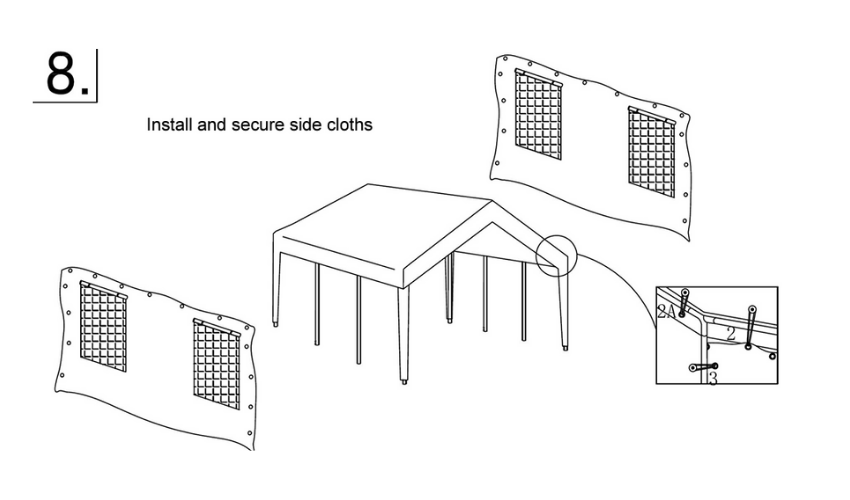
Step 8: Install and secure side cloths
Along the sides of the carport, place side panels or cloths and secure them to the frame using suitable fasteners or clips. Make sure that the cloths are pulled in evenly and provide full coverage. Attaching and fastening side curtains makes a second barrier for your porch, so that your vehicles or equipment will be guarded from the wind, rain, and debris.
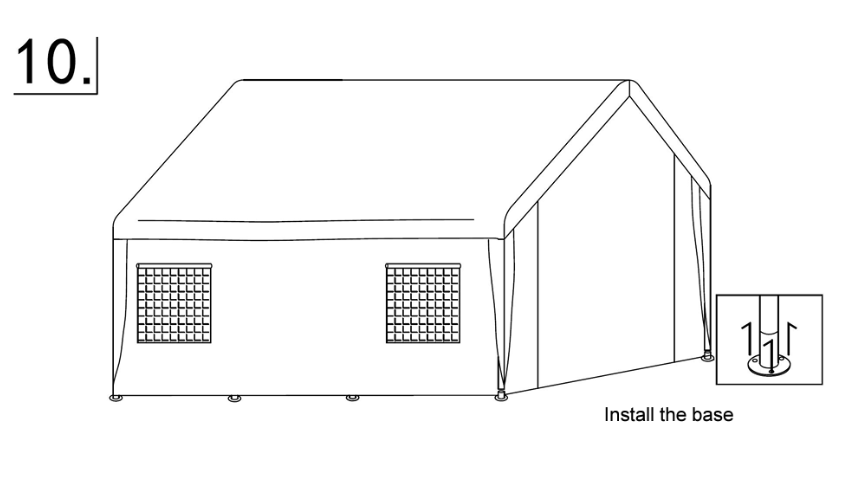
Step 9/10: Install the Base:
Use stabilizing supports or base plates which are recommended in the manufacturer manual.
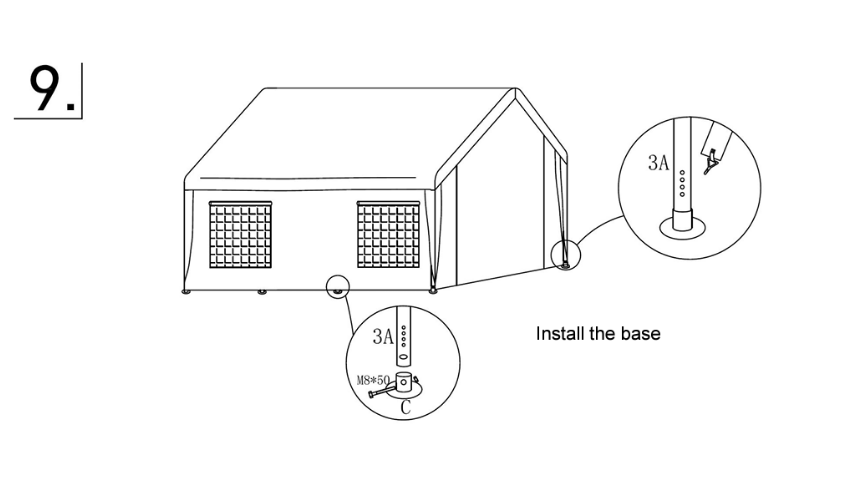
Guarantee that the carport is straight and firmly attached to have the stability as well as the structural integrity during carport building. The set up of the support elements also provides the carport with the strength and security that it needs.
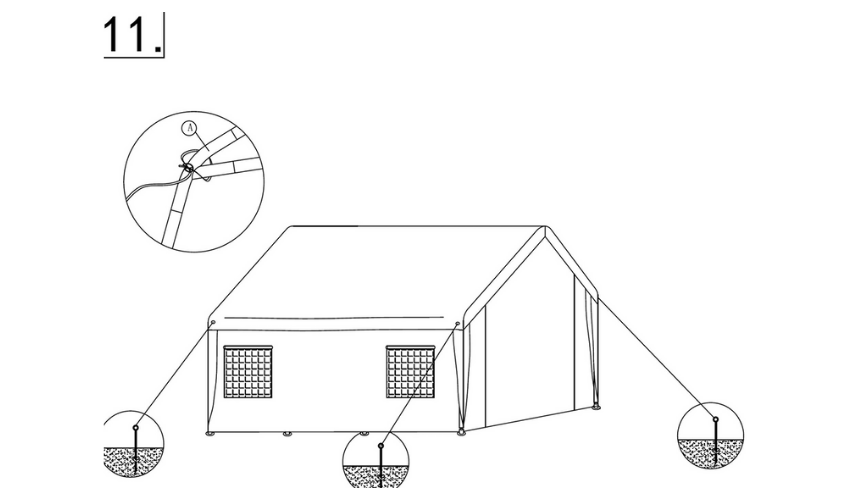
Step 11: Fasten the edges using windproof drawstrings.
Use windproof draw strings or straps to haul the tarp and side cloths on the frame securely. In addition, use ground anchors or posts to immobilize the lower part of the carport to the ground. If sandbags are the only option, place them on the carport legs to provide extra weight and stability regardless of the direction of the wind. With the perimeter defense, you not only strengthen the entire structure of the carport but also make it more resilient to a variety of weather conditions without compromising its integrity.
Through these step-by-step VEVOR carport instructions, one can successfully install the metal carport that covers the car or an outdoor item effectively. Always refer to the assemblage instructions and safety measures provided by the manufacturer during the installation process to make sure that your carport operates at the best level and is long-lasting. Read more on making the right choice for your carport.
Part 3: What Should You Pay Attention to When Installing a Metal Carport?
Include the following points in application scenarios.
Follow the carport installation instructions:
Start by slowly reading and adhering to the manufacturer’s installation instructions that are inside your carport kit. Such instructions are suitable for the particular design and material of the carport model and therefore provide the assembly accuracy.
Check component integrity:
Make the components check for any damages or defects before the assembly process. The main parts of it, like beams, connectors, and fasteners, must be in good condition as these support it.
Choose a suitable installation location:
Pick the level area that has the best surface, either on concrete or asphalt, for carport construction. Set it on a level and solid basis to avoid swaying and to minimize the risk of destruction.
Safety precautions during assembly:
Safety is the most important thing when you work with the equipment. Through the employment of appropriate protective gear, such as gloves and safety goggles, along with the adherence to carefulness when faced with heavy or sharp objects. Take a break at regular intervals to not get exhausted and focus all the time.
Follow safety regulations:
Familiarize yourself with the local building codes and the requirements that deal with the carport installations. Implement applicable conditions such as minimum setback from the property line and height limit to prevent rule violation.
Conclusion
Furthermore, a full understanding of VEVOR Carport Instructions Manual guarantees the correct setup and utilization. The principle suggests longevity and usability. Please note that the carport choice for you must be evaluated very carefully. Think about stuff like size, material, and style. Experience the high quality and reliability of VEVOR carports because we don’t hesitate. Whether you want the guard for your car or you need more than space, choose wisely. Take action today to take care of your investments and also improve the functionality of your house. Trust VEVOR when you need a carport, and be calm knowing that you have made the correct decision.


