
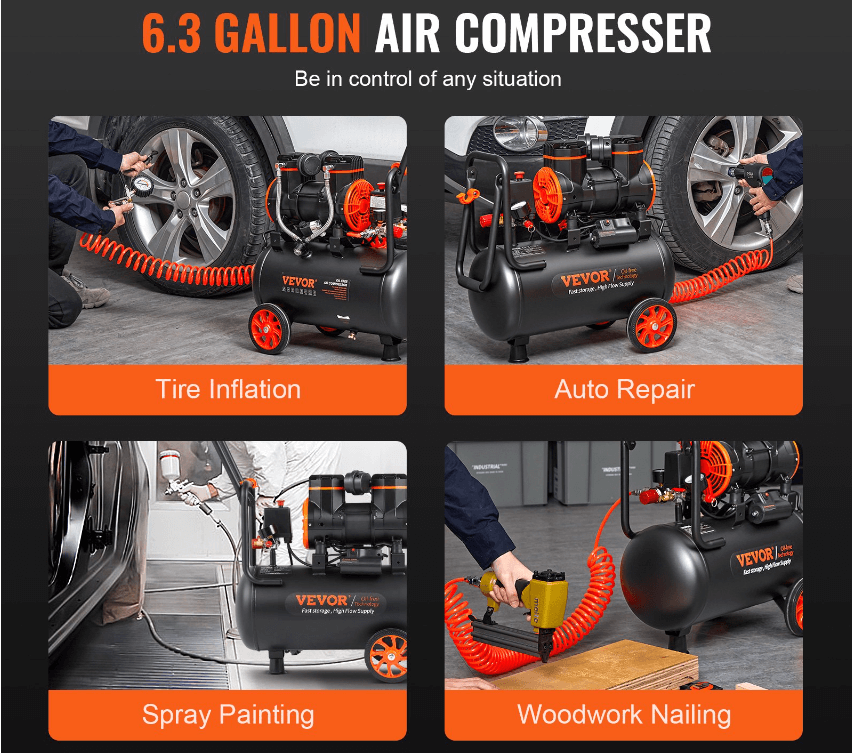
Welcome to the definitive guide on the VEVOR 6.3 gallon air compressor, a masterpiece of efficiency and innovation designed for a myriad of applications. In a landscape where precision and reliability are paramount, the VEVOR air compressor manual emerges as your trusted companion, offering detailed insights into operation, maintenance, and troubleshooting. Whether you’re a professional seeking to enhance your workshop’s capabilities or a DIY enthusiast embarking on home improvement projects, this manual serves as the key to unlocking the full potential of your VEVOR air compressor.
Join us as we delve into the features, advantages, and practical applications of this remarkable tool, ensuring that every task is executed with unparalleled excellence.
Table of contents
Important Safety Instruction
This manual contains important instructions for operating this product. For your safety, and the safety of others, be sure to read this manual thoroughly before operating the product. Thank you for choosing the VEVOR oil-free air compressor. Please contact us if you have any questions.
- The machine should be stored in a dry and ventilated room, and strictly avoid closing to perishable, flammable and chemical substances! The storage period should not exceed two years from the date of leaving the factory, if it exceeds the storage period. Check and maintain before use, or make a test if needed!
- The machine is strictly forbidden to collide, placed steadily when using it, and it must be prevented from tilting and upside-down during transportation to avoid malfunction!
- Try to avoid using it in an environment where the temperature is too high, the air is dirty, dusty, oily fuel and exhaust gas pollution. Use in these environment may cause damage to the machine.
- Before connecting to the working power supply, make sure that the machine is turned off, and the power supply voltage shall not be lower than or higher than 10%of the rated working voltage of the machine!
- Do not touch the high temperature area of the machine while the machine is working! For example, the cylinder head, check valve and other components. If maintenance is required, please turn off the machine, disconnect the power supply, and wait for the machine to cool down to prevent burns!
- The machine has strict requirements of the power cable. Please refer to the specification sheet of this manual for details. The power cable should not be too long to prevent excessive voltage drop and affect the performance of the machine.
- The recommended environment temperature should be 0-37 °C. Too low or too high temperature may affect the performance of the machine.
- Before use, to confirm whether the safety valve is effective, pull up the safety valve to check whether it can easily vent. After checking, press the safety valve to make sure it has been reset.
- During use, avoid the machine air outlet and the equipment connected to the air outlet from directly facing the operator or other personnel to prevent possible potential hazards and injury to the human body.
Advantages of VEVOR
Designed by Italian team, with elegant and modern industrial style appearance; Inheriting the high standards and high quality of the VEVOR brand for 25 years; China’s National High-tech enterprise, focusing on innovation and R&D in pneumatic field.
Introduction
Compared with traditional belt drive or direct drive air compressor, our oil-free air compressor (hereinafter referred to as air compressor) do not require lubricating oil and can provide a relatively clean air source with low noise. This is especially suitable for dentistry, breeding, medicine, fitness, beauty, chemical industry, scientific experiments, and other high-demand fields.
At the same time, it can also be widely used in traditional home improvement, auto repair, factories and other fields. Such as air supply for pneumatic tools, like spray gun, air nailer, etc., air supply for vehicle brakes, air supply for tooling equipment, etc.
Comparison with traditional belt drive or direct drive air compressors:
| Items | Oil free air compressor | Direct drive or Belt-drive |
| Lubrication | No, withoutmaintenance cost | Yes, highermaintenance cost |
| Oil/water filter | No need | Need |
| Cleanliness of air | Higher | Lower |
| Moto | Higher efficiency | Lower efficiency |
| Energy Consumption | Lower | Higher |
| Noise | Soft, low, around 75db | Harsh, high,around 90db |
| continuously working | Less restrictive | More restrictive |
| Failure rate | Lower | Higher |
| Low temperature working | Applicable | Not applicable, risk of emulsification |
Package Contents & Assembly
Applicable Model:2-900F8
Handle type machine
| No. | Parts | Qty |
| 1 | Air Filter | 2 |
| 2 | Handle | 1 |
| 3 | Screw | 2 |
| 4 | Bolt | 4 |
| 5 | Cushion foot | 4 |
Applicable Model
2-900F18/2-1450F/2-1800F35
Pull rod type
| No. | Parts | Qty |
| 1 | Air filter | 2 |
| 2 | Pull rod | 1 |
| 3 | Screw | 4 |
| 4 | Wheel | 2 |
| 5 | Axle | 2 |
| 6 | Bolt | 1 |
| 7 | Cushion foot |
Assembly
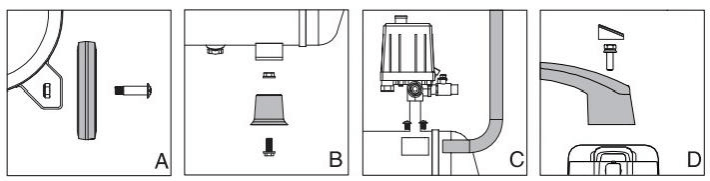
Applicable Model:2-900F8
1. Wheel (Pic. A)
Pass the screws through the casters and the holes of the bottom bracket of the fuselage in turn, tighten the lock nut.
2. Cushion foot (Pic. B)
Screw cushion foot into the screw hole of the machine, and tighten the nut to fix it.
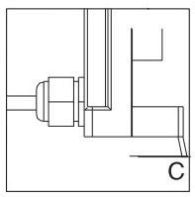
3. Pull rod (Pic. C)
Slide the pull rod to the holder and tighten the nut to fix it.
4.Handle (Pic. D)
Fix the handle to the piston cover with nut.
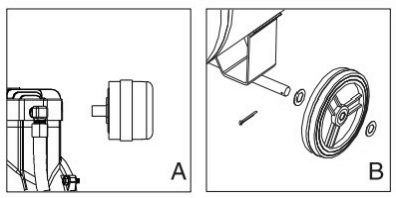
Applicable Model:2-900F18/2-1450F/2-1800F35
1. Install the air filter (pic. A)
2. Install the wheel (pic. B)
3. Install the power cable (pic. C)
Warning:the specification of the power cord must be no less than the requirements on the back cover of this manual.
Operation
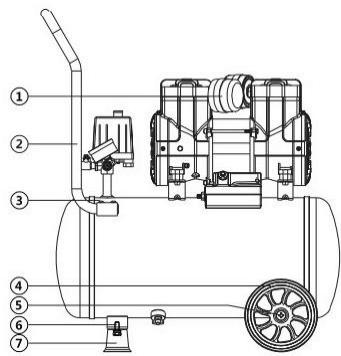
Applicable Model:2-900F8
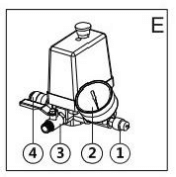
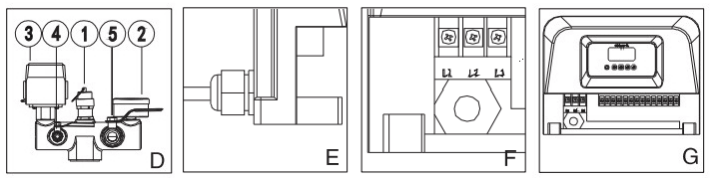
1.safety valve (Pic. E):
Safety valve ① is mainly used to keep the air pressure stable. When the air pressure exceeds 10 bar (15 bar for high-pressure models), it will automatically release the pressure to protect the safety of users. Caveat! The safety valve cannot be used to deflate. Frequent pulling out of the safety valve can easily damage the safety valve.
2. Pressure gauge (Pic. E):
The air compressor is automatically controlled by a pressure switch during normal operation. When the pressure reaches the maximum value, it will automatically stop, and when the pressure drops to the starting pressure, it will automatically start. The working pressure of the air pressure switch has been adjusted before leaving the factory and cannot be changed at will during use. The pressure is displayed by the pressure gauge ②.
3. Power connection:
Plug in the plug and turn on the power (power must be grounded). Note: The air compressor should not be placed too far away from the power source (within 10 meters), so as not to reduce the voltage of the motor.
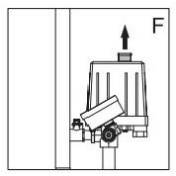
4. Pressure switch (Pic. F)
Vertical switch:Pull up the switch button to turn on, and press the button to turn off. Horizontal switch: Turn the switch to AUTO to turn it on; turn the switch to OFF to shut down.
5. Air outlet (Pic. E)
- The ball valve ③ can be used directly.
- before using the quick connector ④make sure there is no pressure in the air tank.
6. Movement
Before moving the compressor, make sure that the switch is off and the power cord plug is unplugged from the socket. Grasp the handle, lift the air compressor, move the air compressor to the desired position, lower the handle, and ensure that the air compressor is on a flat ground. Note:Make sure your feet stand firm and seek help if necessary.
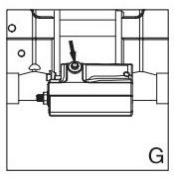
7. Overload protection (Pic. G)
This product is equipped with an overload protection device. When the working voltage is too low or too high, or the working environment is with high ambient temperature, the motor is overheated, the machine will automatically cut off the power supply to protect the motor. After that, the user needs to turn off the power switch first, wait for 3–10 minutes, and then press the red reset button (depending on the cooling condition). Then turn it on, the machine can be used normally. If the button is reset, it still does not work normally. Wait for 30 minutes or more, and then start the motor after it has cooled down completely.
Applicable Model:2-900F18/2-1450F/2-1800F35
1. Safety valve (Pic. D):
Safety valve ①is mainly used to keep the air pressure stable. When the air pressure exceeds 10 bar (15 bar for high-pressure models), it will automatically release the pressure to protect the safety of users. Caveat! The safety valve cannot be used to deflate. Frequent pulling out of the safety valve can easily damage the safety valve.
2. Pressure gauge (Pic. D):
The air compressor is automatically controlled by a pressure switch during normal operation. When the pressure reaches the maximum value, it will automatically stop, and when the
pressure drops to the starting pressure, it will automatically start. The working pressure of the air pressure switch has been adjusted before leaving the factory and cannot be changed at will during use. The pressure is displayed by the pressure gauge ②.
3. Power connection (Pic. E. F):
(1)The specifications of the air switch connected must be more than 50%higher than the rated current of the air compressor.
(2)The air compressor has a standard grounding device, connect the ground
wire before use. Note:The length of the power cord shall not longer than 10 meters, If you need toextend it, please use a power cord with a higher diameter.
4. Pressure switch③ (Pic. D):
Pull up the switch to turn on, lower the switch to turn off.
5. Air outlet (Pic. D):
(1)The ball valve④ can be used directly.
(2)before using the quick connector ⑤make sure there is no pressure in the air tank.
6. Movement
Before moving the compressor, make sure that the switch is off and the power cord plug is
unplugged from the socket. Grasp the handle, lift the air compressor, move the air compressor to the desired position, lower the handle, and ensure that the air compressor is on a flat ground. Note: Make sure your feet stand firm and seek help if necessary.
7. Control box (pic. G)
(1). Each motor has an independent control switch. When it is started normally, motors will start in sequence with a delay of 4 seconds. The user can also set the number of working motors according to actual work requirements.
(2). Phase sequence correction, if the electric control box displays “999” after the power is turned on, but it does not work normally:it is because the power input line is connected
incorrectly, and the motor is in phase sequence protection state to avoid motor reversal, and the wiring sequence needs to be re-adjusted for normal use.
(3) Over-voltage and under-voltage protection
The air compressor will automatically cut off the power to protect the motor due to the high or low input voltage. The user needs to make sure that the voltage is normal and then restart the machine. Warning! Please use the air compressor in a suitable environment!
Maintenance
Before any maintenance or repair work, you must cut off the power supply and ensure that the air tank is pressure-free, otherwise it is very easy to cause injury!!
- Please clean and maintain the machine regularly.
- If the power cord is damaged, in order to avoid danger, it must be replaced by the manufacturer’s maintenance department or qualified person.
- Open the drain valve to drain the water daily or after every use. When draining, the pressure in the air tank should be less than 1 bar.
- Check whether the safety valve is sensitive every week, pull out the safety valve to check whether it can be easily exhausted, and it can be reset immediately after pressing it.
- It is recommended that remove the filter element of the air alter and clean it with clean high-pressure air every 200 hours of use. Replace the filter element of the air filter every 500 hours of use and replace the cylinder and piston ring every 2000 hours of use. The details can be adjusted according to the actual use.
- The air tank shall be subjected to a pressure test every two years, and the internal and external surfaces shall be inspected once a year. When there is severe rust, severe bruising or failed to pass the pressure test, the air tank shall be replaced.
- In case of severe machine vibration, please pay attention to whether you need to replace the shock pad.
Precautions for maintenance:
- Before disassembling the machine, cut off the power supply, wait for the machine to cool down and ensure that the air tank is pressure-free.
- During the maintenance process, the fasteners should be tightened, if any damage is found, they should be replaced with new ones.
- when the maintenance is over, after re-installation, the fan should be rotated to check for abnormalities
Note:The left and right fan blow inward when the motor rotates.
Troubleshooting
Warning: Before any maintenance or repair work, you must cut off the power supply and ensure that the air tank is pressure-free, otherwise it is very easy to cause injury!
| Problem | Possible cause | Solution |
| The motor doesnot start andwithoutany noise | No Power supply | Check the plug and the power supply |
| Pressure switch is off | Turn on the pressure switch | |
| Under overload protection | Press the red reset button to start after the machine cooled down | |
| Pressure switch faulty | Replace the pressure switch | |
| Stater faulty | Replace the stater | |
| The motor doesnot start or starts slowly,with a humming noise | Low voltage supply | Place the air compressor in a well-ventilated place |
| Short circuit or open circuit of motor coiling | Contact Auarita or dealer | |
| Check valve or pressureswitch faulty | Contact Auarita or dealer | |
| The overloadprotector cuts off the powerrepeatedly | Low voltage supply | Check the input voltage,can not 10% lower than the rated voltage |
| Poor ventilation,too high temperature | Check the input voltage,can not 10% lower than the rated voltage | |
| Wrong installation of fan | Check the fan and install it in the correct direction | |
| Pressure drops in the tank | Air leaks at connections | Check each connection,tighten leaky connection |
| Drain valve is open or loose | Tighten the drain valve | |
| Air leaks at check valve | Remove and clean,if still not work Replace the check valve | |
| The exhaustgas has ahigh humidity | A lot of water in the tank | Drain the water in the tank |
| The working environmentwith too high humidity | Move the air compressor to a place with ow humidity,or use an oil-water separator | |
| The motor does not stop | Pressure switch faulty | Replace the pressure switch |
| Air leakage,can not reach the max pressure | Check and tighten the leaky connection | |
| Machine with High vibration | Loose fasteners | Check and tighten |
| The internal parts of the air compressor are aging or damaged | Replace foot or shock pad | |
| Cushion foot or shockpad damaged | Replace aging or damaged parts | |
| Can not reachthe max workingpressure | Drain valve is open or loose | Tighten the drain valve |
| Air filter blocked | Clean or replace the filter element | |
| Air leakage | Check and tighten | |
| Poor valve function or foreign matter or air leakage | Clean or replace | |
| Excessive wear of piston rings | Replace the piston ring |
EXPLODED VIED & PARTS LIST
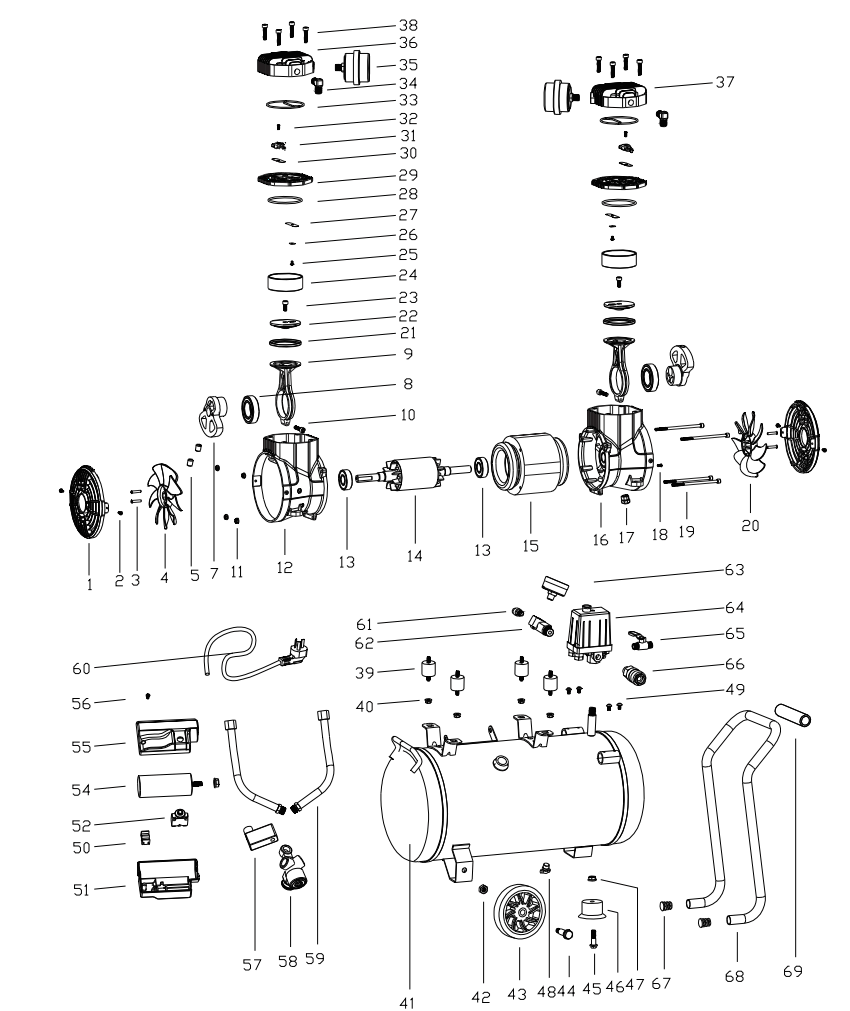
| No. | Parts | Qty | No. | Parts | Qty |
| 1 | Fan cove | 2 | 36 | Left cylinder cover | 2 |
| 2 | Screw | 4 | 37 | Right cylinder cover | 1 |
| 3 | Screw | 2 | 38 | Screw | 1 |
| 4 | Left fan | 1 | 39 | Shock pad | 8 |
| 5 | Set screw | 2 | 40 | Screw | 4 |
| 6 | Set screw | 2 | 41 | Air tank | 4 |
| 7 | Crank | 2 | 42 | nut | |
| 8 | Bearing | 2 | 43 | Wheel | 2 |
| 9 | Connecting rod | 2 | 44 | axle | 2 |
| 10 | Screw | 2 | 45 | Bolt | |
| 11 | Nut | 4 | 46 | Cushion foot | 1 |
| 12 | Crankcase | 47 | Nut | 1 | |
| 13 | Bearing | 2 | 48 | Drain valve | 1 |
| 14 | Rotor | 1 | 49 | Lock nut for handle | 4 |
| 15 | Stator | 50 | Terminal block | ||
| 16 | Crankcase | 51 | Bottom cover for capacitor | 1 | |
| 17 | Strain Relief Bushing | 1 | 52 | Overload protection | |
| 18 | Ground screw | 1 | 53 | Nut for capacitor case | 1 |
| 19 | Screw | 4 | 54 | Capacitor | 1 |
| 20 | Riaht fan | 1 | 55 | Upper cover for capacitor | |
| 21 | Piston ring | 2 | 56 | Screw | |
| 22 | Pressure plate | 2 | 57 | Solenoid valve | 1 |
| 23 | Screw | 2 | 58 | Check valve | |
| 24 | Cylinder | 2 | 59 | High pressure pipe | 2 |
| 25 | Screw | 2 | 60 | Power cord and plug | 1 |
| 26 | Metal strengthen sheet | 2 | 61 | Safety valve | 1 |
| 27 | Air valve | 2 | 62 | Connector | |
| 28 | Cylinder obturating ring | 2 | 63 | Pressure gauge | 1 |
| 29 | Valve plate | 2 | 64 | Pressure switch | |
| 30 | Air valve | 2 | 65 | Ball valve | |
| 31 | Limited block | 2 | 66 | Quick connector | 1 |
| 32 | Screw | 2 | 67 | Fnd car | 2 |
| 33 | Obturating ring | 2 | 68 | Handle | |
| 34 | Elbow | 2 | 69 | Foam sleeve | 1 |
| 35 | Air filter | 2 |
Product Specifications
| Series | Sales area | Model | Voltage Frequency | Air flow @8bar | Maxpressure | Power | Tank volume | Noise | Power cord | Motor Speed |
| L/min | Bar | kW | L | dB | mm² | rpm | ||||
| Oil-free series | United States Canada | 2-900F8 | 120V60Hz | 65 | 8 | 0.9 | 8 | 75 | 1.5 | 3400 |
| 2-900F18 | 65 | 8 | 0.9 | 18 | 75 | 1.5 | 3400 | |||
| 2-1450F24 | 95 | 8 | 1.45 | 24 | 75 | 2.5 | 3400 | |||
| TheEuropeanUnion | 2-900F8 | 220-240V~ 50Hz | 65 | 8 | 0.9 | 8 | 72 | 0.75 | 2800 | |
| 2-900F18 | 65 | 8 | 0.9 | 18 | 72 | 0.75 | 2800 | |||
| 2-1450F24 | 95 | 8 | 1.45 | 24 | 72 | 1 | 2800 | |||
| 2-1800F35 | 140 | 8 | 1.8 | 35 | 76 | 1.5 | 2800 |
Dispose:
This product is subject to the provision of European Directive 2012/19/EC. The symbol showing a wheelie bin crossed through indicates that the product requires separate refuse collection in the European Union. This applies to the product and all accessories marked with this symbol. Products marked as such may not be discarded with normal domestic waste, but must be taken to a collection point for recycling electrical and electronic devices.
FC
This device complies with Part 15 of the FCC Rules. Operation is subject to the following two conditions:
1. This device may not cause harmful interference;
2. This device must accept any interference received, including interference that may cause undesired operation
FAQs
Q: What makes the VEVOR 6.3 gallon air compressor unique?
A: Its oil-free design eliminates the need for lubrication, ensuring a cleaner air supply and reducing maintenance costs. Additionally, it operates quietly at around 75db, making it suitable for use in environments where noise is a concern.
Q: Can I use this air compressor in a commercial setting?
A: Absolutely. The VEVOR air compressor is designed for both home and commercial use. Its high efficiency and durability make it perfect for applications in dentistry, automotive repair, and more.
Q: How do I maintain the VEVOR air compressor?
A: The compressor is designed to be low-maintenance. However, regular checks such as draining the water from the tank, ensuring the safety valve is sensitive, and cleaning or replacing the air filter are recommended.
Q: Is the air compressor difficult to assemble?
A: Not at all. The VEVOR 6.3 gallon air compressor comes with a clear instruction manual that guides you through the assembly process. Whether it’s attaching the air filter or securing the handle, setup is straightforward.
Q: What should I do if my air compressor experiences a fault?
A: The manual includes a troubleshooting section for common issues, such as the motor not starting or the machine vibrating excessively. For more complex problems, contacting VEVOR’s customer service is advised.
Maximizing Your VEVOR Air Compressor Experience
As we conclude our journey through the intricacies of the VEVOR 6.3 gallon air compressor, it’s evident that this tool is a game-changer in the realms of precision work and efficiency. Armed with the knowledge from the VEVOR air compressor manual, you’re now well-equipped to tackle any project with confidence and finesse.
From setting up your compressor to conducting routine maintenance, the manual has laid the foundation for a seamless operation, ensuring that your VEVOR air compressor stands as a pillar of reliability in your arsenal of tools.
Looking to maximize your project’s potential? Dive deeper into the world of VEVOR by exploring our range of accessories, seeking further guidance, or simply staying updated on the latest tips and tricks. Visit our website or reach out to our customer service team for any inquiries.
Let the VEVOR air compressor manual be your guide to achieving perfection in every compressed air task ahead. Your journey towards exceptional craftsmanship begins here.


