
Vacuum sealers have become an indispensable tool for preserving food, extending its longevity, and maintaining its freshness and nutrient profile. However, like any appliance, they can encounter issues that hinder their performance. The most common issues include vacuum sealer not vacuuming or sealing. When not vacuuming properly, it might leave air in the vacuum sealer bags, which can compromise the preservation process.
Bringing home your freshly bought groceries but not being able to properly store them because your vacuum sealer is not working properly can be frustrating. But fret not.
In this comprehensive guide, we are going to discuss the reasons underlying a vacuum sealer not vacuuming properly and provide a step-by-step troubleshooting guide for each reason.
We will also be introducing you to a reliable vacuum sealer collection of VEVOR, which you can explore to find a suitable vacuum sealer for your needs and upgrade from your faulty sealer.
So, let’s do some fixing!
Potential Reasons for a Vacuum Sealer Not Vacuuming With Solutions
If your vacuum sealer is not vacuuming properly, there could be several potential reasons for this issue. Here are some common problems and their possible solutions:
A. The Lid Is Damaged:
A damaged lid can prevent the vacuum sealer from creating a tight seal, preventing the vacuum pump from effectively removing air. A warped lid may not close properly, allowing air to leak in and disrupting the vacuuming process. Cracks or dents in the lid can also compromise its integrity and hinder proper sealing.
Solution:
If there is any crack, warp, or dent in the lead, consider replacing it. Check if your customer offers part replacements.
B. The power cord is damaged:
A damaged or frayed power cord can disrupt the electrical supply, preventing the vacuum sealer from operating properly. A damaged power cord can pose safety hazards and hinder the vacuum sealer’s ability to function.
If the power cord is okay, you may want to check if there is power in the light plug.
Solution:
If the power cord is damaged, consider getting it replaced by a professional electrician.
C. Issue with Gasket
The gasket is a crucial component that seals the chamber, preventing air from leaking back in during the vacuuming process. A damaged or worn gasket can cause the vacuum sealer to malfunction. Cracks, tears, or excessive wear on the gasket can compromise its sealing, compromising the vacuuming as well.
Solution:
Unplug your vacuum sealer and let it cool down. When it has cooled down, open the vacuum sealer plug, locate the rubber part, pry it from the lid, and inspect it closely. If there is any food buildup and no damage, clean it and put it back on.
In case of damage, you will have to replace it. When going to get the replacement gasket, consider taking the original one with you for reference.
D. Seal Bar Issues
The seal bar is responsible for melting the bag and creating a seal that prevents air from entering. A damaged or dirty seal bar can cause the vacuum sealer to malfunction, leading to leaks and preventing effective vacuuming.
Solution:
If there is debris, simply clean the seal bar with a soft cloth or brush, and if it is damaged, consider replacing it with a new one.
E. Vacuum Pump Problems
The vacuum pump is the heart of the vacuum sealer, responsible for removing air from the bag. A malfunctioning vacuum pump can cause the vacuum sealer to fail to vacuum properly. If the vacuum pump is damaged, worn out, or obstructed, it may not be able to create the necessary suction to remove air effectively.
Solution:
If you suspect a problem with the vacuum pump, consider consulting a qualified technician for repair or replacement.
F. Overheating
Vacuum sealers can overheat if used for extended periods without sufficient rest. Overheating can damage components and affect the vacuum sealer’s performance, leading to reduced suction and inefficient vacuuming.
Solution:
Allow the vacuum sealer to cool down between sealing cycles to prevent overheating. Moreover, manufacturers recommend waiting around 20 seconds between sealing cycles. Also, follow the manufacturer’s instructions for maximum usage time to avoid overheating and potential damage.
G. Issue with the accessory hose
A loose or damaged hose can disrupt the airflow and prevent the vacuum pump from effectively removing air from the container.
Solution:
Ensure the hose is properly connected and free of any leaks or obstructions. If there are any cracks, tears, or kinks, consider replacing the hose.
H. Drip tray is full:
A full drip tray can interfere with the vacuum sealing process and cause the vacuum pump to malfunction by obstructing the pump’s airflow and hindering its ability to remove air effectively.
Solution:
Simply empty the drip tray regularly to prevent overflow. If there is any buildup, consider cleaning it with warm, soapy water for optimum performance.
I. Issues with Vacuum Sealer Bags
Your vacuum sealer not working? The first thing you want to do is check if there is something wrong with the vacuum sealer bags that you are using. Here are some common sealer bag issues that keep your vacuum sealer from vacuuming properly:
1. Bags are not dry
Moisture on the bag’s surface can interfere with the vacuum sealing process, preventing the vacuum pump from creating a proper seal. This is because moisture can create a barrier between the bag and the seal bar, preventing the bag from melting and sealing properly.
Solution:
Before placing a bag in the vacuum sealer, thoroughly dry the bag, especially the sealing ends, using a clean cloth or paper towel. If you are vacuum-sealing moist food such as fish, consider patting it dry to remove excess moisture.
When vacuum-sealing moist foods, do not forget to turn the moist mode on.
2. Bags are damaged
Punctures, tears, or rips in the bag can create leaks, allowing air to enter and preventing the vacuum pump from effectively removing air. So, if your vacuum sealer bag is dry but still not vacuuming properly, look if the bag is damaged. Even small imperfections can compromise the integrity of the seal and hinder the vacuum sealing process.
Solution:
While it would be best if you discarded the damaged bags and got new ones, if you want your damaged bags to work, you can try using duct tape to patch up the damaged parts. It might work but would probably not give good results as duct tape is not designed to contract.
3. Bags are not compatible
Not all bags are compatible with vacuum sealers. Some vacuum sealers only work with certain types or brands of bags. For instance, using regular food bags instead of vacuum sealer bags recommended by the manufacturer might prevent proper vacuuming.
Solution:
For best results, consider using vacuum sealer bags that are specifically designed for your vacuum sealer. If you cannot find the same sealer bags, consider checking out the specifications of the vacuum sealer machine and using the compatible bags.
4. Bag Placement and Sealing:
Improper bag placement or an incomplete seal can also prevent the vacuum pump from functioning correctly. If the bag is not placed correctly on the sealing bar, there may not be enough space for the air to be removed. Additionally, an incomplete seal can allow air to leak back into the bag, nullifying the vacuum sealing process.
Solution:
When vacuum sealing, ensure that each time, the bag is properly placed on the sealing bar, leaving enough space for the air to be removed. Also, consider smoothing out any wrinkles or air pockets in the bag before sealing.
Upgrade to a Reliable Vacuum Sealer for Efficiency!
If your vacuum sealer is not working and is beyond repair, or you are just tired of your vacuum sealer not vacuuming properly and have been thinking of upgrading, consider exploring VEVOR’s vacuum sealer collection. VEVOR is a reliable brand known for its tough and highly effective products and affordable prices.
In our vacuum sealer collection, we have a got a wide variety of vacuum sealers. Whether you need a chamber vacuum sealer or an external vacuum sealer, we have got you covered.
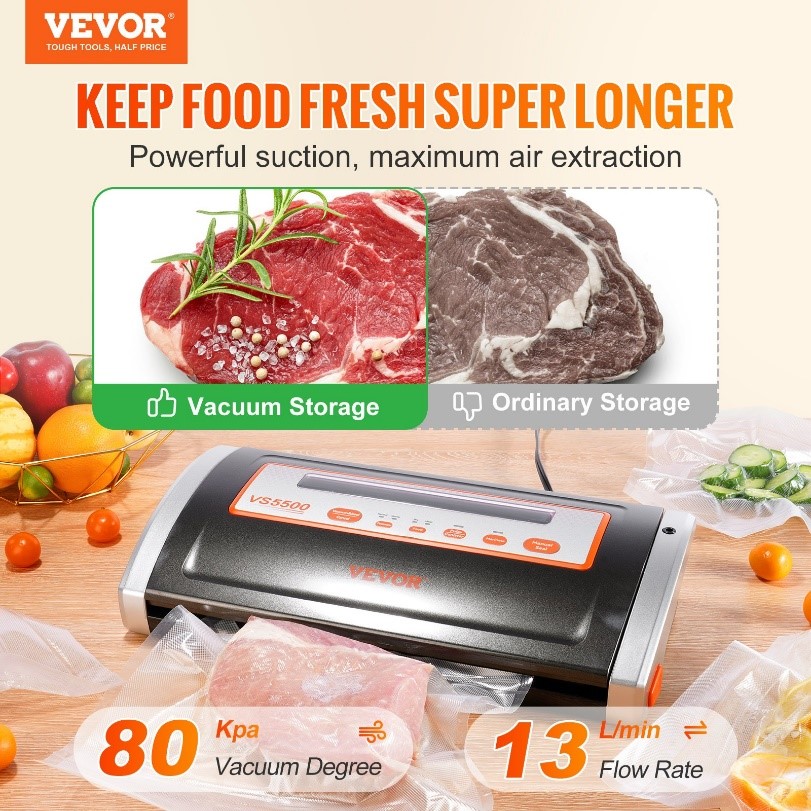
Among our external vacuum sealers, this 80Kpa, 130W Powerful Vacuum Sealer Machine is the most popular. It features both automatic and manual air sealing systems and supports both dry and moist vacuum sealing.
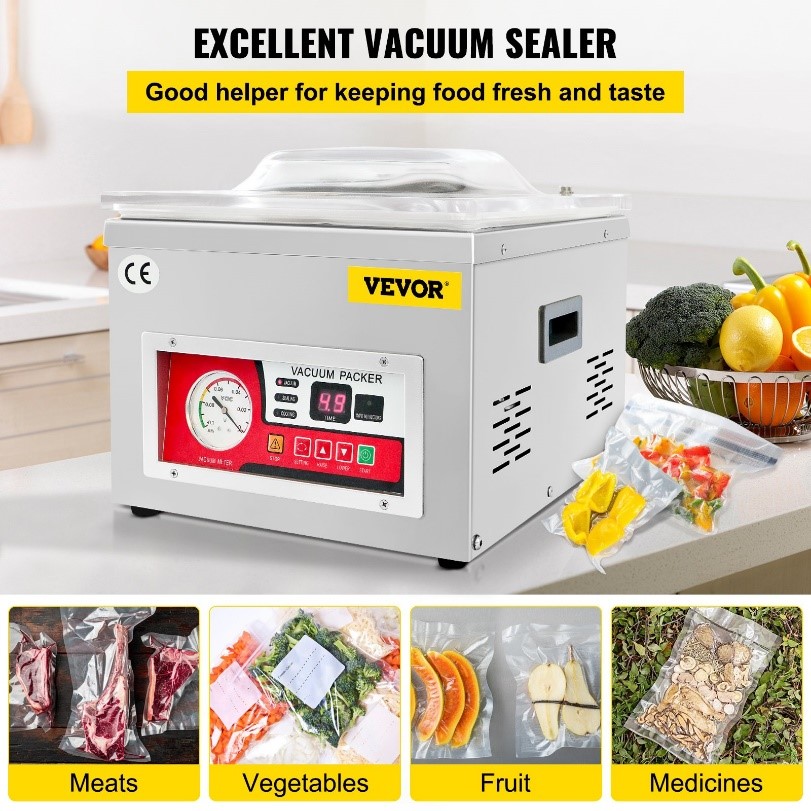
If you are looking for a chamber vacuum sealer, check out the DZ-260A Chamber Vacuum Sealer. With 260W sealing power and 6.5 m³/h pump rate, it is a powerful chamber vacuum sealer and is perfect for homes as well as commercial kitchens.
Regular Maintenance Tips: Extending Your Vacuum Sealer’s Life
Regular maintenance is essential for extending the lifespan of your vacuum sealer and ensuring it continues to perform at its best.
- Clean the seal bar: After each use, wipe the seal bar with a soft, damp cloth to remove any food particles or debris.
- Regular inspection: Regularly check the gaskets, lid, power cord, and the overall vacuum sealer for any signs of damage. And address the issues promptly.
- Store properly: When not in use, store your vacuum sealer in a cool, dry place, away from direct sunlight and heat sources.
- Use high-quality compatible bags: Use only high-quality vacuum sealer bags that are compatible with your vacuum sealer for optimum performance.
- Don’t Overfill Bags: Avoid overfilling vacuum sealer bags, as this can put strain on the seal and prevent a complete closure.
- Consult Your Manual: Refer to your vacuum sealer’s manual for specific maintenance instructions and recommendations.
Conclusion
In this troubleshooting guide, we have provided a comprehensive overview of common vacuum sealer problems, along with step-by-step solutions to rectify them. So, if your vacuum sealer is not vacuuming, check for the potential underlying reasons discussed in the article and apply the given solutions to get your vacuum sealer back to vacuuming perfectly for effective storage and preservation of your food items. Remember, regular maintenance is key to keeping your vacuum sealer in top working condition and extending its lifespan.
If your vacuum sealer is beyond repair, or you are not satisfied with its performance, consider upgrading to VEVOR’s vacuum sealers.


Ich wusste nicht, dass Vakuumiergeräte so viele Fehler ausweisen können. Mein Gerät spinnt auch gerade und ich weiß nicht, woran es liegt. Ich habe aber noch nicht geschaut, ob die Siegelschiene verschmutzt ist. Das werde ich gleich machen und ggf. den Schweißbalken mit einem Tuch putzen.