
Transforming your feathered friend into a succulent meal requires delicate plucking. Careful plucking makes your bird look great on the dinner table, enhancing the overall dining experience. Conversely, a misstep in the plucking process can not only ruin the appearance of your chicken but also compromise its taste.
For seamless plucking, you need not only the proper plucking technique but also the art of scalding chickens. For proper scalding, which makes chicken plucking a breeze, you need to ensure a delicate balance between the chicken scalding temperature and the duration of immersion in hot water.
If you do not know what temp to scald chickens at, continue reading. In this comprehensive guide, we are not only going to discuss why is the scalding temperature for chickens important but are also going to help you find the optimum chicken scalding temp and duration and how to go about scalding chickens once they are properly scalded.
So, let’s get started!
Table of contents
Why Is The Scalding Temperature for Chickens Important?
Chicken scalding temperature is pivotal to the poultry processing journey. It does not only affect scalding, which in turn affects plucking, but also the final quality of the meat. Below, we have discussed a few reasons highlighting the importance of scalding temperature for chickens:
Efficient De-feathering
Chicken scalding temperature plays a key role in loosening feathers, making them easier to remove during the plucking process. This not only helps save time but also saves your hands from the hand-numbing, hard plucking. If the temp for scalding chickens is not optimum, results won’t be optimum either—when the chicken scalding temperature is high or immersion time is long, chicken skin will start to cook, and plucking might tear the skin. Conversely, low scalding temperature or short immersion time would not loosen the feathers, making plucking harder and more time-consuming.
Meat Quality
The scalding process influences the tenderness of the chicken meat. A carefully chosen temperature to scald chickens ensures that feathers are removed without compromising the integrity of the skin or damaging the underlying meat. Know that where hotter or longer scalding may be better for de-feathering and Salmonella control, it results in white streaking and meat toughening.
Market Value and Presentation
The unsuitable chicken scalding temperature would result in improper scalding and plucking, meaning there would either be feathers still in place on the chicken (in case of low temperature/short immersion) or damaged skin (in case of higher temp/longer immersion). Given that no one wants to buy chicken meat with still feathers on it or with damaged skin, its market value either goes down or the chickens are outright rejected. Therefore, to keep the chicken rejects and downgrades to a bare minimum, you must maintain optimal scalding temperatures for chickens to ensure seamless plucking.
Uniformity in Processing
Maintaining a consistent temperature to scald chickens across batches ensures uniformity in the processing of chickens. This standardization contributes to a streamlined operation, allowing for efficiency and consistent results.
Microbial Safety
The scalding process, when executed at the right temperature, contributes to microbial safety by reducing the risk of bacterial contamination. Proper scalding aids in creating a hygienic environment for further processing and ensures the safety of the final product for consumers.
How to Scald Chickens Properly (Never-Fail Technique)
Now that we have understood the importance of temperature for scalding chickens, let’s find out how you can achieve that perfect scald. Follow these steps of never-fail scalding technique to prepare your chickens for perfect plucking:
Preparation
Before you kill the chicken, ensure that you are fully prepared for scalding and plucking the chicken.
- Gather your tools: You’ll need a large pot or container capable of holding the chicken fully submerged, a thermometer, and a hanging hook or rope for suspending the bird.
- Heat the water: Fill your pot with enough water to cover the chicken comfortably. But make sure that it does not overflow when you submerge the chicken in it. Aim for a temperature between 140°F and 150°F (60°C- 65°C). Use your thermometer to monitor the temperature closely, as even slight variations can impact the scalding outcome.
- Prepare the chicken: Humanely slaughter the chicken, bleed it, and let it cool down completely.
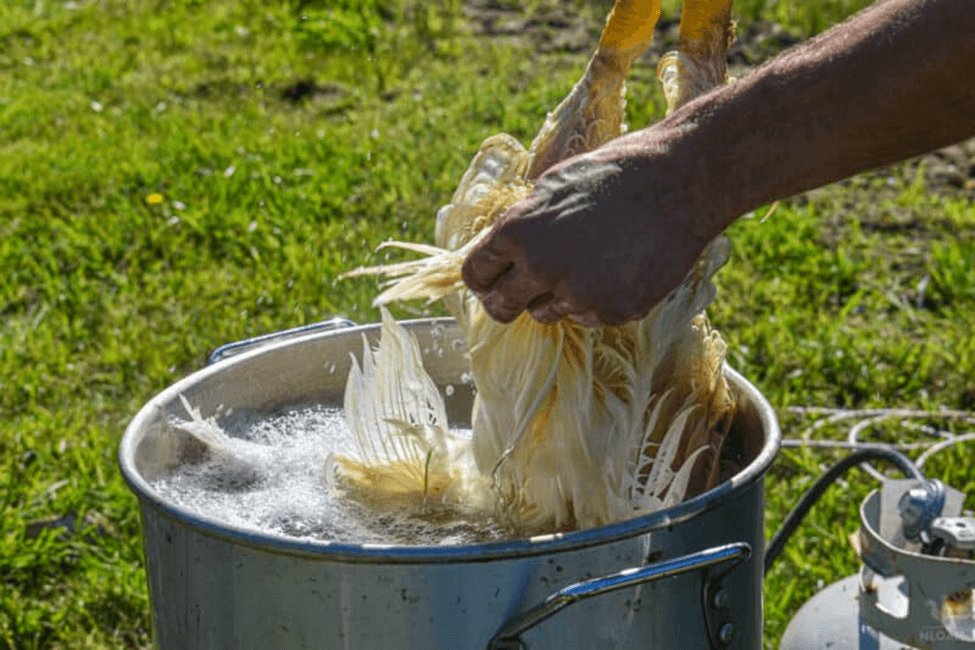
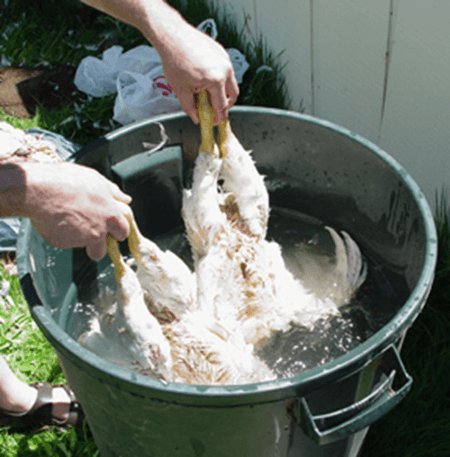
Dipping the Chicken
Now that the water is at the optimum chicken scalding temperature, you can go ahead and begin scalding.
- Immersion and Agitation: Gently lower the chicken into the hot water headfirst. Submerge it completely for about 30 to 60 seconds. Swirl the bird gently in the water to ensure even heat distribution, especially around the wings and legs. If the chicken tries to come to the surface, use a stick or something else with a long handle to keep the chicken immersed.
- Test the Feathers: After 30 seconds, remove the chicken and perform a feather test. Gently pull a large wing or tail feather. If it comes out easily with minimal resistance, your chicken is ready for plucking. If it seems stuck, return the bird to the water for another 15-20 seconds and test again. Repeat until the feather test is successful.
Pro Tip: Over-scalding can damage the skin, so err on the side of caution. If feathers are stubborn, consider a slightly longer scalding time, but avoid exceeding 150°F.
Final Touches
Once the feather test indicates that the chicken has been properly scalded, it’s time to take it out and pluck it naked.
- Hang and Drain: Once the feather test is successful, take the chicken out of the scalding pot and hang it by its feet to drain and cool. This allows excess water to drip off, preventing feather re-attachment and facilitating easier plucking.
- Pluck with Precision: For plucking, start with the larger feathers on the wings and tail, working your way down the body. You can also use a chicken plucker machine for quick plucking.
How Long Should You Scald Chickens?
Achieving the perfect scald requires not just the right temperature but also precise timing, which depends on various factors, such as the bird’s size, age, and the water’s temperature. In case of high chicken scalding temperatures (145°F-150°F) require less time, around 30 seconds, and at lower temperatures (140°F-145°F), you might need to dip it for about 45-60 seconds. Similarly, younger and smaller birds require less scalding time than mature and bigger chickens.
Pro Tip: No matter the chosen time, let the feather test be your cue on how long you should scald chickens.
How Do You Know If a Chicken is Over Scalding?
While over-scalding won’t necessarily render your chicken inedible, it can negatively impact the final presentation and eating experience. The damaged skin could affect flavor and moisture retention, resulting in drier, less flavorful meat. Additionally, torn skin presents hygiene concerns.
Recognizing the telltale signs of over-scalding is key to salvaging the situation and preventing future mishaps.
- Skin Discoloration: The most obvious sign of over-scalding is a change in skin color. Instead of the natural pale yellow or white, you might see patches of brown, red, or even a cooked, rubbery appearance.
- Slimy Texture: Run your fingers gently over the skin. If it feels slimy or slippery, it’s another red flag for over-scalding. The heat has broken down the skin’s natural oils and proteins, leading to this unpleasant texture.
- Feather Tears: Over-scalding can weaken the skin to the point where feathers tear during plucking. Instead of clean breaks at the base, you might see ragged edges and exposed flesh.
- Burnt Scalp Spots: In severe cases of over-scalding, you might even see dark, burnt patches on the chicken’s head and neck.
How to Pluck a Chicken Efficiently After Scalding It?
Whether you favor the traditional hand-plucking method or prefer the swift efficiency of a plucker, mastering the technique ensures a smooth and satisfying transition from feathered fowl to plucked masterpiece.
Hand-Plucking
Once the water has been drained from the chicken after proper scalding, you can begin plucking. Start with larger feathers on the wings and tail, grasping firmly at the base and pulling in the direction of growth. Remember, gentle but firm movements are key to avoid tearing the skin. Focus on removing clusters of feathers rather than individual ones, making the process faster and more efficient.
Using a chicken Plucker Machine
After draining excess water from the chicken, you can put it into the plucking chamber of your chicken plucker and turn it on. The whirring of plucking fingers will pluck away the chicken feather in seconds.
Whether you pluck by hand or with a plucker machine, after plucking, rinse the chicken under cool running water to remove any remaining feather fragments. Dry it thoroughly before chilling or processing further.
VEVOR Chicken Plucker
If you are dealing with a large number of chickens, consider investing in an efficient chicken plucker, as plucking by hand can be very time-consuming. So, check out VEVOR Chicken Plucker Machine 2.0, which has a powerful motor (550W) and 108 Soft Fingers strategically placed in its plucking chamber. It can handle 2 to 4 chickens at one time and can pluck up to 6 chickens in one minute.
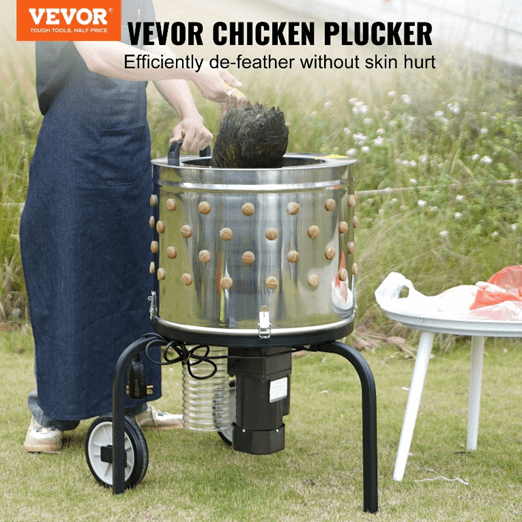
If you are looking for a more cost-effective alternative, you can check out the VEVOR Chicken Plucker Drill Attachment. You can attach it to your drill machine and pluck and conveniently pluck small chickens, quail, pigeons, doves, pheasants, and other poultry.
Conclusion
Optimum temperature is key to perfect scalding.
Perfect scalding is key to effective plucking.
Effective plucking is key to the perfect-looking succulent chicken at the dinner table. Use this guide to learn what temperature to scald chickens at and how long to scald a chicken and set the stage for succulent, beautifully presented meals that will tantalize your taste buds and impress your guests.


