
It is easy to install golf cart batteries, provided you do the correct steps and take caution at every step. This manual demonstrates how to manage the entire process safely, including inserting the batteries into the proper locations and wiring them in both 36V and 48V systems. You will also know what to do to prevent some of the most common errors that can affect performance or ruin your cart. The installation can be done with ease, as clear instructions and explanations are provided. An appropriate installation enhances battery lifespan, power supply, and reliability. With this approach, you will have a well-maintained, well-performing, and just-workable golf cart.
- Tools and Materials Needed for Installing Golf Cart Batteries
- Essential Tools for Battery Installation
- How to Prepare Your Golf Cart Before Battery Installation
- How to Safely Remove Old Golf Cart Batteries
- Step-by-Step Guide to Installing Golf Cart Batteries
- Understanding Golf Cart Battery Wiring Diagrams
- Final Checks After Installing Golf Cart Batteries
Tools and Materials Needed for Installing Golf Cart Batteries
It is good to know in advance what you will require before you start working with the batteries. Every tool and material is focused on a particular task, and understanding it simplifies the tasks. This section will take you through the tools, types of batteries, and safety gear in a straightforward and understandable manner. It will also assist you in being organized throughout.
Essential Tools for Battery Installation
To learn how to change the batteries in the electric golf cart, it is much easier and safer to use the appropriate tools. All the tools assist with various aspects of the process, from eliminating old batteries to properly placing new ones. A set of basic tools and cleaning supplies is often sufficient to have a hassle-free installation.
You will need:
- Wrench to loosen and tighten battery terminals.
- Battery terminal puller to loosen tight or stuck cables.
- Cleaning terminal wire brush used to remove corrosion.
- Wiping the surface with clean towels or paper.
- Baking soda and water to neutralize spills.
- A battery strap or lifting tool, so as to handle heavy batteries safely.
These tools will assist you in staying organized and reducing the risk of injury during installation. Preparation of them prior to commencement also saves time and energy.
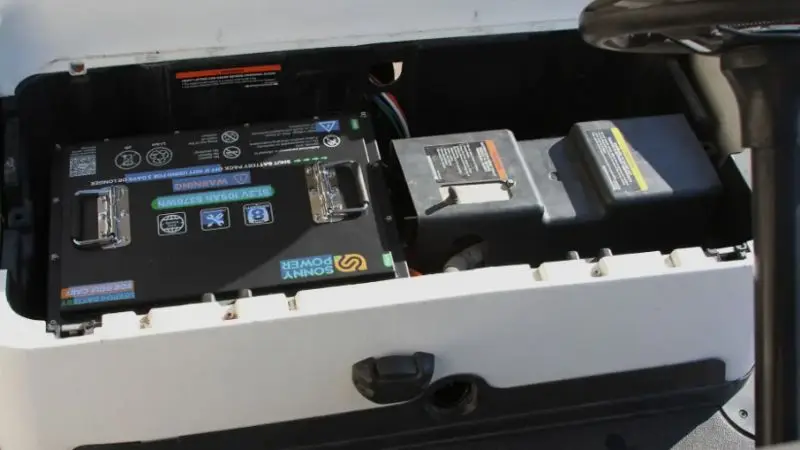
Types of Golf Cart Batteries
Golf carts use various types of batteries, each with its own benefits and drawbacks. Knowing them will guide you to select the most appropriate installation of 48 V golf cart batteries depending on your requirements and finances. All types of batteries perform differently depending on their usage and maintenance.
- Flooded lead-acid batteries are cheap and fairly common, but need frequent maintenance and water inspections.
- AGM batteries are non-spillable, spill-free, and low-maintenance, making them easier to manage.
- Lithium-ion batteries are light, long-lasting, and efficient, yet are pricier.
It is significant to select a proper type of battery as it influences the performance, charging time, and long-term reliability. Never make a final decision without consulting your golf cart manual.
You can easily install and wire golf cart batteries following a simple and methodical procedure. Correctly positioning batteries, connecting them, and testing voltage each have a significant impact on performance and safety. During installation, you can take time to avoid mistakes that are likely to occur, ensuring your cart runs smoothly in the long run. Always use correct diagrams and ensure that each connection is checked before completion. A properly installed battery system enhances power, reliability, and battery life. With the proper attitude, you can be sure of installing golf cart batteries and having a safe and efficient ride each time you are in your cart.
Safety Gear for Battery Handling
Electric golf cart battery installation tips are largely concerned with safety since batteries are filled with acid and electricity. Proper safety equipment helps you stay safe on the job and work confidently in the event of an accident. Simple protection is enough to prevent serious injuries during installation.
- Eye protection, such as safety glasses or goggles, to keep splashes out of your eyes.
- Rubber gloves in case of direct contact with acid or chemicals.
- A shop apron or old clothes to cover your skin and clothes.
These safety materials must be worn at all times before commencing any battery work. By remaining safe, the installation process will be more controlled and safer, particularly in the case of dealing with heavy or old batteries.
How to Prepare Your Golf Cart Before Battery Installation
The cart should be fully ready before installing golf cart batteries. This will be safe and avoid unnecessary electrical accidents at work. Battery installation is also more controlled and easier to accomplish with proper preparation.
All actions in this step contribute to developing a safe battery-handling environment. It is also capable of providing assurance that the cart is ready to undergo new power installation without taking risks.
Turn Off the Golf Cart and Remove the Key
The initial part of the process of replacing batteries in an electric golf cart is to shut down the cart. Disable the key to prevent the system from initiating inadvertently when working. This helps to avoid shocks and undesirable movement.
When your cart has a tow/run switch, make sure to switch it to tow mode to provide additional safety. This completely shuts down the system, and a stable working environment is established before proceeding.
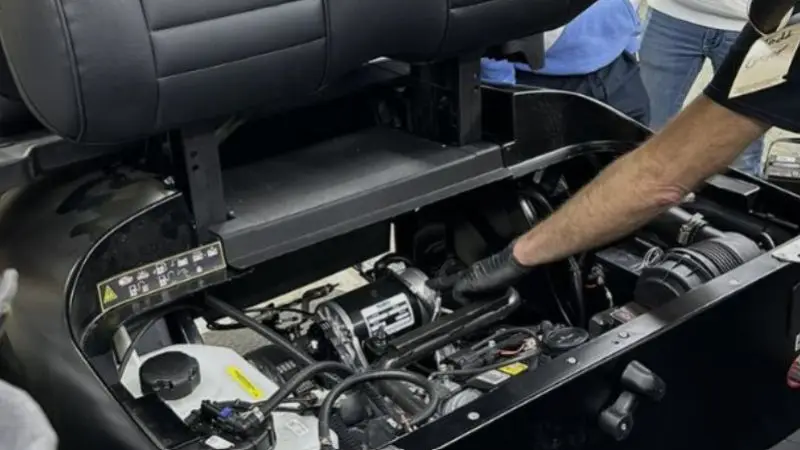
Check and Inspect Battery Compartment
Once it has been turned off, open the battery compartment and have a look inside. This is a necessary step in electric golf cart battery installation tips, as it assists in finding the hidden problems prior to the installation.
Search for dirt, debris, rust, and old residue of acid. You may need to use a light to see inside. The unbroken and unscathed compartment will mean safer installation, and the battery will perform better.
Clean Battery Terminals and Remove Corrosion
The most effective method to install 48V golf cart batteries is by cleaning the terminals, as corrosion will prevent the flow of electricity. It should be removed before replacing the batteries.
Clean the terminals with a baking soda and water mixture. Lightly brush with a wire brush till corrosion stops. Wipe the part with a clean cloth to leave no residue. Clean terminals provide excellent electrical connections and performance.
Inspect Battery Cables for Damage
Check all cables before replacing the new batteries. This is a critical step in the electric golf cart battery installation tips, as broken cables may impact performance and safety.
Look for cracks, wear, or loose ends. Install new cables in case of damage. Keep cables clean; if they are not, make sure they are clean to maintain a strong, reliable connection.
How to Safely Remove Old Golf Cart Batteries
The old batteries should be removed before installing golf cart batteries. This is necessary as it will keep you safe and ready for the cart to be installed again. Careful removal is also a way to prevent damage and provides a seamless transition to the next step of work.
The safe way of installing golf cart batteries includes understanding how to dispose of old batteries. Every step must be carried out gradually and in the proper sequence to avoid sparks or injuries.
Disconnect Battery Cables in the Correct Order
Proper cable disconnection in the correct sequence is essential for understanding how to change batteries in an electric golf cart. Always begin by turning off the cart and taking away the key. Next, unplug the negative wire to minimize the chances of sparks. Then take out the positive cable. When the cables are tight, loosen them without force by using a wrench or a terminal puller.
This step will take some time, and you should not rush, as it may lead to errors or broken objects. Every connection must be maintained to ensure the system remains safe. This is also included in adhering to the appropriate electric golf cart battery installation guidelines, as it would be necessary to make sure the electric system is completely shut down before taking the battery away.
Lift and Handle Heavy Batteries Safely
Golf cart batteries are weighty and hence, it is essential to exercise proper lifting when removing them. This is an important step that is usually ignored when putting together golf cart batteries, but it is a major safety factor. A lifting strap or an appropriate tool should be used to ensure that your body does not strain. Never pull anything with your back, as it can be harmful.
When a battery is heavy, seek assistance rather than attempting to carry it on your own. Once removed, place each battery on a stable surface. Do not drop or tilt the battery as it can leak or be damaged. Handling is done carefully to provide a safer working environment and to prepare the cart with fresh batteries.
Dispose of and Recycle Old Batteries Properly
Once old batteries are removed, it is highly significant that they are disposed of properly, as it is a safety and environmental issue. This is among the responsible electric golf cart battery installation tips, since batteries contain harmful chemicals that should not be thrown in regular waste.
You are supposed to dispose of old batteries in a recycling facility or in an auto part store that accepts them. Many locations recycle them safely or participate in exchange programs. Dispose of safety by always observing the local rules. Recycling is a good way to maintain your workspace clean, protect the environment, and be ready to install a new battery.
Step-by-Step Guide to Installing Golf Cart Batteries
The process of replacing the batteries in a golf cart does not simply involve putting in place and assembling components. It is a cautious process that requires care at each stage to prevent damage and ensure the proper course of performance. Properly done, it also simplifies a lot of the future maintenance and makes it much safer.
This part is a detailed description of this process in a very simple manner in order to make you clearly see each step of the process as you learn how to change batteries in an electric golf cart.
How to Place New Golf Cart Batteries in the Battery Tray
The first step is the one in which you literally place the batteries into the cart. Install the batteries one by one in the tray, ensuring each is flat and stable. Depending on the wiring arrangement of your cart, the terminals must be oriented correctly. When you install them improperly, the wiring later will be hard and hazardous.
This is a significant phase of installing golf cart batteries, as proper positioning is the sure way that all will fit securely and properly. Each battery should be checked to ensure it is not rocking or tilted. A standstill position minimizes vibration losses during cart motion.
One of the most significant tips of electric golf cart battery installation is also good placement, as it directly influences performance and safety. This time will allow you to save difficulties in the future of the process.
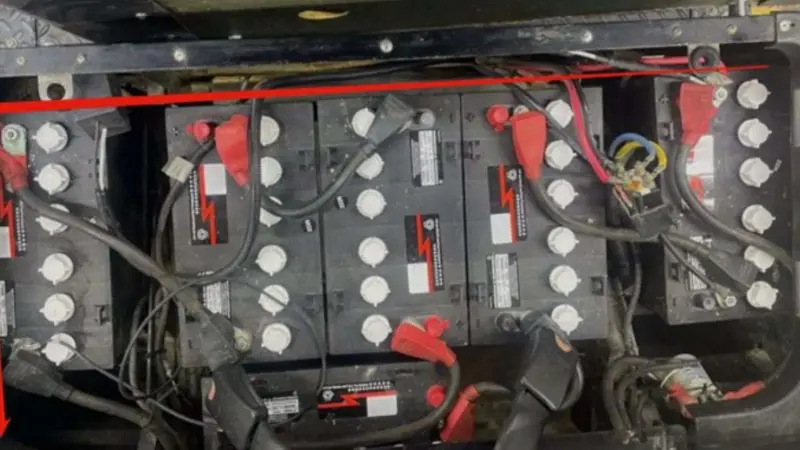
How to Connect Golf Cart Batteries in Series or Parallel
Once the batteries are placed, wiring them follows. A series connection is the most common connection type on most golf carts; in this configuration, the positive terminal of one battery is connected to the negative terminal of the next. This results in a higher voltage and is widely employed in electric carts of the day.
A parallel connection is employed in certain instances. Here, all positive terminals are attached to each other, and all negative terminals are attached to each other. This maintains the same voltage but increases battery capacity. Your cart manual will instruct you on what system you require.
This is an essential measure when learning how to fit 48V golf cart batteries; the incorrect wiring will ruin the whole system. It is also an important element in learning how to replace batteries in an electric golf cart. Never rush to make any connection without rechecking twice to prevent expensive errors.
How to Secure Golf Cart Batteries Safely
After wiring is complete, the batteries should be securely fastened in the tray. Hold-down brackets to keep everything in place. Tighten them to fit without moving the batteries, but don’t tighten too hard, as this may cause damage.
This is one of the main steps in installing golf cart batteries, since loose batteries may move during movement and damage cables or terminals. An adequately fixed battery system will be stable even on rugged roads.
This step is necessary to ensure safety and a long battery life, as per the electric golf cart battery installation tips. The batteries must be firm and stable, without movement, when light is checked when properly done.
How to Tighten Golf Cart Battery Terminals Properly
Now concentrate on the terminals. Tighten each connection with a wrench to ensure that the cables fit snugly on the battery posts. A loose terminal will result in poor performance, power loss, or even overheating.
This is quite a crucial measure in how to install golf cart batteries safely, since good electrical contact provides a smooth flow of energy. Tightness of each terminal should not be compulsory.
This step should be given special consideration if you are following instructions for replacing batteries in an electric golf cart. Even bad connections can cause trouble for the rest of the system; therefore, it is always best to check all terminals twice before proceeding.
How to Protect Golf Cart Battery Terminals from Corrosion
The last one is the securing of your work. Spray a light layer of anti-corrosion spray on each terminal to prevent rust and buildup. This helps maintain a strong connection and extends battery life.
This final step is commonly included in tips for installing an electric golf cart battery, since corrosion is one of the most common causes of battery failure. Maintenance is minimized, and performance is enhanced by keeping terminals clean.
It is also included in the most ideal method of installing 48 V golf cart batteries, particularly on carts that are to be used outside or in a wet environment. After this, you are ready to use your golf cart, and it is installed.
Understanding Golf Cart Battery Wiring Diagrams
It is necessary to learn how to work with wiring in a golf cart before you install or replace batteries. The wiring diagram gives the way in which all the batteries are interconnected and the flow of power through the system. This will guide you so you don’t make any mistakes, and your cart will run. It also plays a significant role in safely changing the battery in an electric golf cart.
Knowledge of wiring simplifies the entire installation and makes it more precise. It also helps you follow the correct procedure for installing golf cart batteries.
Here, we will discuss the two primary wiring systems and the most common errors that you should not make.
How a 36-Volt Golf Cart Battery System Is Wired
Three batteries in a series are typical of a 36-volt system. In such an arrangement, one battery has a positive terminal connected to the negative terminal of the other battery. This is done until the three batteries are chained together. The positive and negative terminals are attached to the golf cart wiring system through the final positive and negative terminals.
This is usually installed on smaller or older carts and offers sufficient power for simple applications. It is extremely important to ensure that all connections are tight and right when it comes to adhering to electric golf cart battery installation tips.
The slightest wiring mishap can result in poor performance or power loss. This is why the knowledge of this system is included in the safe method of installing golf cart batteries and makes it work properly.
How a 48-Volt Golf Cart Battery System Is Wired
A 48-volt system is stronger and typically uses six batteries linked in series. Similar to the 36-volt system, the positive of one battery is connected to the negative of the next until all the batteries are connected together in a chain.
The positive and negative terminals are then attached to the main wiring system of the golf cart as the last positive and negative terminals. This arrangement provides greater strength, extended driving duration, and enhanced performance to contemporary carts.
This is a critical section of the optimal method for installing 48 V golf cart batteries, as proper wiring ensures optimal performance and safety. It is also significant in the way of replacing batteries in an electric golf cart.
Close wiring is used to ensure a steady power flow and prevent damage to the system.
Common Golf Cart Battery Wiring Mistakes
Wiring errors are quite likely when installing the circuit, particularly if you are in a hurry. Changing the positive and negative terminals is one of the greatest errors. This may result in severe damage or even a short circuit.
Leaving terminals loose is another common problem. Slack connections will decrease power and make your cart begin to work improperly. This is the reason why caution should be taken when installing golf cart batteries.
It is recommended to use the wiring diagram rather than guess when installing the battery in electric golf cars. All the connections should be tight and correct.
These errors are among those that must be avoided when installing golf cart batteries and can help keep your system safe and efficient.
Final Checks After Installing Golf Cart Batteries
Once you have installed it, verify everything to ensure that the system is functioning properly. This last step will help you catch minor errors before they become major issues. It is a significant element of the replacement of batteries in an electric golf cart.
These inspections also ensure that your golf cart battery was installed properly and safely.
This section describes the final steps to make your golf cart operational.
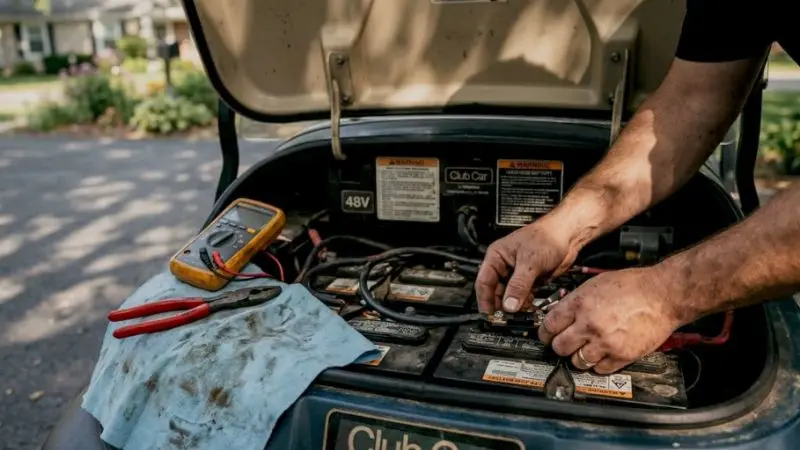
How to Check Golf Cart Battery Connections
The first step is to check all cables and terminals in the battery connection. Ensure that all connections are tight, secure, and positioned correctly as per the wiring diagram. Slack connections may lead to poor performance or loss of power.
This is one of the essential steps in the safe method of installing golf cart batteries, as good connections ensure a proper flow of power. Inspect all terminals to ensure nothing is loose or out of place.
This last check will ensure future troubles are avoided after installing tips on electric golf cart batteries. A few extra minutes spent here will be worth keeping your system stable and reliable.
How to Test Golf Cart Battery Voltage and Charging
After all checks are complete, testing the system follows. Measure the total voltage in the main terminals using a voltmeter. It must be compatible with your cart, 36 volt or 48 volt.
If the reading is inaccurate, recheck the wiring and proceed. Once the voltage has been verified, connect the charger and let it charge fully. This helps balance the battery system.
This is a significant step in installing golf cart batteries and ensures that everything is running properly. It is one of the most appropriate methods for installing 48 V golf cart batteries to achieve long-term functionality.
Once charged, re-test the voltage to ensure the system is stable and ready to use.
Wrap Up
You can easily install and wire golf cart batteries following a simple and methodical procedure. Correctly positioning batteries, connecting them, and testing voltage each have a significant impact on performance and safety. During installation, you can take time to avoid mistakes that are likely to occur, ensuring your cart runs smoothly in the long run. Always use correct diagrams and ensure that each connection is checked before completion. A properly installed battery system enhances power, reliability, and battery life. With the proper attitude, you can be sure of installing golf cart batteries and having a safe and efficient ride each time you are in your cart.
FAQ
How often should you check the water level in a golf cart battery?
Water levels should be checked once a month. Add water, distilled as necessary. Do not allow the plates to be above the water.
Is it possible to interchange old and new golf cart batteries?
No, they should not be mixed. Old batteries have the power to spoil fresh ones. Always replace all batteries at the same time.
What should you do if your golf cart won’t start after installing new batteries?
Double-check all cable connections. Make sure you wired everything correctly. Test the voltage with a meter. If it still won’t start, contact a golf cart technician.


