
Starting your first DIY project? Learning how to use a drill properly is the perfect place to begin. It might look a little intimidating at first, but with a few simple tips, you’ll be drilling like a pro in no time. A magnetic drill is one of the most useful tools for any DIY beginner, from hanging shelves to building furniture. Remember, safety always comes first. Once you feel confident handling your drill, every project becomes easier, faster, and more enjoyable. With the right grip, steady pressure, and a little practice, you’ll soon master one of the handiest tools in your kit.
Types of Drills and Their Uses
Selecting the appropriate drill will depend on the type of work that you intend to do. It can be repairing furniture, attaching shelves, or knowing how to use a drill to fix the house; knowing the type of drills enables you to work effectively and safely. We will discuss two major categories and their essential distinctions.
Corded vs. Cordless Drills
Corded and cordless drives have their purposes. This corded drill is directly inserted into a wall socket, and you have constant power without worrying about batteries. This type is suitable for heavy-duty work or in instances where you require prolonged drilling.
On the other hand, a cordless drill is rechargeable, making it very portable. It is perfect in tight areas or outdoor work where the power sources are not close.
Quick comparison:
- Power Source: Corded – wall outlet | Cordless – battery
- Portability: Corded – limited | Cordless – high
- Best For: Corded – heavy-duty drilling | Cordless – quick, light tasks
If you often work outdoors or away from outlets, a cordless drill makes your projects much easier and faster to complete.
Drill Bits and Their Purposes
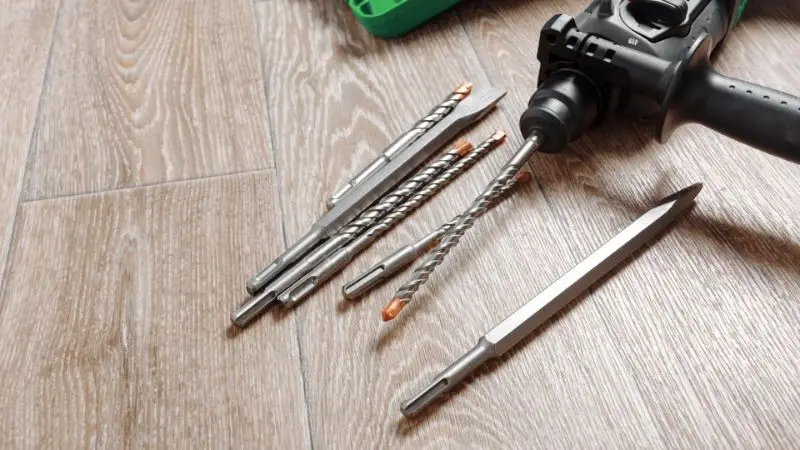
There are numerous types of drill bits with various shapes and materials, which will serve a special purpose. The selection of the correct bit also prevents some errors, such as cracks or damage, in case you are not familiar with how to use a drill without ruining the wall. It is important to make sure that your bit fits properly before beginning and that it matches the material of your project.
General categories of drill bits are:
- Twist Bit: This one is excellent for drilling in wood, plastic, and metal.
- Spade Bit: It is applied in creating large holes in wood.
- Masonry Bit: Ideal on brick, stone, or concrete surface.
By knowing the function of each bit, you can also learn how to drill straight holes using a hand drill so that they are clean and correct each and every time..
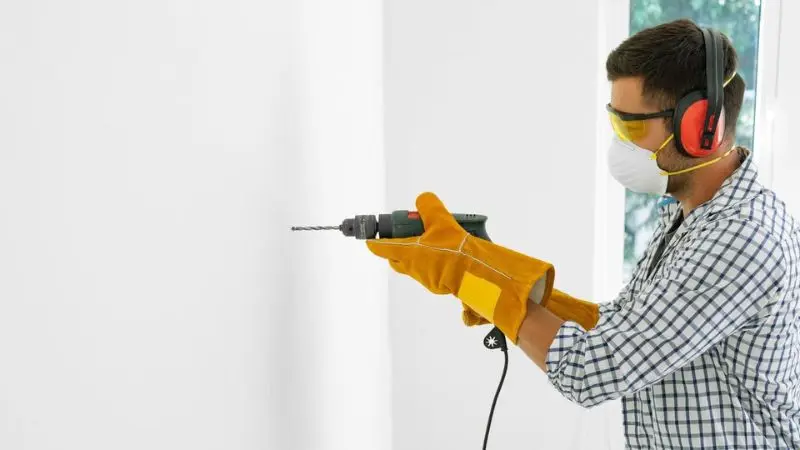
Drill Safety Basics Before You Start
Before you begin drilling, safety should be your top priority. A few smart steps can help prevent accidents and make your work smoother. Whether you’re learning how to use a drill for home repairs or handling a small DIY task, being careful ensures better control and results.
Wear Safety Gear Before Drilling
Always wear proper protective gear when working with a drill. Safety glasses protect your eyes from flying dust and debris. Gloves give you a stronger grip and protect your hands from minor cuts. Closed-toe shoes keep your feet safe if something drops. If you’ll be drilling for a long time, use ear protection to reduce loud noise.
Safety checklist:
- Safety glasses: Protect your eyes.
- Gloves: Help with grip and safety.
- Closed-toe shoes: Shield your feet.
- Ear protection: Blocks loud noise.
Also, tie back long hair and remove loose jewelry to prevent anything from getting caught in the drill.
Check Your Drill and Workspace
Inspect your workplace and the magnetic drill before beginning to drill. Check on the presence of cracks, missing cords, and loose battery links. To check the smooth operation of the trigger, test it, and check that the drill bit is tight and straight. A brief inspection prevents errors, particularly when operating a drill without damaging the wall.
Preparation steps:
- Loosen the drill body and cord and see whether they are damaged.
- Make sure that the bit fits into position and rotates freely.
- Recharge the battery of cordless drills.
- Clean the work area and ensure that it is bright.
- Clamp your workpiece to hold it, not with your hands.
- A well-kept and clean area keeps you focused and drills safely and accurately.
How to Use a Drill Step by Step for Beginners
Learning how to use a drill for home repairs is simple once you understand each step. Whether you’re drilling holes, hanging frames, or assembling furniture, the right setup and technique make your work safer and smoother. Follow these steps to drill confidently and accurately.
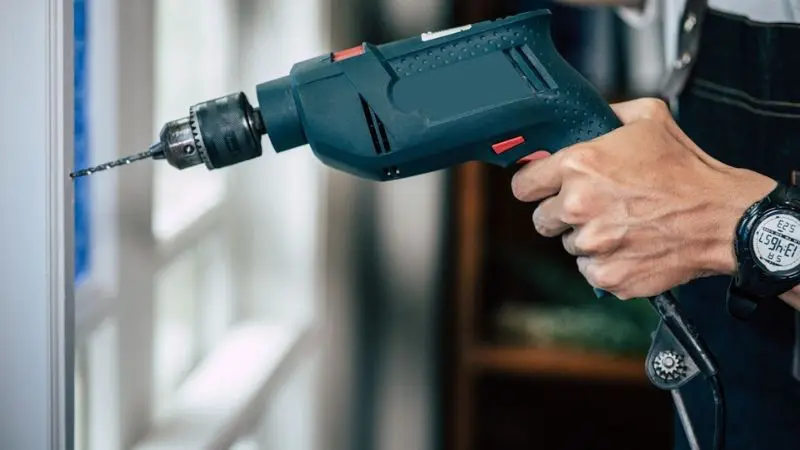
Step 1: How to Prepare Your Drill Before Starting
Have your drill in hand before drilling. Test the charge of the battery, or insert your corded drill. Then place the drill bit on the right side, which is to be used in your task. Take the chuck, twist it, insert the bit, and tighten it fully. In case you intend to screw your drill, then fit a bit to the screw head. This is done initially so that you do not ruin screws or bits, and it is much easier to drill.
Before you start:
- Plug in the charging battery or power cord.
- Select and screw the appropriate drill bit.
- Be sure that you have attached a driver bit when using the drill on screws.
Step 2: How to Measure and Mark Exact Drilling Points
Accurate marking helps you drill straight and even holes. Use a pencil and a tape measure to mark exactly where you want to drill. Keep your marks level using a ruler or spirit level. If drilling into drywall, locate the studs for better support. Make small pilot holes to guide your drill bit — this keeps the material from splitting and helps you master how to drill straight holes with a hand drill for perfect results every time.
Before drilling holes:
- Measure carefully and mark clear drilling spots.
- Use a level to keep your lines straight.
- Make pilot holes to prevent cracks or splits.
Step 3: How to Drill Properly Without Damaging the Wall
You are now ready to drill safely and productively. Keep the drill in both hands to keep it steady. This is done by placing the tip of the bit on your marked position and then beginning at a slow pace. Slowly increase the speed of drilling as you go down. Get the drill to work–do not strain too hard, or you will ruin the surface. The trick really matters in the process of learning how to operate a drill without ruining the wall. When changing to screws, use a drill bit instead of a driver bit so that one can learn how to use a drill with screws with confidence.
While drilling:
- Hold the drill with your hands firmly.
- Begin slowly, then pick up progressively.
- Maintain constant pressure; do not overstretch the bit.
- Change bits in the switching holes to screws.
Common Drilling Mistakes You Should Avoid

Even when you know how to use a drill for home repairs, small mistakes can still cause problems. Being aware of common errors helps you save time, protect your materials, and keep your tools working properly. Let’s go over a few mistakes beginners often make when drilling for the first time.
1. Using the Wrong Drill Bit
Choosing the wrong bit is a common issue. Each drill bit is designed for a specific material. For example, a wood bit won’t work well on metal or concrete. Using the wrong one can damage both your bit and your project. Always check the bit type before you start to ensure it fits your task, especially when learning how to use a drill without damaging the wall.
Quick reminder:
- Use wood bits for wood projects.
- Use masonry bits for concrete or brick.
- Use metal bits for steel or aluminum.
2. Forgetting to Secure the Workpiece
If your material moves while drilling, your hole can become crooked or uneven. Always keep your workpiece stable. Use clamps or a sturdy surface to hold it in place. This extra step also helps you master how to drill straight holes with a hand drill, as the material won’t shift while you work.
Keep things steady by:
- Using clamps to hold materials firmly.
- Avoid drilling while holding items by hand.
- Working on a flat, stable surface.
3. Drilling Too Fast or With Too Much Pressure
Novices believe that quicker drilling means being faster on the job. But at high speed or excessive pressure, you may overheat the bit or produce smoke, or even crack your material. It is best to begin slowly and leave the drill to most of the work. This softer solution leaves you with cleaner holes and also safeguards your Drill.
To drill properly:
- Begin at a slow pace, then pick up the pace when necessary.
- Keep light, steady pressure.
- Stop if you smell something burning or see smoke.
4. Skipping Pilot Holes
Skipping pilot holes can save a few seconds, but it often leads to split wood or poorly placed screws. A pilot hole acts as a guide for your main drill bit, especially when learning how to use a drill for screws. This simple step helps your screws go in smoothly and stay secure.
Before driving screws:
- Drill a small pilot hole first.
- Use the right drill bit size for your screw.
- Avoid drilling too deep or wide.
5. Ignoring Safety Precautions
Even minor drilling projects require basic safety measures. Leaving the use of safety gloves or glasses may cause flying dust or debris to cause injuries. Safety rules should be observed even in the execution of minor tasks to prevent accidents.
Always remember:
- Keep your gloves and safety glasses on.
- Keep your hair tied back.
- When something does not seem right, stop drilling.
By avoiding these mistakes, you will not only work faster and safer but also become better at every project. Be patient, and one day you shall be able to handle any drilling job like a professional.
Maintenance Tips to Keep Your Drill in Good Condition
Taking proper care of your drill helps it stay powerful, safe, and reliable for years. Whether you’re still learning how to use a drill for home repairs or are already confident with your tools, regular maintenance prevents problems and saves money in the long run. You don’t need special tools—just a few simple habits make a big difference.
Clean Your Drill After Every Use
Always clean your drill once you finish working. Dust, wood shavings, or small debris can block vents and affect performance. Use a dry cloth to wipe it down and a soft brush or compressed air to reach tight spots. Keeping it clean ensures smooth performance every time you use it.
Cleaning checklist:
- Wipe off dust and debris with a dry cloth.
- Clear vents and moving parts carefully.
- Use a brush or compressed air for stubborn dirt.
Check the Drill Bit and Chuck Regularly
After each use, remove the bit from the chuck. Inspect both for signs of wear, rust, or dullness. If the chuck feels sticky, open and close it several times to keep it working smoothly. These quick checks also help you stay comfortable while practicing how to use a drill for screws or switching between bits during projects.
What to check:
- Remove the bit and inspect for damage.
- Look for rust or rough movement.
- Keep the chuck clean and lightly oiled.
Store Your Drill in a Dry, Safe Place
Good storage helps in avoiding damage from moisture and dust. It is important to remember to keep your drill in its case or on a dry shelf, not in a damp area. It is quite important to store your drill well in case you are practicing on how to use a drill without destroying the wall, a well-maintained tool works more effectively.
Storage tips:
- Store your drill in a dry place.
- The damp garages or basements should be avoided.
- Keep in a shelf case or on a high shelf.
Keep the Battery or Power Cord in Good Shape
If you use a cordless drill, charge the battery regularly instead of letting it sit empty. This helps the battery hold power longer. For corded drills, inspect the cord for cracks or frayed wires before each use. A well-maintained power source keeps your drill safe and strong.
Battery and cord care:
- Charge batteries every few weeks.
- Avoid overcharging or leaving them unused for too long.
- Replace damaged cords or connectors immediately.
Add Light Oil to Moving Parts
Even the slightest amount of oil on the chuck or moving parts will keep your drill running smoothly and will stop rust. This will consume less than a minute and give additional years to your drill.
Maintenance reminder:
- Apply a little light oil to the chuck.
- Blot additional oil to prevent some oil buildup.
Along with making your drill last longer by performing regular maintenance, it will also ensure that your drill works at its optimal level. By having these habits, you will never be short of doing your next DIY task or repair project..
Wrap Up
Keeping your drill in good shape and using it correctly makes every project easier and safer. Once you know how to use a drill properly, you can handle tasks like hanging shelves, fixing furniture, or building small projects with confidence. Remember to pick the right drill bit, drill slowly, and always secure your materials. With regular cleaning, proper storage, and safe habits, your drill will last for years and perform perfectly. Whether you’re learning how to drill straight holes with a hand drill or how to use a drill without damaging the wall, practice makes every project smoother.
FAQ
What drill bit should I use?
Depending on the material, select the bit. Wood- Use a wood bit, brick/concrete-use masonry, steel/aluminum surface- use metal.
How am I supposed to deal with a stuck drill bit?
Stop drilling immediately. Change the drill to pull slowly and turn it around. In case it gets stuck, one should simply wiggle the drill up and down as they help the bit come out.
Will I be able to use a drill to drive screws?
Yes, you can. Then insert a screwdriver bit, position your drill on a low setting, hold it still, and allow the drill to drive screws without over-tightening.


