
| Difficulty | Cost | Duration |
|---|---|---|
| 6 out of 10 | $500-$1000 | 3-6 hours |
Do you want to know how to install gazebo? It seems you are looking to do some DIY on your lawn, patio, or backyard. A gazebo is a great way to add beauty and functionality to an open space in your house. It also offers protection from the weather elements and a place to unwind and enjoy alone or with family or friends. Though DIY is initially daunting, you can achieve the results with a high-quality, sturdy gazebo like VEVOR.
This guide will provide you with stepwise instructions on how to install gazebo. We will discuss how to assemble gazebo, the advantages of having a gazebo, common installation mistakes, and much more.
But first, for those planning installing gazebo on their own, the chart below will give you an idea of the challenges, the expenses, and the duration.
Note: These are only general estimates on installing gazebo yourself. However, these may vary depending on the complexity of the gazebo you choose, your skills, and the condition of the installation area.
Next, we will discuss the various advantages of a gazebo set up.
Benefits of Having a Gazebo in Your Outdoor Space
An outdoor gazebo is like an extension of your inner space. You can use this area for multiple purposes, including but not limited to:
Shade and protection from elements: An outdoor space with no shade is also prone to weather elements. A gazebo with a tough roof and weather-resistant curtains can protect you from harsh weather conditions.
Entertain guests: A gazebo set up is a nice place to welcome guests for an event, a barbeque party, or a get-together. It provides a shelter to enjoy the outdoors.
A space to relax: A few minutes in the gazebo allows you to escape from the hustle and bustle of everyday life. You can read a book, listen to your favorite music, and breathe fresh air here.
Increases property value: A gazebo adds to the curb value of your house. It makes your house look more attractive to buyers instantly.
You may want to know how to put up a gazebo after knowing the benefits. So let’s begin with learning how to assemble a gazebo first.
How to Assemble a Gazebo: Tool Required For This Project
Before you assemble gazebo, you require some basic tools and materials. Given below are a few of them.
Tools
You will come across the following terms while understanding how to assemble a gazebo:
● Drill: A drill makes holes in the gazebo frame for screws and bolts. You need a drilling machine with various bits, including a 10mm bit for screws and a 5mm bit for bolts.
● Hammer: A hammer drives nails into the gazebo frame. You will need a claw hammer. A multi-purpose hammer drill may also work.
● Level: An optical level ensures that the gazebo is level.
● Ladder: You need two ladders to assemble gazebo. One ladder can help you reach the top of the gazebo, and the other supports the gazebo while you are working on it.
● Measuring Tape: It measures the distance between different parts of the gazebo. This helps in ensuring that the gazebo assembles correctly
● Screwdriver: A screwdriver tightens screws in the gazebo frame.
● Wrenches: A wrench helps tighten bolts in the gazebo frame. You will need a socket wrench and a wrench with an adjustable jaw.
Materials
The materials underneath are essential for an effective gazebo set up.
● Decking screws: These aid in attaching the gazebo frame together.
● Gazebo kit: The gazebo kit will include all the necessary parts to assemble gazebo. This includes the frame, the roof, and any other accessories.
● Clear roofing silicone: Clear roofing silicone seals the roof of the gazebo. This prevents water from leaking into the gazebo
● Lights: Lights add ambiance to the gazebo. You can choose between string lights, chandeliers, and lanterns.
● Roofing nails or screws: Roofing nails or screws connect the roof to the gazebo frame.
● Sand: It creates a base for the gazebo if you are not installing it on a concrete foundation.
Now, we know about the tools and the materials of gazebo set up. So, let’s jump to gazebo set up instructions.
Step-by-Step Guide to Install the Gazebo
While it is true that a DIY gazebo set up is not easy, consider an easy assembly gazebo that is also easy to install. VEVOR’s hardtop roof gazebo is a weather-resistant structure with a double PVC roof design. It is ideal for transforming your backyard, patio, lawn, or outdoors.
The answer to how to install gazebo lies in the steps below. Follow them when installing a VEVOR gazebo.
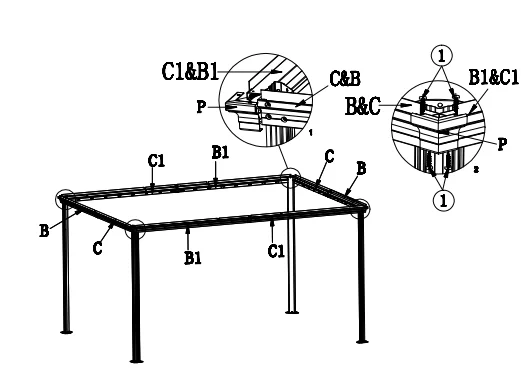
Step 1: Putting up a gazebo frame
Attach the column to the base. Connect the right short beam to the left short beam using a bar union. Connect the right long beam to the left long beam using a bar union again.

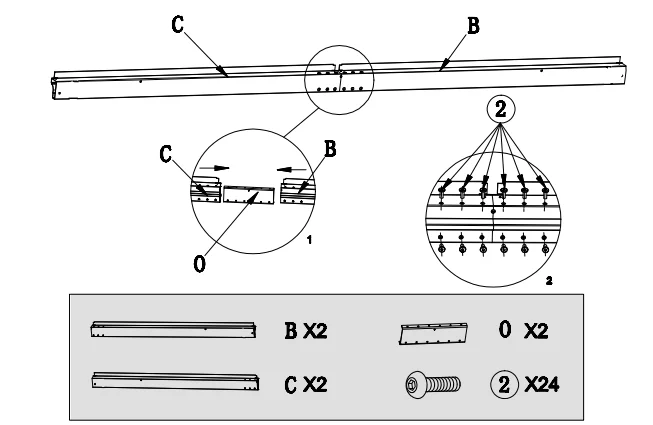
Attach the short track and the long track using the hooks.
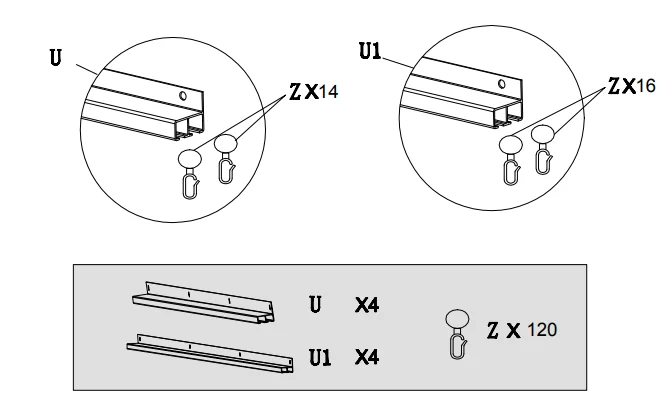
Bring the right short beam, the short track, and the left long beam closer together. Use joint cover plates to connect the right short beam and the left long beam.
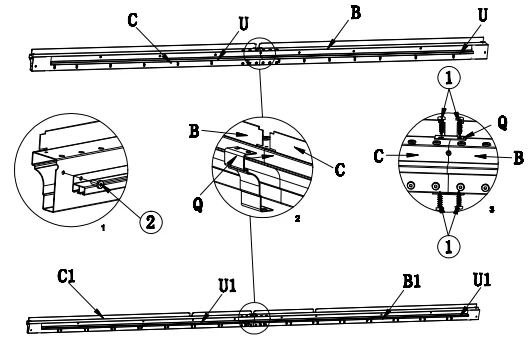
Similarly, get the left long beam and right long beam to join using the long track. Use screws, bolts, and joint plates to fasten.
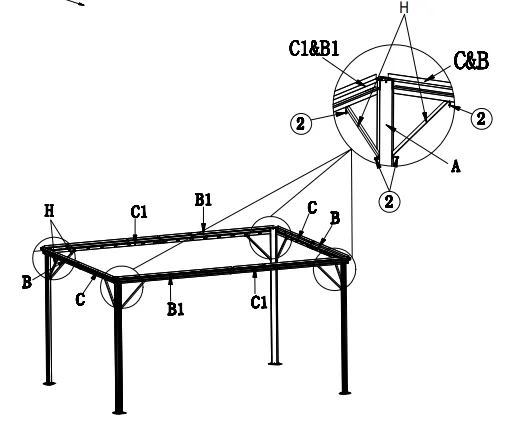
Step 2: Raising the main gazebo structure
Add two columns to the two ends of the structure created in steps 2 and 3. Join the structures of steps 2 and 3 using three bolts. Do the same to the structure made after step 3(refer to image). Raise the structure vertically. You will now have a main structure with four legs and a roof frame.
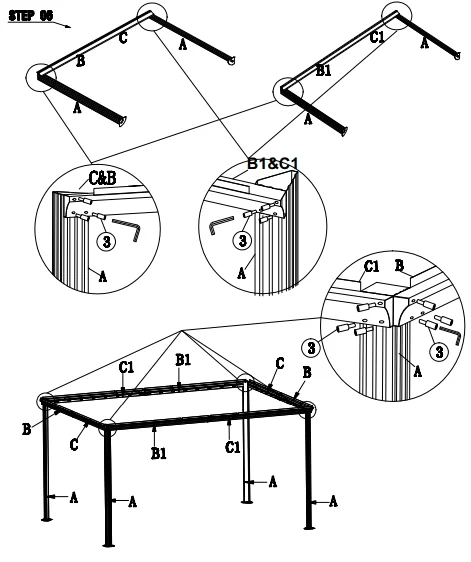
Attach corner covers to the corners where the beams join the columns. Use screws for this purpose.
Now, install a connection piece to the upper corners of the structure, leaving 5 inches of space between the column and the beam on all sides. Secure the connection piece with bolts.
Steps 3: Setting up gazebo canopy
Connect the long corner roof bar and the short corner roof bar to the middle roof finishing bar using inside roof connectors and outside roof connectors. Secure the connections with bolts. Connect the structure of step 9(refer to image) to the four beams using bolts.
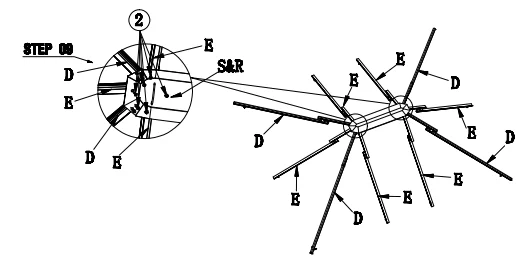
Connect the top inner left roof finishing bar, the top inner right roof finishing bar, and the middle roof finishing bar to the finishing end and the corner finishing end using bolts.
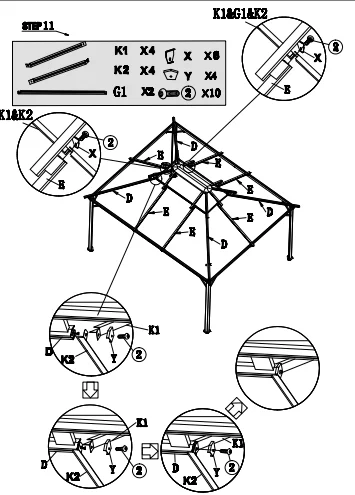
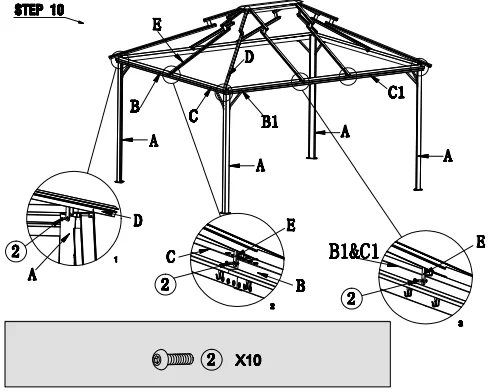
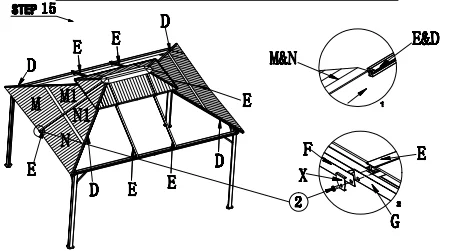
Step 4: Attaching Roof Panels
Now, attach the top left roof panel, the top right roof panel, and the middle roof panel to the structure of Step 11(refer to image). Connect the top outer left roof finishing bar and the top outer right roof finishing bar to the middle roof finishing bar to the finishing end and the corner finishing end using bolts.
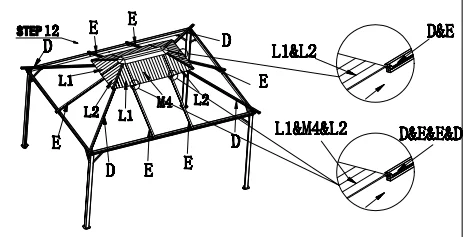
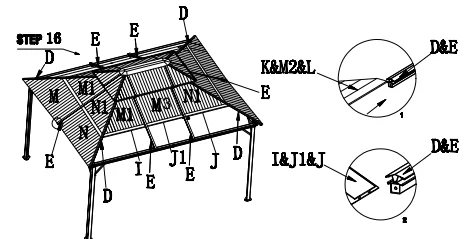
Install the left roof panel and the right roof panel (both upside) just below the top left roof panel. Install the left roof panel (downside) and the right roof panel (downside) just below the upside panel. Repeat on the opposite side.
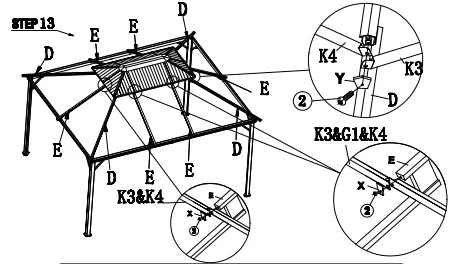
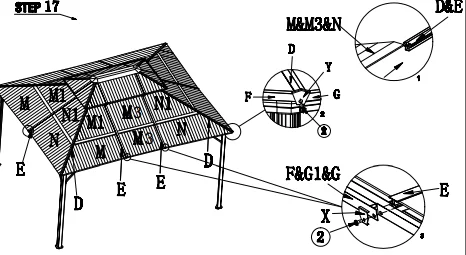
Attach the left roof panel (upside), the middle roof panel (upside and downside), and the right roof panel (upside) to the left roof support bar, right roof support bar and middle roof support bar using the finishing end, corner finishing end, and bolts.
Attach the left roof panel (downside), the middle roof panel (upside and downside), and the right roof panel (downside) to the left roof finishing bar, right roof finishing bar and middle roof finishing bar using the finishing end, corner finishing end, and bolts.
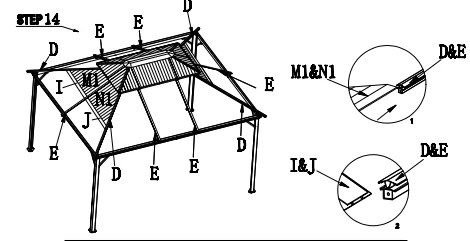
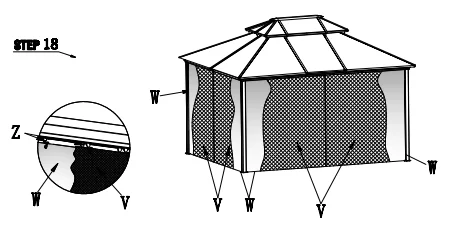
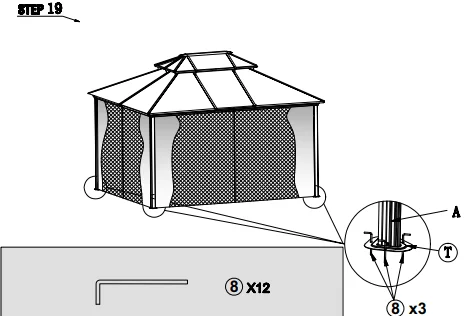
Step 5: Installing gazebo curtains
Install mosquito netting and curtains on all four sides of the gazebo. Add stakes to all four sides of the gazebo on the ground.
Safety Considerations and Common Installation Mistakes
A gazebo set up can last long with some safety measures. These include:
● Make sure the gazebo installation is on a level surface to prevent titling or collapse.
● Take down your gazebo during storms or heavy rains.
● Secure your gazebo with weights to protect it from blowing away during strong winds.
● Do not allow kids or pets to use the gazebo roughly.
● Inspect your gazebo frequently to catch any wear or tear capable of damaging the structure in the long run.
Common gazebo installation mistakes
People make many mistakes while installing a gazebo. Here are some common mistakes:
● Using the wrong material: People buy a gazebo set up in a material that fails to withstand the different weather conditions. Buy wood and vinyl gazebos; they last longer than others.
● Incorrect installation: Strong winds can pull out your gazebo units without anchoring properly. Experts suggest adding some weight while installing a gazebo.
● No legal permissions. Having the permit for installing gazebo can lead you to the right side of the law. One must take legal permission before installation. Note that the authorities consider factors such as the location, the size of the gazebo, the structure of your yard, and more. Only then do they grant rights for putting a gazebo on a deck or some other place in the house.
● Becoming a DIY gazebo installer: You need specific skills to install a canopy to avoid more harm than good. You can avert this by hiring a professional installer who knows how to install gazebo.
FAQs About Gazebo Installation
1. How long does it take to set up a gazebo?
Generally, a gazebo of the size of 10X12 can take up to 2 hours to set up. Whereas, installing gazebo of 12X20 measurements requires approximately 8 hours to set up and so on.
2. How to install gazebo lights?
There are three main types of lights for a gazebo set up: string lights, chandeliers, and lanterns. To install string lights, measure the length of the lights you require and then attach them to the gazebo using zip ties or cable clips. Find a sturdy palace to hang a chandelier; it can be the gazebo roof or a beam. Wire it properly and hang it using a hook. The last and easiest way to install lights in a gazebo is a lantern. Place it on a table or a shelf.
3. How do I ensure that the gazebo is level and stable once installed?
Even after choosing a level site and anchoring the gazebo properly, your structure can become unstable over time. This happens due to changes in the ground or weather conditions. So, check the level of the gazebo regularly and make adjustments. Another consideration is for windy areas. If your area receives strong winds, add extra bracing.
4. Will this gazebo roof withstand winters with a lot of snowfall?
A soft top construction gazebo cannot handle snow. The latter may accumulate over time, leading to the canopy collapse. Even the metal frame is not so strong. So you may need to remove it before the heavy snowfall. Vervo gazebo provides a hard top and can handle all weather conditions effectively.
5. Does the roof have a hook to hang a chandelier or light?
Mostly there is no hook to hang a chandelier or light. The reason behind this is that different people have different preferences. If you want to hang a chandelier or light, you can attach a metal hook yourself.
Conclusion
This article answers the question how to install gazebo. By now, you know installing a gazebo is easy when you follow the instructions carefully. We have them in detail to help you enjoy the benefits quickly. So, understand the procedure and acquire the necessary tools to embark on the journey confidently. However, avoid the mistakes others make. Why wait now! Install a gazebo and enjoy your beautiful outdoor space for a long time.


I am genuinely thankful to the owner of this site who has shared this wonderful post at here.