
Transform your backyard into a cozy outdoor kitchen where you can cook and hang out with family and friends. It’s a great place to cook and spend time with family and friends. Building an outdoor kitchen can make your yard more useful and even increase your home’s value. You don’t need to be an expert to create one.
With easy steps and some effort, you can make an outdoor kitchen that works well and looks good. This guide will show you how to build an outdoor kitchen so you can enjoy cooking and relaxing outside with your loved ones.
Plan Your Outdoor Kitchen
Designing an outdoor kitchen is an exciting way to expand your living space. Before you begin buying appliances or laying down stone, it’s important to plan ahead. From picking the perfect location to designing the layout, each step plays a role in creating a space you’ll love to use. Use these outdoor kitchen design tips to help shape your plan.
Choose the Right Spot
Start by finding the best place in your yard for your kitchen. Look for an area that’s easy to reach from your house, especially one close to water and power lines. A shady spot or one that can support a pergola is great for staying cool while cooking.
Try to avoid places where the wind could blow smoke toward your guests. If you enjoy hosting, choose a space where people can gather nearby without getting in the way. This makes your kitchen both social and practical — a top outdoor kitchen design tip.
Set Your Budget
Before building anything, think about how much you want to spend. Having a budget helps you stay on track and focus on what matters most. Make a list of basic costs like appliances, countertops, and materials.
You can always start with essentials like a grill and sturdy counters, then add extras later. Whether you want something simple or a full outdoor setup, planning your spending helps turn your vision into reality without going overboard — a smart move in any outdoor kitchen building guide.
Design the Layout
Once your location and budget are set, it’s time to plan how your kitchen will look. Start with a rough sketch to map out where everything will go. Decide if you just need a grill or a full setup with a sink, fridge, and storage.
Think about adding counters, seating, and lighting to make the space more comfortable. Try to separate areas for cooking, prepping, and relaxing. These DIY outdoor kitchen ideas and layout tips will guide you in creating a practical and inviting space.
Tools and Materials for Building an Outdoor Kitchen

With your plan in place, it’s time to gather what you’ll need to bring your outdoor kitchen to life. The right tools and materials can make the building process smoother, faster, and even more enjoyable. This outdoor kitchen building guide will help you pick the best gear and materials to get started.
Tools You’ll Need
Before you begin building, gather the tools that will help you work more easily and accurately. These basic items are essential for measuring, cutting, assembling, and finishing your kitchen space:
- Tape measure: Helps you get accurate measurements so your materials fit perfectly and your layout stays true to your design.
- Level: Makes sure your counters, appliances, and surfaces are even and straight, which is key for both safety and looks.
- Power drill and screws: Needed to build the kitchen frame securely and attach key parts without wasting time or effort.
- Saw: Useful for cutting wood, metal, or other materials to the right sizes as you build your frame or supports.
- Trowel: Handy for spreading mortar when working with bricks, stone, or tile to get a smooth and even surface.
If you don’t already own these tools, borrowing or renting is a smart way to save money. The right tools not only help you build better, but they also make the whole process more enjoyable.
Choosing Strong Materials
The materials you choose will affect how your kitchen looks and how long it lasts. For the frame, consider treated wood, metal studs, or concrete blocks. Each one works well outdoors and offers different benefits depending on your budget and climate.
For countertops, granite, concrete, or stainless steel are all strong choices that handle sun and rain. Add finishes like stone, tile, or stucco to match your personal style. Picking durable, weather-resistant materials means your kitchen will stay looking great for years to come. These are some of the best materials for outdoor kitchen building.
Picking the Right Appliances
Appliances bring your outdoor kitchen to life, so choose them based on how you plan to use the space. A grill, mini fridge, and sink are good starting points. If you love hosting, you might also want extras like a pizza oven or an ice maker.
Make sure all appliances are designed for outdoor use—this helps them last longer and prevents expensive repairs. Matching your fixtures and hardware to your overall design adds a nice touch and helps everything feel pulled together.
Step-by-Step Guide to Building the Outdoor Kitchen Structure
Now that you’ve planned your space, it’s time to bring your outdoor kitchen to life. This section walks you through each stage of the building process—from setting the foundation to installing your appliances. Follow this guide on how to build an outdoor kitchen step by step.
Step 1: Build the Frame and Foundation
Every great structure starts with a strong foundation. Begin by clearing and levelling the ground using a shovel and rake. If the surface isn’t even, use gravel or sand to fix low areas.
Once the ground is ready, pour a concrete slab. Outline your space using wooden forms, then pour the concrete and spread it evenly. Let it dry for at least 48 hours before building on it.
Choose the best materials for outdoor kitchen frames, like treated wood or metal studs. Metal is a great outdoor choice because it resists water and pests. Cut everything to size and screw the frame together carefully.
Step 2: Sheath the Frame and Attach the Lath
With your frame in place, you’ll now cover it to create a surface for your finishes. Use cement board or exterior-grade plywood to sheathe the frame. Cement board is best for handling outdoor conditions.
Screw the panels into the frame, making sure everything is flush and solid. Then, attach metal lath over the sheathing. The lath gives your mortar something to grip onto in the next step.
Wear gloves while working with lathe, as the edges can be sharp. Secure it tightly with screws or staples and make sure there are no gaps or loose areas. This is a crucial step to follow in any solid outdoor kitchen building guide.
Step 3: Apply the Scratch Coat and Score the Mortar
This step creates a strong base layer for your stone finish. Mix mortar according to the instructions on the bag. Use a trowel to spread a thin layer—about 1/4 inch—over the lath.
After applying the mortar, use a notched trowel or rake to scratch horizontal grooves across the surface. These grooves help the next layer stick better.
Let this scratch coat dry for at least 24 to 48 hours. Don’t rush it—this step builds the lasting strength of your outer walls. Work in small sections so the mortar doesn’t dry before you finish scoring, a key tip in your outdoor kitchen design.
Step 4: Set and Shape the Stones
This part transforms your outdoor kitchen from a basic frame into a beautiful showpiece. Laying and shaping stones takes patience, but the result is worth it. Here’s how to do it step by step:
- Choose Your Stones: Select natural stone, brick, or stone veneer that suits your style and climate. Look for durable, weather-resistant materials that are easy to cut and shape.
- Mix the Mortar: Prepare mortar in a large bucket or tub until it’s thick but spreadable. It should hold its shape when scooped, but still spread easily onto stone backs.
- Start Setting the Stones: Begin from the bottom and work upward. Press each stone into the mortar firmly, giving it a gentle wiggle so it bonds well to the scratch coat.
- Shape and Adjust: Use a chisel or saw to trim stones for a better fit. Customize the shape as needed to keep the layout smooth and visually balanced.
- Leave Small Gaps: Let there be a bit of space between stones to create a natural look. These joints can be filled with mortar later for strength and style.
- Let It Dry: Allow everything to dry for at least 24 hours before moving or touching the stones. This helps the mortar fully set and prevents shifting.
By carefully placing each stone, you’ll give your kitchen a professional finish that stands out, a must-follow tip in any good outdoor kitchen building guide.
Step 5: Install Utilities and Appliances
Once your stonework is complete, it’s time to make the kitchen usable. Setting up your water, gas, and electric connections turns your structure into a real cooking space. Follow these easy steps to stay safe and organized:
- Plan Utility Connections: Decide where your water, gas, and electric lines will go. Make sure the placement matches your layout and appliance locations according to your outdoor kitchen design tips.
- Install Water Lines: Run flexible hoses or PVC pipes to your outdoor sink. Add a shut-off valve for safety and easy control during winter or repairs.
- Set Up Gas Lines: If you’re using a gas grill, use outdoor-rated pipes and fittings. Always test connections for leaks before turning on the gas.
- Add Electrical Wiring: Install weatherproof outlets near appliances and under counters. Use protective covers and run wiring through outdoor-safe conduits.
- Install Appliances: Place your grill, fridge, and sink into their spots. Follow the manufacturer’s instructions and anchor them securely to prevent shifting or tipping.
- Test Everything: Turn on your water, gas, and power to check for issues. Fix any leaks or wiring problems before regular use.
With all utilities connected and appliances in place, your kitchen is finally ready. This final stage completes your how-to build an outdoor kitchen step-by-step process, giving you a strong, stylish, and fully functional space to cook and entertain under the open sky.
Finishing Touches for Your Outdoor Kitchen
With the structure and appliances in place, it’s time to add the final details that make your space both beautiful and functional. These finishing touches bring comfort, style, and personality to your outdoor kitchen, completing your outdoor kitchen design tips perfectly.
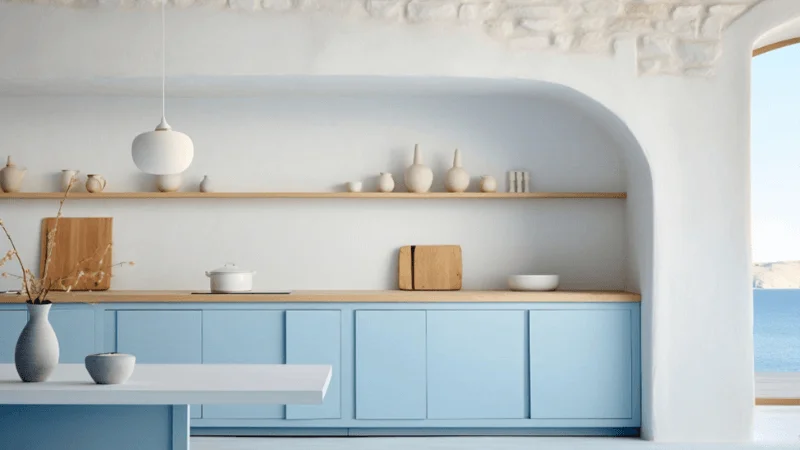
Add Countertops and Cladding
Countertops and cladding are more than just finishes—they add function and style. Choose the best materials for outdoor kitchen countertops, like granite, concrete, or stainless steel. These surfaces handle sun, rain, and heat while being easy to wipe clean.
For cladding, pick finishes that match your style. Stone veneer, brick, or stucco are all great options. Natural stone brings a rustic touch, while sleek tile offers a modern look. These finishes also add strength and weather resistance to your kitchen’s frame.
Incorporate Lighting and Decor
Lighting and decor help create the right mood for evening cooking or late-night meals. Hang string lights or lanterns around your kitchen for a warm, cozy glow. LED fixtures work well near prep areas, making it easy to see when cooking after sunset.
Add personality with small decor items. Potted plants, a patterned outdoor rug, or even a weatherproof chalkboard can make the space feel fun and lived-in. These elements turn your kitchen into a gathering spot, not just a place to cook.
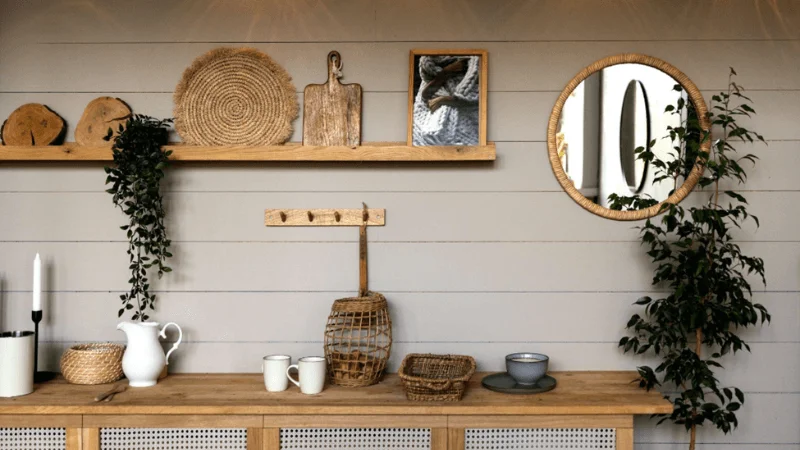
Include Seating and Storage Options
Seating and storage turn your kitchen into a comfortable and usable hangout. Add bar stools by the counter or set up a small dining table where guests can gather. Built-in benches or corner seats work well in smaller yards and create a cozy vibe.
For storage, install shelves or outdoor-rated cabinets to hold utensils, plates, and other essentials. Use materials like stainless steel or treated wood that resist moisture and sun exposure.
With the right seating and storage, your outdoor kitchen becomes not just a cooking spot but a perfect place to relax and entertain, bringing together the best of DIY outdoor kitchen ideas and expert design.
Safety and Budget Tips for Building an Outdoor Kitchen
As exciting as building your outdoor kitchen can be, it’s just as important to stay safe and spend wisely. Whether you’re following a detailed outdoor kitchen building guide or using DIY outdoor kitchen ideas, smart steps will make the process easier, safer, and more cost-effective.
Stay Safe While Building
Working with tools, heavy materials, and utilities can be risky without the right precautions. Make sure safety is always part of your plan.
- Wear gloves, safety goggles, and closed-toe shoes to protect your hands, eyes, and feet during cutting, lifting, or drilling. These basics can help prevent minor injuries that slow you down.
- Keep your work area tidy and free of clutter to avoid trips and falls. A clean space helps you move safely and work more efficiently.
- Inspect your power tools before using them to ensure they’re working properly. Loose wires or dull blades can cause accidents or delay your project.
- Follow safety guidelines when dealing with gas and electricity. If you’re unsure about a connection or line, don’t take chances—call a professional.
Always keep a first-aid kit nearby in case of small cuts, burns, or scrapes. Quick treatment can keep minor injuries from becoming big problems.
Save Money Without Losing Quality
Building a great outdoor kitchen doesn’t have to drain your wallet. With a few smart choices and knowledge of the best materials for an outdoor kitchen, you can keep costs down while still getting a great result.
- Use budget-friendly, durable materials like concrete blocks for your kitchen frame. These cost less than custom panels but offer solid strength and long life.
- Start with must-have appliances like a grill and a mini fridge. You can always add more features—like a pizza oven or sink—once you know what you’ll use most.
- Shop during off-seasons or sales to find great deals on tools, furniture, and materials. A little planning can lead to big savings.
- Take on smaller tasks yourself, like painting or setting up furniture. Doing simple work on your own helps reduce labor costs without affecting quality.
Use leftover materials like old bricks or spare tiles in creative ways. They can add charm to your space while keeping your budget in check.
Know When to Get Expert Help
While DIY outdoor kitchen ideas can be fun, there are times when calling in a pro makes sense, especially for safety and long-term reliability.
- Hire a licensed professional for gas lines and electrical work. These tasks can be dangerous and often require special tools and knowledge to pass safety inspections.
- If you’re unsure about pouring concrete or building the frame, getting expert help can give you peace of mind. They’ll make sure everything is level, strong, and weather-safe.
- Bring in help if you’re short on time or tools. Even one day of support can speed up your project and reduce stress.
Hiring a professional may cost more upfront, but it protects your investment and helps avoid mistakes that are costly to fix later.
Wrap Up
Building an outdoor kitchen is a fun and rewarding project. With the right plan, tools, and materials, you can learn how to build an outdoor kitchen that’s perfect for cooking, relaxing, and spending time with loved ones. From picking the best spot to adding the final touches, every step brings your vision to life.
Stay safe, stick to your budget, and don’t be afraid to ask for help when needed. Whether simple or fancy, your outdoor kitchen will be a place to enjoy for years. Start small, dream big, and soon you’ll be cooking under the open sky in your own backyard.
FAQ
What is the best material to use for outdoor kitchen countertops?
Building materials like granite, concrete, and stainless steel do very well. They are durable, tough enough for weather and regular rain and cleaning them is no trouble. Find a match that goes well with your taste and is not too expensive. Granite has a natural appearance, and stainless steel gives your kitchen a modern touch.
Do I have to get a permit before making an outdoor kitchen?
This is different depending on where you live. Permits are often required in some places for gas, water or electricity. Send a quick email or call your local building office just to confirm. Have someone skilled handle utilities to guarantee you obey all the laws.
How much will it cost to make an outdoor kitchen?
Size, materials, and appliances are the factors that determine how much you will pay. You can have a basic kitchen for $2,000–$5,000. Very nice setups for streaming can cost over $10,000. Work with smaller quantities at first and add more little by little to stay on a budget.
Is it possible to put up an outdoor kitchen by myself?
You are able to do that. Simple steps, for example, framing or finishing, are something even beginners can do. But it is best to hire a professional for any gas or electric projects. Ensuring safety should come first! Don’t be afraid to get support when you get stuck.
How can I keep my outdoor kitchen safe from weather problems?
Make sure the materials you choose are strong, such as stainless steel and stone. Wrap your appliances and seal your countertops to make them safe. Keep your kitchen in good shape by cleaning it and applying a new seal regularly.


