Are you embarking on a journey on how to build a shower curb? The shower curb has endless benefits for your bathroom. It doesn’t only provide a safer Surface but also ensures the central collection and adequate drainage of water. Get better water flow and keep it away from spreading all around.
But the question is– How to install a shower curb? No more wandering as we have written a full-fledged guide to build a shower curb and ensure better safety of your bathroom. You’ll learn about the different materials and tools used in the shower curb with their significance. Let’s discuss it!
Table of contents
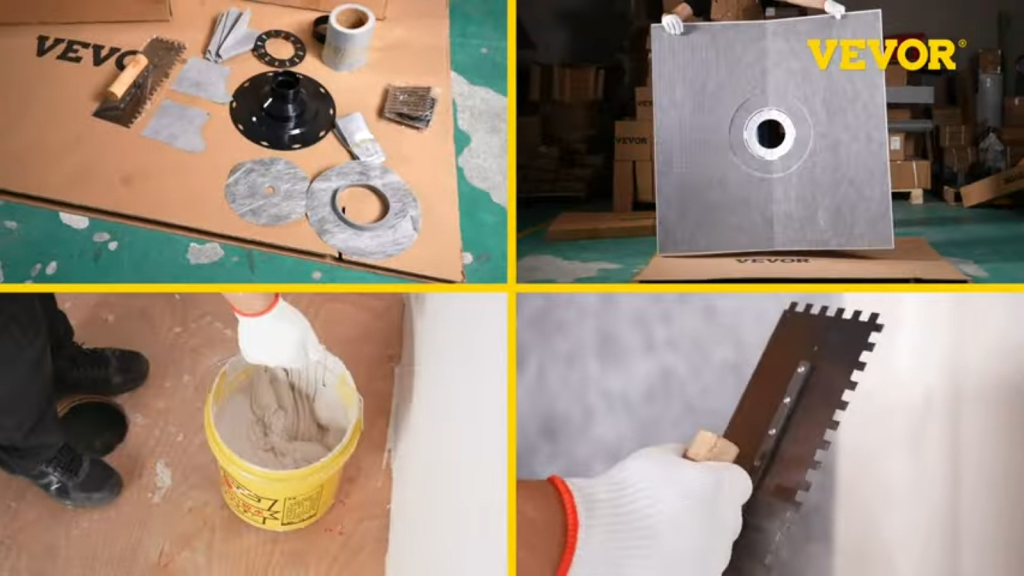
Part 1: Tools and Material Needed for Shower Curb Construction
Keep all the following materials and tools assembled and prepared to take off on your first journey of how to build a shower curb.
Material
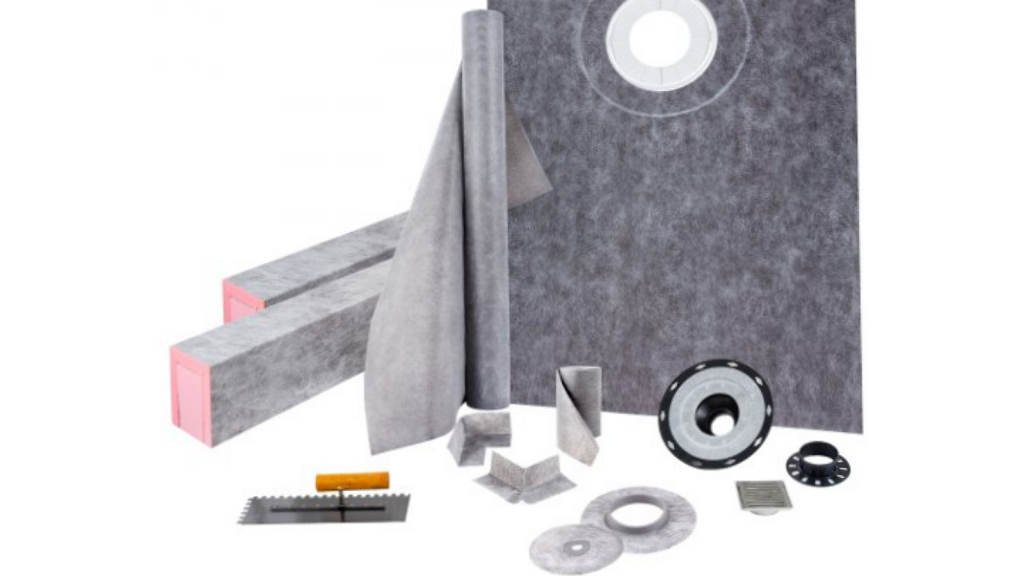
- Shower kit. VEVOR Shower kit has all the necessary tools for installation processes. From trowel to waterproof membranes, get all the tools.
- Pre Blended Dry Mortar. Mortar helps in the perfect sticking and installation of a waterproof membrane.
- Lumber board. It helps in applying the pressure and sticking the membrane
- Boards. Water boards add up to safety setups for the shower curb.
- Tile and bullnose tile. If you have a plan for installation, get these materials ready to install on the floor.
- Mosaic tile for wet-area flooring. In the wet area of the floors, use the mosaic tile.
- Grout. It helps fill the gaps if you have left it in the building shower curb.
- Tile caulk. Connect the tile walls with the caulk.
- Liquid waterproofing barrier. The barrier keeps the water away in the bathroom.
Tool
- Slice saw. You can cut parts of the tiles according to your desired dimensions.
- Hammer. Apply the pressure and stick the surface with the hammer tool.
- Protractor. Measure the angles of the corners with the protractors and leave no mistakes during the installation.
- Margin trowel. For the finishing and application of the dry mortar.
- Level. For resurfacing the areas of membranes.
- Pencil. Draw the lines with the pencil tool. It assists in a better definition of the borders of the area.
- Non reusable paintbrush. You can give a custom aesthetic touch to your bathroom and shower walls.
- Little foam roller. Use a roller for uniformity of the content on the walls.
- Pail. It stores most of your liquid materials. You can keep your adhesive materials or even store the solid materials in the pail.
- Wet rag. Clean up the surface with the wet for better adhesion.
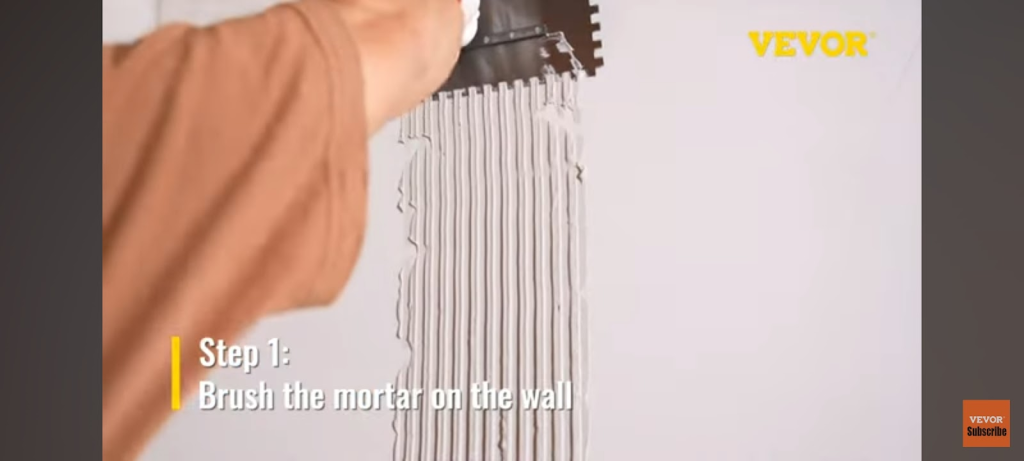
Part 2: How to Build a Shower Curb?
Building a shower curb is quite a simple and fun game. All you have to do is keep your tools and materials handy and show off your skills for the best efficiency. Here are various steps to build a shower curb.
Step 1: Brush The Mortar
The very first step of the shower curb installation is to make the scene ready. Therefore, you need to prepare the walls and floors before installing a shower curb in such a scene.
Get up your tools and be ready to apply the mortar on the walls. Apply uniformly on the whole walls of your shower or bath setup.
Tips:
- Use the proper trowler that uniformly spreads the mortar.
- Check if there is any part of the wall left out.
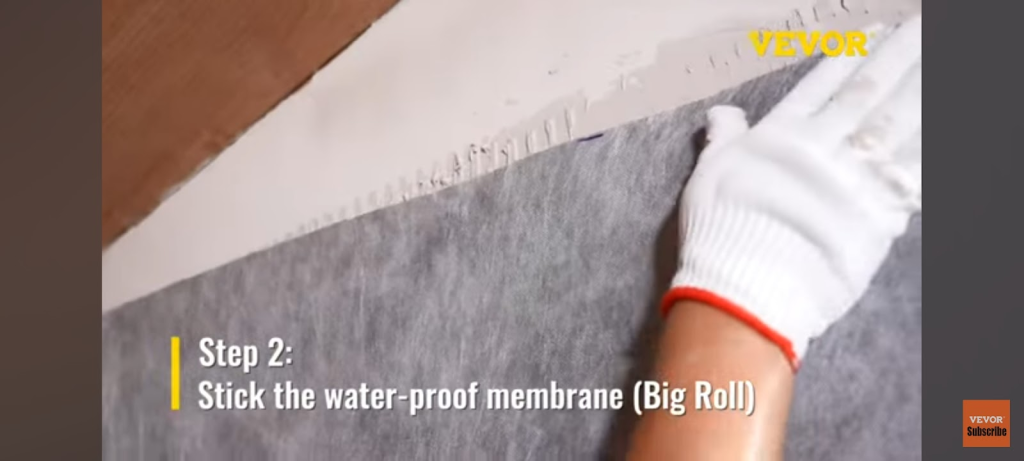
Step 2: Stick the Waterproof Membrane
Since the bathroom involves the water systems, you need to keep the water away from reaching the walls. That’s when you think about the installation of the waterproof material. VEVOR shower kit comes with all the tools on the list and provides an effective barrier.
Now, take out the big roll. Cut it in the accurate dimensions for your walls. Have you done that? Now, stick the membrane all along the wall. Apply a little pressure to fix the membrane in place and pop out the extra mortar.
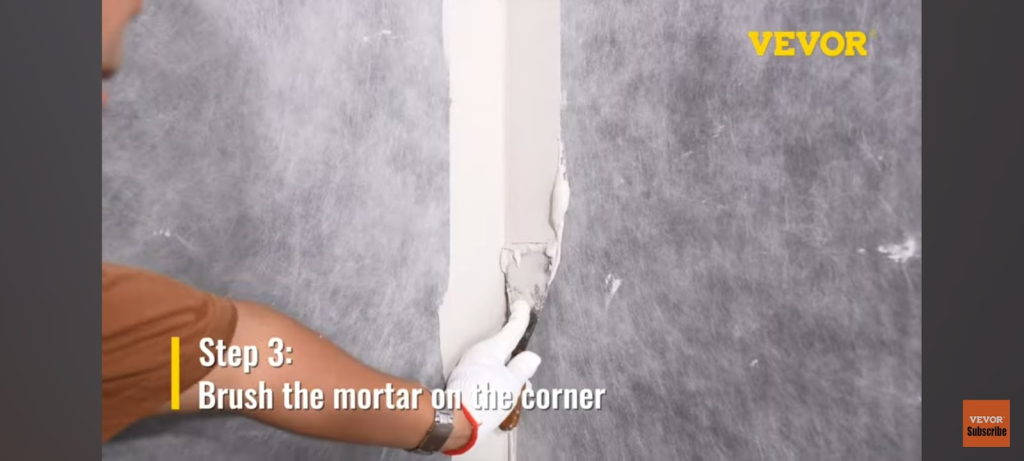
Step 3: Brush the mortar on the corner
Once you have covered the walls, it is time to think about the corners. They are often ignored and must be given proper attention. What you have to do is to repeat the process.
- Get your mortar and trowel.
- Apply the mortar along the corners.
- Reach out to the curved areas because they are often out in the event of mortar application.
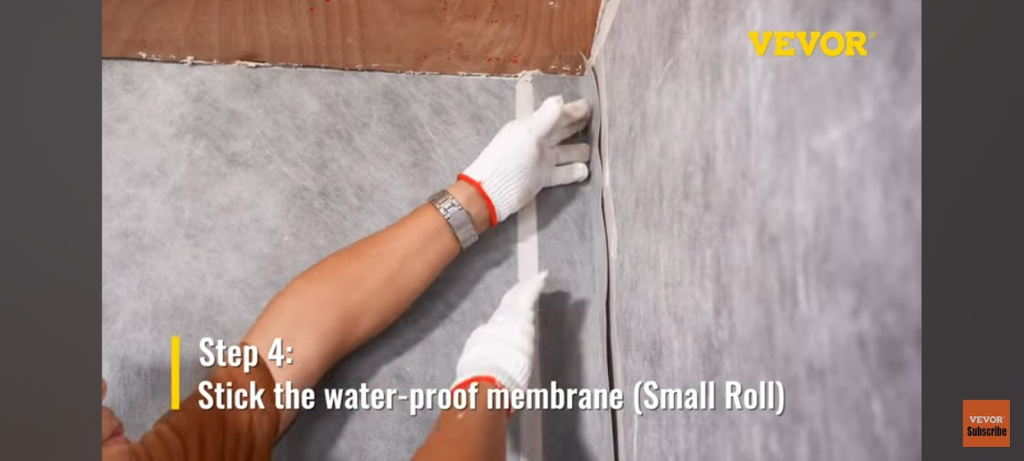
Step 4: Stick the Waterproof Membrane
Previously, you installed the waterproofing membrane on the walls; now, do the same on the corners.
- This time, get a small of the Waterproof Membrane.
- Cut it according to the length and edges of the corner of the wall.
- Go on, sticking the wall and implementing a little pressure to perform the perfect adhesion.
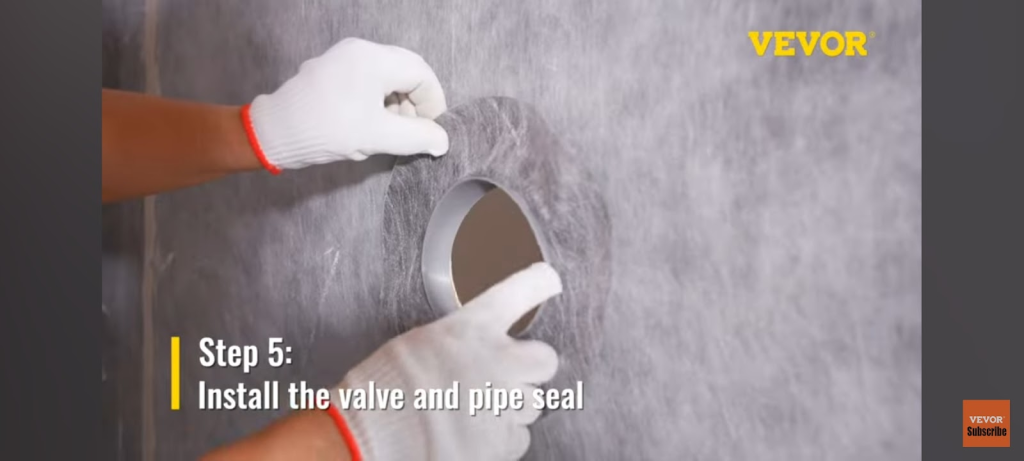
Step 5: Install the valve and pipe
Now, install the shower system. For that, you need the pipe and valve system. Here is how you will install the shower system:
- Create a hole in the wall.
- Apply the mortar to the installation area.
- Install the pipe and valve system through the hole.
Step 6: Install the shower overlay
Apply the mortar on the floor to install the shower overlay. Measure the length of the floor with its dimensions and cut the shower overlay membrane accordingly.
- Ensure the proper enforcement of the material.
- The surface must be waterproof.
- Check for any leaks and eliminate them with practical materials.

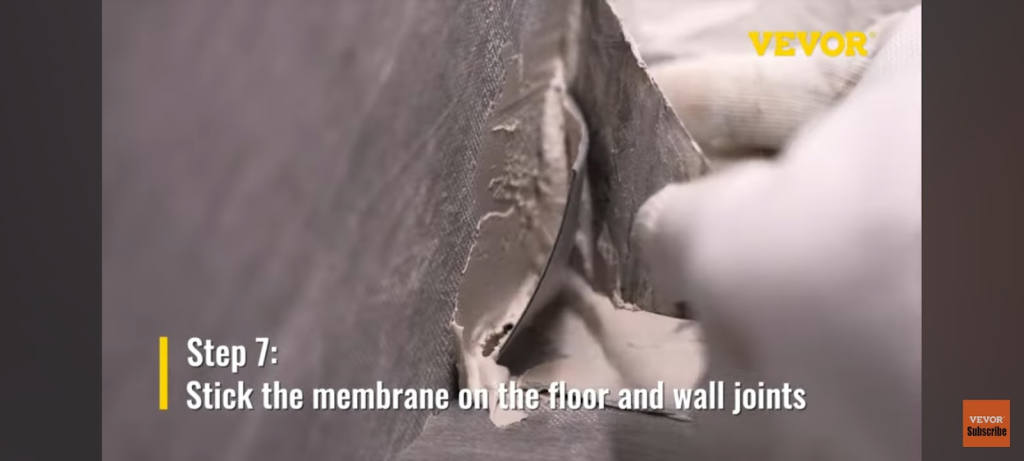
Step 7: Stick the membrane
Install the membrane to make the whole surface and walls waterproof. Brush the mortar on the place where you want to install the membrane. Overlay the membrane, apply some pressure, and you are ready.
Check the wall joints and fill the gaps and leaks in the surface. Inspect the points after you have installed the membrane. Is there any gap still left? Measure the gap and apply the membrane to that place.
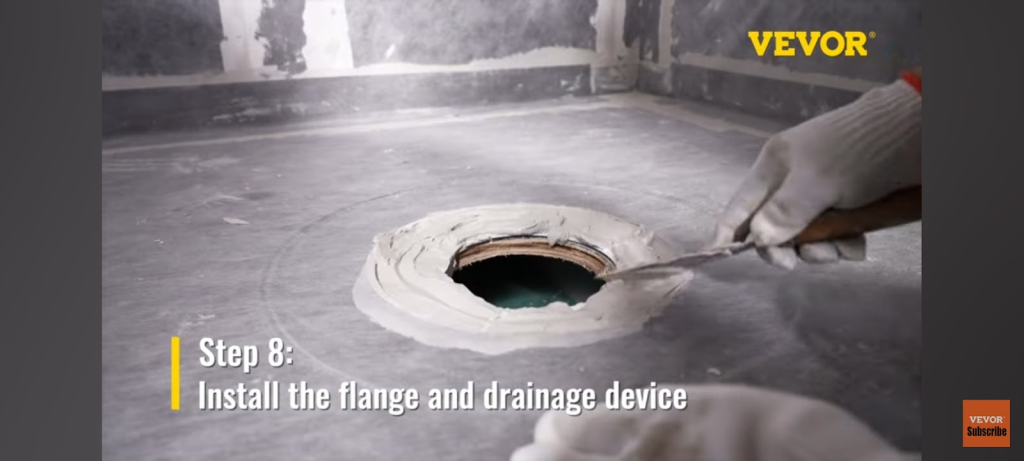
Step 8: Install the Flange
How will you drain the water coming out of your shower? First, you must have drainage channels. In the underground area, you can install the drainage systems.
On the floor, you can apply the mortar where you want to install the flange. Lay a layer of membrane on the flange. Now, install the drainage device for effective water drainage systems.
Remember, water drainage must be at a lower surface so that all the water gets removed through it. No water must be left on the floor, though a waterproof membrane provides protection.
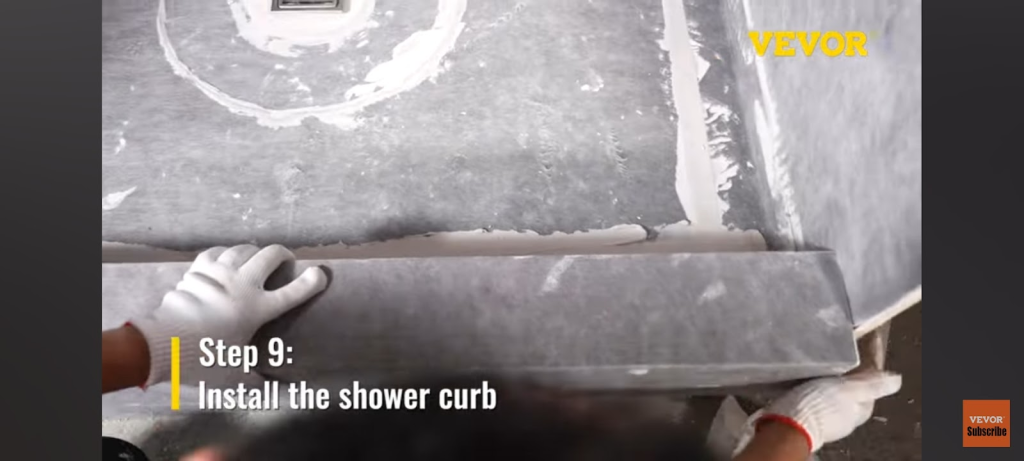
Step 9: Install the Shower Curb
Now is the time to build a shower curb. Get your shower curb out of your storage systems. Place it along the edges of the bath. Install it.
Here are some tips for effective installation processes.
- Apply enough mortar to stick the shower curb to the surface.
- Check the alignment of the edges during building a shower curb. There must not be a little space where water can leak out.
- Monitor the height and width. Usually, the height is 2 inches above the drainage system of the water so all the water can slide down the shower curb and pass through the drainage systems and not spill on the floor.
- After installation, check the shower curb activity for the first time. Revise the areas in case of leaks and seal them entirely to keep the water away from reaching the floor of your bathroom.
Part 3: VEVOR Shower Curb Kit: Waterproof, Customizable and Easy-to-install
VEVOR has been on the top for its flawless quality, impeccable approach, and fantastic material with guaranteed quality.
The VEVOR shower curb is an all-in-one set with super easy installation processes. Here are many reasons that the VEVOR shower curbs.
- Premium Quality Shower Curb. Don’t worry about the quality anymore when VEVOR is here. Our production process has strict quality control and goes through each part of your shower curb kit. You get nothing but the epitome of integral shower curbs.
- All in One solution. Easy up yourself as we offer all the tools in a single kit. Drainage parts ensure efficient water drainage systems.
- Water Proofing. Get the ultimate protection from the water you are already trying for. The VEVOR shower curb is impressive with waterproofing features.
- Ease of Installation. Are you a beginner? It doesn’t matter, as the installation process is relatively smooth and straightforward. Plus, VEVOR offers a YouTube guide for quick installation.
- Affordable Costs. Get affordable costs only; that makes the VEVOR the number one solution for shower lovers.
Part 4: Frequently Asked Questions about Building a Shower Curb
What can I use for the shower curb?
There are different materials functional to build a shower curb. These include:
- Cement
- Wood
- Cement Blocks
- Pre-formed polystyrene pieces
- High-density plastic.
These are a good choice for a long-lasting finish for your shower curb.
How thick should a shower curb be?
A thickness of 4 inches is usually a standard to keep the water away. If you have some safer plans for the water, keep it at 6 inches, which offers good area protection.
What is the proper slope for a shower curb?
Inward sloping of a shower curb is a technically good idea to keep the water away. There will be no dripping down of the water and droplets. Usually, 1/8th of the inch represents the shower slope.
Is the shower curb necessary?
Curbless showers can cause several problems. For example, water will flow on your floors instead of the tub area. The shower curb controls the water and lets your bath area be safer and more effective for your bathing experience.
How wide does a shower curb need to be?
A higher and broader Shower scrub can provide better safety. Therefore, consider at least 4 inches of width during the shower curb installation. Height must be 2 inches above the drain to keep the water flow appropriate.
Conclusion
Building a shower curb isn’t accessible until you have the relevant experience and skills. If it is feasible, you can DIY install a shower curb. Otherwise, spare some time and hire the experts. Keep one thing in mind— get the best quality offset shower key to be your long-term partner.
VEVOR has nurtured its consumers with a convenient approach to the best quality showers with complete waterproofing. You’ll get access to tons of options with Top-level solutions. Guess what? Prices are affordable too. Don’t miss out on this opportunity and grab the best shower kits now!


