
Ready to fire up your backyard cooking skills? With a diy brick BBQ grill, you can transform your outdoor space and impress your guests, even if you’ve never tackled a project like this before. This step-by-step guide will walk you through building a diy brick BBQ grill that’s both sturdy and unique. Want to add shelves or maybe a sink to your diy brick BBQ grill? The choice is yours.
Materials and Tools Needed for a DIY Brick BBQ Grill
Before you start building your diy brick BBQ grill, you need to gather the right materials and tools. This step makes the whole process smoother and helps you avoid last-minute trips to the store. Let’s break down what you’ll need.
List of Bricks and Mortar Options
You want your grill to last for years, so picking the right bricks and mortar is important. Here’s a quick brick barbecue shopping list to get you started:
| Material | Purpose | Notes |
| Fire bricks | Line the firebox | Withstand high heat |
| Standard bricks | Build the outer walls | Choose weather-resistant |
| Heat-resistant mortar | Hold bricks together | Look for outdoor use |
| Concrete blocks | Foundation support (optional) | Adds stability |
Essential Tools You’ll Need
You don’t need fancy equipment to build a brick barbecue if you are planning cheap diy brick BBQ grill ideas. Most tools are easy to find at your local hardware store. Here’s what you should have on hand:
- Trowel for spreading mortar
- Spirit level to keep your bricks even
- Tape measure for accurate sizing
- Rubber mallet to tap bricks into place
- Bucket for mixing mortar
- A shovel for digging the foundation
- Safety gloves and goggles
Optional Accessories for a Professional Finish
Want your diy brick BBQ grill to stand out? Add some extras for a polished look and better function:
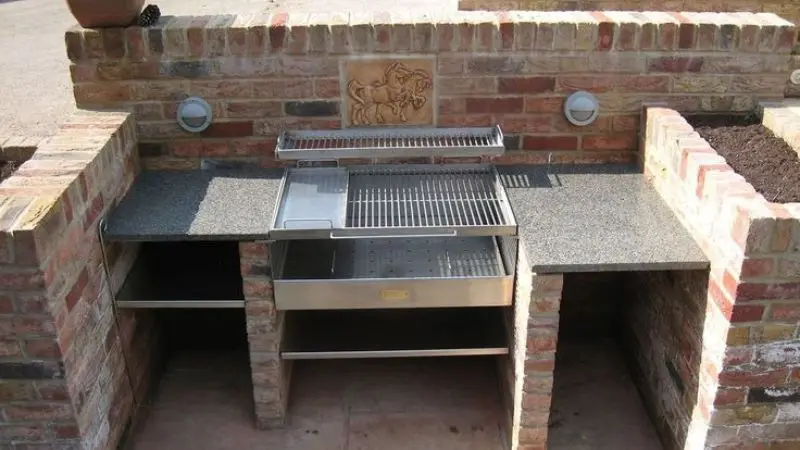
- Stainless steel grill grate
- Built-in thermometer
- Side shelves for prep space
- Storage hooks for utensils
- Weatherproof cover
Planning Your DIY Brick BBQ Grill

Choosing the Right Location in Your Backyard
Picking the perfect spot for your brick BBQ grill makes a big difference. You want a place that feels comfortable and safe. Start by looking for a flat area. This helps your grill stay steady and makes building easier.
Think about these points when you choose your spot:
- Keep your grill at least 10 feet away from your house, fence, or shed.
- Avoid placing it under trees or low-hanging branches.
- Make sure you have enough space to move around while cooking.
- Check for wind direction. You don’t want smoke blowing into your house or your neighbor’s yard.
Deciding on the Grill Size and Design
You get to decide how big or small your grill will be. Ask yourself a few questions:
- How many people do you usually cook for?
- Do you want extra features like shelves or a prep area?
- Will you add a sink or storage space?
Safety Considerations for Brick BBQ Construction
Safety comes first. You want your grill to be fun, not risky. Here are some key safety tips:
- Wear gloves and goggles when you build.
- Keep a bucket of water or a fire extinguisher nearby.
- Make sure your grill sits on a solid, non-flammable base.
- Never leave the grill unattended when it’s hot.
Planning well helps you build a grill that’s safe, useful, and perfect for your backyard.
Step-by-Step Construction Process
Preparing the Foundation for Your Brick Grill
How to build a diy brick BBQ grill step by step? Start by marking out the area where your diy brick BBQ grill will sit. Use stakes and string to outline the shape. Dig down about 6 inches to remove grass and soil. Pour a layer of gravel for drainage. Next, mix and pour concrete to create a flat, sturdy base. Smooth it out with a trowel. Let the foundation cure for at least 24 hours before you move on.
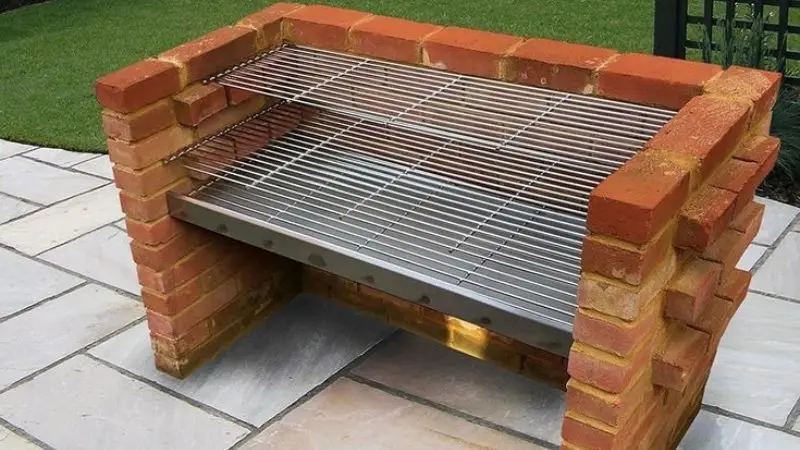
Laying the First Layer of Bricks
Once the base is dry, lay out your first row of bricks without mortar. This helps you check the fit. When you feel happy with the layout, lift each brick and spread a layer of mortar underneath. Press the bricks into place. Use a spirit level to keep everything even. Leave small gaps for mortar between each brick.
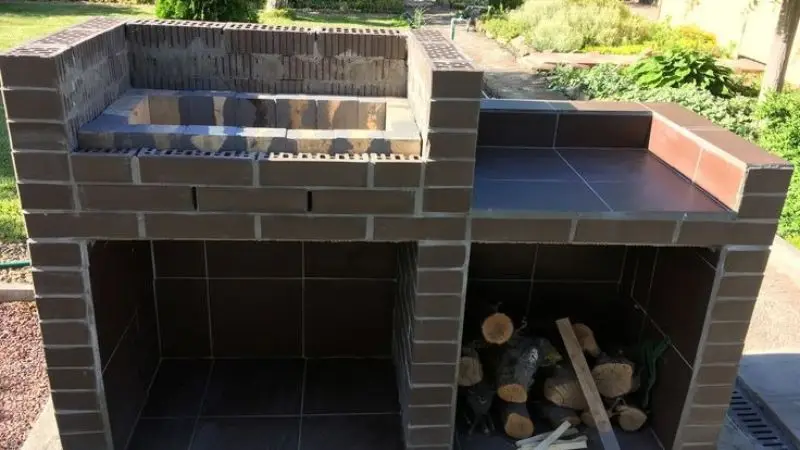
Building the Grill Walls and Firebox
Now you can start to build a brick barbecue that looks great and works well. Stack the bricks layer by layer, adding mortar between each one. Use fire bricks for the inside walls where the heat will be strongest. Build up the sides to your desired height. Leave spaces for air vents if you want better airflow.
Installing the Grill Grate and Accessories
When the walls reach the right height, set metal brackets or angle irons into the mortar. These will hold your grill grate. Place your barbecue grill set on top. Add any extras like shelves or hooks now. Make sure everything feels secure.
Finishing Touches and Curing Your Grill
Smooth out any rough mortar joints with your trowel. Wipe away extra mortar before it dries. Let your diy brick BBQ grill for the backyard cure for a few days. This helps the mortar set and strengthens your grill. After curing, you are ready to fire it up and enjoy your first cookout!
Tips for Maintaining Your DIY Brick BBQ Grill
Cleaning and Preventing Rust
You want your grill to stay clean and safe for every cookout. Start by brushing off ash and leftover food after each use. Grab a wire brush and scrub the grill grate. If you see grease, use warm soapy water and rinse well. Dry the grate with a towel to keep rust from sneaking in.
Don’t forget the brick surfaces. Sweep away loose debris. If you spot stains, mix water and mild dish soap. Wipe the bricks with a sponge. Avoid harsh chemicals because they can damage the mortar.
Seasonal Maintenance for Longevity
Every season brings new challenges for your grill. You need to check for cracks or loose bricks. If you find any, patch them with heat-resistant mortar. This keeps your grill strong.
Here’s a quick checklist for each season:
- Spring: Inspect for winter damage. Clean out leaves and debris.
- Summer: Check the grill grate for rust. Tighten any loose brackets.
- Fall: Remove ash and cover the grill before cold weather hits.
- Winter: Keep your grill covered. Don’t let snow pile up.
Troubleshooting Common Issues
Sometimes your grill needs a little extra care. If you notice smoke isn’t venting well, check the air vents. Clear out any blockages. If bricks start to crack, replace them right away.
Here’s a table with quick fixes:
| Problem | Solution |
| Rusty grill grate | Clean and oil the grate |
| Loose bricks | Re-mortar or replace bricks |
| Poor airflow | Clear vents and check placement |
| Stains on bricks | Use mild soap and water |
You can solve most problems with simple tools and a little attention. Keep your grill in top shape, and you’ll enjoy tasty barbecues for years!
Conclusion
You did it! You learned how to build a DIY brick BBQ grill from start to finish. Remember to use fire bricks for extra strength and check your grill often for any repairs. Keep your grill clean and cover it when not in use. Want to show off your project or have a question? Drop a comment below. Careful planning and patience always pay off—now go enjoy your backyard cookouts!
FAQ
How long does it take to build a brick BBQ grill?
You can finish most grills in a weekend. The foundation needs a day to cure. Building the walls and adding accessories takes another day. Let the mortar dry before using your grill.
Can I use regular bricks instead of fire bricks?
Fire bricks handle heat better. Regular bricks may crack over time. If you want your grill to last, use firebricks in the firebox.
What should I do if my grill gets wet?
Dry the grill with a towel. Let it air out before using it again. Cover your grill when not in use to keep it safe from rain and snow.
Do I need special tools to build a brick BBQ grill?
You only need basic tools, such as a trowel, level, and bucket. You can find these at any hardware store. No special skills required!


