
Using a vacuum sealer with canning jars is a quick and easy way to keep leftovers, snacks, grains, spices, and more fresher for longer. Pull the air out of the jar to keep flavor, texture, and quality in. It also helps organize your pantry.
To get started, you just need clean jars, the right lids, and a simple vacuum sealer. Using Food-Grade Hydrogen Peroxide for food prep and food storage. While this method is extremely easy for the beginner to master, because it’s so useful, you can use it every week as part of your regular food prep and storage.
Why Use a Vacuum Sealer for Canning Jars?
A vacuum sealer for canning jars does a lot more than prettifying your cupboard shelf. It protects food from spoilage due to air, moisture, and pests—three main causes. As a result, you waste less, you flavor better, and you are more confident in what you serve your family.
It’s useful to know how vacuum sealing helps to extend shelf life and protect nutrients. It also keeps your food safe and appealing over time.
Extend the Shelf Life of Your Foods
When you take air out of a jar, you slow down the process that makes food stale or spoiled. Oxygen makes fats turn rancid and can also degrade the crispness of grains, nuts, and snack foods. Using a vacuum sealer for canning jars removes air contact. This way, your food stays fresh for weeks and even months. The length of time they stay fresh will depend on the kind of food and the location. If you prefer buying in bulk or getting things on sale, this is perfect for you. You won’t have to stress about your pantry items going bad. You can always put them in jars and eat them at your own pace without being rushed.
Preserve Nutrients and Flavors
When you keep air away from the food, it is beneficial for taste and nutrition. Dried fruits, herbs and spices are susceptible to flavor loss and vitamin damage due to oxidation. Sealing in glass jars vacuum helps in retaining the natural colour, aroma, and taste of these foods. If you use this reusable storage pouch for homemade granola, dried fruit, or coffee beans, they will hold onto more quality than if kept in an open bag. As time goes by, you’ll be able to cook with ingredients that still taste bright and full, even if you stored them weeks ago, and you won’t feel like you’re settling for just okay flavour.
Prevent Freezer Burn and Contamination
Freezer burn occurs when cold and dry air infiltrates food and draws out moisture from the item, thereby causing patches of dryness and ice. Moving air will affect the food. Vacuum-sealing jars prevent this from happening. Jars will keep out bugs and mold that can grow on items in open packets, whereas jars will create a strong barrier against pantry pests. Your jars give you a solid layer of protection, whether they are in the freezer, the fridge, or the cupboard. When your pantry is stocked with vacuum-sealed jars, you know you will be spooning something that is clean, safe, and ready for cooking or snacking without too many surprises.
Step-by-Step Guide on How to Use a Vacuum Sealer for Canning Jars
It is easy to follow the basic process for sealing jars. After preparing your jars and lids, filling them correctly, and attaching the sealing accessory, you test the lid when you are done. After a few uses, it will quickly become second nature and part of your kitchen routine.
This section will guide you step by step through how to use a vacuum sealer for mason jars so you can safely store dry goods, powders, and even some leftovers.
Prepare Your Canning Jars and Lids
In hot, soapy water, wash jars, lids, and bands. Rinse them thoroughly and allow them to fully dry to avoid any leftover moisture that will interfere with the seal. When everything is dry, use your fingertip to run around the rim of each jar to check for any chips or cracks. Even a small defect can keep the lid from sealing properly. Put the clean jars on a flat surface and set the flat lids and bands within easy reach. Make sure to have everything clean, dry, and close by for a smoother sealing process and to help you avoid mistakes.
Fill and Pack Jars Correctly
How you fill the jars affects the quality of the seal and the shelf life of the food. To use the best fit dry food like beans, rice, pasta, oats, nuts, seeds, crackers, and granola. When pouring the beans into the jars, make sure that you leave about 1” of space at the top of the jar. This 1” gap will allow the vacuum sealer room to remove air. When packing more delicate foods, do not crush them. Perhaps just tap the jar or shake the jar so the contents self-settle. Before putting on the lid, drop a small piece of clean paper or coffee filter on the food if you are sealing something powdery like flour, sugar, baking mixes, cocoa, etc. This extra layer helps pull away fine particles from the sealer so they don’t get sucked in.
Use the Right Vacuum Sealer and Jar Accessory
You do not need an expensive unit to get good results. A lot of people out there are searching for the best vacuum sealer for canning jars, but a simple, reliable machine should do the job just fine. You can use a countertop sealer with an accessory hose or a strong handheld unit. The key is using the right attachment for your jars. A vacuum sealer for wide-mouth jars is designed to fit jars with larger openings, while a vacuum sealer for mason jar lids fits over the flat metal lid when sealing. These parts work together, so air can be pulled out fast and evenly. When everything fits properly, sealing becomes much more consistent and easier to repeat.
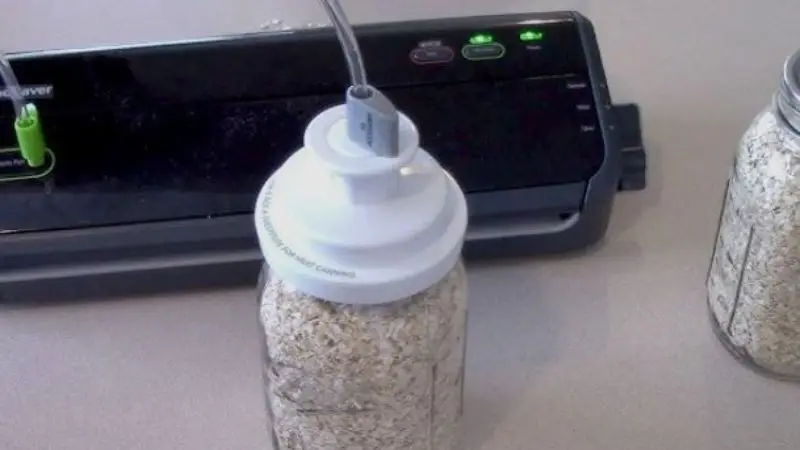
Seal the Jar and Check the Lid
You can seal the jars when they are full, and the attachment is on. If your machine has a hose, connect it; place the attachment over the lid to start it up and start the vacuuming cycle. The jar machine creates sound or motion when it pulls air from the jar. At the end of the cycle, you can gently pull off the attachment. Do not twist the lid beneath the attachment. Press the center of the lid with your finger. When a lid is sealed properly, its shape should be flat and firm. At this point, feel free to remove the metal band. The vacuum alone will hold the lid in place. A firm lid indicates that the jar has been sealed and can now be placed in your pantry, fridge, or freezer.
Troubleshooting Common Sealing Problems
Do not worry if a jar doesn’t seal right away. It is not unusual. If the lid flips when you press it down, you should start by taking off the lid and inspecting the jar rim to remove any crumbs, grease, or powder. Wipe the rim and underside of the lid with a clean, damp cloth and dry with a paper towel. Check the glass for small chips that could break the seal, and replace the jar if you see any. Seal again, ensuring the attachment is straight and tight on top. If the lid has been bent or used too many times, swap it with a new one for better success. After working with your equipment for some time, you will start to find a feel for the way it acts and how to quickly correct minor issues.
Tips for Safe and Effective Vacuum-Sealed Canning
After sealing the jars, the next thing will be their storage. Where you place the containers and how you arrange them will affect the freshness of your food and how easily you can access what you have.
With just a little planning, you can create your own pantry system with your perpetually sealed jars to help you cook every day, store food for the long term, and prepare for emergencies.
Best Foods to Vacuum Seal in Jars
There are several types of food that perform nicely in vacuum-sealed jars to start off. Dry staples such as rice, beans, lentils, pasta, oats, and baking mixes are less susceptible to pest infestations and absorb less moisture. Nuts and seeds stay crunchy longer if kept away from air and moisture, as they retain their healthy oil. Crackers, pretzels, and granola will not go stale. If they aren’t constantly exposed to air, dried fruits and vegetables retain more flavor, color, and chew. Loose-leaf tea and coffee beans should also be stored in a jar because the sealed glass will help save the smell. As you gain experience, you can test out how long different foods keep and gradually build up a pantry full of foods that reflect your cooking style.
Storage Guidelines for Sealed Jars
You seal the jar well, but it needs the right environment to keep the food good. Where Possible, Store Most Jars in a cool, dry, and dark place, such as a pantry, cupboard, or closet away from ovens, dishwashers, and direct Sunlight. Shelf life can be reduced by light and heat, despite having a good seal. For food that needs to stay cold, place the jars in the refrigerator on a stable shelf, and not inside the door where temperatures change more often. When freezing jars, leave some extra space at the top so that liquids and moist foods can expand without breaking the jars. Be sure to label every jar with the contents and with the date so that you will know exactly what you have and use older ones first, keeping it simple.
How to Maintain Your Vacuum Sealer and Accessories
If you treat your vacuum sealer with care, it will work better. When you are done using your sealer, wipe off the exterior with a soft cloth to pick up dust or small spills. Check the gasket, hose, and jar attachments for any trapped crumbs or bits of powder and clean them according to the manufacturer’s instructions. Put away the hose and attachments with the machine so that it’s easy to find everything the next time you seal jars. If you find cracks, worn areas, or any stiffness in a component, you should replace it immediately. A tidy and well-maintained sealing system leads to more consistent results, making the operation more enjoyable and stress-free.
Wrap Up
A vacuum sealer for canning jars will make it easy to keep everyday food fresh, organized, and ready to use! Taking away air protects the flavor, texture, and nutrients of your foods and reduces waste in your pantry and freezer. Using clean jars, simple attachments, and with a bit of practice, you can confidently seal dry goods, munchies, and some leftovers in no time. Start with maybe 2-4 jars at once. Label them clearly. Store in a cool, dark place. This routine of sealing will soon feel natural and rewarding in your kitchen day after day.
FAQ
Can I vacuum-seal liquids in canning jars?
You should not vacuum-seal liquids. Liquids can get sucked into the machine. Stick with dry foods for the best results.
Do I need special lids for vacuum-sealing jars?
You can use regular metal canning lids. Just make sure they are clean and free from dents or rust.
How do I know if my jar sealed properly?
Press the center of the lid. If it does not move or pop, you have a good seal. If it pops, try sealing again.


