
It can be stressful when your RV water heater stops working, especially when you’re on the road and need hot water for showers or dishes. But don’t worry—most problems have simple solutions. If you’re wondering, “What should I do if my RV water heater isn’t working?” the best place to start is with basic RV water heater troubleshooting. By checking each part carefully, you can often find and fix the issue yourself. Whether you’re maintaining your RV’s hot water system or improving comfort during cold trips, a reliable diesel air heater for RVs keeps your living space warm while your water heater delivers consistent hot water.
Understanding How Your RV Water Heater Works
You need to know how the system works before you can solve the problem, like why is my RV water heater not heating water? RV water heaters are available in various models and are dependent on certain methods to provide you with reliability in hot water when you are on the road. The knowledge of the fundamentals will simplify the troubleshooting process and allow you to keep your water heater running smoothly.
The Basics of RV Water Heaters (Gas, Electric, and Hybrid Models)
Your RV water heater gives you the hot water you need for showers, dishes, and cleaning. There are three main types — gas, electric, and hybrid models. Gas heaters use propane to heat the water, while electric ones rely on your RV’s electrical system. Hybrid models combine both, giving you the flexibility to switch depending on your power source.
If you prefer saving energy or camping off-grid, gas heating is ideal. When plugged into a campsite, the electric mode offers convenience and steady heat. Always check your heater type before troubleshooting, since each model has different repair and maintenance steps.
Key Components You Should Know
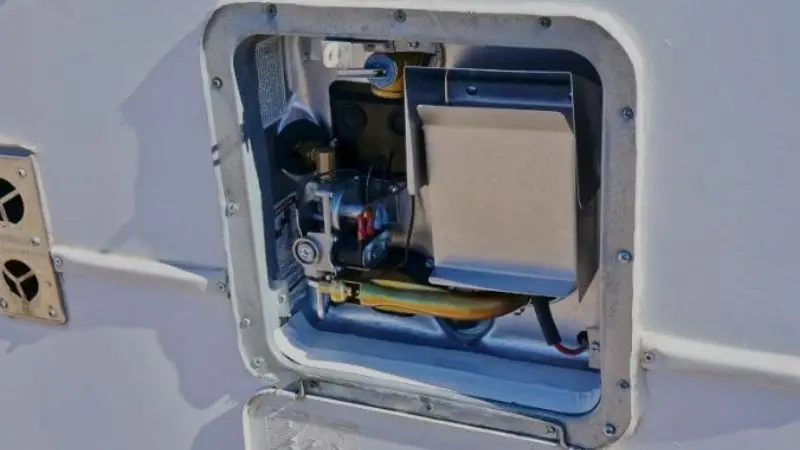
Before deciding how to repair the RV water heater that won’t ignite, it is important to understand the critical components that enable it to operate. The RV water heaters also contain a tank, thermostat, heating element, burner, anode rod, and pressure relief valve.
The tank is used to hold a hot water source, and the thermostat regulates the temperature. In electric units, heating is provided to the water by the heating element, and in gas units by the burner. The anode rod guards the tank against rust, and the pressure relief valve prevents it from exceeding high pressure.
When your water is not heating, it is probably high time you take a look at the thermostat or heating element. These components tend to bring up temperature problems or ignition troubles.
Why Regular Maintenance Prevents Costly Repairs
Proper maintenance is the key to keeping your RV water heater running smoothly. It not only extends the lifespan of the system but also prevents you from wondering why your RV water heater isn’t heating water. when you’re on the road.
Flushing the tank, checking the anode rod, and cleaning the burner help remove buildup and corrosion. Inspecting the thermostat regularly ensures it maintains the correct temperature. A few small checks every few months can stop minor issues before they become expensive repairs and keep your hot water flowing reliably.
Common RV Water Heater Problems and How to Fix Them
RV water heater draws attention easily when it stops functioning properly and can easily spoil your traveling comfort. Knowing what to do to get an RV water heater to work when it will not start, and knowing what to expect when this happens, will surely keep you ready when you are on the road. The following are the most common issues encountered by RV owners and how to resolve them through simple, useful measures.
RV Water Heater Not Heating Water Properly
If you’re wondering why my RV water heater is not heating water, start by checking its power source. For gas models, ensure your propane tank is full and the burner is clean. In electric units, inspect the circuit breaker to make sure it hasn’t tripped. A faulty thermostat or heating element can also prevent water from heating. Testing these parts with a multimeter can help identify the issue. If they are damaged, replacing them is often the best fix to restore steady hot water in your RV.
How to Fix Leaks in Your RV Water Heater
When you find water sitting under your heater, it is possible that your RV water heater is leaking. This may occur because of loose fittings, a broken pressure relief valve, or corrosion of the tank. Check visible connections, look at cracks or missing seals. In case of the leak persistence, it is possible that the anode rod can be rusted or the tank is corroded. The anode rod can be replaced to prevent small leakages and ensure that the tank is not damaged in future. Frequent maintenance can avoid significant water waste and maintain your heating system at the right level.
When the Pilot Light Won’t Stay Lit
A pilot light that won’t stay lit can stop your RV water heater from working entirely. Dirt, debris, or rust buildup near the burner can block proper ignition. Start by cleaning the burner area gently and relighting the pilot. If the flame still goes out, check the thermocouple—a small device that detects the pilot flame. A damaged or dirty thermocouple can prevent gas flow, causing the light to go out. Replacing it usually fixes the issue. Knowing how to fix an RV water heater that won’t ignite can save time and frustration during your trips.
How to Fix Water That’s Too Hot or Too Cold in Your RV
If the temperature of your RV water keeps rising and falling, it is possible the thermostat isn’t functioning properly. When the water is either too hot or too cold, then set the thermostat to a safe setting and wait to determine whether it will balance. In case that does not work, the heating element or the thermostat could be faulty. The problem can be confirmed by testing them. A defective thermostat can be replaced to maintain regular control of the temperature and to avoid abrupt fluctuations. Well-managed water heating in your RV will make your showers, dishes, and cleaning habits more relaxed and effective.
How to Deal with Smelly or Discolored Hot Water in Your RV
If you smell rotten eggs or see brownish water coming from your RV taps, it usually means bacteria or rust have built up in the tank. Start by flushing the tank to remove sediment and debris. If the water still smells bad, check the anode rod—it may be corroded and need replacing. A fresh anode rod protects your tank from rust and helps eliminate odor-causing bacteria. Keeping the tank and diesel air heater clean and well-maintained ensures your water stays fresh, safe, and ready for everyday use throughout your camping adventures.
Step-by-Step RV Water Heater Troubleshooting Checklist
Has your hot water in your RV just cut off? No need to panic! However, with a bit of sifting and a few simple investigations, you may manage to get yourself out of it. The given step-by-step water heater troubleshooting guide to RVs will assist you in detecting the typical problems, including the power failure or gas ignition, as well as, it will teach you how to check the RV water heater fuse or breaker and call the technician only in case of failure.
Step 1: Perform a Full Visual Inspection
Start by examining your RV water heater closely. Look for visible signs like rust, leaks, or loose wires. Check around the tank for water puddles or stains that may signal a leak. Burn marks or strange smells might indicate overheating or an electrical fault. These early clues can help you locate the issue before it worsens. If you’re unsure about something you see, take a picture for reference—it can be useful later if you consult a repair professional for advice or service.
Step 2: Check the Power Supply, Fuses, and Breaker
In the event that your water heater uses electricity, the first thing that needs to be checked is your power connection. Make sure that the unit has been tightly plugged and has been diagnosed with a working power system in your RV. Next, check the fuse box and see whether the fuse has been blown or the breaker has been tripped. It is easy to learn how to check the RV water heater fuse or breaker, just to replace damaged or burned fuses and press the breaker switch with an on and off button. This will frequently work and answer how do I set my RV water heater? even without the assistance of a pro.
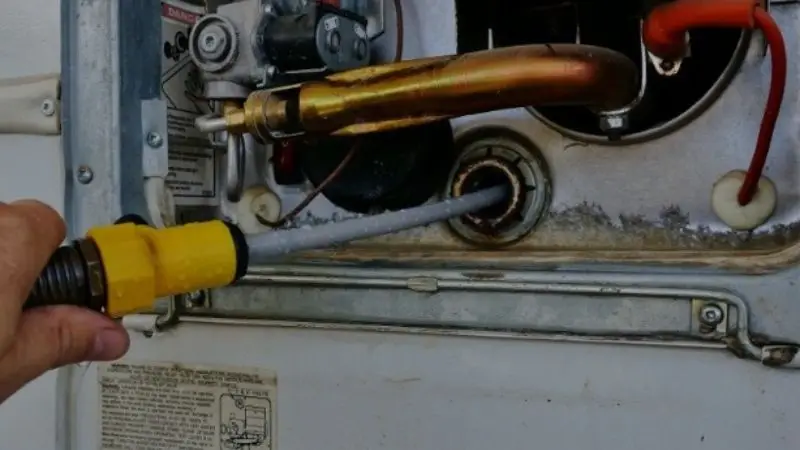
Step 3: Test the Gas Flow and Ignition System
For gas-powered units, problems with ignition are common. To start with, check your propane tank to confirm it is full and the valve is open. When sparking the burner, listen for a clicking sound from the igniter. Not hearing the igniter click indicates it may be dirty or worn out. Cleaning the igniter tip often restores normal operation. If the pilot won’t light, you might want to review how to fix an RV water heater that won’t ignite. Should you smell gas, shut the gas supply off immediately and call an expert.
Step 4: Flush and Clean the RV Water Heater Tank
Layers of minerals and sediment are accumulated in the tank in the course of time, decreasing the heating efficiency. You can clean it by connecting a hose to the drain valve and letting it run till it becomes clean. This process eliminates accumulation, which may influence the efficiency of heating and lead to discolouration or smell. After flushing, fill up the tank and check for leakages or residue. Clean your tank to save time & money! A clean tank makes your RV water heater heat quickly, have a longer life, and helps avoid the common problems, such as why is my RV water heater not heating water? when you are on the road.
Step 5: Replace Worn or Faulty RV Water Heater Parts
If you have gone through all the basic checks, and your RV water heater is still not working, then some part may need to be replaced. A worn-out thermostat, heating element, or anode rod can constitute a hot water heater issue. Take out the anode rod using a wrench and check for corrosion. Replace it if it’s eroded to maintain tank protection. Replacing an old thermostat or heating element can likewise ensure proper heating. You will want to perform these changes as part of long-term maintenance, and it always helps ensure your RV water heater will run reliably on every trip.
When to Call a Professional for RV Water Heater Repairs

Some issues with the RV water heater can only be solved through the assistance of a professional, even with routine maintenance and simple troubleshooting. Being informed about the timeline when it is necessary to call an expert will save you time, guard your RV, and avoid severe security threats. When you have tried to reset, checked on, and even replaced the parts but the problems persist, then it is time to call on a professional technician. These are some of the main indicators that can show whether the time has come or not.
When Persistent Leaks Keep Coming Back
If water keeps dripping from your RV water heater, no matter how many times you tighten fittings or replace worn parts, it’s a sign of a deeper issue. Continuous puddles or stains around the tank could mean there’s an internal crack or a damaged connection inside. Ignoring persistent leaks can lead to floor and wall damage inside your RV. At this stage, only a professional can accurately find the hidden source and seal it properly. Getting expert help ensures your system is repaired safely and prevents long-term water damage.
When You Smell Gas or Burning Near the RV Water Heater
If you smell gas or a burning odor near your RV water heater, that’s a warning. The odour of gas means there is a leak of propane, whereas a burnt smell means melting wires or an electrical short. In either case, stop using the heater immediately. Before you leave the scene, turn off the electricity and propane valve. Never attempt to repair gas and electrical problems on one’s own. Always consult a pro for these jobs. Even if you know how to fix a malfunctioning RV water heater, safety comes first – particularly when wiring or gas is involved.
When the Same RV Water Heater Problems Keep Returning
When you have had multiple repairs on your RV water heater but the heater still does not work, seek professional assistance. You could find that the pilot light keeps flickering, the water temperature fluctuates, or you have a heater that goes off and on every time. They are indicators of electrical or gas system faults that cannot be fixed by DIY. A professional will be capable of solving higher-order diagnostics and repairing internal elements safely. If you’re upgrading or replacing heating components, you might also consider installing a diesel air heater to maintain consistent warmth in your RV while ensuring your hot water system runs efficiently.
RV Water Heater Maintenance Tips for Long-Lasting Performance
Taking good care of your RV water heater keeps it efficient and reliable for every trip. Regular maintenance helps prevent problems like leaks, corrosion, or the common issue of why is my RV water heater not heating water?. With a few simple steps, you can protect your system, save on repairs, and enjoy steady hot water whenever you need it.
Regular Flushing to Remove Mineral Buildup
One of the most significant actions that should be taken as maintenance is the flushing of your RV water heater. The minerals, dirt, and sediment may accumulate over time in the tank, which will result in decreased efficiency and heating difficulties. In order to flush, just run some water via a hose attached to the drain valve until the water runs clear. Once every season, doing this helps to keep your heater in good condition. It is even better to flush more frequently in case you travel in places with hard water. Clean water in the tank helps prevent rust, lengthens the life of your heater, and makes sure it heats every time you turn it on.
Checking and Replacing the Anode Rod Regularly
The anode rod is a small but essential part of your RV water heater’s protection system. It attracts minerals that would otherwise corrode the tank. To maintain it, remove the rod every six months and inspect it closely. If you see rust, thinning, or heavy wear, it’s time for a replacement. A fresh anode rod prevents tank damage, improves heating performance, and keeps your water clean. Routine checks of this part can help avoid problems that lead to how to fix an RV water heater that won’t ignite or stop working efficiently.
Performing a Seasonal Shutdown Before Winter Storage
Prior to taking your RV down the highway during the winter season, it is a good idea to shut off your water heater to avoid freezing and unnecessary, expensive repairs. The first thing to do is empty the tank to the last bit; after that, turn off the power and close the gas valve. Storing the anode rod separately is also known to increase the life of the anode rod. This measure will ensure that your system is not damaged internally on cold days. For complete comfort during every season, pair your well-maintained water system with a diesel air heater. It keeps you warm on cold nights while your RV water heater provides hot water for showers and cleaning.
Wrap Up
Keeping your RV water heater in good shape doesn’t have to be hard. With regular maintenance and simple RV water heater troubleshooting, you can avoid common problems like leaks, poor heating, or wondering why is my RV water heater not heating water. Basic steps such as flushing the tank, checking the anode rod, and knowing how to check the RV water heater fuse or breaker make a big difference. When issues get complicated, call a professional. With the right care, your RV water heater will provide steady hot water on every journey.
FAQ
What causes my water heater in the RV to pop?
When the mineral buildup accumulates within the tank, you hear popping. This sound indicates that you have to empty your water heater. Cleaning every few hours prevents the sound and ensures that your heater remains functional.
What is the frequency of using my RV water heater?
At least once per season, you need to flush your RV water heater. Flush it more frequently, in case you are camping in areas where the water is hard. Clean water heaters are also long-lasting and quick to heat water.
May I turn my RV water heater on when I am driving?
Depending on the model of the RV, you can turn on your water heater when you are driving. First, check your owner’s manual. Certain heaters should be left off. Competitively, adhere to the instructions of a manufacturer.
But what shall I do in case my water smells bad?
In case the hot water is smelly, empty the tank and inspect the anode rod. Change the rod when it appears worn out. The odious water is a sign of bacteria or rust in the tank.
Can I do the repairs myself on my RV water heater?
You are able to resolve minor issues such as changing the anode rod or flushing the tank. In case of an electric or gas problem, contact an expert. Working safely should always be at the forefront; hence, repairs should never be risked.


