
Learning how to build a chicken coop is easier than you might think. With a clear plan and just a few basic tools, you can create a safe and comfortable space for your flock. A well-designed coop keeps chickens protected from predators, gives them shelter from bad weather, and ensures they stay healthy and happy.
You don’t need advanced skills—just follow simple steps and take your time. Many people enjoy the pride of finishing their own DIY chicken coop. Start today and discover how fun and rewarding it can be to build a strong, cozy home for your chickens.
What You Need Before Building a Chicken Coop
Before learning how to build a chicken coop for beginners, it’s important to gather everything you’ll need. Having the right supplies makes the project smoother, safer, and more enjoyable. With proper materials, tools, and safety gear, your DIY project will feel less overwhelming and more like a step-by-step journey you can handle.
Materials for a Strong and Lasting Co-op
The materials you choose will decide how durable and comfortable your coop becomes. If you’re planning how to build a chicken coop cheaply, it’s still possible to use smart options without cutting corners on safety or strength. Go for materials that resist the weather and protect your flock from predators.
- Pressure-treated lumber – best for the frame and base.
- Plywood sheets – useful for walls and floors.
- Galvanized hardware cloth or wire mesh – keeps windows and the run secure.
- Asphalt shingles or metal panels – reliable roofing material.
- Hinges and latches – for sturdy doors and windows.
- Screws and nails – to hold everything together.
- Paint or wood sealant – protects the wood from damage.
For safety, always choose hardware cloth instead of regular chicken wire, since it prevents raccoons and other predators from sneaking in.
Tools You’ll Need for the Build
When you start a DIY chicken coop step by step, you don’t need fancy tools—just the basics. Most of these are probably already in your garage or toolbox. These simple tools will help you measure, cut, and assemble with ease.
- Tape measure – to measure wood and spaces.
- Saw – for cutting lumber and plywood.
- Drill – for making holes and driving screws.
- Hammer – to nail pieces together.
- Screwdriver – for tightening screws.
- Level – ensures everything stays straight.
- Square – helps keep corners even.
With these tools ready, you can confidently move forward knowing each step will be easier to handle.
Safety Gear to Protect Yourself
Safety should always come first when figuring out how to build a chicken coop with pallets or with any other material. Even simple projects need basic protection so you can focus on the build without worrying about accidents. Equip yourself with:
- Work gloves – to keep hands safe.
- Safety glasses – to shield your eyes.
- Dust mask – useful when cutting wood.
- Ear protection – important for loud tools.
- Closed-toe shoes – protect your feet from injury.
By preparing everything in advance, you’ll save time and avoid unnecessary stress. With your materials, tools, and safety gear ready, you’re set to begin building a coop your chickens will love.
How to Plan Your DIY Chicken Coop
Before grabbing your tools, it’s smart to create a solid plan. Careful planning helps you avoid costly mistakes, keeps your flock safe, and makes your project easier to manage. Whether you’re figuring out how to build a chicken coop for beginners or looking for ways to expand later, having a plan sets you on the right track.
Choose the Right Location
Where you place your coop will make a big difference for both comfort and maintenance. A sunny spot helps keep the coop warm and dry, while good drainage prevents puddles and mud from forming around it. Ideally, place the coop close to your house so you can easily check on your chickens and collect eggs each day.
- Choose a sunny area to keep the coop dry.
- Look for ground with natural drainage.
- Place it near your home for daily convenience.
Avoid low-lying areas, since they tend to collect water and leave the coop damp.
How Big Should Your Chicken Coop Be?
Size is one of the most important parts of your plan. Each chicken needs about 3–4 square feet inside the coop and 8–10 square feet in the outside run. If you want to expand your flock in the future, consider building slightly larger from the start—it saves time and effort later.
- 4 chickens → 12–16 sq. ft. inside, 32–40 sq. ft. outside.
- 6 chickens → 18–24 sq. ft. inside, 48–60 sq. ft. outside.
- 8 chickens → 24–32 sq. ft. inside, 64–80 sq. ft. outside.
A bigger coop also makes cleaning easier, which means your flock stays healthier and more comfortable.
Design a Chicken Coop for Comfort and Safety
The design of your coop should balance strength, ventilation, and ease of use. When planning a DIY chicken coop step by step, think about how you’ll clean the interior, collect eggs, and keep predators out.
- Built with strong walls and a sturdy roof.
- Add windows and vents for airflow.
- Use locks and hardware cloth for protection.
- Keep the layout simple for easy cleaning.
Drawing your design before you start building helps you spot problems early. A well-planned design not only saves time but also ensures your chickens enjoy a safe, healthy space every day.
How to Build a Chicken Coop Step by Step
Ready to bring your plan to life? Building your coop is easier when you follow a clear process. Each stage connects smoothly to the next, helping you create a safe and cozy home for your flock. Whether you’re figuring out how to build a chicken coop for beginners or want to try different designs, these steps will guide you from the ground up.
Step 1: Prepare the Ground
The first step in a DIY chicken coop step-by-step project is preparing the ground. Pick a clean, level area and clear away grass, rocks, or roots. A flat surface makes the build easier and keeps the coop stable. Good drainage is very important—water should flow away from the site so your flooring stays dry and mud doesn’t collect.
Sprinkle gravel on the base for even better drainage. Gravel also adds stability, preventing the coop from sinking into the soil. By starting with a clean, well-prepared area, you set a strong foundation for the entire build.
Step 2: Build the Foundation
Your foundation is the backbone of your chicken coop. A solid base keeps the structure standing strong for years. You can use concrete blocks, pressure-treated lumber, or a poured slab. Lay the frame on the prepared ground and check everything with a level and square to make sure it’s even.
Use quality lumber and secure the pieces with screws or nails. For extra safety, add wire mesh under the flooring to stop predators from digging through. If you’re learning how to build a chicken coop cheaply, pressure-treated wood works well without breaking your budget.
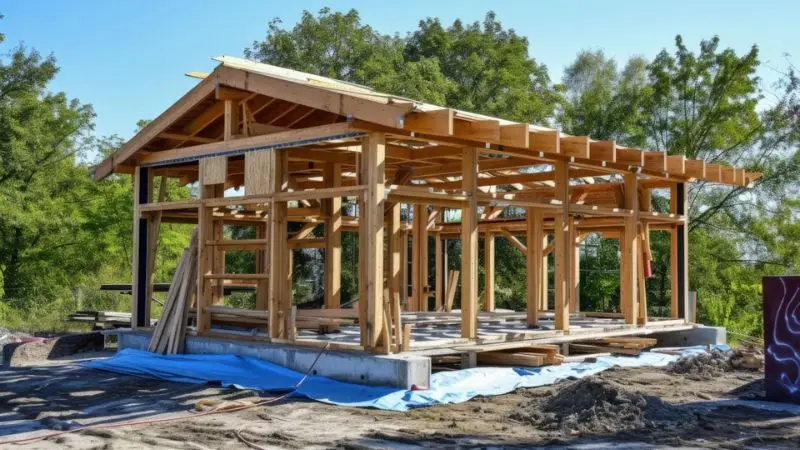
Step 3: Frame the Walls
Once the base is steady, it’s time to frame the walls. Cut your lumber to the right lengths, then build four wall frames on the ground before lifting them into place. Secure the frames tightly to the foundation and use a level to keep everything straight.
Strong wall framing is what gives your chicken coop durability and stability. Use galvanized screws to prevent rusting over time, especially in damp conditions. By focusing on sturdy walls now, you’ll save yourself future repairs and ensure your chickens have a safe, solid structure to call home.
Step 4: Install the Walls
Once the wall frames are prepared, take them and place them on the bottom and on top of each other. Cover the frames in plywood sheets and fasten them in an appropriate manner that prevents wind and rain from entering. The edges can be sealed using caulk, and these prevent the entry of pests into the coop through small holes.
Learning to make a chicken coop out of a pallet, this is equally close – only you need to cover the pallet frame with stronger boards or plywood to give extra protection. A closed coop will help to keep your chickens safe and dry, warm, and out of harm’s way from severe weather conditions, as well as predatory birds outside.
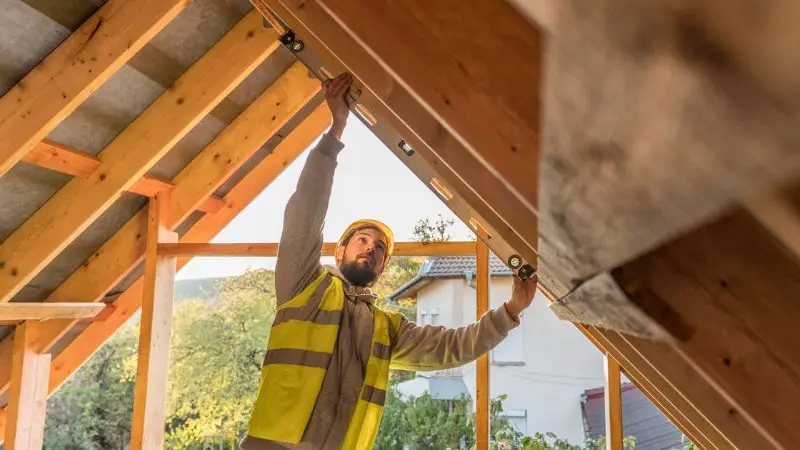
Step 5: Add the Roof
The roof is one of the most important steps because it shields your flock from rain and harsh sun. Build roof trusses with lumber and place them firmly on the wall frames. Cover the roof with asphalt shingles or metal panels, making sure it slopes so rainwater runs off easily.
Adding overhangs helps protect the walls from water damage. This step not only keeps the interior dry but also extends the lifespan of your coop. A sturdy, weatherproof roof is a must-have for every design, whether you’re building with pallets or new lumber.
Step 6: Sheath for Weatherproofing
Sheathing is giving your coop extra armor. Coat the exterior walls and roof with heavy panels and place a moisture shield, like house wrap or tar paper, under your roofing. Stick the sheathing using staples, and tape the seams to make it extra strong.
This layer serves to cover wind and water, and this is very relevant when living in a rainy place. In doing so, you would construct a more durable chicken coop in the face of unfavorable weather and keep your flock comfortable in each season.
Step 7: Add Doors and Windows
Doors and windows are more than just openings—they make your coop functional and safe. Cut openings where needed, then install strong doors with quality hinges and latches. Add windows to let in fresh air and natural light, but cover them with hardware cloth instead of chicken wire. This keeps predators like raccoons or foxes from sneaking inside.
Always use sturdy locks for extra safety. Properly placed doors also make egg collection and cleaning easier for you. With secure and well-planned doors and windows, your chickens will enjoy both safety and comfort.
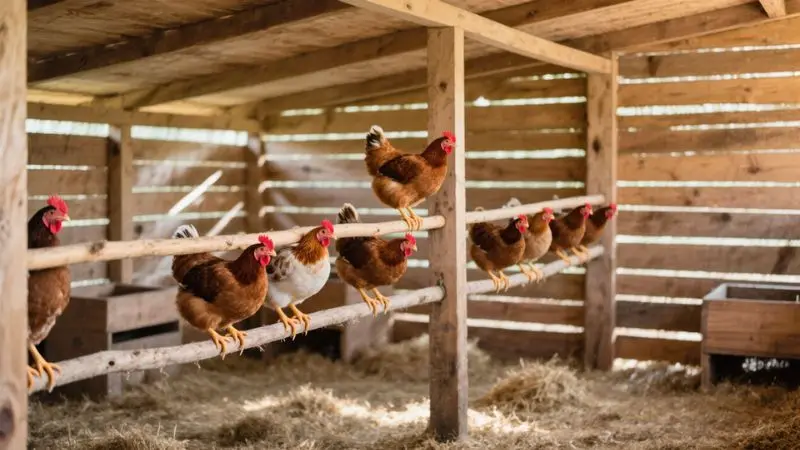
Step 8: Install Roosting Rails
At night, chickens like to sleep on high rails. To ensure that they feel comfortable, place unridged wooden rails of roosting higher than nesting boxes. A chicken requires approximately 8-10 inches of space, and therefore make sure that you put sufficient rails to house the perfectly sized flock.
Spacing between them should be about a foot to avoid crowding. Install the rails into the wall to ensure that there is no movement of the rails under the weight of the chickens. The smooth wood is necessary since it helps to avoid injuries to their feet. Your flock will be well rested and will be healthier, having the well-positioned roosting rails, which are stable.
Step 9: Add Nesting Boxes
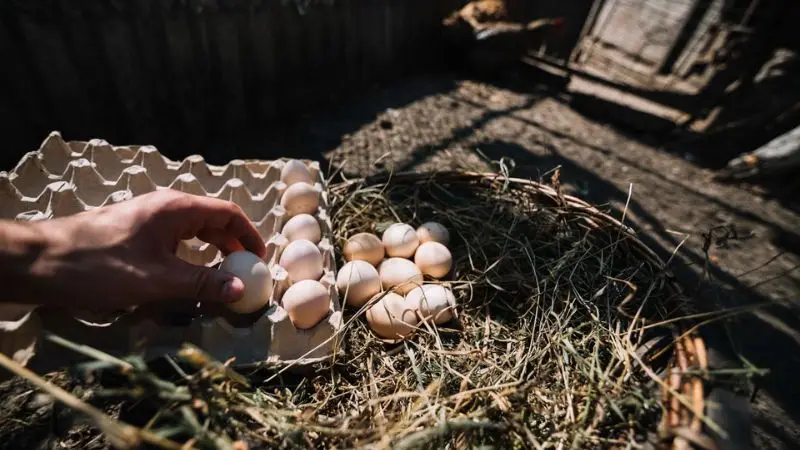
Nesting boxes are where hens feel safe enough to lay their eggs. Build each box around 12 x 12 inches and keep them lower than the roosting rails. Use plywood, plastic, or even repurposed materials, depending on your budget.
Line the boxes with straw or shavings for comfort and warmth. Chickens also prefer quiet, so place the boxes in a calmer corner of the coop. Each box can serve three to four hens. Adding cozy nesting boxes ensures your hens have a private space to lay, keeping both them and their eggs safe.
Step 10: Build the Run
Your chickens need more than a coop—they also need space to roam outside safely. A run gives them fresh air and exercise while still protecting them from predators. Use sturdy posts and hardware cloth to create the run, and bury the wire mesh at least 12 inches underground to stop animals from digging in. Add a secure gate so you can access the area easily. Make sure the run is large enough for your flock to move freely. A spacious run keeps chickens healthier, more active, and less stressed.
Step 11: Ventilation and Cleaning
Every chicken coop must have fresh air, which means vents placed high on the walls or by the roof and covered with hardware cloth that can be removed when it becomes wet. Adequate air supply decreases the level of moisture and also regulates the odor, and keeps the chickens healthier.
Cleaning is important also—have your coop designed so that it can be swept out easily; put soft-flooring in or slideable paneling so that you can get the coop swept out and bedding changed on a regular basis. In winter, do not cover up all the vents, even though airflow is an important factor in the welfare of your flock. Have a coop that is easy to clean and well-ventilated, and all year round, you will be in a neat coop.
How to Finish Your Build a Chicken Coop Project
You’ve put in the hard work, and now your chicken coop is almost ready. Before welcoming your flock, it’s important to do a few finishing touches. These last steps ensure your build is safe, secure, and comfortable for your chickens. Whether you followed a DIY chicken coop step-by-step approach or figured out how to build a chicken coop cheaply, these checks will give you peace of mind.
Last Steps to Check Before Using Your Coop
Walk around your coop and carefully inspect every detail. Tighten any loose screws or nails, and test the doors and windows to be sure they open and close smoothly. Look for sharp edges, splinters, or gaps that might harm your chickens. Even small issues can cause problems later, so it’s worth taking your time here.
- Tighten screws and nails around the frame.
- Test doors and windows for smooth movement.
- Fix sharp edges or loose boards.
- Seal small cracks or gaps for better protection.
A notepad can help you track little fixes, so nothing gets overlooked.
Making Sure Your Chicken Coop Is Safe and Secure
A safe coop makes your flocks happy and healthy. Verify all locks and latches by ensuring that predators are unable to enter. Test the run and check that the burying of the mesh wire is sound ,and dig deep to deter excavation by animals. Flick the roof to get a check on how it sheds water and the vents to ensure they are not impeded to allow air in and out.
- Latches and locks remain firm in attraction.
- Wire mesh has no gaps or holes.
- Mesh secured at least 12 inches in depth.
- The roof keeps the interior dry.
- Hardware cloth is used to cover vents.
The review of safety will ensure that you create a barrier between your birds and the weather, as well as your birds and the wildlife.
Adding Comfort Features to Your Chicken Coop
Once safety is handled, focus on comfort. Add soft bedding such as straw or shavings to nesting boxes and the floor. Place food and water in spots that are easy to reach but not easy to tip over. Chickens also enjoy enrichment, so hang a cabbage, place a perch, or add a toy to keep them busy.
- Bedding for nesting boxes and flooring.
- Feeder and waterer within easy reach.
- Treats or toys for enrichment.
- Extra insulation for cold areas.
- Shade from a bush, tarp, or cover in hot weather.
A comfortable space means healthier, happier chickens—and more fresh eggs for you.
Wrap Up
Building a chicken coop may seem like a big project at first, but with the right plan and steps, it’s something anyone can do. By preparing the ground, adding strong walls, and focusing on safety and comfort, you’ve created a space your flock will love.
Whether you chose pallets to save money or followed a full DIY chicken coop step-by-step design, your hard work has paid off. Now you know how to build a chicken coop for beginners, and your chickens have a safe, cozy home. Enjoy your fresh eggs and a happy, healthy flock every day!
FAQ
How much chicken am I going to have in my coop?
The minimum space to allocate each chicken in the coop is at least 3-4 square feet. One hundred forty-eight to forty-eight square feet would be sufficient to house eight chickens. More room means more chances of birds being happy and healthy.
What is to be done with the ground of my hen house?
Straw, wood shavings, or sand can be used. They are also waterproof materials that are easier to wash. Switch out bedding frequently to ensure that your coop remains new.
What can I do to ensure that predators do not enter my chicken coop?
The fabric used should be hardware cloth, rather than chicken wire. Return the wire at least 12 inches deep into a run. Always lock up all the doors and windows at night.
Should the chicken have heat during winter?
The majority of the chickens are born with cold-weather characteristics. The coop does not require a heater because it is blocked by wind that is also wet. Bedding and vents should be added only when the weather is very cold.


