
You might wonder how to install weed barrier fabric in your garden. The process sounds tricky, but you can master how to install a weed barrier with some simple steps. First, learn how to install a weed barrier by clearing the area and making it smooth.
Next, measure and cut the fabric to fit your space. You will see how to install a weed barrier by overlapping the edges and pinning them down. Remember, how to install a weed barrier becomes easier with practice. With a weed barrier in place, you can enjoy a cleaner, tidier garden.
How to Choose the Right Weed Barrier Fabric
Before learning how to install weed barrier fabric in a garden, it’s important to know the types available. Each option works differently, so picking the right one helps your plants thrive and keeps weeds under control.
Types of Weed Barrier Fabric
You have a few main choices:
- Woven Fabric – Strong and long-lasting with tiny holes that allow water and air to pass through. Ideal for flower beds and for installing a weed barrier around plants with mulch.
- Non-Woven Fabric – Felt-like texture that blocks weeds effectively. Water doesn’t pass through easily, making it suitable for driveways, paths, or learning how to lay weed barriers under gravel.
- Biodegradable Fabric – Breaks down naturally over time. Perfect for vegetable gardens or seasonal planting.
Each type has its own strengths, and knowing how they behave will guide your choice.
Picking the Best Fabric for Your Garden
When planning step-by-step weed barrier installation, think about what your garden needs most. Ask yourself:
- Do you want to plant flowers, shrubs, or veggies?
- Will the top layer be mulch, gravel, or rocks?
- Do you prefer something long-lasting or short-term and eco-friendly?
If you plan to cover beds with mulch, woven fabric is usually the best fit. For gravel paths, non-woven works better. And if you rotate crops often, biodegradable fabric keeps things simple and green. Choosing the right fabric makes knowing how to install a weed barrier under mulch or gravel much easier while saving you effort in the long run.
Gather Supplies Before Installation
Getting ready is half the job. Before you begin step-by-step weed barrier installation, it’s best to gather everything you’ll need. Having tools and materials at hand saves time and keeps the process stress-free. Instead of running back and forth for missing items, you’ll stay focused and finish faster.
Essential Tools You’ll Need
To prepare your garden for fabric installation, keep these tools nearby:
- Garden gloves – Protect your hands from dirt and sharp edges.
- Rake – Smooth out the soil and remove sticks, rocks, or roots.
- Shovel or spade – Useful for digging weeds and leveling the ground.
- Measuring tape – Helps you cut fabric to the right size.
- Scissors or utility knife – For trimming fabric neatly.
- Hammer or mallet – To drive in pins or staples securely.
- Wheelbarrow – Makes carrying mulch, gravel, or soil easier.
If you don’t have a wheelbarrow, buckets will work just fine—it may take extra trips, but it still gets the job done.
Extra Materials for a Lasting Finish
In addition to their tools, there are a couple of added materials that will also help to strengthen your project and make it cleaner:
- Landscape pins or staples – Hold the cloth in place so it cannot move.
- Mulch or gravel – This is a cloth that is overlaid; this gives weight to the cloth and makes the garden look better. This is significant in the process of knowing how to install a weed barrier with mulch or gravel.
- Pre-emergent weed killer – Free added protection before laying fabric.
- Edging material – Cuts edges straight and stops the growth of weeds.
- Plant markers – Indicate where to plant the weed barrier.
When all these are prepared, it will be time to proceed to the next one. Planning guarantees a smooth workload and a clean and professional appearance of the garden.
How to Install Weed Barrier Fabric: Step-by-Step
Learning how to install weed barrier fabric in a garden is easier than it sounds. By breaking the process into clear steps, you can create a garden that looks neat and stays weed-free with less effort. Each stage builds on the last, so take your time and do it carefully. Once complete, you’ll have a strong base that protects your plants and reduces future maintenance. Let’s walk through the process together so you can see how simple and effective this method really is.
Step 1: Prepare the Area
The initial process in the step-by-step weed barrier installation entails ground preparation. Begin by removing weeds, sticks, and rocks using a rake and shovel. Prepare the soil to feel smooth so that the fabric can lie flat and will neither tear nor move.
In case of holes or bumps on the ground, fill and smooth them. This ensures the barrier is longer-lasting and prevents weeds in a much better way. You will find it easier to work the soil when it is slightly damp, and so sprinkle the soil lightly before beginning. The key to success is having a clean, flat foundation.
Step 2: Lay and Cut the Fabric
Once the soil is ready, it’s time to unroll the fabric. Spread it evenly over the garden area you want to protect, making sure it covers every inch. If your garden is large, you may need multiple sheets. Use scissors or a utility knife to cut the fabric to fit the space perfectly.
Take your time with this step, as neat cuts prevent gaps. Always remember to position and trim the fabric before adding mulch or gravel. This step sets the stage for a strong installation and makes the rest of the process smooth.
Step 3: Overlap and Secure the Edges
When using two or more pieces of fabric, overlap the edges between six and twelve inches. This prevents the growth of weeds between the seams. After overlapping, fasten the fabric using landscape pins/staples. Plug them deep, after every few feet, into the ground, and load them up, especially on the sides.
It is also worth keeping the cloth as tight and flat as possible. Not taking this step creates some loopholes into which weeds can creep. Spending an additional few minutes here is a guarantee of a barrier that remains in place and continues to work over the years of your operation.
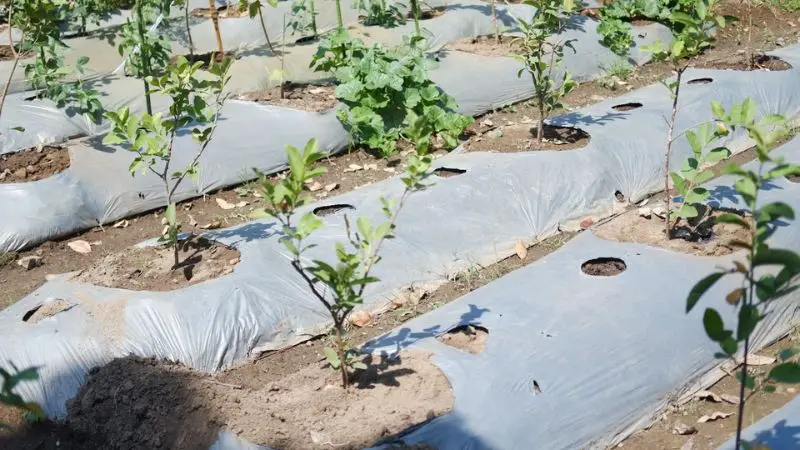
Step 4: Planting Through the Fabric
Even with a barrier in place, you can still add flowers, shrubs, or vegetables. For installing a weed barrier around plants, first mark the spots where you want them to grow. Then cut an X-shaped opening in the fabric with scissors. Fold back the flaps and dig a small hole.
Place your plant carefully inside, then fold the fabric back around its stem. Press the edges firmly so the fabric stays snug. This method protects the rest of the bed while still letting your plants thrive. It’s a simple way to keep weeds out while enjoying healthy growth.
Step 5: Add Mulch or Gravel on Top
The last thing is to cover the cloth on both appearance and functionality. In case of garden beds, it is a good option to use mulch, which covers the fabric, retains moisture, and decomposes with time to fertilize the soil. Stone is better when you are performing pathways or driveways.
Being aware of how to install a weed barrier beneath the mulch or laying a weed barrier beneath the gravel assists in making a tough sort of finish. Use a two-inch layer of rake/shovel to even out and ensure that no piece of fabric is in sight. This is the finishing touch that takes care of a clean and long-lasting garden.
Tips and Mistakes to Watch For
Once you’ve learned how to install weed barrier fabric in a garden, it’s just as important to maintain it properly. A few simple habits will keep your fabric strong and effective for years, while avoiding common mistakes ensures weeds won’t find their way back. Let’s look at what works best and what you should steer clear of.
Tips for Success
To get the most from step-by-step weed barrier installation, follow these easy practices:
- Clear the area first – Always remove weeds and roots before laying fabric. Any leftovers can grow underneath.
- Overlap generously – Place fabric pieces with at least six inches of overlap to block gaps.
- Use plenty of pins – Secure the fabric firmly so it stays flat and doesn’t move in the wind or rain.
- Cut small planting holes – When installing a weed barrier around plants, make openings just large enough for stems.
- Cover with mulch or gravel – Knowing how to install a weed barrier under mulch or gravel protects the fabric and makes the garden look neat.
If you follow these tips, you’ll spend less time fighting weeds and more time enjoying your outdoor space.
Common Mistakes to Avoid
Even the best fabric won’t work if installed carelessly. Keep these points in mind:
- Don’t leave weeds or roots behind – They can push through the barrier and undo your work.
- Avoid small overlaps – Anything less than six inches creates seams where weeds sneak through.
- Never skip securing the edges – Loose fabric shifts easily, especially after rain.
- Don’t leave fabric uncovered – Without mulch or gravel, it breaks down quickly and looks messy.
- Avoid oversized planting holes – Large cuts give weeds space to grow near your plants.
By steering clear of these mistakes, your barrier will stay strong and effective. Careful preparation and smart installation are the keys to long-lasting weed control.
Wrap Up
Installing weed barrier fabric is one of the easiest ways to keep your garden clean and low-maintenance. When you know how to install weed barrier fabric in a garden, you save time, reduce weeds, and protect your plants. The process is simple—prepare the area, lay the fabric, secure it, and finish with mulch or gravel.
Whether you’re learning how to lay a weed barrier under gravel, how to install a weed barrier under mulch, or even installing a weed barrier around plants, the results are the same: a neat, healthy garden. With careful steps, you’ll enjoy weed-free spaces all season long.
FAQ
What is the lifespan of weed barrier cloth?
Most weed barrier fabrics have a life of between 5 and 10 years. Fabric types tend to have a longer life than biodegradable ones. Hit the ground with mulch or gravel, and this will make the fabric last even longer.
Is it possible to use weed barrier fabric again?
You can reuse it if you take it off carefully and it is in good condition. The type of thing you shouldn’t do when digging up plants is to tear them. In case holes appear as well as damage, replace the section.
Should I put mulch on top of the fabric?
Yes, you must lay mold or agate. This action preserves the cloth and contributes to sustaining it. The neatness of your garden is also provided by mulch, which retains water in the soil.
Would water and dung go into my plants?
Most of the woven and biodegradable fabrics can allow the passage of water and liquid fertilizer. More water is blocked by the non-woven. Always read the label and do not purchase. To have healthy plants, choose fabric that allows water to pass through.
Can weeds continue to grow all over the cloth?
Mulch or gravel may contain the growth of some weeds on top of the fabric. Take them out when you detect them. Weed amplifications will be observed in the event that you maintain a thick layer of mulch.


