
Det behövs ingen specialutrustning eller många års erfarenhet för att bygga en grillvagn som kommer att ge en helt ny nivå av nöje till vilken grillplats som helst i trädgården. Överväg att äga din egen gör-det-själv-grillvagn, en som passar perfekt i ditt område och är din stil. En robust, funktionell rullande grillvagn kan monteras för att underlätta grillning och förvara allt nödvändigt på ett ställe. Du kan bygga en stark, portabel vagn med enkel utrustning och slitstarka material som skyddar mot vädret. Den presenterar innovativa anpassningsmöjligheter som passar din utomhuslivsstil. Den erbjuder ett smart sätt att kombinera mobilitet, förvaring och förberedelseutrymme i en kompakt lösning. Den här manualen tar dig igenom processen steg för steg. Den visar dig hur du väljer rätt grill och material, monterar allt och fäster ditt system säkert. Med rätt design kan den fungera som förberedelseutrymme, förvaringsenhet och utemöbler i ett. I den här bloggen får du reda på hur du kan bygga din egen grillvagn med hjälp av väldigt få verktyg och material som finns i närmaste butiker. Den låter dig imponera på dina vänner och släktingar med dina gör-det-själv-färdigheter!
En komplett guide till att välja material, verktyg och rätt grill
Det är en gör-det-själv-guide för att bygga en utomhusvagn för en grill. Den betonar också behovet av att planera och använda väderbeständiga material för att undvika slöseri med tid och att designa en vagn som tål regn, sol och frekvent användning under en grillfest. Den är inriktad på rätt val av grill beroende på användarens behov, såsom storlek, vikt och luftflöde, för att göra den stabil och säker. Sammantaget kan alla dessa förutsättningar, rätt material, korrekt planering och rätt val av grill göra byggprocessen mindre problematisk och slutprodukten stark och trevlig att hantera. Utsökta material, utrustning och en lämpligt monterad grill garanterar den nödvändiga värmekontrollen under matlagning utomhus.
Nödvändigt material för rullande grillvagn
Montera de nödvändiga materialen för att bygga din gör-det-själv-rullgrillvagn innan byggnationen. Detta är en av åtgärderna som gör projektet enklare. Detta gör att du kan identifiera de material som behövs innan arbetet påbörjas. Det sparar också tid och ansträngning som en användare annars skulle lägga på att bestämma vilka material de behöver. Det minskar också monteringstiden, vilket gör att användarna kan fokusera på byggandet. Material som inte är känsliga för regn, sol och tung trafik bör användas. Vagnen kommer att hålla länge och se mycket bättre ut vid alla grillfester. Det är mycket lättare att förbereda med rätt material, vilket gör processen mer effektiv. En robust rullgrillvagn är beroende av ett material som är välbalanserat i styrka.
Till att börja med borde följande lista vara till hjälp:
- Stomme och hyllor/väder-/tryckimpregnerat trä (trä) eller tryckimpregnerat virke.
- Kraftiga länkhjul (minst två av dem ska vara låsbara)
- Skruvar och bultar (galvaniserade utomhus).
- Metallstag eller hörnstag.
- Trä- eller utomhusfärg.
- Handtag eller lådhandtag.
- Krokar för bestick
- Grillplåt eller matta (att lägga under grillen)
Nödvändiga verktyg för gör-det-själv-grillvagn
För att bygga en gör-det-själv-grillvagn behövs några enkla verktyg för att säkerställa att konstruktionen är korrekt och monteringen är säker. Möjligheten att välja de nödvändiga funktionerna på en rullande grillvagn är praktiskt eftersom det gör vagnen redo och eliminerar gissningslek under installationen. Det talar om för användarna vilka verktyg de behöver innan de börjar arbeta. Det minskar förvirring och oro. Det hjälper också till att arbeta med större lätthet, tid och säkerhet. Genom att veta vilka verktyg de behöver kan användarna förbereda sin arbetsyta. Detta är inte ett komplicerat gör-det-själv-projekt av en mobil grillstation. Säkerheten i projektet måste också upprätthållas genom att bära personlig skyddsutrustning. De flesta av dessa verktyg finns i ditt garage eller skjul:
- Hål görs med hjälp av en borr.
- En såg används för att såga trä till rätt storlek.
- En korrekt mätning med en förlängningsmätare.
- Skruvmejseln var monterad.
- För att fila de grova kanterna kommer sandpapper att användas.
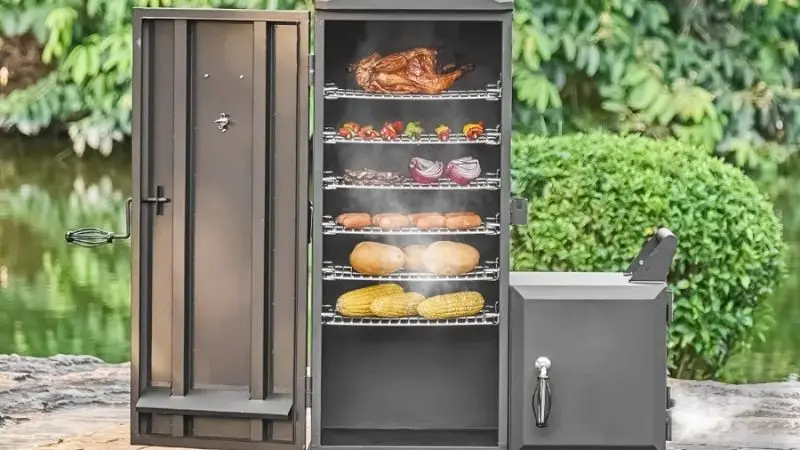
Att välja rätt grill
Att välja rätt grill är viktigt för en gör-det-själv-rullande grillvagn. Fundera över hur du föredrar att grilla. Föredrar du en liten kolgrill eller en gasolgrill? Mät din grill och bygg sedan din vagn. Se till att vagnen har tillräcklig kapacitet för grillens vikt och storlek. Du kan behöva mer utrymme för att tillaga eller förvara mat om du lagar mat utomhus. Se alltid till att din grill är säker och inte blockerar luftflödet. Denna egenskap hjälper användarna att säkerställa att grillen passar korrekt i vagnen och fungerar säkert och bekvämt. Det är tydligt vilken typ av grill som passar bäst för vagnen. Det minskar risken för olyckor och gör matlagning utomhus säkrare för alla. Den här manualen hjälper användare att tryggt välja en grill som passar bra och fungerar effektivt på vagnen. Den eliminerar gissningar och hjälper användare att undvika vanliga problem som kan uppstå när en grill är för stor. Den hjälper också till att säkerställa att grillen sitter helt på ytan utan att hänga över kanterna.
Steg-för-steg-konstruktions- och installationsguide för grillvagn

Den här handledningen tar dig igenom processen att skapa den anpassade grillvagnen i din trädgård. Den fokuserar på att designa och mäta grillen och vagnen för att säkerställa korrekt installation och balans. Användarna lär sig att skapa en stabil ram, lägga till hjul i utrymmet och bygga hyllor och förvaring. Den innehåller också en guide till slipning, målning och ytbehandling för att skydda vagnen från yttre förhållanden. Slutligen beskriver den grillinstallationen som stabil, säker och pålitlig.
Planera din design och dina mått
Börja ditt gör-det-själv-projekt genom att rita din grillvagn och ta sedan en penna och papper. Tänk på det utrymme du behöver för din grill, hyllor och förvaring. Mät din utomhusvagn för grillen och bestäm grillens position. Detta mått gör att du inte gör misstag i framtiden. Det gör att användarna kan montera eller välja en vagn som passar deras utrymme, grill och matlagningsstil. Det säkerställer att grillen förblir stabil ovanpå, inte hänger på sidorna och inte är obalanserad. Det kommer att uppmana användarna att tänka igenom sina handlingar innan de tar dem, vilket hjälper dem att undvika framtida problem. Du måste mäta två gånger innan du sågar någon träbit. Du vill att allt ska fungera perfekt.
Rammontering för grillvagn
Förbered ditt tryckimpregnerade virke och såga det sedan till med en såg. En solid rektangulär bas bör konstrueras, till vilken du fäster benen i alla fyra hörnen. Du bör fästa alla dessa med galvaniserade skruvar och metallfästen. Du är också intresserad av en robust ram för din gör-det-själv-rullande grillvagn. Detta hjälper till att hålla grillen säkert på plats ovanpå och förhindrar att den hänger över sidorna eller blir sned. Det säkerställer också att vagnen kan röra sig fritt genom grindar eller våningar när den inte används. En väl avmätt ram gör matlagningen mer avkopplande, särskilt för mobila grillstationer eller när du förbereder mat för servering. Denna aspekt förbättrar säkerheten, komforten, organisationen och hållbarheten samtidigt som den sparar tid och energi.
Lägg till hjul för mobilitet
Du bör hitta ett sätt att vända din ram och limma fast kraftiga hjul i båda hörnen. Du bör se till att två av hjulen är låsta. Detta håller din grillvagn stabil medan du lagar mat. Vagnen är lätt att flytta runt i trädgården tack vare sina hjul. Den gör det möjligt för användare att flytta sin grillvagn vart de vill utan att lyfta den. Den gör det också möjligt för användare att enkelt rulla vagnen över uteplatser, däck eller gårdar. Den utomhusrullande grillvagnen är också roligare att använda med hjul. Den är särskilt användbar för personer med små uteplatser eller delade utomhusutrymmen. Hjulen förvandlar en orörlig grill till en flyttbar, bekväm matlagningsstation. Denna funktion möjliggör matlagning utomhus och gör det säkrare för alla.
Bygg hyllor och förvaring
Att såga trä är ett annat steg som används för att tillverka hyllor och förvaringsytor. Du kan använda skruvar för att fästa dem i ramen. Krokar bör läggas till grillredskap. Du kan använda en låda eller en korg för extra förvaring. Dessa hyllor används för att förvara dina utomhusköksapparater. De ger avsedda områden för att förvara alla nödvändiga föremål under grillning, vilket förhindrar att svåråtkomliga utrymmen trängs. De kan också utformas för att förhindra att brandfarliga föremål placeras nära värme, vilket skapar en säkrare matlagningsyta. Den förvandlar grillvagnen till en hel utomhusgrillstation. Detta samlar allt på ett ställe, sparar tid och ger ökad komfort och bekvämlighet.
Slipa, måla och ytbehandla
Rengör de ojämna kanterna med sandpapper och ta bort damm. Dessa områden slipas ut, vilket gör att vagnen känns säker och bekväm att röra vid. Det undviker också taggar, repor eller skärsår när du använder vagnen. Måla din hemmagjorda gör-det-själv-rullande grillvagn med utomhusfärg eller tätningsmedel. Detta skyddar din vagn från regn och sol och låter allt torka innan du fortsätter. Det skapar också en skyddande beläggning som skyddar vagnen från utomhusförhållanden, inklusive sol, regn och fukt. Det gör det också möjligt för användare att välja en färg som kompletterar deras uteplats, altan eller personliga smak. Detta följs av den sista proceduren, till exempel ett tätningsmedel eller en klarlack, vilket ger ytterligare skydd. Det gör det mer problematiskt och lättare att torka av efter matlagning.
Montera grillen säkert
Placera först en värmebeständig matta eller metallplåt på den översta hyllan. Du måste placera grillen ovanpå och fästa den med fästen om det behövs. Hur bygger man en rullvagn för din grill? Följ dessa instruktioner från grillens manual. Säkerhet är viktigt när man bygger en rullande vagn för Användning av grill. Om grillen inte är korrekt monterad kan den välta under tillagning, vilket orsakar brännskador, brand eller skador på vagnen. En väl monterad grill hjälper till att hålla vagnen i gott skick, förlänger dess livslängd och bevarar dess utseende. Den hjälper också till att skydda omgivande ytor och material från värmeskador.
Nu har du steg-för-steg-instruktioner för att bygga en gör-det-själv-grillvagn som passar din utomhusmiljö och stil!
DIY Rullande Grillvagn: Förvaring, Förberedelseutrymme och Personliga Idéer
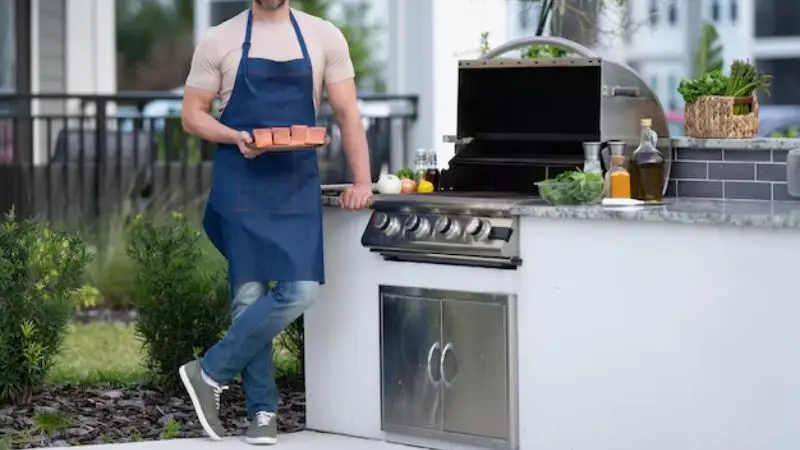
Grillvagnen förvarar även verktyg på lättillgängliga platser, vilket gör grillningen enklare och säkrare. Den ger ett extra förberedelseutrymme, vilket gör det enklare att montera ett nedfällbart sidobord eller en avtagbar skärbräda. Att anpassa din vagn med färg eller schabloner är ett sätt att ge den stil, hållbarhet och en distinkt touch. Dessa modifieringar förvandlar en enkel grillvagn till en bekväm, organiserad och attraktiv utomhusmatlagningsstation.
Lägga till krokar och redskapshållare
Du vill att din gör-det-själv-grillvagn ska ha dina verktyg inom räckhåll. Vissa krokar och redskapshållare gör din utomhusvagn för grillen mer praktisk. Du kan fästa metallkrokar på sidan av grillvagnens hjul. Du kan sedan hänga tång, spatlar, borstar etc. så att du enkelt kan plocka upp dem. Använd en magnetremsa med knivar. Även en liten korg kan användas för såser eller kryddor. Denna lilla insats kan göra en enorm skillnad i den totala matlagningsupplevelsen. Den ger var och en en plats, vilket gör det enkelt att hämta verktyg vid behov och sätta tillbaka dem på rätt plats. Den håller matlagningsutrymmet rent och effektivt. Krokarna och hållarna minimerar böjning, sträckning och verktygsrörelser.
Installera ett sidobord eller en skärbräda
Ett extra sidobord eller en skärbräda kan ge extra utrymme för matlagning. Du kan använda det nedfällbara bordet som är fäst vid din grillvagn. Se till att det är starkt och använd solida gångjärn. En avtagbar skärbräda är mycket praktisk för att hacka grönsaker eller skiva kött. Du kan flytta ut den efter behov. Dessa funktioner skulle göra din DIY grillvagn se mer ut som en riktig grillstation. Ett inbyggt sidobord ger en extra yta där det behövs. Det sparar tid och energi, särskilt när man lagar mat för familjen eller gäster. Det minimerar röran och säkerställer ökad hygien. Det nedfällbara sidobordet är praktiskt eftersom det kan öppnas när det behövs och fällas ner när det inte används. Det är flexibelt, avtagbart för rengöring eller förvaring och får plats enkelt.
Personifiera med färg eller schabloner
Du kan vara snygg med färg eller schabloner. Välj utomhusfärg som tål sol och regn, och överväg en ljus färg eller ett mönster. Du ska använda schabloner på roliga former eller dina initialer. Du kan till och med sätta på lågor eller matdesigner. Dessa speciella detaljer gör din grillvagn till mitten av ditt utomhusrum. Du gör ett vanligt träningspass utomhus till något speciellt. När dina vänner ser din gör-det-själv-grillvagn kommer de att vilja göra sin egen. Du har precis lärt dig hur man gör en grillvagn i ditt utomhusområde. Du tänkte ut den, tillverkade den och gav den din egen touch. Du kommer att kunna laga mat och underhålla gäster med din nya vagn.
- Kontrollera din vagn ofta för lösa skruvar och håll den ren för långvarig användning.
Du kommer att känna dig stolt varje gång du tänder grillen!
Sammanfatta
Man kan bygga en gör-det-själv-rullande grillvagn för att förlänga livslängden på utomhusmatlagning. Genom att designa vagnen korrekt, välja lämpliga material och följa steg-för-steg-monteringsinstruktioner får du en hållbar och säker vagn som passar utrymmet. Detta uppnås genom att integrera hjul, hyllor, krokar och redskapshållare i vagnen för att göra den mer mobil, organiserad och enkel att använda. Den är också modern och hållbar, vilket visar din karaktär. Din grillvagn på hjul kan rullas under hela grillsäsongen med korrekt underhåll. Projektet är kreativt, funktionellt och bekvämt, och det kan förvandla vilken bakgård som helst till en mer förbättrad grill.
Vanliga frågor
Vad kan jag göra för att säkerställa att vädret inte skadar min grillvagn?
Utomhusfärg eller träfogmassa bör användas. När den inte används, förvara vagnen under ett överdrag eller skjul.
Tips: Det är bäst att torka av din vagn efter att den blivit blöt.
Kan jag använda vilken typ av grill som helst på min vagn?
Mest små kolgrillar eller gasgrillar kan användas. Se till att du kontrollerar vikt och storlek innan du bygger. Se till att din vagn kan bära grillen och inte fylls med luft.
Vad händer om min kundvagn känns vinglig?
Kontrollera alla skruvar och bultar. Knyt fast löst sittande saker.
Lägg till extra parenteser om det behövs.
Lås hjulen innan du börjar laga mat.
Hur tvättar ni min grillvagn?
Rengör ytorna med en våt trasa. Milt tvålvatten bör användas vid svåra fläckar.
Obs: Undvik starka kemikalier. De kan skada färg eller träyta.


