
Thank you for choosing the VEVOR meat slicer. Our meat slicer combines the advantages of similar products to make it more convenient and safe to use.
This article will provide you with the necessary information to operate and maintain your VEVOR meat slicer, including important safety guidelines, technical specifications, instructions, and maintenance tips. Please read through the VEVOR Meat Slicer Manual carefully to ensure the safe and efficient use of your slicer.
Table of contents
1. Note
- The power must comply with electric requirements on the label rating. Improper use will result in trouble.
- The machine must be earthed when in use. You run the risk of an electric shock if not grounded or not reliably grounded.
- Please turn off all switches and unplug when an Emergency happens.
- The hand or any other body part is not allowed to enter the workspace when the machine open or will hurt you.
- The machine should be repaired by the manufacturer or agent if it does not work.
- We are not responsible for self-harm while using the machine.
- When the electric wire is damaged, it must be replaced.
- The electric wire must be from the manufacturer or repair department.
- The machine can not be washed by water. It is not a waterproof structure, it will cause an electric shock and damage the mechanical department and electric parts.
- Please turn off all switches when not operating, and unplug the slicer.
- Please stop operating, and unplug it when cleaning the machine.
- If the machine starts operating unusually, turn it off.
- Periodically check whether the machine’s parts are tight to prevent damage.
- Can not cut the frozen meat below the temperature of-6℃.
- Please attach the manual operation when reselling the machine.
- Please contact us when damage or lose the manual operation.
- Please contact us when you meet other items which are not detailed in the manual operation.


The machine before operation must have reliable grounding, to avoid leakage or personal accidents.
The machine operation, it is strictly prohibited to a finger into the work area, so avoid cutting off your fingers.
Don’t bring your hand or finger near the replacement blade.
2. Main Technical Specifications
| Model | Voltage | Power (W) | Slice Thickness (mm) | Blade Diameter (mm) | Max slicing width | Weight | Measurement |
| JK- 195 | 220-240V/50Hz/60Hz110V/60Hz | 120W | 0.2- 12MM | 195MM | 160MM | 14KG | 520*420*380MM |
| JK-220JS | 220-240V/50Hz/60Hz110V/60Hz | 120w | 0.2- 12MM | 220MM | 160MM | 14.5KG | 520*420*380MM |
| JK-220A | 220-240V/50Hz/60Hz110V/60Hz | 120W | 0.2- 12MM | 220MM | 160MM | 17KG | 575*465*415MM |
| JK-220 | 18KG | ||||||
| JK-220L | 19KG | ||||||
| JK-250A | 220-240V/50Hz/60Hz 110V/60Hz | 150W | 0.2- 12MM | 250MM | 160MM | 18KG | 575*465*415MM |
| JK-250 | 19KG | ||||||
| JK-250L | 20KG | ||||||
| JK-275A | 220-240V/50Hz/60Hz 110V/60Hz | 250W | 0.2- 15MM | 275MM | 200MM | 25KG | 615*525*500MM |
| JK-275 | 26KG | ||||||
| JK-275L | 28KG | ||||||
| JK-300A | 220-240V/50Hz/60Hz 110V/60Hz | 250W | 0.2- 15MM | 300MM | 220MM | 27KG | 615*525*500MM |
| JK-300 | 28KG | ||||||
| JK-300L | 30KG |
3. VEVOR Meat Slicer instruction and parts name
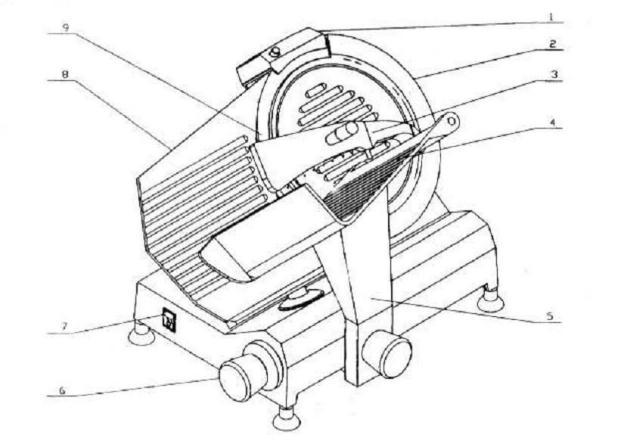
- Sharpener
- Guard cutter
- Active pusher
- Carriage
- Product pusher handle
- Slicer thickness regulator
- Power button
- Scale plate
- Slicer
4. Operation
1. The VEVOR meat slicer should be installed on a work surface that has sufficient stability and strength to support the weight of the machine.
2. Make sure that the line voltage of your main power source matches the rated voltage of the machine.
3. Turn the switch on and let the machine race for about 2-3 minutes to see if the machine works well.
4. Turn the switch on, the pilot lamp of the power button is lighting, and the blade rotates on the opposite way of the watch hands.
5. Adjust the slicer thickness by turning the slicer thickness regulator on the opposite way of the watch hands. Turn the fixing positioner knob in the way of watch hands.
6. Pushing the product carriage forward and back over the blade with a continuous motion, using the product pusher handle and the push knob.
7. After slicing the desired amount of the zero position. Turn the fixing positioner knob and let the fixing positioner head back to the original position.
8. You can now move away the slicers and the products.
5. Cleaning
1. Always turn off and unplug the meat slicer before cleaning, and make sure to turn the slicer thickness regulator to zero position.
2. Never use any chemical or abrasive products. Do not use a brush or any other type of utensils instrument, which could damage the different pieces of the slicers.
3. Use a damp cloth in detergent to clean the machine, thin and dry. Make sure to clean the meat slicer completely every day.
4. Remove the blade cover away from the blade when cleaning, and clean the products carriage, too.
5. Warning for blade cleaning:
a. wear a safety glove for making the operation
b. do not touch the edge of the blade.
c. This is a dangerous operation, be careful.
6. Maintenance
1. Blade rustproof
a. Dry the blade with a dry cloth after work.
b. Spread the cooking oil on the edge of the blade with a dry cloth.
c. Sharpen the blade every day to prevent rust.
2. Guide lubrication:
a. Push the carriage to one side, and clean the grease dirt of the guide with a dry cloth.
b. Smear the guide surface with grease by figure, well spread, and lubricate.
c. It is suitable to lubricate the guide every week.
3. Pusher axle lubrication
a.Clean the pusher with a dry cloth first.
b. Put the cooking oil on both of the axles.
c.It is suitable to lubricate the axle every week.
4. Localizing head lubrication
a. Turn the fixing positioner on the opposite way of watch hands to the max length.
b. Clean the localizing head and put the cooking oil on.
c. Turn around and slide the axle until the axles work well.
5. Localizing head lubrication:
a. Turn the fixing positioner on the opposite way of watch hands to the max length.
b. Clean the localizing head and put the cooking oil on.
c. Then the fixing positioner back to the original position.
d. It is suitable to lubricate it every week and do not spread too much oil.
7. Blade Sharpening
1. You ought to sharpen the slicer blade before use.
2. Clean the edge of the blade before sharpening.
3. Pull the sharpener out and lubricate the sharpener axles as it works well.
4. Pull the sharpener out and turn 180 degrees, press the right side stone down by finger the put the sharpener in the working position.
5. Make sure that the surface of the stone is nesting closely to the surface of the edge. If not, please adjust it.
6. Turn the power on and let the blade work for 1-2 minutes. Stop the machine and see if the blade is sharpened well, if not,continuous.
7. Press the left side stone down and make sure the surface of the stone is nesting closely to the surface of the blade, then sharpen for 3 seconds to remove the burr.
8. Put the sharpener back to the original position after work.
9. Always keep the stone clean as the stone works well.
10. Do not make your eyes look right at the way that the stone rotates. Don’t get hurt by the piece of the stone.
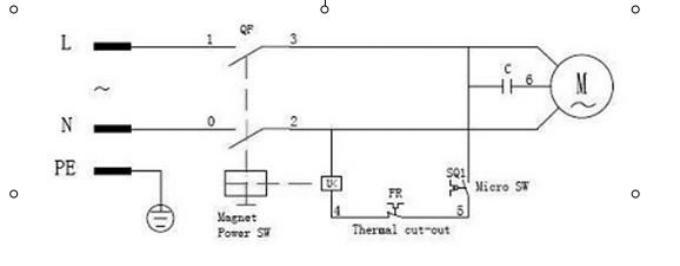
8. Illustration
Conclusion
The VEVOR Meat Slicer Manual is a must-have for anyone who wants to use their meat slicer to its fullest potential. By following the instructions provided in the manual, you can guarantee the safe and efficient use of your slicer. Remember to always keep your slicer clean and well-maintained to avoid accidents and unwanted damage. Choose the VEVOR meat slicer and use this manual to get the most out of your investment.


You have made some really good points there. I checked on the internet for additional information about the issue and found most people will
go along with your views on this website.
Thank you!