
Are you looking to elevate your nacho game or keep your sauces at the perfect serving temperature? Look no further! The VEVOR Cheese Warmer is the ideal solution for anyone from professional caterers to home cinema enthusiasts. With the VEVOR Cheese Warmer Instructions, setting up and operating your cheese warmer is a breeze, ensuring your sauces are deliciously warm and ready to serve at any time.
Dive into the world of effortless and efficient cheese warming, where convenience meets culinary delight.
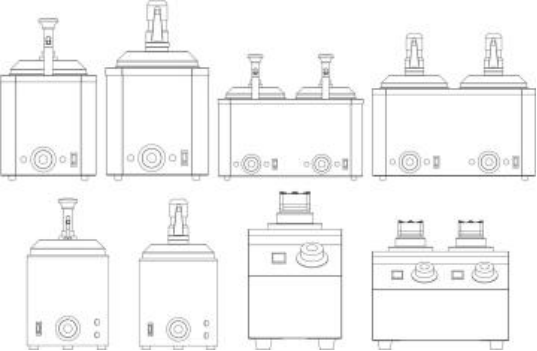
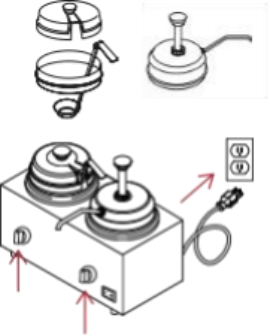
MODEL:BH-01/ PBH-01/BH-02/PBH-02/RBH-01/RPBH-01/CH-01/CH-02
IMPORTANT SAFEGUARDS

NOTICE:
1. Read all instructions.
2. Local codes regarding installation vary greatly from one area to another. The National Fire Protection Association, Inc., states in its latest edition of NFPA96 that local codes are “Authority Having Jurisdiction” when it comes to requirements for the installation of equipment. Therefore, installation should comply with all local codes.
WARNING:
For your safety, do not store or use gasoline or other flammable vapors or liquids in the vicinity of this or any appliances. Keep the area free and clear of combustible materials. (See ANSI Z83. 14B, 1991.)
WARNING:
Improper installation, adjustment, alteration, service, or maintenance can cause property damage, injury, or death. Read the installation, operating, and maintenance instructions thoroughly before installing or servicing this equipment.
CAUTION:
These models are designed, built, and sold for commercial use only. If these models are positioned, so the general public can use the equipment. Make sure that cautions, warnings, and operating instructions are posted near each unit so that anyone using the equipment will use it correctly and not injure themselves or harm the equipment.
NOTICE:
When installed, the unit must be electrically grounded and comply with local codes, or in the absence of local codes, with the national electrical code ANSI/NFPA70-latest edition. Canadian installation must comply with CSA-STANDARD C.22.2 Number 0 M1 982 General Requirements-Canadian Electrical Code Part ll, 109-M1981- Commercial Cooking Appliances. Do not use a unit with a damaged cord or plug if the appliance malfunctions or has been damaged in any manner.
WARNING:
1. SHOCK HAZARD – Unplug and turn OFF all power to the equipment before cleaning the equipment. DO NOT immerse any part of this equipment in the water.
2. This appliance can be used by children aged 8 years and above and persons with reduced physical, sensory, or mental capabilities or lack of experience and knowledge. They must have been given supervision or instruction concerning the use of the appliance in a safe way and understand the hazards involved. Children shall not play with the appliance. Children shall not make cleaning and user maintenance without supervision.
3. This appliance must not be cleaned with jet water. Do not immerse in water.
WARNING:
Improper installation, adjustment, alteration, service, or maintenance can cause property damage, injury, or death. Any alterations to this equipment will void the warranty and may cause a dangerous condition. Do not use this unit for other than intended use. This appliance is not intended to be operated by means of an external timer or a separate remote-control system. NEVER make alterations or modifications to this equipment. Always operate on a firm, dry, and level surface. Read the Installation, Operating, and Maintenance Instructions thoroughly before installing, servicing, or operating this equipment.
Installation and Operation Instructions
Notice: Wash all parts properly before every use.
Caution: DO NOT OPERATE UNIT WITHOUT WATER. Check the water level frequently when in operation. Apply more water as needed.
Caution: Pump spout becomes hot during operation. To avoid possible serious injury, use protective heat-resistant gloves when handling hot unit.
Warning: DO NOT OPERATE ON HIGH HEAT FOR MORE THAN 45 MINUTES. Contents may overheat and burn.
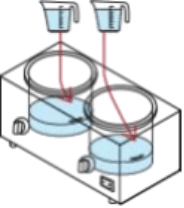
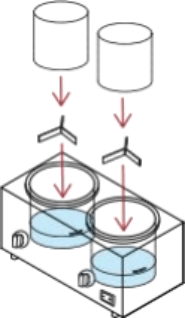
1. Fill wells.
- If using # 10 can or inset, locate and place included spacer at the bottom of the unit. This is used to support a # 10 can or inset and create a water gap for more uniform heating.
- Fill each well with 5 cups of hot water. Filtered water is recommended.
- Do not overfill.
- Check water levels throughout the holding period.
- Sauce bottle warmer: Leave at least ½” gap between the top of the water line and the warmer rim. Too much water will cause water to overflow when bottles are used.
2. Place # 10 can or inset (or bottles) into the well. NEVER PLACE FOOD DIRECTLY INTO THE WELL.
- Bottle Warmer: There is no need to use the spacer. Just place the bottle holder inside the well.
- Notice: For Bottle warmer, only use bottles that have a minimum heat resistance of 200 degrees Fahrenheit or higher. Check with the manufacturer of your bottles to ensure they can be used in a bottle warmer.
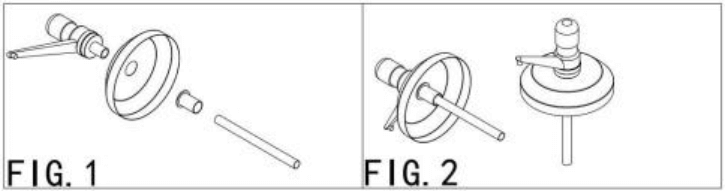
3. Now install lid accessories or pump(s).
For installation details of plastic pumps (Model No.:PBH-01,PBH-02,RPBH-01), please refer to the figures below
4. Plug cord into power source and press switch(es) to the ‘On’ position.
- Set the thermostatic knob to the food manufacturer’s recommended serving temperature(s), or desired temperature.
- To heat the unit faster, you may temporarily set the temperature to maximum. Once food has reached the desired temperature, adjust temperature back down to holding.
Re-thermalization: Is achieved when a unit elevates the food product temperature from a refrigerated 40 degrees Fahrenheit (4.44 °C) to a safe serving temperature of 165
degrees Fahrenheit within a period of 2 hours. Monitor food closely for food safety. Cold food should not be added to the unit for re-thermalization, while hot food is
being held.
Hot Food Holding: It is achieved when it maintains a food product temperature at or above 150 degrees Fahrenheit (ca. 66 °C) for at least 2 hours. Monitor food closely for food safety.
Tips
- It may take up to three impressions of the plunger to fully prime and vend thick products. If the pump does not dispense properly, remove it and ensure the‘O-Ring’ is in the correct place. If missing, ensure the ‘O-Ring’ did not get pulled into the pump plunger tube. Failure to do this can result in a broken ‘O-Ring’pumped out when food is vented.
- The pump insert will not function properly with cold foods and/or sauces. Properly pre-heat foods and/or sauces before trying to use the pump.
- Sauce bottle warmer is intended to be used with 24 oz. Bottle or smaller.
- Using insets and inset liners, or # 10 cans, can make change-outs and cleaning up much easier.
- Always use spacers beneath # 10 cans or insets to improve heating consistency and to ensure all food is pumped from the container.
- Remember to empty the water each day rather than add more water. This will extend the life of your unit.
- Keeping the lid, cover, or pump on the unit is recommended to help maintain product temperature.
Cleaning
Never immerse the unit in water or any liquid.
Never use any water jet or pressure washer.
Make sure the unit is unplugged and turned ‘Off’ before cleaning.
- Before first use and after daily use, disassemble unit and wash removable parts.
- Empty water each day and rinse with clean water.
- Clean the interior well and external surfaces. We recommend Noble Chemical Sun Bright mild detergent. Do not use abrasive, caustic, or ammonia-based
cleansers. A mildly abrasive nylon brush may remove stubborn food or mineral
depots on the unit’s interior. Do not use metal scrapers or cleaning pads that could scratch the external surfaces.
- Pump Cleaning: clean pump thoroughly between each use.
FAQs
Q: How do I set up my VEVOR Cheese Warmer?
A: Start by filling the well with 5 cups of hot water, ensuring not to overfill. Place your #10 can or inset into the well, and then install the lid or pump. Finally, plug it in, switch it on, and set the temperature.
Q: Can children operate the VEVOR Cheese Warmer?
A: Yes, under supervision. The VEVOR Cheese Warmer is safe for use by children aged 8 and above, provided they have been instructed on its safe use and are supervised by an adult.
Q: How do I clean my VEVOR Cheese Warmer?
A: Ensure the unit is unplugged and cool. Disassemble and wash removable parts with a mild detergent. Rinse and dry thoroughly. Never immerse the unit in water or use abrasive cleaners.
Q: Is it safe to leave the VEVOR Cheese Warmer on for extended periods?
A: Do not operate on high heat for more than 45 minutes to prevent contents from overheating. Always monitor the water level and add more as needed.
Final Words
Embrace the ease and efficiency of the VEVOR Cheese Warmer for all your sauce and cheese warming needs. With simple setup, operation, and maintenance, it’s never been easier to serve perfectly warmed delicacies to your guests or family. Don’t let your culinary creations be let down by cold sauces—upgrade your serving game today. Ready to transform your serving experience? Click to get your VEVOR Cheese Warmer and follow the straightforward VEVOR Cheese Warmer Instructions for a seamless experience.


