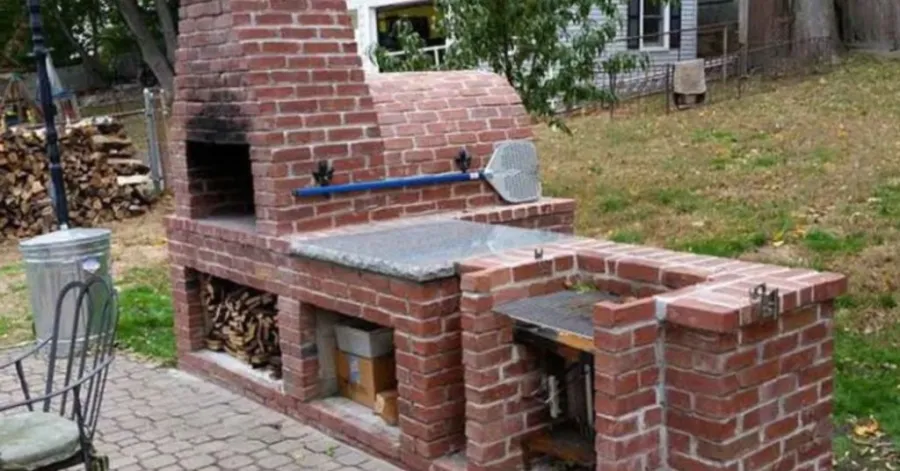
With a bit of effort, you can create an outdoor cooking station DIY. This do-it-yourself project is cost-effective and allows you to create your own grill configuration. Or imagine grilling your favorite BBQ recipes outside while enjoying the fresh air. You don’t need to be an expert and have the skills for this DIY adventure. Your outdoor cooking station DIY is a fun and tasty addition to any BBQ. You get to select the features that suit your cooking style when it comes to the grill. So grab your tools and get to work on your diy grill project today. Get ready for outdoor BBQ memoirs!
Outdoor Cooking Station DIY Choices
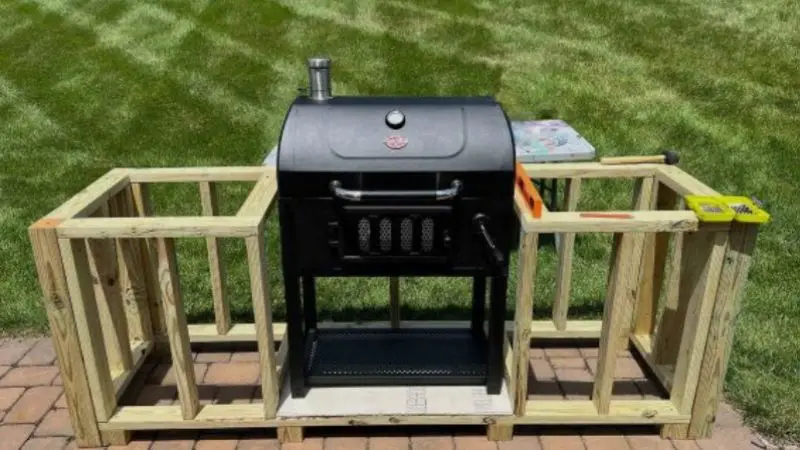
Creating an outdoor cooking space can help turn your backyard into a cozy place to spend time with family and host cookouts on the weekend. With a DIY method, you have full control over the design and size, as well as features, of your cooking area. From a basic grill operation to a more elaborate outdoor kitchen, the possibilities are endless. If you love doing things hands-on, a DIY project of building an outdoor cooking station is a great way to not only make your backyard your own but also make your cooking experience a lot better.
Types of Grill Stations
When planning your DIY cooking station with a built-in grill, you have several to choose from. Some people would like to set up a basic grill station with only a grill and a little area to prep food, while others would like to create something more elaborate with storage space, counter space, and even a sink. Materials can range from wood to brick to metal, depending on your style and budget. You can use a gas grill, charcoal, or a smoker, and some have even come after portability if you’d like to relocate your station around your yard. Custom-built grill stations allow you to incorporate additional features, such as shelves, cabinets, or a mini refrigerator, which can give your space a functional and stylish appearance.
Choosing the Right DIY Grill Station
Picking out the best grill station depends on your space, budget, and style of cooking. First, you’ll want to measure the area in your backyard where you’d like your setup and ensure there’s enough room for walking and for smoke to drift away from your house. Next, consider your budget. A cheaper version of an outdoor cooking station DIY can be made of recycled or basic materials that won’t cut corners on style. Think about how you cook: If you have large gatherings, a larger station with several burners and prep areas may work for you. If you’re grilling primarily for your family, you will do just fine with a smaller, easy DIY backyard cooking station. The joy of a DIY project is that you can create a grill station that is your outdoor style and meets all of your cooking needs.
Materials and Tools for a DIY Grill-Station
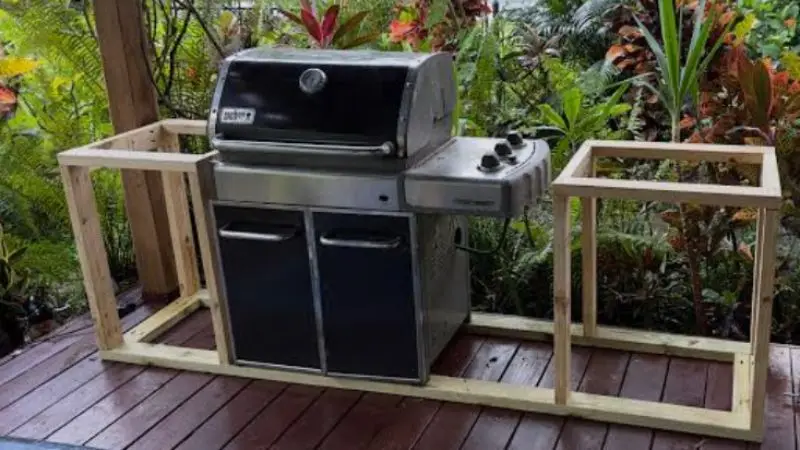
Before embarking on your step-by-step guide to making an outdoor kitchen, it’s important to gather the right materials and tools. The quality of your materials makes a difference in your grill station’s safety and durability. Choosing weather-proof and safe from hot elements also means that your outdoor kitchen will break fewer parts as the years pass. Having everything ready before you start makes the building process easier and more enjoyable.
Essential Materials List
To construct a powerful and practical DIY cooking station that includes a built-in grill, you need materials that can stand up to the heat, moisture, and lots of use. Start with pressure-treated 2x4s for the frame since they are resistant to rot and would last longer outdoors. Use cement board panels for the outer layer for protection from heat and weather. Stainless steel sheets offer a durable and stylish finish. Additional materials include:
- Fire barrier tape/heat-resistant sealant
- Galvanized screws and bolts
- Grill door kit
- Construction adhesive
- Weatherproof paint or stain
It’s a good idea to purchase a few extra screws and bolts because changes during the construction are not uncommon. With these materials, you can make an affordable outdoor cooking station DIY that has a professional appearance and will last for years.
Tools You’ll Need
You don’t need any fancy tools for an easy DIY backyard cooking station. Most tools can be found at your local hardware store, and they will make the process of building much easier. Here’s what you’ll need:
- Tape measure – for getting your space measurements right
- Circular saw – to cleanly cut lumber and boards
- Drill – to drive screws and bolts
- Level – to make sure your surfaces are even
- Screwdriver – to tighten up hardware
- Safety goggles – for the protection of your eyes
- Work gloves – to protect your hands
Using the right tools to ensure your grill station is stable, safe, and aesthetically pleasing. As always, safety is key, so make sure you wear gloves and goggles while building your station. Following this step-by-step DIY outdoor kitchen guide with the appropriate materials and tools will help you create a functional and attractive cooking area in your backyard.
How To Make A Grill Station Step By Step
Building your own backyard cooking space can be an exciting and rewarding experience. Following a step-by-step DIY outdoor kitchen guide is a sure way to have your grill station be functional and stylish. With some good directions, you can make your outdoor cooking setup fit your space, as well as your style, and make outdoor cooking enjoyable for years to come! From planning to finish touches, each step is important to create a safe and durable outdoor kitchen.
Plan and Measure Your Space
Before you grab your tools, planning is a must. Walk around your backyard and pick out a spot for your grill station, so there’s enough room for cooking and moving around. Measure the length and width of the area in inches with a tape measure (take your numbers carefully). Consider where the smoke will go, how easily you can access the grill, and where food prep is going to take place. Proper planning helps ensure that mistakes aren’t made later on down the line and that your easy DIY backyard cooking station fits perfectly into your outdoor space while keeping safety in mind.
Build the Frame with 2x4s
Once you have your space ready to go, begin building the frame out of pressure-treated 2x4s. Cut the boards to suit your own measurements and lay them out to create a rectangular layer. In that case, secure the corners with screws, as well as make use of a level to make sure everything is flat on the ground. The frame is the foundation of your grill station, so the structure needs to be stable. Make adjustments to the boards as necessary to remove any wobbling. Wearing gloves and goggles during this step will ensure safety while cutting and drilling. A strong frame creates the likelihood of a strong and long-lasting outdoor cooking station DIY.
Add Support and Stability
To build a sturdy grill station, insert additional boards in the frame, inside the base, every two feet between two boards. These supports support the cement board and grill and keep the structure in place. Check all joints and connections to ensure they are tight, and check the frame to make sure it’s level. Proper support makes sure that your DIY cooking station with a built-in grill will last for years and stay safe during heavy use. Taking the time to reinforce the frame means no problems in the future, as well as a solid foundation for the rest of your project.
Install Cement Board
Cement board is a key ingredient to protecting your grill station from heat and weather. Cut the panels to fit with the frame and securely attach them to the frame, covering all sides, including the back and bottom. To be sure everything sits flush, fill any gaps with construction adhesive. Cement board is fire and moisture-resistant, which makes it ideal for outdoor use. Installing it properly makes sure that your affordable outdoor cooking station DIY will be safe and durable enough to take on frequent cookouts.
Frame Grill Door Opening
Having a grill door will add functionality to your station. Measure and mark the opening carefully, then saw the cement board and frame to size. Install the grill door kit, following the instructions, ensuring that the door opens and closes easily. A door also gives easy access for cleaning and maintenance, allowing for a more convenient outdoor cooking experience. Including this feature makes your easy DIY backyard cooking station not only practical, but also gives it a more professional appearance.
Apply Fire Barrier and Sealant
Protect your grill station from the high heat by using fire barrier tape or sealant around the grill opening and seams. So, make sure to close all gaps for damage and to increase safety during cookouts. Using fire-rated products helps keep your station safe even during lengthy grilling excursions. This step is also a good way to enhance the longevity of your DIY cooking station, complete with a built-in grill to handle the heat of many future barbecues!
Add Stainless Steel Sheets
Complete your grill station using stainless steel sheets to give it a fancy and easy-to-maintain appearance. Measure and cut the sheets and screw or connect them onto the cement board using a construction adhesive. Stainless steel can make your outdoor kitchen look good in addition to performing its duty, because besides being heat-resistant and easy to clean, it also makes it look good. Once installed, clean stations with a towel on a frequent basis to ensure your stations are shiny. The final step completes the DIY guide to an outdoor kitchen, and you will have a worthy, safe, and appealing grill section that will improve your backyard grill.
DIY Tips & Troubleshooting
Even the best step-by-step DIY outdoor kitchen guide is easier to follow when you know how to troubleshoot problems and how to avoid common mistakes. Listening to safety and minor details will leave you with a grill station that will pay off in years to come and leave you and your family safe. In building your own outdoor cooking station or renovating an old one, these tips will make your project an enjoyable and successful one.
Safety Tips for Outdoor Cooking Stations
The greatest consideration in any self-grill project is safety. In order to eliminate accidents, always ensure that your grill is free of loose components or gas before placing it on the fire. Keep a fire extinguisher on hand, put on gloves and goggles when working on your DIY cooking station with an inbuilt grill. Store the grill away from trees, fences, and or other combustible substances, and never leave the grill unattended when cooking. It is also important to clean your grill after using it because grease will accumulate, causing fires. Using these safety measures, you are keeping yourself, your family, and your guests safe as you enjoy your new outdoor cooking space.
Common DIY Mistakes to Avoid
There are numerous do-it-yourself grill projects with problems that can be avoided with proper planning. The first error is not measuring your room before you start, which will lead to poorly fitting stations. Not complying with the fire barrier or using incorrect screws may also be hazardous as well as unsafe. Slow each action down, be sure to use galvanized hardware to fasten them, and again have a good check of the frame and grill position, and go on to the next stage. Correct any errors immediately, rather than haste towards construction. These recommendations will ensure that your simple DIY outdoor cooking station is beautiful, secure, strong, and durable enough to enjoy years of outdoor cooking.
Customization Ideas
Once you have created your grill station, you can add your own custom touches to make it their own and functional. Consider adding shelves for tools, hooks for spatulas, or cabinets for storage. You can even create a prep table or put in a small sink for convenience. Weatherproof paint, stainless steel finish, and decorative tile give your station a professional appearance, and wheels make it portable if necessary. Custom lighting can help you cook into the evening hours for a cozy atmosphere. With some thoughtful customization, your low-cost outdoor cooking station DIY will showcase your style and fit your cooking needs while serving as the centerpiece of your backyard get-togethers.
Creating a grill station that is safe, functional, and uniquely yours is a great project. With attention to detail, proper materials, and a little creativity, your DIY cooking station with grill will make for countless enjoyable cookouts and make your backyard a favorite gathering place.
Wrap-Up
It is a great and entertaining option to create your own grill station in the backyard. Planning, measuring your space, installing cement boards, stainless steel finish, and even customizing your outdoor kitchen, an outdoor kitchen do-it-yourself guide, step by step, made the process enjoyable and easy. With a few precautionary measures, advice on how to avoid some of the most frequent errors, and a few details of your own, you will be able to make a simple DIY backyard cooking station that is useful and long-lasting as well as attractive. Be it a simple outdoor cooking station DIY or a DIY cooking station-grill, this project will make your backyard an excellent barbecue location.
FAQ
What is the time it takes to construct an outdoor cooking station?
With a little fore planning, you can have your grill station ready in three days (a weekend). The majority take a day to build the frame and a second day to add finishing touches.
Is it possible to use ordinary wood in place of pressure-treated lumber?
In reality, you should use pressure-treated lumber. Unimpregnated wood will decay or split along the grain. The pressure-treated boards will cost less and hold your grill station upright.
What do you mean by not having a circular saw?
Wood can be cut with a handsaw. It is more work, and you get the job done. Ask a friend or neighbor whether you can borrow their circular saw.
Can a grill station be placed next to my house?
Your grill should be at least 10 feet away. You want to avoid fire risks. Things that you should never do before you start to build are to consult the local codes.