
Need to know how to change the inner tube on a garden cart? Don’t worry—it’s easier than you think! With just a few basic tools and a little time, you can do it yourself and get your cart rolling smoothly again. Whether it’s a flat tire or a leaky tube, this simple step-by-step guide will walk you through the whole process. No experience? No problem. We’ll show you exactly what to do, even if it’s your first time. Plus, you’ll get helpful tips to avoid common mistakes. Ready to fix that wheel? Let’s get into how to change the innertube like a pro.
Tools and Prep Before You Start
Before jumping into the job, it’s important to prepare. A little planning goes a long way when it comes to DIY garden cart tire tube replacement. Having the right tools on hand and setting up your workspace properly makes the whole process smoother. Let’s begin with what you’ll need and how to stay safe while working.
What You’ll Need for a Smooth Tire Tube Change
To successfully change the innertube, gather these tools and materials first. These basics will help you work more efficiently and avoid delays:
- Tire irons or flathead screwdrivers to pry the tire off the rim
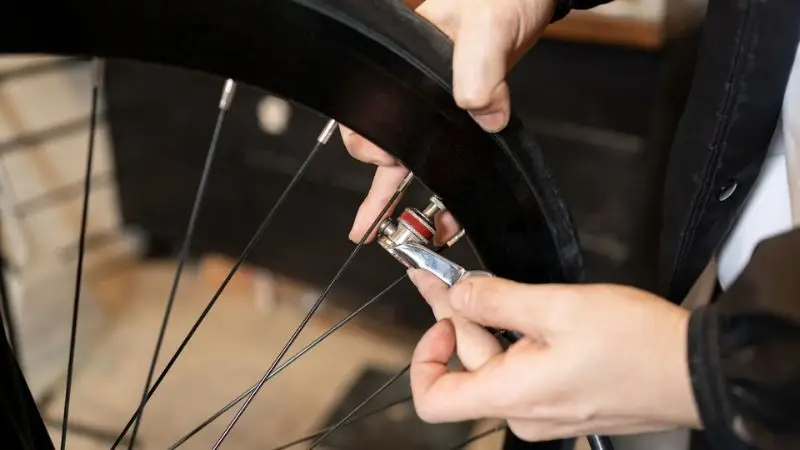
- Valve core tool to release air from the old tube
- Air pump for inflating the new inner tube
- Pliers or an adjustable wrench to loosen or tighten the axle nuts
- Replacement inner tube in the correct size for your wheel
- Soapy water to help slide the tire back on easily
- Rag or towel to clean the rim and tire before reassembly
Double-check the tire’s sidewall to match the new inner tube size. Starting with the right tools keeps your step-by-step tire tube change simple and stress-free.
Safety and Setup Tips for Garden Cart Repairs
Safety is also a key component of any repair work, including this small chore. Remember that even when you are learning how to change an innertube on a garden cart, do not omit these elementary precautions:
- Always make your workstation dry and bright to avoid accidents
- Never use the wrong tools that may bend the rim or break the axle
- Apply no sharp instruments to your new inner tube
- Recheck everything twice, prior to fitting anything new
Spending some time to set up and correct will save you a couple of pitfalls. This is one of the smart garden cart maintenance tips that can make your work safer and easier.
Remove the Wheel from Your Garden Cart

Once your tools are ready, it’s time to remove the wheel. This step might seem tricky at first, but with a little patience and the right technique, it’s simple to handle. Whether you’re dealing with rust or tight nuts, knowing the correct method is key to avoiding damage.
Follow these steps to safely detach the wheel and continue your DIY garden cart tire tube replacement.
Loosen the Axle Nut Carefully
Look to center the wheel where the axle nut is located. This nut retains the wheel onto the frame. Rotate the nut using an adjustable wrench or pliers in a counterclockwise direction. When it becomes stuck, spray it with a bit of soapy water (or any light lubricant) and wait a few seconds before attempting again. Start by loosening the wheel, but hold it in place so it does not spin.
In case you have a cotter pin in your cart, take that off first by straightening it with pliers and carefully pulling it out. Put that pin aside in a safe place where you can retrieve it later to put everything back together. The steps are necessary for troubleshooting the garden cart wheels.
Going Down smoothly with the Wheel
Now, when the axle nut is slack or off, turn off the wheel on the axle with care. In case of resistance, shake the wheel up and down slowly so as to loosen it. Do not whack it with some tool, as you may deform the axle or break the rim.
Put the wheel in a clean horizontal area. Collect the small items, such as washers or spacers, and hold them in one place to prevent the loss of any item. In case you have a two-wheel cart, follow this same procedure again on the second wheel. It is one of the most important steps in the procedure of learning to change the innertube on a garden cart without complications.
Remove the Old Inner Tube
Now that the wheel is off, the next step in your step-by-step tire tube change is getting the old tube out. This part can be a little messy, but it’s straightforward if you go slowly. Deflating the tire and removing it properly helps prevent damage and makes installing the new tube much easier.
Follow these steps to remove the old tube without any trouble.
Deflate the Tire Completely
Begin by releasing all the air from the tire. Use a valve core tool to unscrew the core by turning it counterclockwise. You’ll hear the air hiss out, and the tire will slowly go flat. If you don’t have the tool, you can press the valve stem in with a small object like a screwdriver—just be careful not to damage the stem. Let all the air escape before moving on. This step is essential in any DIY garden cart tire tube replacement, as it allows the tire to loosen from the rim easily.
Pry the Tire Away from the Rim
When the tire is flat, lift one side of the tire off the rim with tire irons or flathead screwdrivers. Squeeze the tool between the rim and the tire, then force it up and over the edge of the tire. Do a little at a time, a few inches at a time, with the tool.
It can be smoother when applied using soapy water. There is no need to rush; you could lose the rim and your fingers. This methodical treatment will aid you in preventing problems throughout your garden cart maintenance session.
The Old Tube Out of the Insides of the Tube
When one side of the tire is removed, stick your hand inside and find the valve stem. With the hole in the rim, pull it out, and then carefully take the rest of the tube out. When it clogs, shake it or pour in more soapy water to loosen it up.
Take your time to ensure you do not tear the rubber or the tire itself. After the tube has been removed, check the edge of the rim and the inside of the tire to see if anything is sharp. This step helps make sure that you have a clean install in proceeding in terms of how to change the innertube on a garden cart.
Inspect and Prep Before Installing the New Tube
Before inserting the new tube, it’s important to inspect and prep everything carefully. A missed sharp edge or overlooked damage can lead to another flat tire. Taking a few extra minutes now will help prevent future problems and ensure your repair lasts.
Here’s how to get everything ready for a smooth install.
Inspect the Tire and Rim Thoroughly
After removing the old tube, examine both the tire and rim closely. Feel along the inside of the tire with your hand, checking for sharp objects like glass, nails, or thorns. Even a tiny piece of debris can puncture your new tube. Look over the tread for hidden stones or wires lodged in the grooves and remove them.
Next, check the rim for rust, cracks, or sharp edges that could pinch the new tube. If needed, clean the rim with a damp rag and some soapy water until it feels smooth all the way around. This extra care is a smart part of any garden cart maintenance tips routine.
Prepare the New Inner Tube for Installation
Now, take out your new inner tube and unroll it fully. Look it over for any visible damage or creases from packaging. The rubber should be smooth with no cracks or weak spots. Add a little bit of air using your pump—just enough to give it some shape, but not enough to make it firm. A slightly inflated tube is easier to position and won’t fold over inside the tire.
Check that the valve stem stands straight and isn’t bent or loose. This small prep step plays a big role in a successful DIY garden cart tire tube replacement and helps avoid future leaks.
Install the New Inner Tube with Care and Precision
Now that your tire and rim are clean and your new tube is prepped, it’s time for the most delicate part of this repair. This step takes a bit of patience, but it’s a key part of any successful DIY garden cart tire tube replacement.
Let’s walk through the process of placing and sealing the new tube correctly.
Insert the Inner Tube Into the Tire
To start with, it is important to take off only one side of the tire from the rim. Gently inflate the new tube until it is round and soft. Locate the valve hole on the rim and carefully insert the valve stem through the hole. Take it in one hand and use the other hand to feed the remaining tube into the tire. Go with a slow pace and avoid twisting or folding of the tube. It has to be flat and smooth on the inside of the tire.
In case the tube is too rigid to be placed in its place, release some air. It is also important to keep the valve stem straight to prevent pinching and to simplify inflation later. It is an important step in any step-by-step guide to changing tire tubes.
Put the Tire Back on the Rim
Well, now it is time to put the tire back on the rim. Begin at the valve part and insert the tire-edge bead end over the rim with your hands. When it is too rigid, take care of your tire levers and touch nothing on your inner tube with any tools. Rotate on the edge slowly, little by little, and push the tire back into position.
So they might be smoother; use a bit of soapy water to rub around the rim of the tire, or get a tire warmed up in sunlight to make it pliable. After inserting the tire to a complete point, ensure that the inner tube does not stick out anywhere. Also, ensure that the valve stem remains upright. Before inflating, repair anything that appears off-key.
Inflate the Tube and Reinstall the Wheel Safely
You’ve reached the final steps in your DIY garden cart tire tube replacement. This part is all about taking your time and checking your work carefully. Inflation and reassembly are simple—but rushing can undo all your effort. Let’s walk through how to finish your repair the right way.
Inflate the Tire with Care
Attach your air pump to the valve stem and begin slowly adding air. Watch the tire closely as it expands. The tire should seat evenly all around the rim—no bulges, wobbles, or odd shapes. If you notice anything uneven:
- Stop inflating
- Let out some air
- Reposition the tire or tube by hand
If the tube gets pinched and forms a bulge, deflate it and adjust it. Once everything looks even, inflate the tire to the pressure listed on the sidewall. Avoid over-inflating—it can damage your tube and undo your hard work. This step is essential in avoiding future troubleshooting of garden cart wheel problems.
Reattach the Wheel to the Cart
Now that your tire is inflated correctly, reinstall the wheel. Slide it back onto the axle, ensuring it sits straight and snug. If your cart uses washers or spacers, reinstall them in the same order as before. Then:
- Thread the axle nut onto the axle
- Tighten it using a wrench or pliers
- Insert the cotter pin (if present) and bend the ends to secure it
Give the wheel a test spin. It should turn freely without wobbling or sticking. This part of the process is vital for solid garden cart maintenance tips and helps extend your cart’s life.
Do Final Safety Checks Before Use
Before you roll your cart back into action, take a moment to do a full check:
- Squeeze the tire to ensure it’s firm, not soft
- Listen or feel for any slow air leaks
- Confirm the valve stem is straight and doesn’t shift
- Tighten all nuts, pins, or other hardware
If everything looks and feels right, you’ve done it! Your tire is sealed, your wheel is secure, and your cart is ready for work. By following this step-by-step tire tube change, you’ve not only fixed the issue but also extended the life of your cart.
Wrap Up
You’ve just learned how to change an inner tube on a garden cart, step by step. From letting the air out to reattaching the wheel, each part helps keep your cart rolling smoothly. Taking the time to check for damage, install the tube correctly, and inflate it properly can save you from future problems. Whether you’re hauling soil or tools, a well-fixed tire makes the job easier. Now that you’ve done it yourself, you’ll be ready anytime a flat tire pops up. Keep these steps in mind, and your cart will stay in great shape for a long time.
FAQ
So what size inner tube should I get?
Look at the figures on the side of your tire. It will be observed that there will be something like 4.00-6 or 3.50-8. Compare them with a new tube purchase. In case you are confused, take the old tube with you to the store.
Am I able to patch an old inner tube rather than replacing it?
Certainly, you can, and you can repair a small hole with a bicycle patch kit. Wipe and then cover with the patch, and dry it out. Patching applies to little holes. The tube should be replaced if you observe substantial destruction.
Why does my new tube go flat?
You could be confusing a sharp thing in the tire or in the rim. Check again to see if you have thorns, nails, or rough spots. Don’t be fooled by just a little bit of glass, which can be flat.
What do I need to repair an inner tube?
You do not have to have sophisticated items. A wrench, tire irons, and an air pump are just what most jobs use.


