
Welcome to the world of delightful possibilities with VEVOR Cotton Candy Makers! In this instruction manual, we unveil the key elements to ensure your cotton candy creation journey is nothing short of perfection. From hassle-free Installation to essential Operation Precautions, detailed Operating Instructions, and troubleshooting insights, we’ve got you covered. Let’s sweeten the deal—this manual seamlessly leads you through every step, making cotton candy crafting a breeze. Don’t just read, experience the magic as we guide you through the art of cotton candy making.
Table of contents

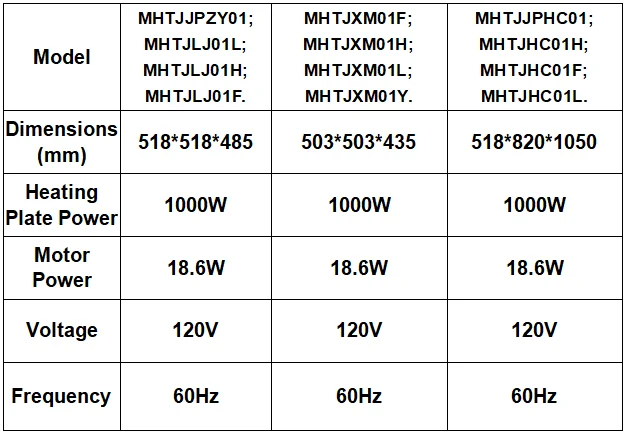
Product Parameters
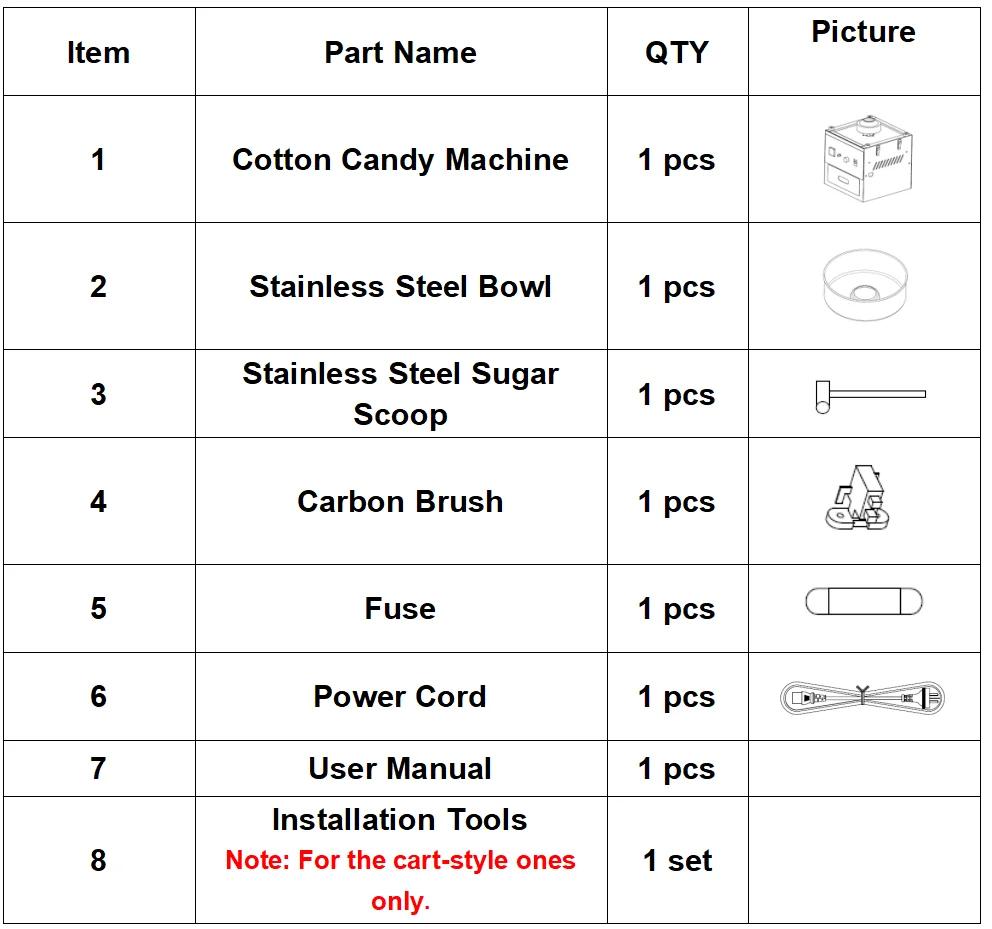
Packing List
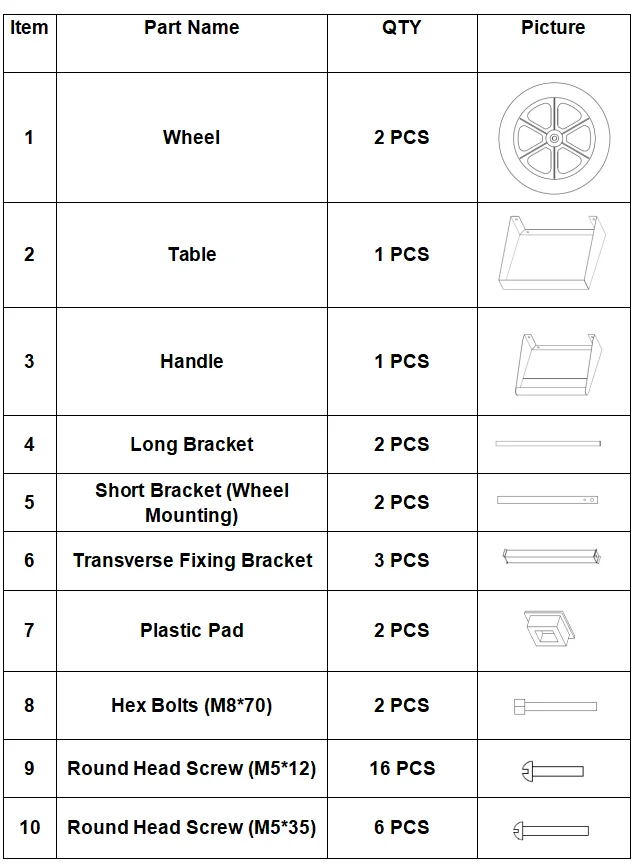
Installation Kit Accessories List
Note: Only the cart-style machines come with the installation kits.
Product Description
- Meet Your Commercial Needs: Our commercial cotton candy machine’s power is 1000W, which only requires 2-minute preheat time, ensuring rapid cotton candy production; The spinning head, with 3000RPM rotating speed, can store 0.5 oz / 15g sugar at one time and product 120 cotton candy per hour, satisfying your large output demands.
- Temperature Control: Different from ordinary ones, the temperature can be easily controlled by adjusting the voltage precisely. You absolutely need it if you want to experiment with different flavors of sugar.
- Reliable Construction: Our cotton candy maker features a carbon steel body and a 19.7-inch diameter stainless steel bowl that provides resistance to rust and corrosion. Thanks to the high-quality materials, it is extremely robust for long-term use and withstands demanding tasks. In addition, this machine adopts a locking clip design, which allows you to easily disassemble the washing bowl, and reduces vibration, noise and stability during work.
- User-Friendly Design: This cotton candy maker is equipped with a candy box, which can provide extra storage space for items such as bamboo sticks; the ventilation holes on both sides are well-designed for easy heat dissipation, ensuring the reliability of the motor for long-term use; The bottom is non-slip to keep the machine stable. Also, a sugar scoop as an extra supply is handy for you to scoop and pour sugar.
- Work with Any Candy You Like: This cotton machine allows you to use the traditional flossing sugars, milk sugars, fruit cubes, or any of your favorite hard candies to make delicious cotton candies. With a compact size, it is suitable for countertop use, and it is perfect for carnivals, festivals, birthday parties, and sports events.
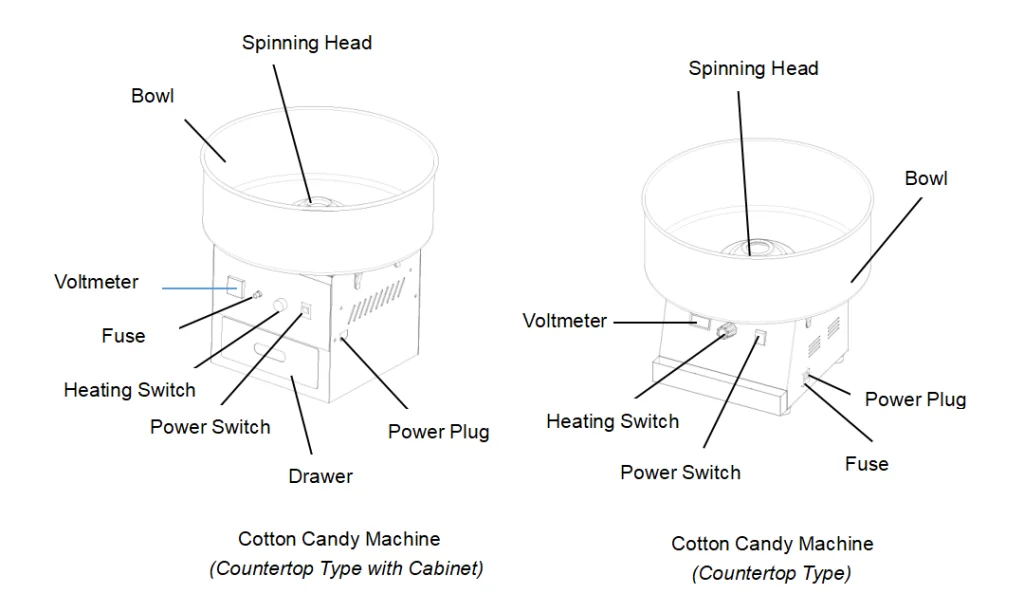
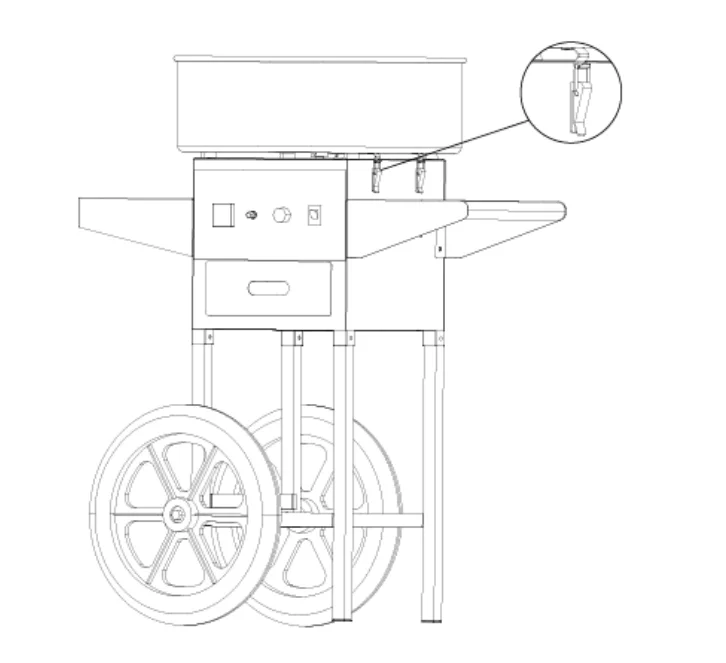
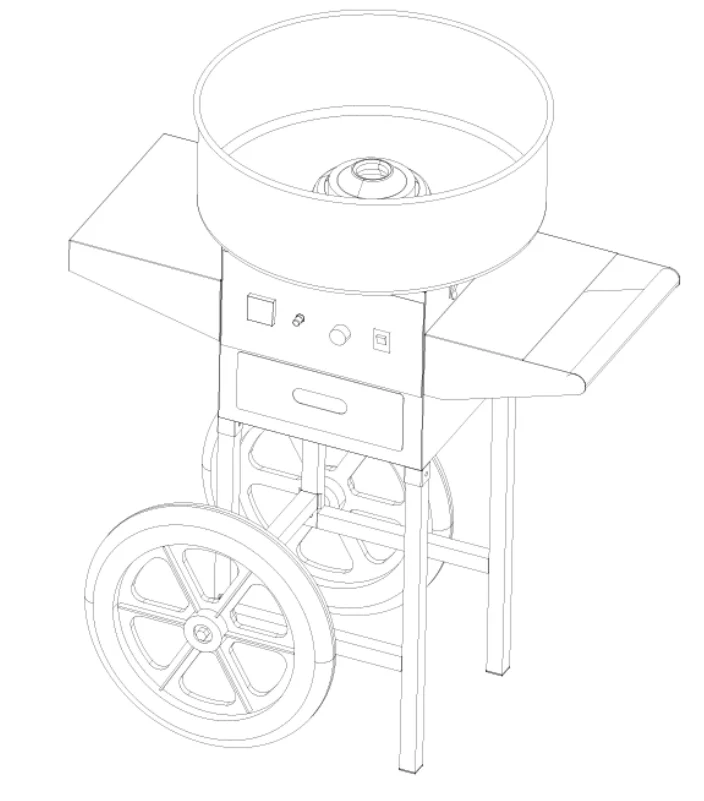
Product Composition Diagram
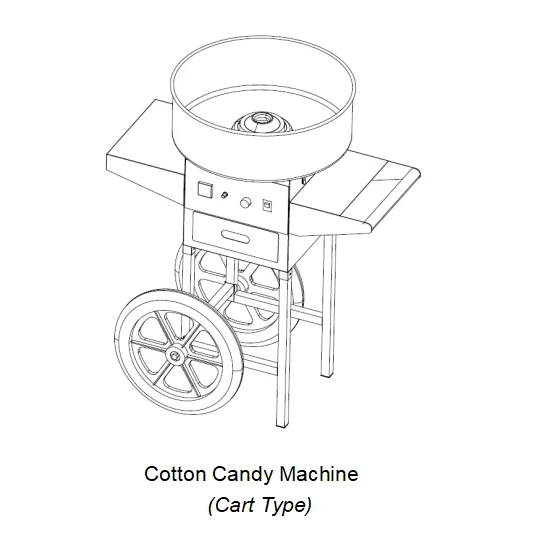
Please install the wheels for the Cart Type in the following order.
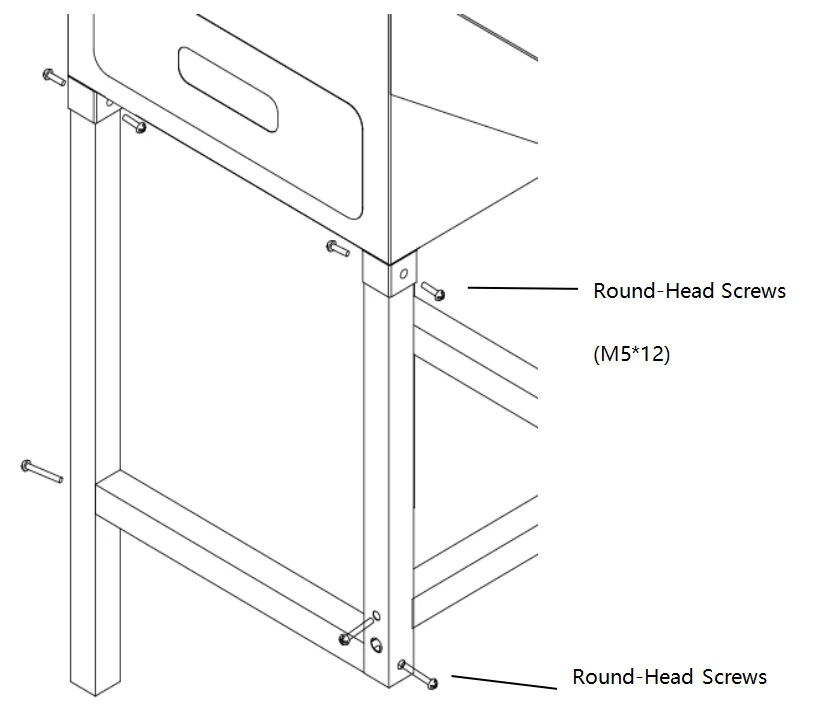
1. Use round-head screws (M5*12) and round-head screws (M5*35) to install the bracket as shown in the figure. The installation steps on both sides are the same.
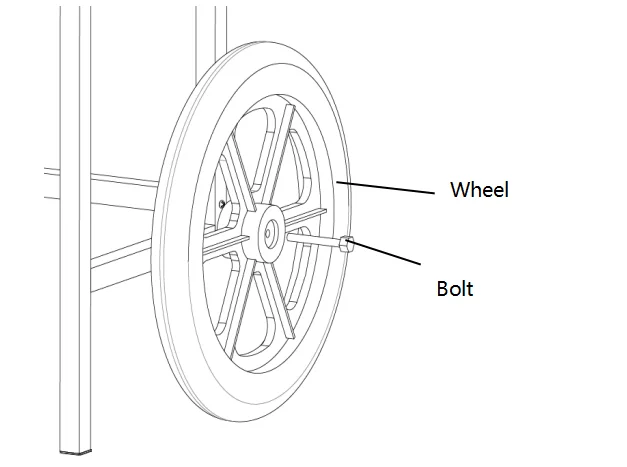
2. Install two wheels under the frame with two M8 Bolts.
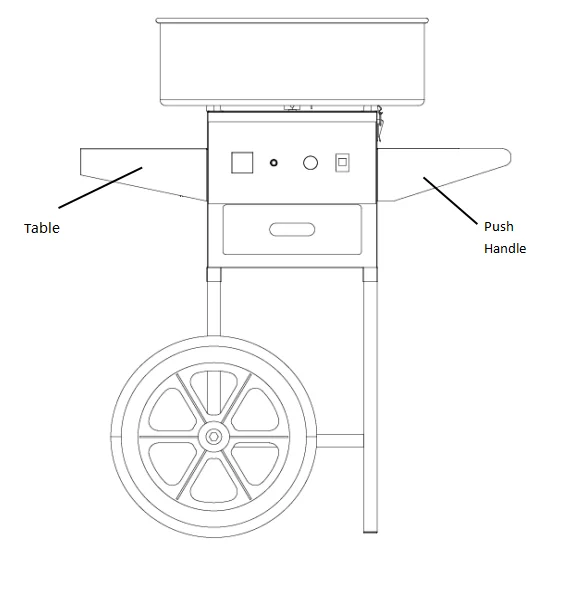
3. Install the table on the left side of the main body, and install the push handle on the right side with 8 pcs M5*12 screws and 8 pcs washers.

4. Place the stainless steel pan on top of the box and fix it with the 4 locking clips on both sides.
5. After all assembly is completed, it is ready to use. Please properly keep the other components, which will be used during use or maintenance.
Operation Precautions
1. Please read this manual carefully before use. In order to give full play to its advantages and achieve satisfactory results, please understand the structure and function of the machine, and be familiar with its main parts and related safety operations.
2. After taking the machine out of the package, rinse the bowl and spinning head with a small amount of clean water, and then wipe the water stains with a soft cloth.
3. The machine should be installed on a supported workbench, keeping a distance from the ground.
4. Before starting the machine, please check whether the voltage of the power supply used is consistent with the voltage of the machine used. Ensure that the contact between the socket and the machine meets the safety standards, the leakage protection switch and ground wire are installed, and everything meet the electricity requirements.
Operating Instructions
1. Press the switch to turn on the machine and wait for 1–2 minutes. Observe whether the machine runs smoothly when the spinning head of the machine is rotating. If the vibration is too severe, the machine needs to be adjusted. It must be ensured that the machine is placed stably.
2. Adjust the voltage knob to Max, and the voltmeter will change with the adjustment. Warm up the machine for 2–3 minutes. After preheating, the voltage can be adjusted according to the user’s temperature requirements.
3. First, pour half a teaspoon of sugar, test the degree of heating and sugar production. When everything is okay, then pour a spoonful of clean white sugar in the center of the sugar head.
4. After about 3 seconds, the cotton candy starts to squirt out. Take a bamboo stick and rotate it a few times along the inner wall of the bowl. Then, place the stick horizontally and rotate it over the spinning head to form cotton candy. Different shapes can be made by tilting the sticks.
5. After making enough cotton candy, turn off the machine.
Cleaning
1. The machine needs to be cleaned after the cotton candy is made, otherwise the spinning head may be blocked. Keep the machine running during the cleaning process, pour a small amount of water into the rotor, then the rotor will shake off the water slowly. After that, turn off the machine and clean it with a dry, soft cloth.
2. If the spinning head is blocked, turn off the machine and open the spinning head, then clean up the burnt sugar.
3. Do not wash the machine with detergents such as washing powder.
4. Do not rinse the machine directly with water.
Notice
1. Minors are prohibited from using this product.
2. Do not put the wire close to the hot surface. Do not immerse the lugs on the machine in water or other liquids. Do not use damaged cords, sockets or plugs.
3. The machine must be properly installed before inserting the plug into the outlet. When not in use or before cleaning, turn off the switch, unplug the power supply, wait for the spinning head to stop rotating, and wait for the machine to cool down.
4. Do not touch the rotating spinning head when the machine is working. Do not reach your hands into the bowl until the sugar is gone. To avoid burns, do not move the machine while it is working.
5. Do not touch the plug or wire when the plug or wire is wet or your hands are wet, otherwise it may cause an electric shock.
6. The motor of this machine is designed to have a temporary cut-off rate of 80%, so long-term continuous operation should be avoided. After working continuously for one hour, you should pause for 20 minutes before starting to work, which will greatly extend the service life of the motor.
7. Whether it is cleaning, maintenance and other related work, the power should be turned off first, and the power plug should be unplugged. The machine is not allowed to run without load for a long time.
8. Cleaning agents are not allowed to be used during cleaning to prevent the cleaning agents remaining on the machine from being eaten by mistake.
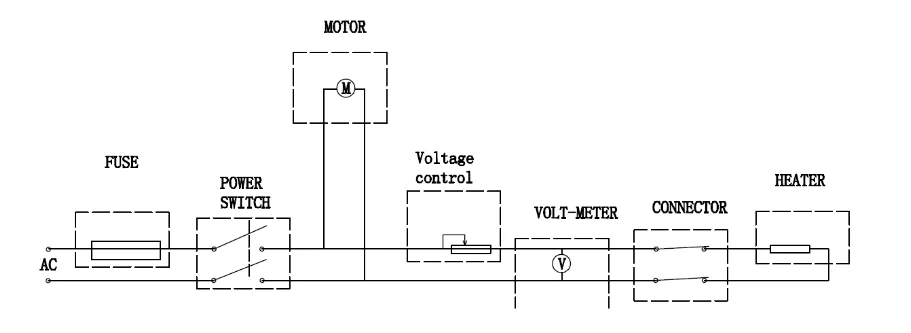
Circuit Diagram
Troubleshooting
Fault: No Sugar Filament
1. Check whether the sugar head is rotating or not, and stop the machine to sense whether the sugar head is hot.
2. If the sugar head does not rotate: check whether the machine is powered on, and whether the motor is broken.
3. If the sugar head is not hot: check whether the machine is powered on, whether the sugar head is ringing, and whether the voltage is excessive.
4. Unscrew the fuse knob on the panel or pry open the fuse cover (for Countertop Type) in the socket, then, take the fuse out to check whether it is burnt out.
5. Remove the baffle & upper cover and take out the cover through the spinning head, then you can see the internal condition of the machine. Check whether the carbon brush is loose or not working, if so, replace it with a new one.
FAQs
Q1: Is the VEVOR Cotton Candy Maker easy to assemble?
A: Absolutely! The Installation section provides straightforward, step-by-step instructions for a hassle-free setup.
Q2: Can I experiment with different sugar flavors?
A: Indeed! The Operating Instructions detail not only the process but also offer suggestions for creating a variety of delectable cotton candy flavors.
Q3: What safety measures should I follow during operation?
A: Your safety is our priority. Refer to the Operation Precautions for essential guidelines ensuring a secure and enjoyable cotton candy-making experience.
Q4: How do I troubleshoot if the machine isn’t producing cotton candy correctly?
A: Turn to the Troubleshooting section to address any issues promptly, and continue crafting perfect cotton candy. If you still couldn’t solve the problems, please contact us or seek professional help.
Summing Up
As you wrap up your journey through the VEVOR Cotton Candy Maker operating manual, envision a world where creating whimsical, sugary clouds is effortlessly at your fingertips. From easy assembly to diverse flavor experiments, our guide empowers you to master the art of cotton candy making. With safety precautions in place and troubleshooting tips on hand, VEVOR ensures your experience is not just sweet but smooth. Elevate your cotton candy creations—choose VEVOR for a blend of simplicity and sweetness. Purchase your Cotton Candy Maker today and turn every moment into a cotton candy masterpiece!


