
Even when you have never attempted to work on a project like this, you can construct an insulated chicken coop at home. The process will be easy, feasible, and user-friendly with the right approach. The correct insulation will keep the interior of the coop at a constant temperature, so your chickens are not cold when the weather is not warm. It also makes your flock less stressed and helps them to be healthier in winter. A properly arranged house ensures safe, comfortable conditions in which chickens can rest and be active. Backyard chicken coops can be built by anyone using simple materials and with a few precautions.
Materials and Tools for Building an Insulated Chicken Coop
The first step toward a warm and safe coop is to gather the right materials and tools. You can be more effective once you concentrate on proper planning. This section helps you realize what you need before beginning your project.
Insulation Materials for a Warm Chicken Coop
Selecting the appropriate insulation helps create a comfortable environment for your birds. An insulated chicken coop is a good structure that will keep the chickens at a constant temperature during cold seasons and shield them from severe weather. Depending on your budget and availability, various materials can be used.
Examples of common insulation materials are:
- Lightweight and easy to install on the wall using Styrofoam sheets.
- Foam boards to enhance greater heat retention and durability.
- Fiberglass batting makes wall cavities effective in insulation.
- Horse stall pads to keep the floor warm and lessen the transfer of cold.
The materials used to insulate a chicken coop to keep the chickens warm are commonly used because they are cost-effective and perform well.
When applying insulation, take care to cover all exposed surfaces. Chickens are easily tempted to peck at soft surfaces, and plywood or plastic panels can be used to cover them, to keep everything sturdy and durable. This is usually applicable to the most insulated chicken coop design in a cold winter climate, where both heat and security are equally important.
Essential Tools for Building a Chicken Coop
With reliable tools, the construction process becomes easier and less stressful. You do not need costly equipment if you are building an insulated chicken coop to shelter backyard chickens. The simplest of tools suffices to get the job done.
Generally, you will require:
- Tape measure to measure and align correctly.
- A utility knife or saw to cut insulation and boards.
- Hammer, nails, or screw gun, and screws to assemble.
- A staple gun to fasten light materials.
- Personal protective equipment (PPE) such as safety gloves and goggles.
All tools are used at different levels of construction. Even amateurs are sure to be able to build their coop using these tools.
@frankbrooks8 This @Vevor Store US chicken coop and run was perfect for what we needed and so easy to assemble! #chickencoop #coop #vevor #chickensoftiktok #tiktokshopfalldealsforyou
♬ original sound – FrankzFindz
Budget-Friendly Materials and Simple Alternatives
A warm coop does not necessarily have to be constructed with a huge budget. Insulated chicken coop plans are available in various DIY plans at low prices. Most people will decide to use it when they are new to save money while keeping their chickens comfortable during winter.
Simple and recycled alternatives that you can use to save costs include:
- Old home projects leftover foam or Styrofoam
- Shopping for discounted insulation at the local hardware stores.
- Recycled cardboard sheets to use as temporary wall covering.
- Blankets or pieces of fabric, to keep warm in the short term.
When stored and well-secured, these materials can be quite helpful. They come in particularly handy when experimenting or assembling your first insulated chicken coop set-up.
Even with low-cost materials, it is still important to ensure proper coverage and protection. With a good strategy, you can easily get to warmth and safety without spending a lot of money, and make your project useful and easy to start.
How to Prepare the Coop Before Adding Insulation
The coop should be well prepared before you begin working on warming it. This will simplify the remaining work and ensure effectiveness. A properly built building will guarantee your insulated chicken house works more efficiently during colder weather. By being careful, you will also prevent errors during future insulation installation.
Measure and Assess the Coop Structure for Insulation Fit
The first step in an insulated chicken coop planning project is to measure accurately how to construct a chicken coop in the backyard. Begin by using a tape measure to measure all the walls, the roof, and the floor. Record all measurements in a way that you can recall later. This helps you determine the exact amount of insulation material you will need.
When measuring, pay attention to the structure. Corners of some coops may be irregular or irregularly shaped and can use additional attention. You also need to check between boards or loose panels, as they tend to lose heat.
It is quite good to make a sketch of your coop. Indicate all measurements and problem areas on it to enable you to plan the insulation layout appropriately. This will help make it more accurate and minimize installation errors, particularly when constructing the best-insulated chicken coop design to withstand cold winter conditions.
Clean and Clear the Chicken Coop Before Work Starts
Cleaning the coop is another necessary step prior to insulation, as a dirty surface would diminish its effectiveness. Dust, feathers, and used bedding should be removed to provide a clean working area. This also contributes to a healthy environment for your chickens.
Sweep the floor and clean up all trash. Clean the walls thoroughly to get rid of dust. If you see any wet spots or mold, wash them thoroughly to prevent moisture from destroying the insulation in the future.
The feeders, water containers, and other equipment in the coop should also be eliminated. When working, keep chickens in a safe temporary place. Look out for sharp nails or screws and repair them. An open, clean environment also helps keep insulation materials in place and improves efficiency, particularly when applying insulation used to insulate a chicken coop and keep chickens warm.
Identify and Fix Draft Points in the Co-op
Drafting is vital in ensuring the coop is warm in winter. The passage of cold air through fissures may reduce insulation efficiency, making it more difficult to retain heat. The step is particularly significant in the case of adhering to low-cost DIY insulated chicken coop plans as a beginner.
To locate drafts, examine doors, windows, corners, and wall joints. During a windy day, you can be able to feel cold air seeping through weak points. A flashlight to test cracks where there is light can also be used.
After finding these spots, you mark them to be closed later. Typical fixes include caulk, weatherstripping, or extra layers of insulation. Proper draft sealing helps retain heat in the coop and enhances comfort for your chickens during the winter.
How to Install Insulation in a Chicken Coop for Winter Protection
The best action towards building a warm and safe shelter is to install the insulation properly. A properly constructed insulated chicken coop protects chickens in freezing temperatures and stabilizes their environment during winter. Once this is done, you can proceed to insulate your home in an organized, meticulous manner to achieve the best results.
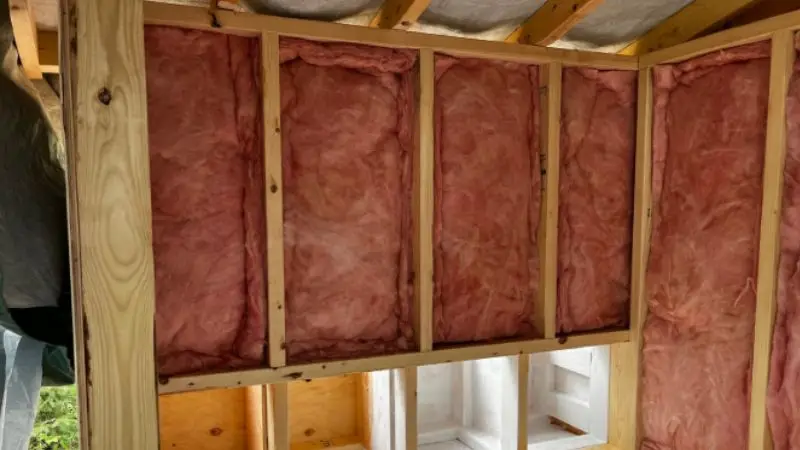
Install Wall Insulation in a Chicken Coop Properly
The primary barrier that prevents cold air from entering and warm air from inside is the wall insulation. This is a necessary step in the process of designing the best insulated chicken coop in cold winter climates, since the walls lose heat like a sieve when not well covered.
Begin by cutting insulation materials, such as Styrofoam sheets or foam boards, to the size of each wall section. The materials are frequently used to insulate a chicken coop to keep the chickens warm, as they are effective and easy to install. Install insulation between the inside and outside layers of the walls, ensuring that there are no air gaps.
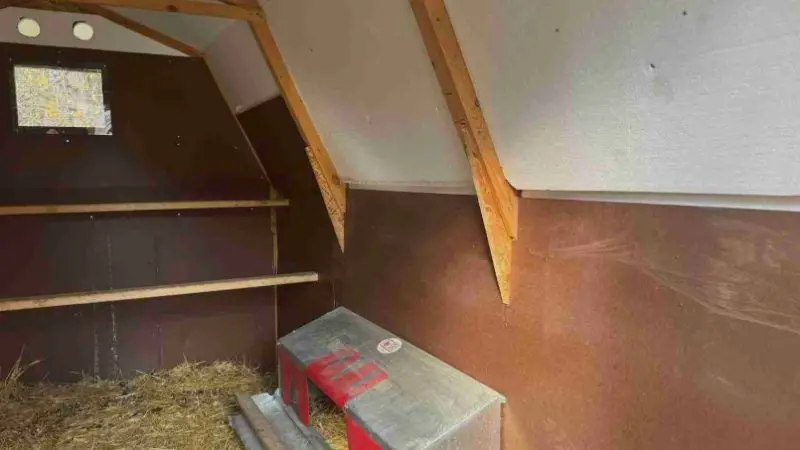
When your coop has single-layer walls only, put the foam boards on the inside. Once the insulation is in place, it should always be covered with plywood or plastic sheets to prevent the chickens from pecking at it. This is a crucial measure for safety and longevity.
In prefab coops with thin walls, it is possible to add layers using foam boards or thick fabrics such as old blankets. Fasten all items with screws or a staple gun, and ensure there are no gaps. Properly sealing the walls will ensure consistent warmth in the coop.
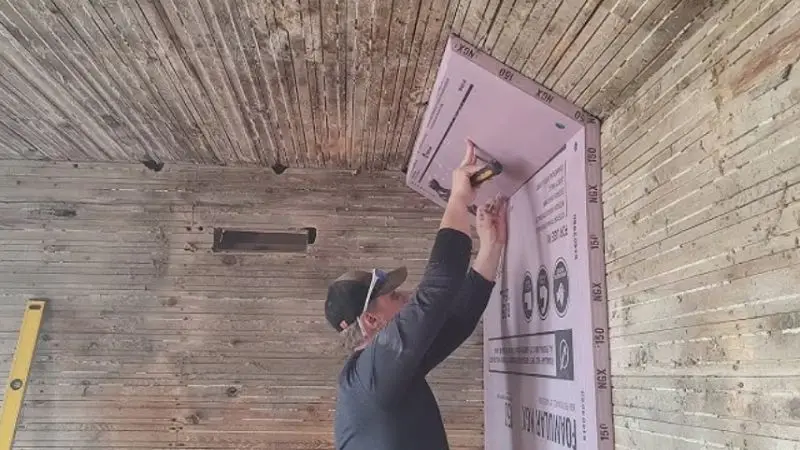
Insulate the Roof and Floor for Maximum Warmth
The floor and roof contribute significantly to heat control, since warm air rises while cold air enters the floor. These areas are significantly improved by proper insulation, which enhances overall comfort in an insulated chicken coop.
For the roof, foam boards or Styrofoam sheets can be cut to fit the ceiling area. Fix them firmly with screws or staples, and always cover them with plywood to protect them. This helps trap heat and prevents damage from chickens or moisture.
For the floor, insulation is also crucial, as the chickens often stand or rest on it. A strong and effective alternative is horse stall pads. They help reduce heat transfer between the ground and the feet. Cardboard sheets or foam can also serve as a temporary option if you have a tight budget.
One should ensure that all the floor insulation is dry. Moisture impairs the performance of insulators and may cause damage over time. A well-covered and dry base is good in terms of heat retention during winter.
Seal Drafts and Improve Ventilation in the Chicken Coop
One of the last steps in creating a warm environment is to seal drafts. Small holes may decrease insulation effectiveness, particularly with the low-cost DIY insulated chicken coop designs that are popular with beginners, where minor holes are frequently ignored.
Begin with all the draft points already marked. Caulk or weatherstripping should be used to seal gaps around doors, windows, and wall joints. When any gaps are visible, they should be covered with insulation or foam to keep cold air out.
In wire-covered places, apply transparent plastic sheets to prevent wind entry and yet allow the sunlight to enter. Ensure the plastic is securely fastened so it does not blow away or tear in strong winds.
Still important in airflow is ventilation; do not close vents. Rather than this, cover them with protective mesh, such as hardware cloth, and place them out of the direct path of the wind. This will enable air to circulate in and keep the coop warm.
Once the insulation is done, it is always a good idea to check the coop after it has been blown on. In case of any cold spots, you might have to provide additional sealing or insulation. When properly sealed, your insulated chicken coop will be warm, safe, and comfortable through the winter months of your flock.
Winter Comfort Tips for a Warm Chicken Coop
As much as insulation is important in the construction of a safe and comfortable environment for your flock, so too is winter care. An effectively insulated chicken house will keep the cold away, and comfort is also affected by bedding, roosting, access to water, and safe warmth measures. These enhancements will keep your chickens healthy and active even when it is freezing.
Deep Litter Bedding for Natural Coop Warmth
A thick bedding system helps create natural warmth in the coop. Begin with pine shavings or straw and pile up a deep covering upon the floor. Chickens scratch, add fresh bedding on top of the old, but do not remove the old. Gradually, the bottom layers dissolve and provide certain warmth, which enhances the general comfort.
This technique is popular in low-cost DIY insulated chicken house plans among novices since it is inexpensive and simple to operate. Turn the bedding once a week to make it even and eliminate damp spots. Cleanse and add new stuff every time it appears dirty. The accumulated bedding can be taken out and utilized as natural compost in spring, which is practical, as well as efficient.
Proper Roost Design for Cold Night Protection
Comfort in roosting is of significant importance in winter survival. Chickens nest by wrapping their feet in feathers; therefore, broad roosts help them avoid frostbite. A 2×4 piece of wood with the flat side facing up is good to serve this purpose.
Position roosts are not next to windows, doors, and draft areas to minimize cold air exposure. When you observe cold air in and around sleeping areas, then change the position to a more secure part of the coop. A good roosting location is a significant element of the best insulated chicken coop design in cold winter climates, where it is essential to keep the nighttime temperatures warm.
Safe Water Access to Prevent Freezing
The chickens must have unlimited access to fresh water, even during periods of freezing. Frozen water may be a severe winter issue, impacting the morbidity and egg hatching. The best solution is a hot-water heater since it will not accumulate ice during the day.
When there is no option of a heated choice, use warm water in the morning to refill and monitor it regularly. Sheltered water containers can also be kept to delay freezing. Positioning the waterer a few inches above floor level reduces contact with cold surfaces and enhances temperature stability.
These basic techniques are frequently combined with materials used to insulate a chicken coop to keep the chickens warm through winter and to avoid disrupting their daily hydration.
Safe Heating and Lighting for Winter Support
Additional heating is typically not required, except at extremely low temperatures. Heat sources should always be safe and properly installed if used. The heat lamps must be secured and positioned out of reach of bedding, wood, or other flammable materials to prevent the risk of fire.
The shorter winter days can also be supported by the use of lighting to produce eggs. Chickens normally do better on 14-16 hours of light in a day. A high-mounted, timer-controlled light in the coop will provide safe, consistent lighting without disturbing the birds.
Safety is critical when enclosing chicken coops. Regular electrical safety and fire checks can contribute to a safe environment during the winter season.
Wrap- Up
A well-constructed insulated coop can ensure the chickens remain warm, healthy, and active even in bitter winter seasons. Selecting the right insulation materials, sealing drafts, and improving bedding each help create a comfortable environment inside the house. By adhering to an organized method, an insulated chicken coop is more efficient and easier to maintain. Comfort is further enhanced by simple additions such as deep litter bedding, safe roosts, and proper water management. By planning and frequent inspections, cold stress can be prevented in your flock. This provides a safer, warmer, and more productive environment for the chickens across the entire winter season.
FAQ
What is the thickness of insulation to use in a chicken coop?
A good amount of insulation is at least 3.5 inches. Your chickens are warmer in thicker insulation during cold weather. In case of foam board or Styrofoam, layer it up until it is the appropriate thickness.
Are there any old blankets or cardboard that I can use as insulation?
Yes, old blankets or cardboard can be used as a low-cost alternative. Ensure that they are clean and dry. Wet materials are not good insulators. Wipe them off when they become wet or dirty.
Should the heat lamps be used on the chickens in winter?
The chickens do not require heat lamps until the temperature is below 35 F. Chickens are cold-tolerant. When you have the use of a lamp, be careful with it and keep it out of bed to avoid fire.
What can I do to keep the coop ventilated and warm?
You should have an air conditioner to prevent moisture and odors. Cover vents using hardware cloth and turn away from the wind. Cover windows with transparent plastic to prevent drafts and allow light to enter.
Which is the best winter bedding?
Deep litter bedding should be made of pine shavings or straw. They keep the heat trapped and remain dry longer. Turn the bedding frequently, and add to it. Your chickens will be kept warmer and healthier.


