
An OBD2 scanner is basically like a health checker for cars; this small tool connects to your car and reads problem codes. It makes fixing issues easier by finding them fast. Many people use it at home to save money.
Knowing how to use an OBD2 scanner helps you fix problems quickly and skip expensive mechanic visits. So in this article, let’s explore how obd2 scanner works and how you can use it!
How to Use an OBD2 Scanner Step by Step
Locating the OBD2 Port in Your CarAlt Text: OBD2 port in a car
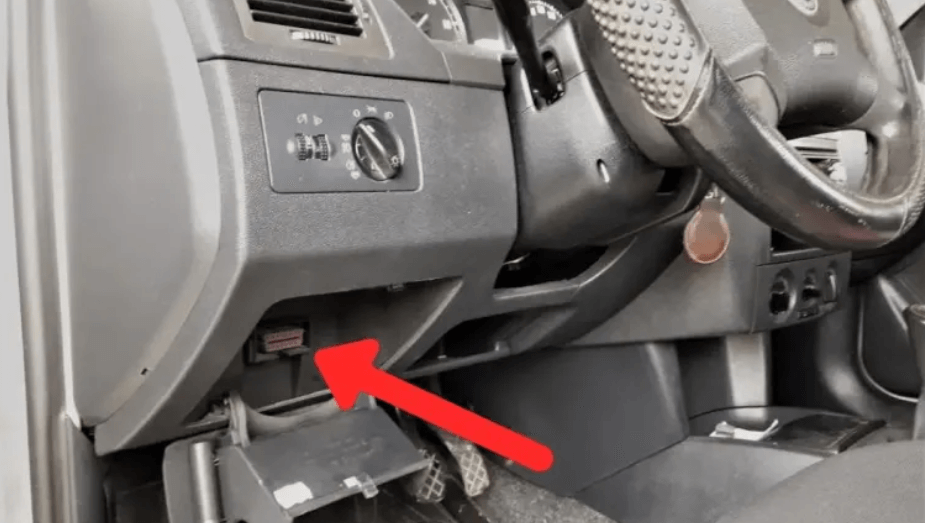
The first thing to do when you’re figuring out how to use an OBD2 scanner is to find the OBD2 port. It’s usually under the dashboard near the steering wheel. Some cars hide it behind a panel or cover, so in case you can’t find it, check your car’s manual.
Manuals often include diagrams showing where the port is located. What you are essentially looking for is a rectangular connector with 16 pins. Most cars have the same design, no matter the brand or model.
If you’re still unsure, search online for your car’s model. Many videos and forums can help you locate it. Once you find the port, you can connect your scanner.
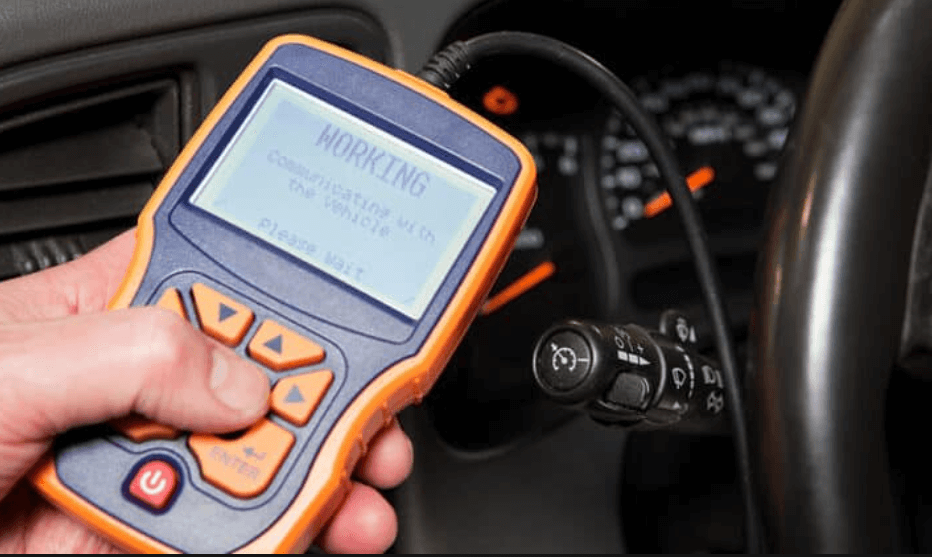
Connecting the OBD Scanner to Your Vehicle
Plugging in the scanner is easy. Take the OBD2 cable and insert it into the port. Make sure it’s firmly connected. Loose cables can cause problems during scanning.
Some scanners use Bluetooth or Wi-Fi instead of cables. If yours does, follow the manual to pair it with your phone or tablet.
Note: Turn off your car before connecting the scanner. This avoids electrical problems and makes setup smoother.
After connecting, turn on the scanner to start checking your car’s system.
Powering the Scanner and Accessing Onboard Diagnostics
Before learning how to use an OBD2 scanner, you need to set it up. Follow these steps:
- Unboxing and Initial Setup: Check if the scanner, cables, and manual are included.
- Charging and Powering On: Charge the battery or confirm it has enough power.
- Software Installation and Updates: Install software or updates using a computer. This ensures it works with your car.
- Check Vehicle Compatibility: Make sure the scanner supports your car’s make and model.
- Connecting Your Vehicle: Attach the OBD2 cable securely to the port.
- Configuring Diagnostic Settings: Choose your car’s make, model, and engine type on the scanner.
- Ready to Diagnose: Start scanning to read codes and view live data.
These steps prepare your scanner for accurate diagnostics.
Retrieving and Reading Diagnostic Trouble Codes (DTCs)
Once the scanner is connected and powered on, you can get the DTCs. These codes tell you what’s wrong with your car.
Go to the “Read Codes” or “Diagnostics” section on the scanner. It will talk to your car’s computer and show a list of codes.
Did you know? Around 80% of common emission-related issues can be found using an OBD2 scanner. It’s a fast way to spot problems.
Each code starts with a letter and has numbers after it. For example, P0301 means cylinder 1 is misfiring. Write down the codes or save them on the scanner for later.
Tip: Don’t worry if there are many codes. Some might be minor or connected to bigger issues. Focus on the ones marked “critical” first.
Now that you have the codes, you can look up their meanings and plan repairs.
Interpreting and Responding to Diagnostic Codes
1. Understanding Common Diagnostic Codes
Now that you know how to use an OBD2 scanner on a car, it’s time to understand what the codes mean. When you get codes from your OBD2 scanner, they follow a set pattern. Each code begins with a letter, such as “P,” “B,” “C,” or “U,” followed by numbers. These letters show which car system has a problem:
- P (Powertrain): Issues with the engine or transmission.
- B (Body): Problems with airbags, doors, or seatbelts.
- C (Chassis): Trouble with brakes, suspension, or steering.
- U (Network): Errors in communication between car computers.
For example, the code “P0420” points to a catalytic converter issue. Knowing these groups helps you decide where to start.
Some codes appear more often than others. For instance, “P0300” means random misfires, while “P0171” shows the engine is running too lean. These are common problems you might face.
Tip: Focus on “P” codes first. They often affect how your car runs and its emissions.
2. Researching Code Meanings and Solutions
Did you know? Codes often include extra details, like when the problem happened or how serious it is.
After getting the codes, the next step is to learn their meanings. Your OBD2 scanner may give a short explanation, but you’ll likely need more details. Here’s how to find them:
- Check the Scanner’s Manual: Many scanners list common codes and their meanings.
- Search Online Resources: Websites like OBD-Codes.com or car forums can help.
- Look in Your Car’s Manual: Some manuals explain diagnostic trouble codes.
Here’s an example of the data you might find during your research:
| Data Type | Description |
| Vehicle Technical Data | Includes engine type, fuel type, and axle loads. |
| Vehicle Registration Data | Shows registration date and location. |
| Diagnostic Test Information | Provides test dates and locations. |
| Defect Information | Lists detected problems, test results, and malfunctions. |
| Additional Information | Includes vehicle model, manufacturer, and road course. |
3. Deciding Between DIY Repairs and Professional Help
Once you understand the codes, decide if you’ll fix it yourself or see a mechanic. Here’s how to choose:
- DIY Repairs: Fix small issues like a loose gas cap or dirty air filter. Many OBD2 scanners offer repair guides to help you.
- Professional Help: For big problems like transmission or electrical issues, go to a mechanic. They have the right tools and skills for these repairs.
When you’re learning how to use an OBD2 scanner, don’t ignore critical codes. They can lead to bigger problems later. Fix urgent issues right away.
Ask yourself these questions before deciding:
- Do I have the tools and knowledge to fix this?
- Is it worth the risk to try fixing it myself?
- Will ignoring this problem make my car unsafe or unreliable?
By thinking about these points, you can decide the best way to keep your car in good shape.
Troubleshooting Issues with Your OBD2 Scanner
Now that you’ve learned how to use an OBD2 scanner, it’s time to face a few common issues. Even the best OBD2 scanners can run into problems. If your scanner isn’t working as expected, don’t worry. Here’s how you can troubleshoot common issues and get back to diagnosing your car.
1. Resolve Connection Problems with the OBD Scanner
Connection issues are one of the most common problems with OBD2 scanners. If your scanner isn’t connecting to your car, try these steps:
- Make sure the scanner is securely plugged into the OBD2 port under the dashboard. A loose connection can stop it from working.
- Turn on your car’s ignition without starting the engine. This powers up the car’s systems and allows the scanner to communicate with the onboard computer.
- Navigate the scanner’s menu to find the diagnostics or fault code reading section.
- Run a scan to retrieve codes. If the scanner still doesn’t connect, check if its software is up to date.
Tip: Some older cars may use different OBD protocols. If your scanner isn’t compatible, it won’t connect.
2. Address Error Messages or Incomplete Data
Sometimes, your scanner might display error messages or fail to retrieve all the codes. This can be frustrating, but it’s often easy to fix.
- First, double-check the connection. A loose cable or low battery in the scanner can cause errors.
- Next, ensure the scanner’s software is updated. Updates often fix bugs and add support for newer car models.
- If the problem persists, restart both the scanner and the car. This can reset the system and clear temporary glitches.
Did you know? Incomplete data can also happen if the car’s onboard computer has a fault. If you see a “check engine light” but no codes, the issue might be with the car itself.
3. Ensure Compatibility with Your Car’s Onboard Diagnostics
Not all OBD2 scanners work with every car. Compatibility depends on the car’s make, model, and the OBD protocol it uses. Most modern cars use the CAN protocol, which is fast and reliable. However, older vehicles might use protocols like KWP2000 or J1850.
To ensure compatibility as you learn how to use an OBD2 scanner:
- Check if your scanner supports your car’s protocol. This information is usually in the scanner’s manual or on the manufacturer’s website.
- Remember, OBD2 scanners generally work with cars made after 1996 in the U.S. If your car is older, you may need a specialized tool.
- For European or Asian cars from the early 2000s, look for scanners that support KWP2000.
Note: If your scanner isn’t compatible, it won’t read any codes or data. Investing in a modern scanner with multi-protocol support can save you time and frustration.
By following these tips, you can troubleshoot most issues and make the most of your OBD2 scanner.
FAQ
What does an OBD scanner do?
It reads your car’s onboard diagnostics system to find issues. It retrieves error codes and helps you understand what needs fixing.
Can I use an OBD scanner on any car?
Most cars made after 1996 support OBD scanners. Check your car’s manual or the scanner’s compatibility list to confirm.
Do I need special skills to use an OBD scanner?
No, you don’t. The process is straightforward. Plug it in, follow the instructions, and read the codes. Many scanners also provide repair suggestions.
Conclusion
Using an OBD2 scanner is easier than you think. First, find the port and connect the scanner. Then, get the codes and figure out what they mean. Each step helps you learn more about your car. Fixing problems early keeps your car in good shape and saves money.
Now that you know how to use an OBD2 scanner, it’s time to buy one. For that VEVOR has got you covered, whether is an OBD2 scanner or other automotive tools, our huge collection has it all. So what are you waiting for? Shop now at VEVOR!


