
Painting with a spray gun might sound tricky at first, but it’s easier than you think. If you’ve ever wondered how to use a spray gun to paint, you’re in the right place. With the right prep, safety gear, and a little practice, you can achieve smooth, professional-looking finishes without the hassle of brushes and rollers.
Whether you’re painting furniture, walls, or even your car, this tool makes the job faster and cleaner. Don’t worry if you’re a beginner—this guide will walk you through every step so you can spray paint confidently and get amazing results.
How to Use a Spray Gun to Paint Step by Step
Learning how to use a spray gun to paint can make your projects look smooth and professional. Spray guns cover large surfaces faster than brushes and rollers, giving you an even coat without visible strokes. If you are new, it may feel a little intimidating, but with some practice, you can master this skill. Let’s start with the basics so you can paint with confidence.
How to Choose the Right Spray Gun for Painting
You should also be familiar with the best type of spray gun to use in your project. This is because each of them has its advantages, and the application will yield greater improvements once selected carefully.
- Air spray gun — It involves the use of compressed air to spray the paint in a fine mist and helps provide a smooth finish. It can be used to do smaller pieces, such as cabinets or furniture.
- HVLP (High Volume Low Pressure) sprayer — It consumes less pressure but uses more in terms of air; hence, it uses less paint and produces better results in terms of cleanup. Usually, this is the ideal spray gun for in-house painting.
- Airless paint sprayer — Paint is pumped at extremely high pressure, which makes it efficient in a vast area, like a wall, a ceiling, or a fence.
You should consider the size of your project and the material of the surface, in the case of detailed work that typically requires finishing, as in the furniture, an air spray gun is a good solution, whereas bigger surfaces might require the added power.
What Supplies and Safety Gear Do You Need to Start?
A good paint job starts with being prepared. Having everything ready before you begin will make the process smoother and safer.
You will need:
- Paint (suitable for spray guns)
- Paint sprayer (air spray, HVLP, or airless)
- Air compressor (if required for your model)
- Paint strainer (to remove lumps)
- Drop cloths or plastic sheets
- Painter’s tape
- Stir sticks and cleaning brushes
Safety gear is just as important as your tools. Always wear:
- A mask or respirator to avoid breathing in paint spray
- Safety goggles to protect your eyes
- Gloves to keep paint off your skin
- Old clothes or a protective painting suit
When you know how to use a spray gun for painting furniture or walls, safety will help you stay focused and work comfortably.
How to Prepare for Your First Painting Project
Preparation makes all the difference between a patchy job and a flawless finish. Take time to set things up properly before you start spraying.
- Set up your workspace – Choose a well-ventilated spot. Cover floors, furniture, and anything you don’t want painted with drop cloths. Use tape to protect edges and trim.
- Prepare the surface – Clean the item to remove dust, grease, or old paint. Lightly sand so the new paint sticks better.
- Prime if needed – Some materials require primer for stronger adhesion and durability.
- Strain your paint – Pour it through a filter to remove lumps that could clog the spray gun.
- Mix and test – Stir your paint, fill the sprayer, and test the spray on cardboard. Adjust the pressure and spray pattern until the mist looks smooth.
Testing first will help you feel more confident when you begin. This is the first step in mastering a step-by-step spray gun painting tutorial.
How to Paint with a Spray Gun for Smooth Results
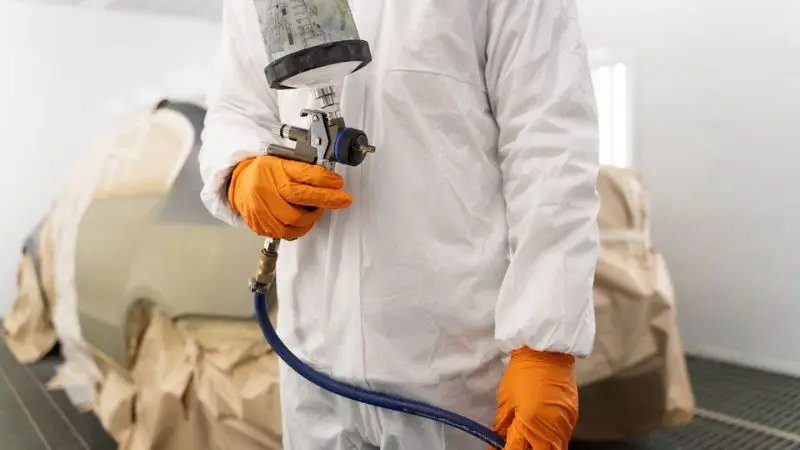
Once you have your supplies ready and your workspace prepared, it’s time to begin painting. Setting up the sprayer correctly and practicing good technique are the keys to a smooth, even finish. With the right approach, even beginners can feel confident using a spray gun.
How to Set Up a Paint Sprayer for Painting
All sprayers have guidelines, and the first thing is to look at the guidebook. After you have learned your model, you can set it up to be painted. Do this in these steps:
- Blend your paint – Stir thoroughly. When it happens to be too thick, Canvas shows how to make the paint thin by following the instructions on the can to use the spray gun.
- Filter the paint – Separate the paint by pumping it through a filtration paper into the spray can so that the paint does not clog.
- Insert sprayer components – Snap cup, nozzle, and hose together.
- Regulate the pressure — By starting with low pressure and adding more when needed will help to avoid splashing.
- Test the spray – Spray on a piece of cardboard or scrap wood to determine the pattern and the flow of air.
Before you get to the project itself, it would be a good idea to test your sprayer and make sure you do not have problems when it comes time to begin work again.
How to Practice Spray Techniques for Better Control
Before painting your walls or furniture, spend a few minutes practicing. This will help you control the sprayer and get even results.
- Hold the sprayer about 12 inches (30 cm) from the surface.
- Keep it perpendicular; avoid tilting up or down.
- Move your whole arm in smooth strokes instead of flicking your wrist.
- Start moving before pressing the trigger, and release after passing the edge.
- Use light, even passes instead of trying to cover everything at once.
Practicing first is a core step in any step-by-step spray gun painting tutorial, giving you confidence before you move on to real projects.
How to Apply Paint Evenly with a Spray Gun
Now that you’ve practiced, it’s time to begin painting. Focus on thin layers and steady movement to achieve a flawless finish.
- Start with thin coats – Light layers help the next coat stick better.
- Apply 2–3 coats – Most surfaces need multiple layers for full coverage.
- Overlap passes – Overlap by about 50% to avoid streaks and bare spots.
- Watch for drips – Drips happen when you spray too close or move too slowly.
- Adjust as needed – Change nozzle or pressure if the spray looks rough.
Using these steps makes it much easier to achieve professional results, whether you’re learning how to paint walls with a spray gun or working on furniture.
How to Finish and Clean Up After Spray Painting
After painting, proper cleanup will protect your paint sprayer and make the next project easier. Don’t leave paint sitting inside—it can dry and clog your equipment.
- Empty the paint cup – Pour leftover paint back into the can.
- Flush the sprayer – Use water (latex) or thinner (oil-based) until it runs clear.
- Take apart the sprayer – Remove nozzle, needle, and other parts.
- Scrub and rinse – Clean with a brush, rinse well, and let dry.
- Store safely – Reassemble and store in a dry place.
Cleaning right after painting keeps your equipment in top shape, making it easier to tackle the next job—whether that’s cabinets, furniture, or even a full room.
Wrap Up
When it comes to spray painting, it might appear to be tricky, although with practice, this process turns out to be quite easy and actually fun. With proper preparation of your workspace, proper installation of your sprayer, and slow and even strokes, you can have a professional finish each time.
You are either learning how to use a spray gun to paint, or you get to know about using a spray gun to paint furniture, but anyway, patience, control, and correct cleaning are all that you need to know. When you learn these steps, you will be all prepared to take on larger projects and new ideas and transform something dull and rough into something smooth and beautiful.
FAQ
What do you do to prevent the clogging of the spray gun?
You should never fill your sprayer without straining your paint. Wash the nozzle and filters after usage. This provides your spray gun with smooth operation.
Is it possible to use any paint in a spraying gun?
You must consult the control manual of the spray gun. Some paints need thinning. Always apply paint that corresponds to the type of sprayer that you use.
What about the case when the paint appears uneven?
Check your spray distance.
Adjust the pressure.
Overlap each pass by half.
Work on the scrap until you prefer a smooth finish.


