
Crafting personalized presents for your loved ones is the most rewarding thing to do. You can print beautiful and funky designs on a plate, mug, or a mixing bowl. There are also other options, such as printing pictures on a cushion, t-shirt, or a handbag. Just like other items, printing a design on a mug can be done easily at home with the help of a mug press machine. But you might be wondering how to use a mug press to create the magic of your own designs.
To help you out here, we have put together an insightful article through which you will learn a few things about mug press machines. You will also learn how to pick the right mugs for pressing and gathering essential materials. Apart from that, we have also added five steps to bring your designs to life.
So, stick around to get answers to your questions and get ready to design the mugs of your liking.
Table of contents
What Kind of Mugs Can I Use with My Mug Press?
As mentioned above, you can press mugs to your own liking from the comfort of your home. But before you learn how to use a mug press, there are a few things that need to be taken care of.
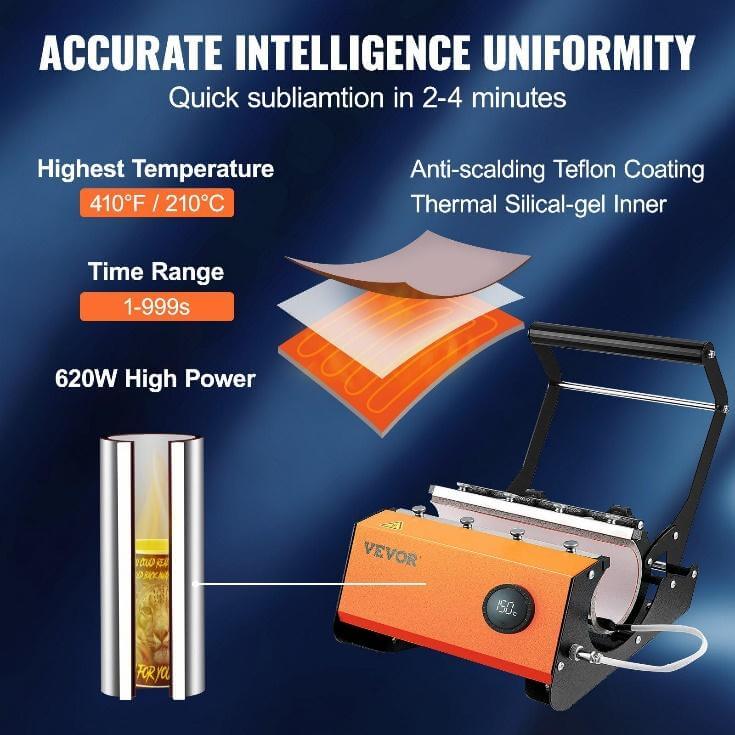
Here is a frequently asked question: can you heat press any mug? It is important to understand that most press machines cannot press all kinds of mugs. They can only press mugs that are ceramic. But there is a pressing machine that works with various types, shapes, and sizes of mugs. We’re talking about a VEVOR mug press machine that can press ceramic, glass, and metal. Just make sure the mugs are coated for sublimation if you want those colors to pop and stay put through countless washes.
Stainless steel travel mugs are also a fair game, but remember—they need that special polymer coating too. Size does matter; thankfully, VEVOR gets it and also offers adjustable pressure settings so you can work with any type of mug.
What Material Do I Need to Heat Press a Mug?
Heat pressing a mug is like giving your cup a brand-new tattoo, but instead of ink and needles, you’ll be working with heat and pressure. So, what do you need to pull off this cool trick?
- Sublimation Mugs: First things first, you need sublimation mugs. These aren’t your average mugs; they’re specially coated for sublimation printing.
- Sublimation Paper: Secondly, you can’t press designs onto mugs without some key supplies. So, you’ll need a sublimation paper where your design starts its journey.
- Heat Resistant Tape: Then there’s heat-resistant tape to keep that design from being misplaced while under pressure. Of course, don’t forget the essential graphics software to bring your creative vision to life.
- Mug Press Machine: Last but not least comes the mug press machine itself. The VEVOR Mug Heat Press makes it easy with its user-friendly interface and consistent results—it’s practically foolproof.
How to Heat Press a Mug in 5 Easy Steps
Now that you have an understanding of what mug pressing is, you will now learn how to use a mug press. If you want to present customized gifts to your loved ones, heat pressing is the answer. When it comes to designing a mug, not just any scribble will do—we’re talking about sharp, vivid designs here that can stand up to daily dishwashing battles.
Step 1: Choose Your Design and Print It Out
So, the first step in mug pressing is picking a design that you want to see pressed on the mug. Make sure it’s printed on sublimation paper with sublimation ink. This combo ensures your design doesn’t fade away after the first wash.
Step 2: Get Your Mug Ready for Its Makeover
Next, you don’t need dust on your mug, so it is essential to clean it. A lint-free cloth should do the trick. Once it is cleaned, you can then cut out your design. Remember to leave just enough edge so you don’t end up cutting too close to the design. It will be easier to position it on the mug.
Step 3: Secure The Design in Place
This is a crucial step in getting your design correct. For getting a mug that is printed perfectly—the design needs to stay put. Use heat-resistant tape for this purpose. Wrap the tape tightly around the mug so the design doesn’t move from the required position.
Step 4: Set Up Your VEVOR Mug Press for Success
Now comes the important step: setting up your heat press machine. Follow the manufacturer’s manual guide to understand how your machine works. Another thing to learn about is how long it takes to heat press a mug. The right mug sublimation temperature and time are crucial. For ceramic mugs, aim for about 400°F (204°C), but always check manufacturer recommendations.
Step 5: Let The Magic Happen
Gently place your mug into the VEVOR press cradle. Once locked in properly, printing a mug typically takes between 60-240 seconds, depending on material thickness. When done, unwrap cautiously to avoid getting burnt as the mug gets hot during the process.
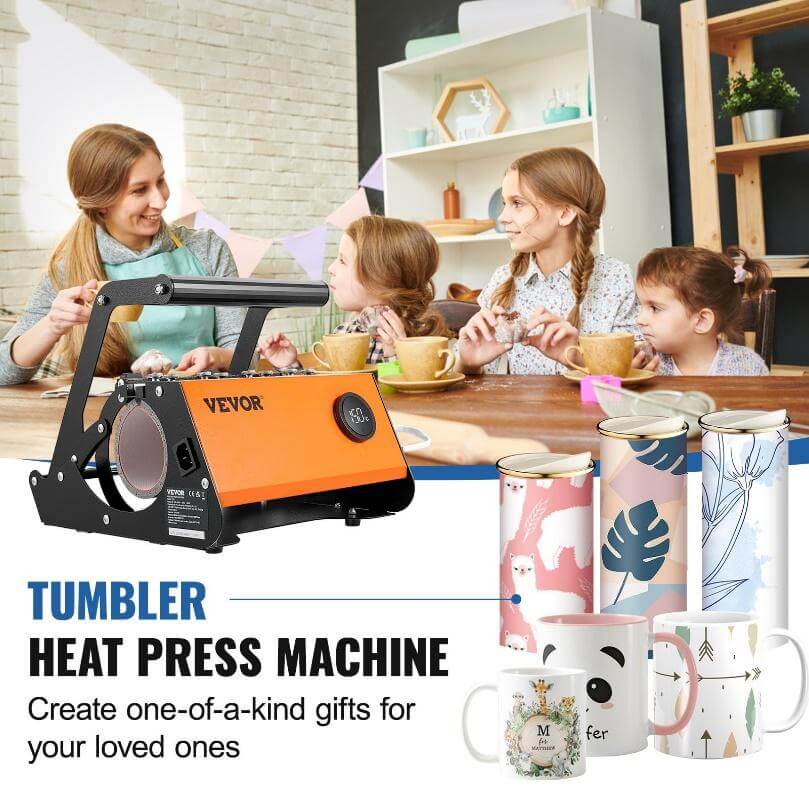
VEVOR Mug/Tumbler Heat Press—Pretty Mugs, Made Easy.
If you want to print a personalized mug for your close family members or friends, this VEVOR Mug Heat Press Machine is your best friend. With its user-friendly design and versatile functionality, this machine lets you turn an ordinary cup into a funky gift.
This isn’t just about pasting a photo on a cup; it’s about creating lasting impressions that won’t fade after a few washes.
VEVOR Mug Heat Press has a 30 oz capacity that can fully cover a mug’s surface, so you don’t have to worry about uncovered areas. It also allows you to heat press two mugs simultaneously.
So, why settle for plain mugs when you can personalize them? A birthday wish, a company logo, or even your pet’s face—the possibilities are endless with VEVOR’s mug press machine. And you don’t have to worry about compatibility; this machine caters to various sizes and shapes so that creativity is never limited by dimensions.
Tips and Tricks for Flawless Mug Pressing
Mastering the art of mug pressing takes a bit of practice, but once you get it right, you won’t get it wrong. Thus, here are a few tips and tricks that will always give you the perfect mug printing.
- Even Heat Distribution: The key to those Insta-worthy mugs lies in even heat distribution and timing. Make sure your mug press is preheated to the manufacturer’s recommended temperature—this will help prevent those dreaded cold spots that result in uneven designs.
- Cleaning the Mugs: Always clean your mugs before pressing. A spotless surface means there are no oils or dust to interfere with ink transfer. Just like a painter primes his canvas before painting, clean the mug you are about to press print.
- Avoid Ghosting: To get a perfect print, you should avoid ghosting. It is a faint secondary image next to your main design, which can ruin how the mug looks. To avoid that, be swift when wrapping the transfer paper around the mug. Once pressed, let it cool completely in a safe place where it won’t be jostled or bumped. Patience here ensures crisp lines and vibrant colors on every single piece.
FAQs About Heat Pressing Mugs
Do you have questions about turning plain mugs into personalized treasures with a heat press? You’re not alone. Here are some common curiosities that mug-making enthusiasts often have.
Q: Can I use regular mugs in the mug press?
You might think any old mug can withstand the heat, but not all ceramics are created equal. For successful results, you should go for specially coated sublimation mugs. These mugs are designed to take on those high temperatures and ensure your designs don’t just ghost you after a few washes.
Q: Do I need to mirror for a mug press?
Yes, you need to mirror for a mug press. Think of it as writing backward so when it’s transferred onto your mug, everything reads right-side-up.
Q: How long does it take to press a mug?
Heat pressing a mug should typically take 60 seconds at around 360°F temperature.
Q: Why is my sublimation mug yellow?
Sometimes, things can turn yellow if they stay under heat too long. This also happens if there’s leftover gunk from previous projects. By keeping things clean and time-bound, you can avoid getting your mugs turn yellow.
Conclusion
So, you’ve explored how to use a mug press. Now, you can easily design eye-catching mugs for your loved ones. With a VEVOR Mug Press, you can now print these photo-worthy mugs from the comfort of your home.
You just need to keep the pointers in mind, and in no time, you will be creating your own magic with customized mugs.


