
Brake fluid is one of the most important components of your car. It guards against corrosion, sustains high brake temperatures, and resists moisture that might lead to a nasty vapour lock brake failure.
According to your car’s manufacturer’s manual, you must learn how to change brake fluid. So, with the right tools and a little patience, you can absolutely handle this yourself. Let’s learn how to change the brake fluid of your car so you can drive safely. But first…
What is brake fluid?
Your car’s brake system uses brake fluid, a kind of hydraulic fluid, to transfer power. It guarantees that your vehicle will stop when you press the brake pedal. Brake fluid is non-compressible, just like all hydraulic fluids.
This means that the fluid in a car’s brake line is forced to flow through the brake system when pressure from the brake pedal is applied at one end. The brake pads, which eventually push on a car’s wheels and bring it to a stop, receive this force after it has been transferred to a vacuum-powered brake boost.
Because of this, brake fluid is an essential part of your car. Anything that could deteriorate your fluid’s quality, including moisture collected from the air, can impair its function and eventually make it more difficult for your car to brake.
Why Do You Need to Change Brake Fluid?
Brake fluid is “hygroscopic.” This is a fancy term for how it naturally collects moisture from the air over time. Even in a sealed system, this occurs slowly but steadily.
When water contaminates a fluid, its boiling point drops dramatically. When your brakes become hot (such as during forceful stops or downhill driving), the water might boil and convert into vapour.
In contrast to liquids, vapour is compressible. When you step on the pedal, you will experience a spongy or soft sensation. This is known as “brake fade,” and it implies your stopping strength is significantly decreased.
Therefore, to avoid this deadly condition, you must know how often to change brake fluid in car. It also prevents internal corrosion in the essential components of the brake.
Tools You Need to Change Brake Fluid
Having the proper tools is half the battle in any car repair work. Don’t skimp out on safety equipment when you’re learning how to change brake fluid! A bleeder kit is an excellent choice for quick, one-person applications. Here is a checklist of the important equipment you will require:
- New Brake Fluid
- Gloves
- Eye protection
- Floor jack
- Brake Bleeder Kit
- Turkey baster or syringe
- Wrench
- Clear tubing with a catch bottle
- Shop rags
How to Change Brake Fluid by Yourself
This detailed section will guide you through the process of draining out your old, tainted fluid. This is how you get the task done correctly. Remember to read your owner’s manual for the proper bleed order for how to change brake fluid in cars of different models. Usually, the wheel farthest from the master cylinder comes first.
Step 1: Prepare the Vehicle and Locate the Reservoir
First, park your vehicle on flat ground. Apply the parking brake firmly. Then, using your jack, secure the automobile on strong jack stands. You will need to remove all four wheels.
Open the hood and look for the master cylinder reservoir. It is typically a plastic container on the firewall on the driver’s side. To keep debris out, thoroughly clean the reservoir’s top.
Step 2: Remove Old Brake Fluid from the Reservoir
This is the quickest approach to remove most of the old, unclean fluid. Open the reservoir cover and insert a turkey baster or large syringe. Extract as much old fluid as possible.
Dispose of the old fluid in a separate, labelled container. Do not leak any on your car’s paint, since this will ruin the finish. Don’t worry about collecting every last drop; we’ll flush it out later.
Step 3: Refill with New Brake Fluid
When the reservoir is almost empty, quickly refill it with new, clean brake fluid. Check the label for the relevant type (DOT 3, DOT 4, etc.).
Maintain a close check on the reservoir level during the bleeding procedure. Never let the reservoir dip below the “Min” line while bleeding the brakes. Running the reservoir dry forces air into the master cylinder, making your work much more difficult.
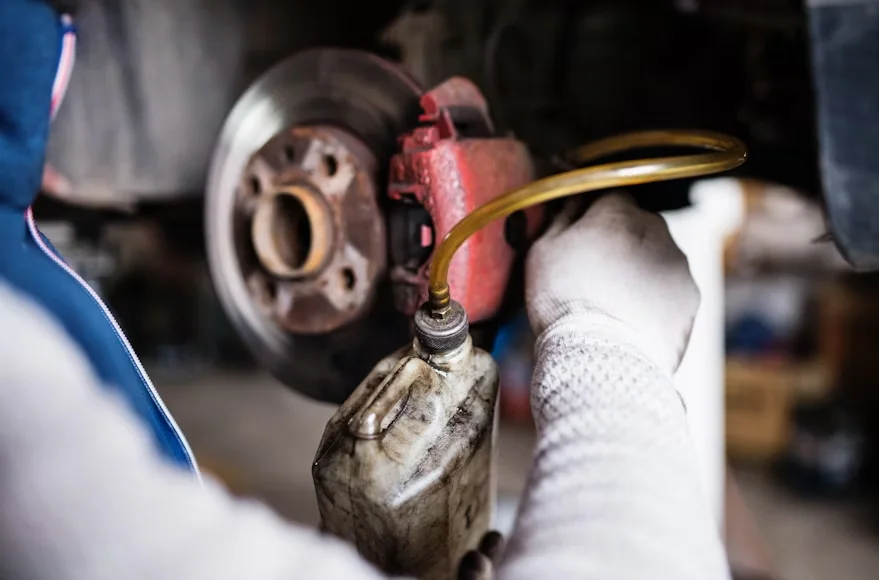
Step 4: Bleed the Brake Lines (Wheel by Wheel)
This is the primary event. Bleeding forces the new fluid through the lines, displacing the old fluid. If you’re learning how to change brake fluid by yourself, a decent vacuum bleeder kit will come in handy.
- Identify Order: Begin with the wheel furthest from the master cylinder (often the rear passenger wheel).
- Attach Bleeder: First, tighten the bleeder screw with the appropriate size wrench. Then, thread the clear tubing from your catch bottle or vacuum bleeder over the screw’s end. Vevor offers excellent, user-friendly bleeder bottles.
- Perform Bleed: If you’re using a one-person vacuum pump, apply suction first, then loosen the screw by a quarter to half turn. Watch how the fluid pours into the clear tube.
- Check Fluid: Continue bleeding until the fluid exiting the tube is clear and bubble-free. This confirms that all of the old fluid has been expelled.
- Tighten: Tighten the bleeder screw prior to removing the tube or releasing the vacuum. Do not overtighten!
- Repeat: Repeat the technique on all four wheels, working your way up to the master cylinder. Most importantly, check and top off the reservoir after each wheel.
Note: Some people ask, “How to change brake fluid without bleeding the brakes?” The answer is technically yes, as long as the reservoir fluid is changed on a regular basis throughout time (a “turkey baster” procedure).
However, in order to properly flush the old, contaminated fluid from the callipers and lines, bleeding is essential. We highly urge a complete flush.
Step 5: Top Off Fluid and Check Pedal Pressure
Part a: Fill and prepare the bleeding point.
Once the old fluid has been removed, fill the master cylinder to the MAX line. Always use freshly prepared fluid from a sealed container. Next, clean the bleeder nipple of the first calliper. Attach a rubber hose to the nipple and store the other end in a catch container.
Prepare your aide in the driver’s seat. Make certain that they understand and will strictly adhere to your verbal directions.
Part b: Perform the “Pump and Hold” Flush.
Open the nipples slightly. Start the cycle by screaming “down” and having your friend press the pedal. Close the nipple immediately before shouting “up,” which signals them to release the pedal. This stops air from being sucked in.
Continue this cycle until the fluid is clear and bubble-free, making sure to top off the master cylinder fluid after every few pumps. Repeat the process with all four wheels, beginning with the furthest one. After you’ve finished, the pedal should feel firm.
Brake fluid is not poisonous on its own, but it can quickly become hazardous if polluted; thus, it must be properly disposed of.
FAQs
How often should I change brake fluid?
Most manufacturers recommend replacing brake fluid every two to four years. The exact interval is determined by your driving conditions and the type of fluid. Because it absorbs moisture, living in a humid atmosphere may encourage you to keep a more frequent schedule. A simple test strip can determine its condition.
Can I change brake fluid without bleeding the brakes?
To do a partial change, use a syringe to empty and refill the master cylinder reservoir. This eliminates the dirtiest liquids from the top. However, this procedure does not remove the tainted fluid that has become trapped in the brake lines and callipers. For a true, thorough flush, bleeding is required for best safety.
What happens if I mix DOT 3 and DOT 4 brake fluid?
DOT 3 and DOT 4 are glycol-ether-based and generally compatible. DOT 4 has a higher boiling point than DOT 3; therefore, mixing them usually produces a fluid with a boiling point somewhere in the middle. Never mix these with DOT 5 (silicone-based) because they are incompatible and can harm your system.
How long does it take to change brake fluid?
If you have a proper vacuum or pressure bleeder, you can usually finish the entire procedure in 60 to 90 minutes. If you have a companion to help you, the two-person manual pump approach may take a little longer, but it is still possible in under 2 hours.
Can I drive immediately after changing brake fluid?
Yes, but you should conduct a thorough test drive first. Drive gently in a peaceful, safe environment, making numerous mild stops followed by a few forceful stops. If the pedal is solid and does not sink or feel spongy, the job is completed successfully. If not, immediately park and bleed the brakes.
Conclusion
Taking the time to learn how to change brake fluid is a wise financial decision as well as a safe one. It removes the moisture-laden, corrosive fluid that reduces your braking power. This DIY task is empowering and keeps your vehicle in excellent shape.
You may effectively execute a big maintenance work by following these simple procedures and using reliable equipment from Vevor. Keep up with this maintenance routine, and you’ll have solid, dependable brakes for years, without disturbing your next joyful drive!


