
Fed up with temporary arrangements spoiling your racing game fun? Are you tired of tables or chairs shaking and annoying your control? Farewell to those hindrances. In this comprehensive guide, you’ll discover the ultimate solution: a DIY racing wheel stand. Why would you settle for less when you can easily construct a sturdy stand customized just for you? Release your racing capacity with stability and comfort. Read this guide and follow the instructions, from the required materials to some assembly pro tips.
Table of contents
Tools and Materials Needed For DIY Racing Wheel Stand
Tools:
- Screwdriver set
- Saw
- Electric drill
- Drill bits
- Clamps
- Adjustable wrench or socket set
- Tape measure
- Pencil or marker
- Sandpaper or sanding block
- Hammer
- Wood glue
Materials:
- Screws
- Nuts and bolts
- Plywood or MDF sheets
- Wooden beams or lumber
- L-brackets or corner braces
- PVC pipes or metal pipes
- Paint or wood finish
- Casters or wheels
- Carpet or rubber matting
- Velcro straps or bungee cords
- Seat
Step By Step Building a Personalized DIY Racing Wheel Stand
To build a DIY racing wheel stand you need to follow a stepwise procedure. This will help you do things in an organized manner and to avoid any confusion. Down below is the step by step process for your consideration:
1. Evaluation of need and space:
Assess your gaming area. Ascertain how much room you have for your DIY race wheel stand. Consider things such as room size, furniture arrangement, and potential obstacles. Measure the place to guarantee that your DIY stand is not cramped in the room. Consider your particular requirements: do you need a small stand to fit into tight places or a larger one for stability during long and intense gaming sessions?
2. Budget Idealisation:
Choose how much money you are going to spend on your DIY racing wheel stand project. Pay attention to the expense of tools, amenities, and materials that you want. Make sure to include the costs of components, including screws, lumber, and hardware for mounting. Don’t forget to include the expenses for improvements or customizations.
3. Focus on Design Factors:
Select the design that you like and that goes with your playing. Take into account such factors as ergonomics, amortization, and longevity. Find ideas from the current racing wheel stands or design your custom version. Put your thoughts on paper or utilize design software to see how the finished product will look. Focus on features such as adjustability of height and tilt angles since they will help you improve the quality of your gaming. Select tough but light materials to be easily transported and stored.
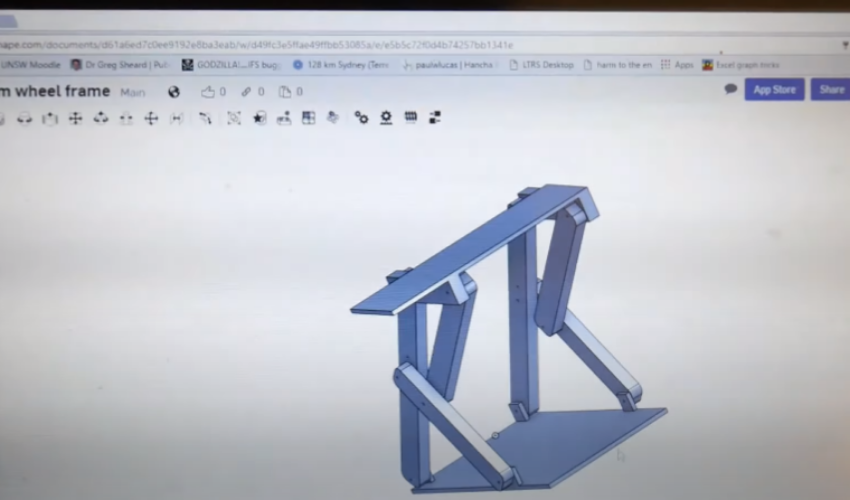
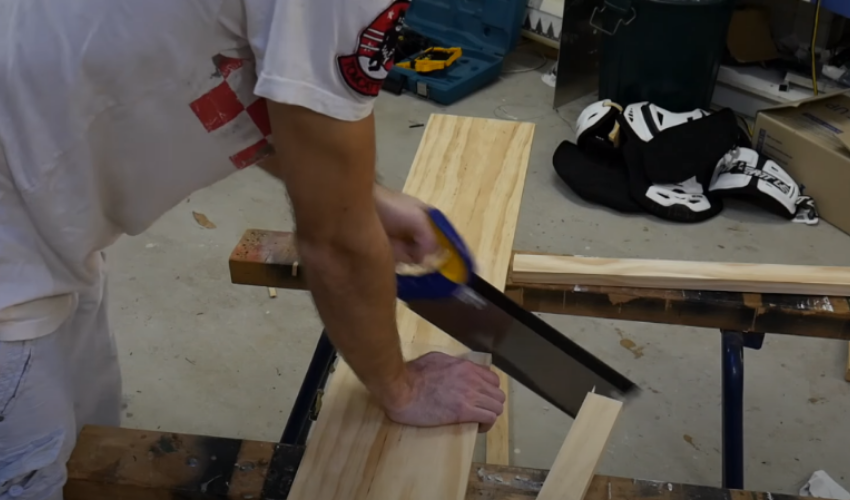
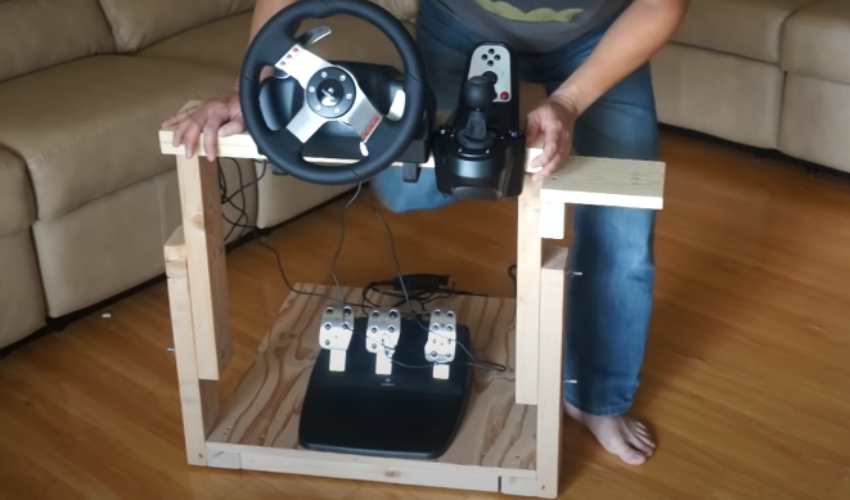
4. Assemble up Frame:
Collect your frame-constructing materials and tools. Saw out your lumber to your design specifications.
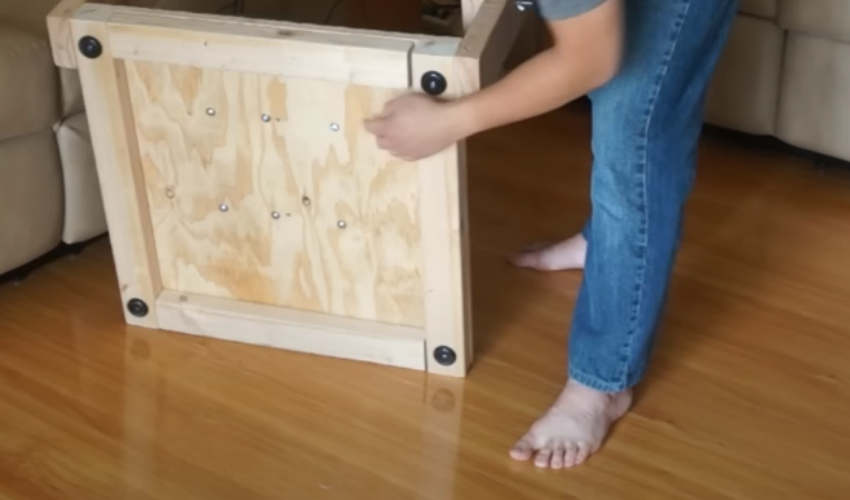
Put together the pieces to make the carcass of your racing wheel stand, taking care of proper alignment and stability. Attach the frame through screws or bolts, ensuring close adherence to the assembly instruction.
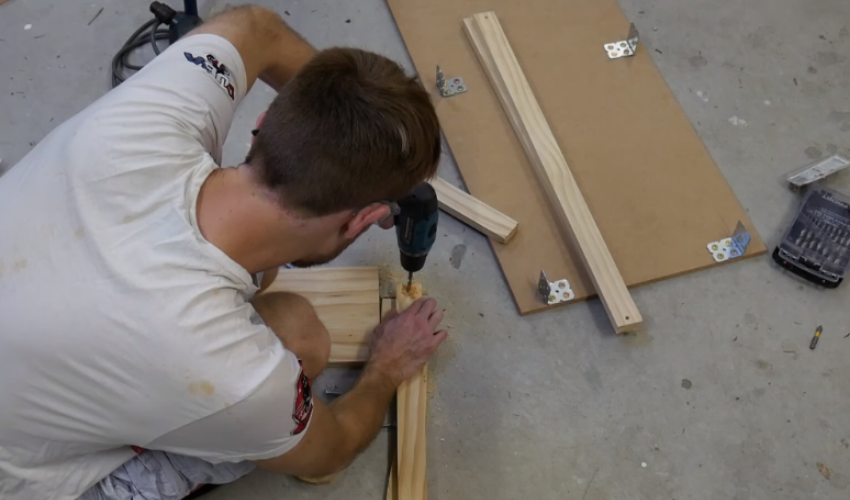
Verify all connections to make sure they are correctly tightened. The frame is the base of your racing wheel stand; therefore, it must be robust and reliable.
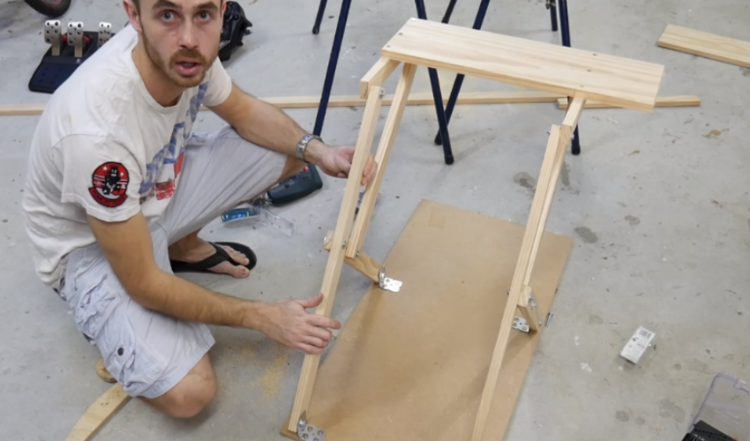
5. Mounting plate installation:
Mount the mounting plate included for your racing wheel and gear shifter. Measure and mark the positions where the mounting plate should be placed on the frame, ensuring it is centered and level. Fasten the mounting plate to the frame using screws or bolts. Pressure test the mounting plate and adjust where necessary. Ensure the mounting plate is durable enough and does not let the racing wheel and shifter wobble.
6. Pedal stand construction:
Make a pedestal for the pedal assembly. Measure and then see the lumber to make a platform for the pedals, ensuring it is wide enough to fit all the pedals comfortably. Fit support braces underneath the platform to strengthen and avoid flexing while in use. Place the pedal stand conveniently regarding height and angle for your feet. You can use screws or bolts for pedal setup, ensuring it is stable and safe. Try your pedal to stand out to ensure it can handle the force with which your foot may come down and the force with which it will be moved during gameplay.
7. Stabilizing:
Improve the stability of your DIY steering wheel stand by incorporating details such as cross braces and stabilizing feet. Put cross braces between the feet of the stand to strengthen the structure and stop wobbling. You need to install stabilizer feet on the stand base. An option exists to add non-slip/rubber pads on the bottom to eliminate slipping/sliding. To have stability features added means that your racing wheel stand will stay stable and safe even during extreme gaming sessions.
8. Optional customisation (cup holders/ cable management):
Customize the DIY racing wheel stand with personal options, for example, cup holders and cable management solutions. Mount cup holders at the sides of the stand for easy access to drinks during playing. Affix the cup holders very well to the frame using adhesive or screws. Introduce cable management systems to tidy and hide cables to make the environment look elegant. Employ cable clips, ties or channels to run the wires through the frame and avoid tangling. Optional modification enhances additional functionality and convenience of your wheel stand.
9. Sanding and surface finishing:
Kindly be informed that Sanding is a vital part of the smooth paint process. Utilise sanding blocks or paper to smoothen rough edges and blemishes. Use a damp cloth to clean the surface. Re-sand the surface, making it flat, flush and level. The finishing makes your racing wheel stand look glossy and preserves the wood from damage and wear.
10. Put on protective coatings:
Protect your DIY steering wheel stand using protective coats such as polyurethane or varnish. Evenly spread the protective layer over the stand’s surface with a brush or roller. Let the coating dry completely between coats and lightly sand with fine-grit sandpaper to level any high spots. A few coats should be used to extend the durability and prevent scratches, spills and UV harm. Protective coatings prolong your racing wheel stand’s look and service life, enabling you to use it for many years.
11. Perform testing and adjustments:
Adjust the last part of your racing do-it-yourself wheel stand to signal that everything is arranged correctly and is stable. Inspect all connections, screws and bolts to ensure they are snug and firm. Test the stability and functionality of the stand by mounting your steering wheel, gear shifter, pedals, and in-play simulation. Adjust the components’ height, angle, and position for the best comfort and control.
Critical Considerations for DIY Wheel Stand
Certain things if ignored may result in an ineffective DIY wheel stand. But pay attention to the following things may lead you to design an efficient and effective DIY wheel stand:
Stability:
Stability is the key to an intense gaming environment. Your DIY wheel stand should be strong enough not to jiggle when the force feedback of the racing wheel is applied. Strengthen the foundation and attachments to eliminate unnecessary movement during long gaming sessions.
Adjustability:
Each racer is an individual. Ensure your wheel stand is adjustable in height, angle, and distance from the seat. Such flexibility allows for the highest level of comfort and control, adjusting with ease to your particular setup and style of gaming.
Compatibility:
Before proceeding with the build, ensure your DIY wheel stand is compatible with your racing wheel and pedals. Calculate dimensions and check the possibility of installation to prevent any gaps. Don’t be overcome by the compatibility hurdle of your gaming desires.
Portability:
Portability matters whether you are racing in the living room of your house or at a friend’s house. Use light materials for easy carrying. Give priority to convenience but without sacrificing stability.
Withstand Time:
The DIY wheel stand should withstand time and many racing sessions. Choose strong materials such as steel and aluminum and strengthen critical joints. Making your purchase durable now will spare you from frequent repairs or replacements later.
Level of Personalisation:
Grab this chance to modify your wheel stand the way you want it. Include mounting brackets for other accessories, such as gear shifters or handbrakes. Customize the design with paint or decals to show your individualism and gaming persona.
Total Cost:
Building your wheel stand is cost-effective, but a budget must be made and kept. Focus on necessary characteristics and consider material and tool costs. By carefully planning, one may get a qualitative set-up by spending a dime.
Safety:
Ensure you’re safe and your equipment is safe, so follow safety measures throughout the construction. Deburr sharp corners, secure cables from tripping hazards, and ensure stability before every usage. The DIY wheel stand project you have come up with should improve your game experience, not threaten you
Upgrade Your Racing Game with VEVOR’s Easy-to-Install Wheel Stand
Purchase VEVOR Wheel Stand and transform your gaming experience. This stand has perfect engineering and is compatible with Logitech G27, G25, and G29 racing wheels. Simply connect your wheel and shifter to assemble your racing rig.
- Universal Compatibility: Mount all your racing gear easily. Compatible with Logitech G25, G27, G29, G920, Thrustmaster T300RS, TX F458, T500RS, T3PA-PRO (F1/GT), Fanatec Clubsport and Simcube, and Thrustmaster and CSR pedals. (Note: Wheel, shifter, and pedals are EXCLUDED.)
- Fully Adjustable: Go to the extreme with customizing your set-up. Adjust the angle and height (27″-31.5″/68.5-80 cm) for the last driving delight. Design wheel and pedal plate placements to suit comfort and flexibility.
- Built to Last: Achieve stability and long-lasting that you would have never imagined before. Manufactured of high-strength carbon steel ensures a lifetime of operation. The rubber pads of every support point add safety.
- Foldable & Portable: Maximise space and convenience. Retract the stand to fit neatly under furniture or in tight spaces. Perfect for gamers confined to space. Take the setup everywhere.
- Versatile Shifter Holder: Adapt rapidly to your selection. The gear shifter holder is flexible: It can be put on either side for the left or right-handed players. Pre-drilled holes ease the installation for an almost invisible mount.
| Sr. No. | Parameter | Specs | Parameter | Specs |
| 1 | Model | G920ZDJ | Material | Carbon Steel |
| 2 | Adjustable Height | 27″-31.5″/68.5-80 cm | Base Size (LxW) | 18.9″x22.6″/48×57.5cm |
| 3 | Wheel Holder Size (Lx W) | 16.5″ x 5.9″/42 x 15 cm | Shifter Holder Size (Lx W) | 6.3″ x 4.7″/16 X 12 cm |
| 4 | Folding Size (L | 18.9″ X 30.3″ X 7.5″/48 X 77 X 19 cm | Product Weight | 24.9 Ibs/ 11.3 kg |
| 5 | Compatible Model | Logitech G25, G27, G29, G920; | ||
| 6 | Thrustmaster T300RS, TX F458, T500RS, T3PA-PRO (F1/GT) pedals; | Fanatec Clubsport & Simcube & Thrustmaster CSR pedals |
FAQs about DIY Racing Wheel Stand
Do you require a stand for a race wheel?
Indeed, a stand provides stability and ease while playing. This eliminates the risk of slip or wobble, ensuring an even more captivating gameplay. It also places the wheel at the optimal level, minimizing the tension on your arms.
How should you place a racing wheel?
Set the wheel stand on a flat surface in front of your gaming setup. Set the wheel’s height and angle according to your seating position. Ensure the wheel is at arm’s length for easy control access.
How great are racing games when you play with a wheel?
Using a wheel adds much realism and thrill to racing games. You will enjoy more accurate and responsive handling of your car. The tactile feel and the potent steering make the game feel more like real life, enhancing your gaming experience.
Conclusion
To sum up, you have helpful information on how to construct your DIY racing wheel stand and thus can improve the quality of your gaming. Now, the moment has come to apply that knowledge. Refrain from settling for average setups while a specially designed stand will lift your gaming. Own your racing fate and construct a stand that is right for you. Also, you should choose VEVOR for top-notch products for the best wheel stand choices. Step further to the ultimate gaming pleasure. Start your DIY racing wheel stand today and change the way you race.


