
Unlock the full potential of your VEVOR 3-in-1 EMF Meter with our comprehensive product manual. Designed to enhance your user experience, this detailed guide covers everything from initial setup to advanced troubleshooting. Whether you’re conducting home inspections, outdoor ghost hunting, or evaluating 5G cell tower radiation, our manual ensures you get the most accurate readings from your Handheld Rechargeable Electromagnetic Field Radiation Detector.
The user-friendly manual provides step-by-step instructions and clear illustrations to help you navigate the device’s features, including the Digital LCD and temperature measurement functions.
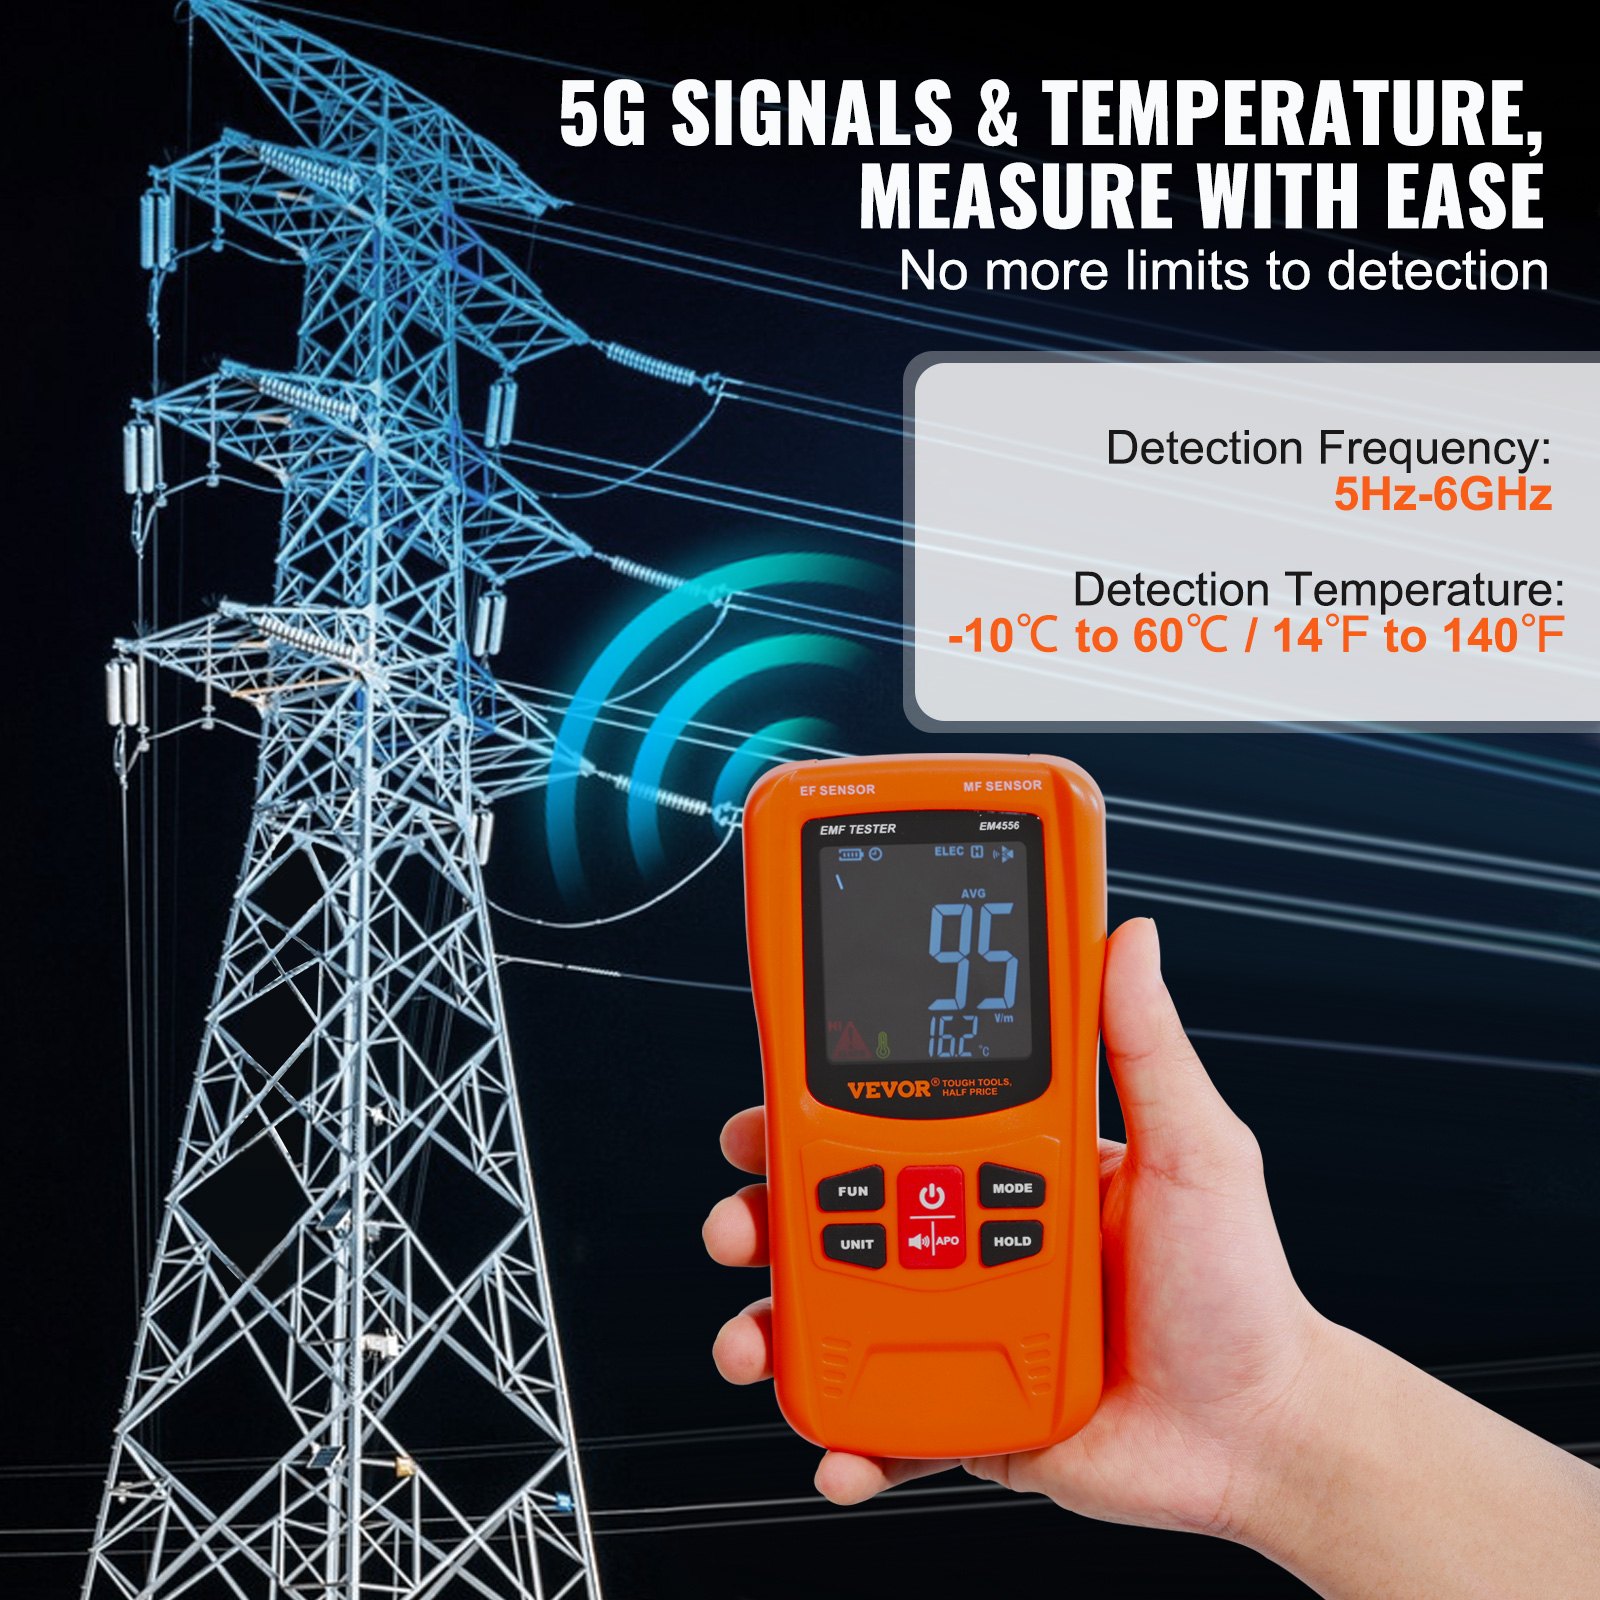
Downloading this manual will give you the confidence to use your EMF meter effectively, ensuring safety and accuracy in every use. Optimize your device’s performance and effortlessly gain insight into electromagnetic fields ranging from 5Hz to 6GHz.
VEVOR EMF METER USER MANUAL
MODEL: EM4556
INTRODUCTION
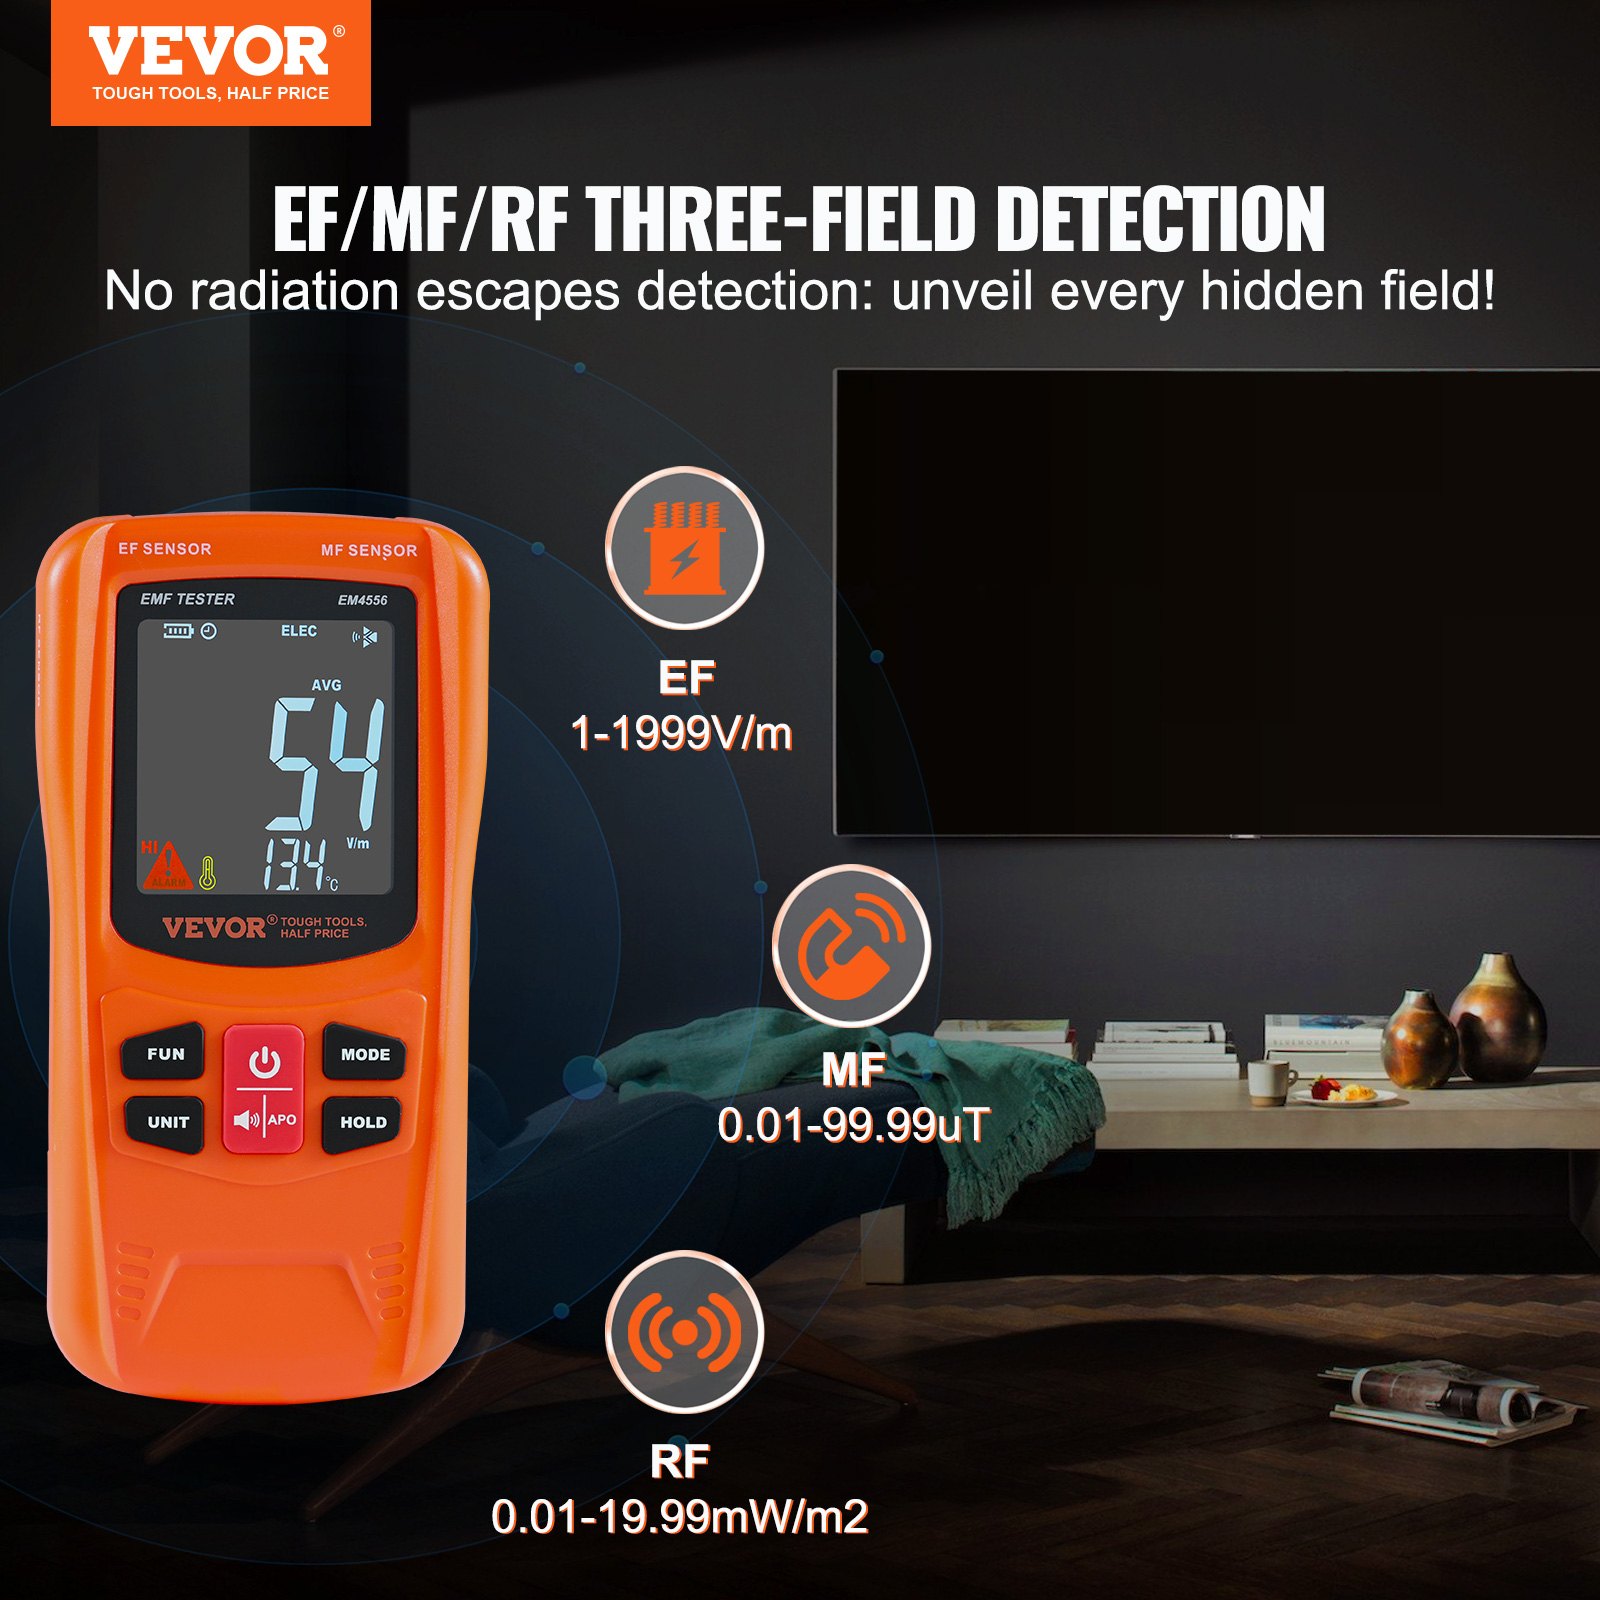
This meter is a multifunctional EMF tester designed to measure radiation levels in the electric field (EF), magnetic field (MF), and radio frequency field (RF). It is equipped with built-in electromagnetic radiation sensors, which can display the radiation value on the LCD screen after processing by the microcontroller chip.
According to the test results, users can make reasonable processing or take effective prevention measures toward electromagnetic radiation.
FEATURES
- Measure and display EF, MF and RF radiation level
- Temperature measurement
- Two magnetic field units to select from
- Average / Weighted / Peak / Maximum mode
- Audible alarm
- Battery level indication
- Data hold
- Auto power off
EMF METER APPLICATIONS
- Electromagnetic Radiation Monitoring
Residence, Office, Outdoors, Industrial sites.
- Electromagnetic Radiation Detection
Mobile phones, Computers, Routers, and Microwave ovens.
- Radiation Protection Product Testing
Radiation-proof clothes, Radiation-blocking films.
WARNING
- Do not tamper with the instrument’s internal circuits.
- Do not bump or drop the instrument. Keep the instrument clean and dry.
- Replace the battery as soon as the battery level indicator becomes empty.
- Remove the battery from the battery compartment to avoid damage if you do not use the instrument for an extended period.
- Do not expose the instrument to direct sunlight or to extreme temperatures and humidity.
- Before use, verify the instrument’s operation by testing a device ( e.g., electric fan, router ) that produces an electromagnetic field. Do not use theEMF meter if it operates abnormally or is damaged.
- Adhere to local and national safety codes.
- Use caution when working in the vicinity of powerful radiation sources. Long-term exposure to electromagnetic fields may be the cause of childhood leukemia and other forms of cancer.
- Persons with electronic implants ( e.g., cardiac pacemakers ) should avoid powerful radiation sources.
- Carefully read the operating instructions for the equipment generating an electromagnetic field that will be measured.
- Do not operate the EMF meter where explosive gas, vapor, or dust is present.
- Please measure from a distance for high-pressure facilities to ensure safety.
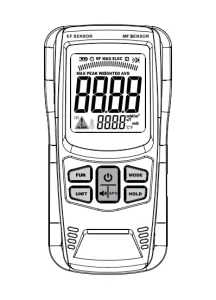
FRONT PANEL

- EF Sensing Area
- RF Sensing Area
- Display
- ” FUN ” Button
Used to switch the Average / Weighted / Peak / Maximum mode. - ” UNIT ” Button
Short press to change the temperature unit.
Long press to change the magnetic field unit when the tester is in
MF measurement mode. - “APO ” Button
Short press to enable or disable the audible alarm function.
Long press to enable or disable the automatic power-off feature. - ” HOLD ” Button
Used to lock or unlock the displayed reading. - ” MODE ” Button
Used to switch the measurement mode between
EF, MF, and RF. - ” POWER” Button
Used to turn on or off the tester. - MF Sensing Area
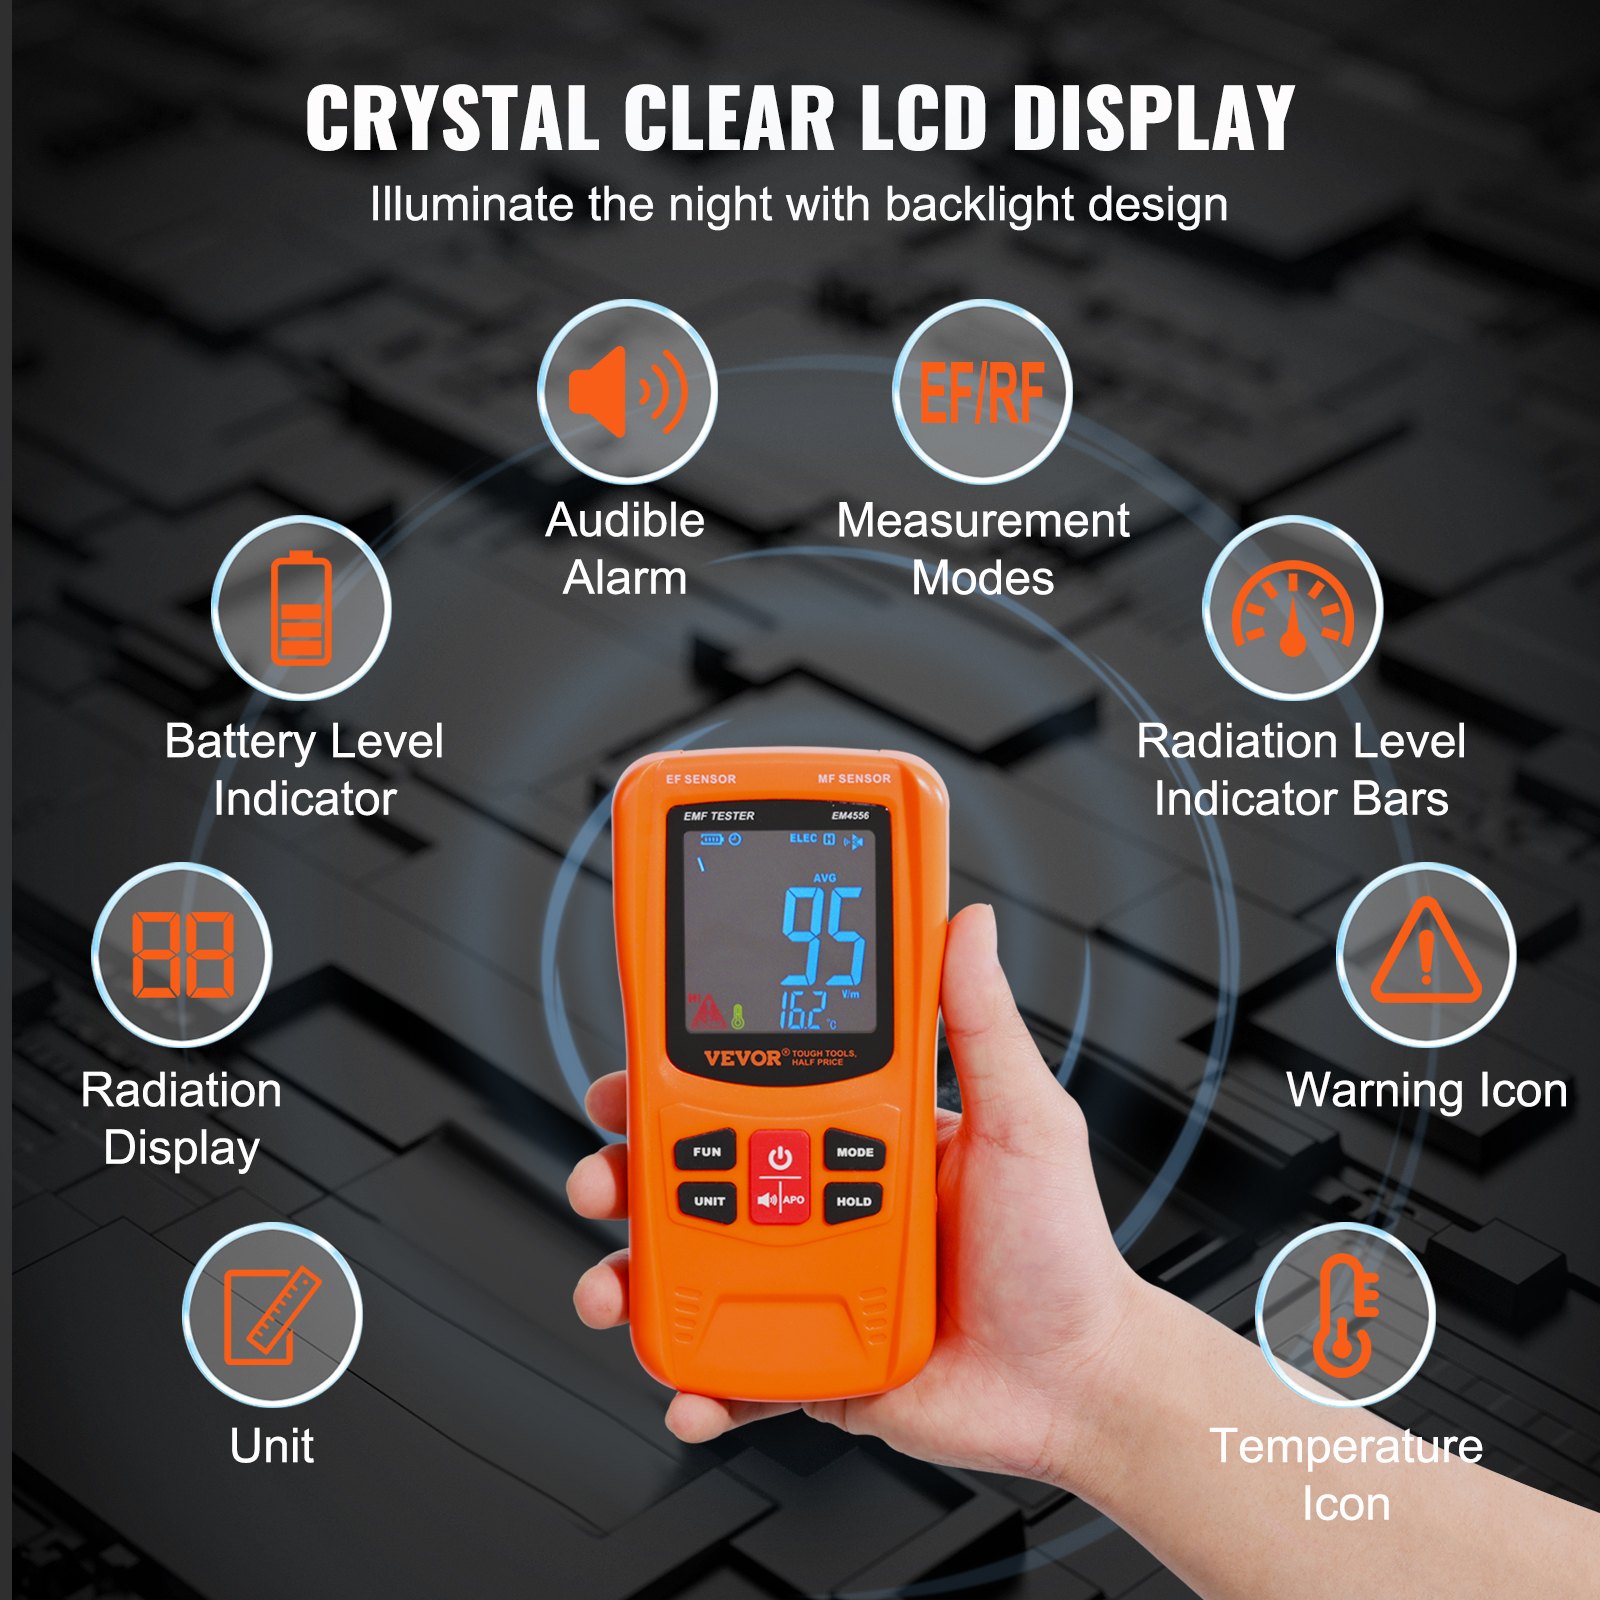
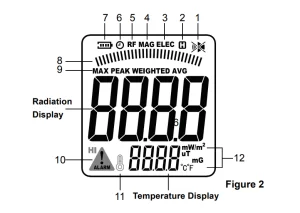
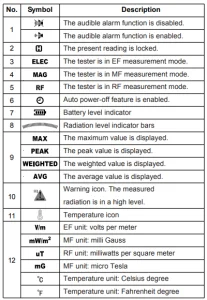
DISPLAY DESCRIPTION
 EMF METER OPERATION INSTRUCTIONS
Power ON/OFF
Press the “POWER” button for about two seconds to power the tester. The display shows all thesegments briefly and the buzzer sounds a long beep. Then the tester enters the measurement mode.
Press and hold the “POWER” button to power off the tester.
Note: Due to possible electromagnetic field interference in the environment, the display may show a small value after powering on. This is not the tester’s malfunction.
Making Measurements
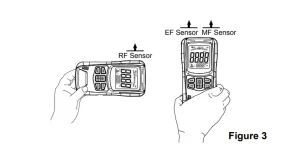
Hold the tester in hand with the sensing area of the tester slowly approaching the electromagnetic radiation source to be tested ( refer to Figure 3 ). The testing value and the indicator bar(s) show up to indicate the measured radiation intensity.
Note: The radiation intensity increases as the tester approaches a radiation source. The higher the measured radiation intensity, the more indicator bars are displayed, and the higher the testing value.
When the measured radiation value exceeds the tester’s alarm threshold ( EF>40V/m, MF>0.4μT, RF>10mW/m2 ), a warning icon will appear on the display to indicate the current radiation level. If the audible alarm function is enabled, a buzzer will sound.
Note:
- The default electric field ( EF ) measurement mode after power-on, and short-press the ” MODE ” button to switch the measurement mode.
- Try different angles to approach the radiation source while making measurements. The tester’s highest radiation intensity indicates the most accurate measurement result.
- Do not cover the EMF meter sensors with your hand or other objects while holding the tester.
- During detection, ensure that no metals or other conductive materials are near the measured object.
Measurement Modes
Every time the tester is turned on, it defaults to enter the electric field measurement mode. Briefly press the ” MODE ” button to switch between the following three measurement modes:
- Electric field measurement mode
( The display shows the symbol ” ELEC “. ) - Magnetic field measurement mode
( The display shows the symbol ” MAG “. ) - Radio frequency field measurement mode
( The display shows the symbol ” RF.” )
Average / Weighted / Peak / Maximum Mode
After each power-on, the tester is in Average mode by default. The display shows the symbol ” AVG ” as an indicator. Short-press the “FUN ” button to sequentially switch to Weighted mode ( the symbol ” WEIGHTED ” is displayed ), Peak mode ( the symbol ” PEAK ” is displayed ), and Maximum mode ( the symbol ” MAX ” is displayed ). The four modes are described as follows:
- Average Mode: The display shows the real-time average value of the current measurement.
- Weighted Mode: The display shows the real-time weighted average value of the current measurement.
- Peak Mode: The display shows the peak value detected since entering Peak mode.
- Maximum Mode: The display shows the maximum value measured since entering Maximum mode.
Unit Switch
Short-press the ” UNIT ” button to switch the temperature unit between °C and °F in any measurement mode.
In magnetic field measurement mode, long-press the ” UNIT ” button to switch the magnetic field unit between mG and μT.
Data Hold
Press the ” HOLD ” button to lock the current reading. The symbol “H ” appears on display.
To unlock the reading, press the” HOLD ” button again. The symbol “H ” disappears.
Audible Alarm Function
When the tester is turned on, the audible alarm function is on. The display shows the symbol “SPEAKER” as an indicator.
Briefly press the “APO” button to enable or disable the audible alarm function. When this function is disabled, the symbol “MUTE” is shown.
Auto Power Off
Long-press the ” APO” button to enable or disable the automatic power-off feature. When the display shows the “clock” symbol, it means the auto power-off is on.
Without any button press, in about 10 minutes, the tester will automatically power off.
BATTERY CHARGING/REPLACEMENT
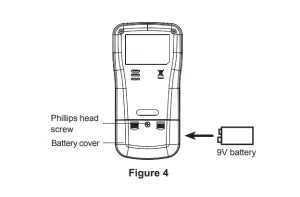
When the symbol “BATTERY” is shown on the display, the battery is not high enough, and replacement is needed. The steps are as follows.
- Use a Phillips screwdriver to remove the screw that secures the battery compartment.
- Remove the battery cover in the direction indicated by the arrow on the battery cover.
- Replace the old battery with a new one of the same type and ensure that the polarity connections are correct.
- Reinstall the battery cover and secure the screw.
RECOMMENDATION
- It is recommended that you regularly measure the presence of the electromagnetic field inside and outside your home and business locations.
- For areas where the tester detects a high level of electromagnetic radiation, re-arrangement of this region is lightly recommended.
- Always try to avoid long-term exposure to strong electromagnetic fields.
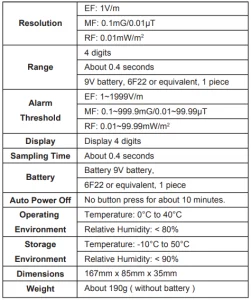
VEVOR EMF METER SPECIFICATIONS
NOTE
- This manual is subject to change without notice.
- Our company will not take the other responsibilities for any loss.
- The contents of this Manual can not be used as the reason to use the tester for special application
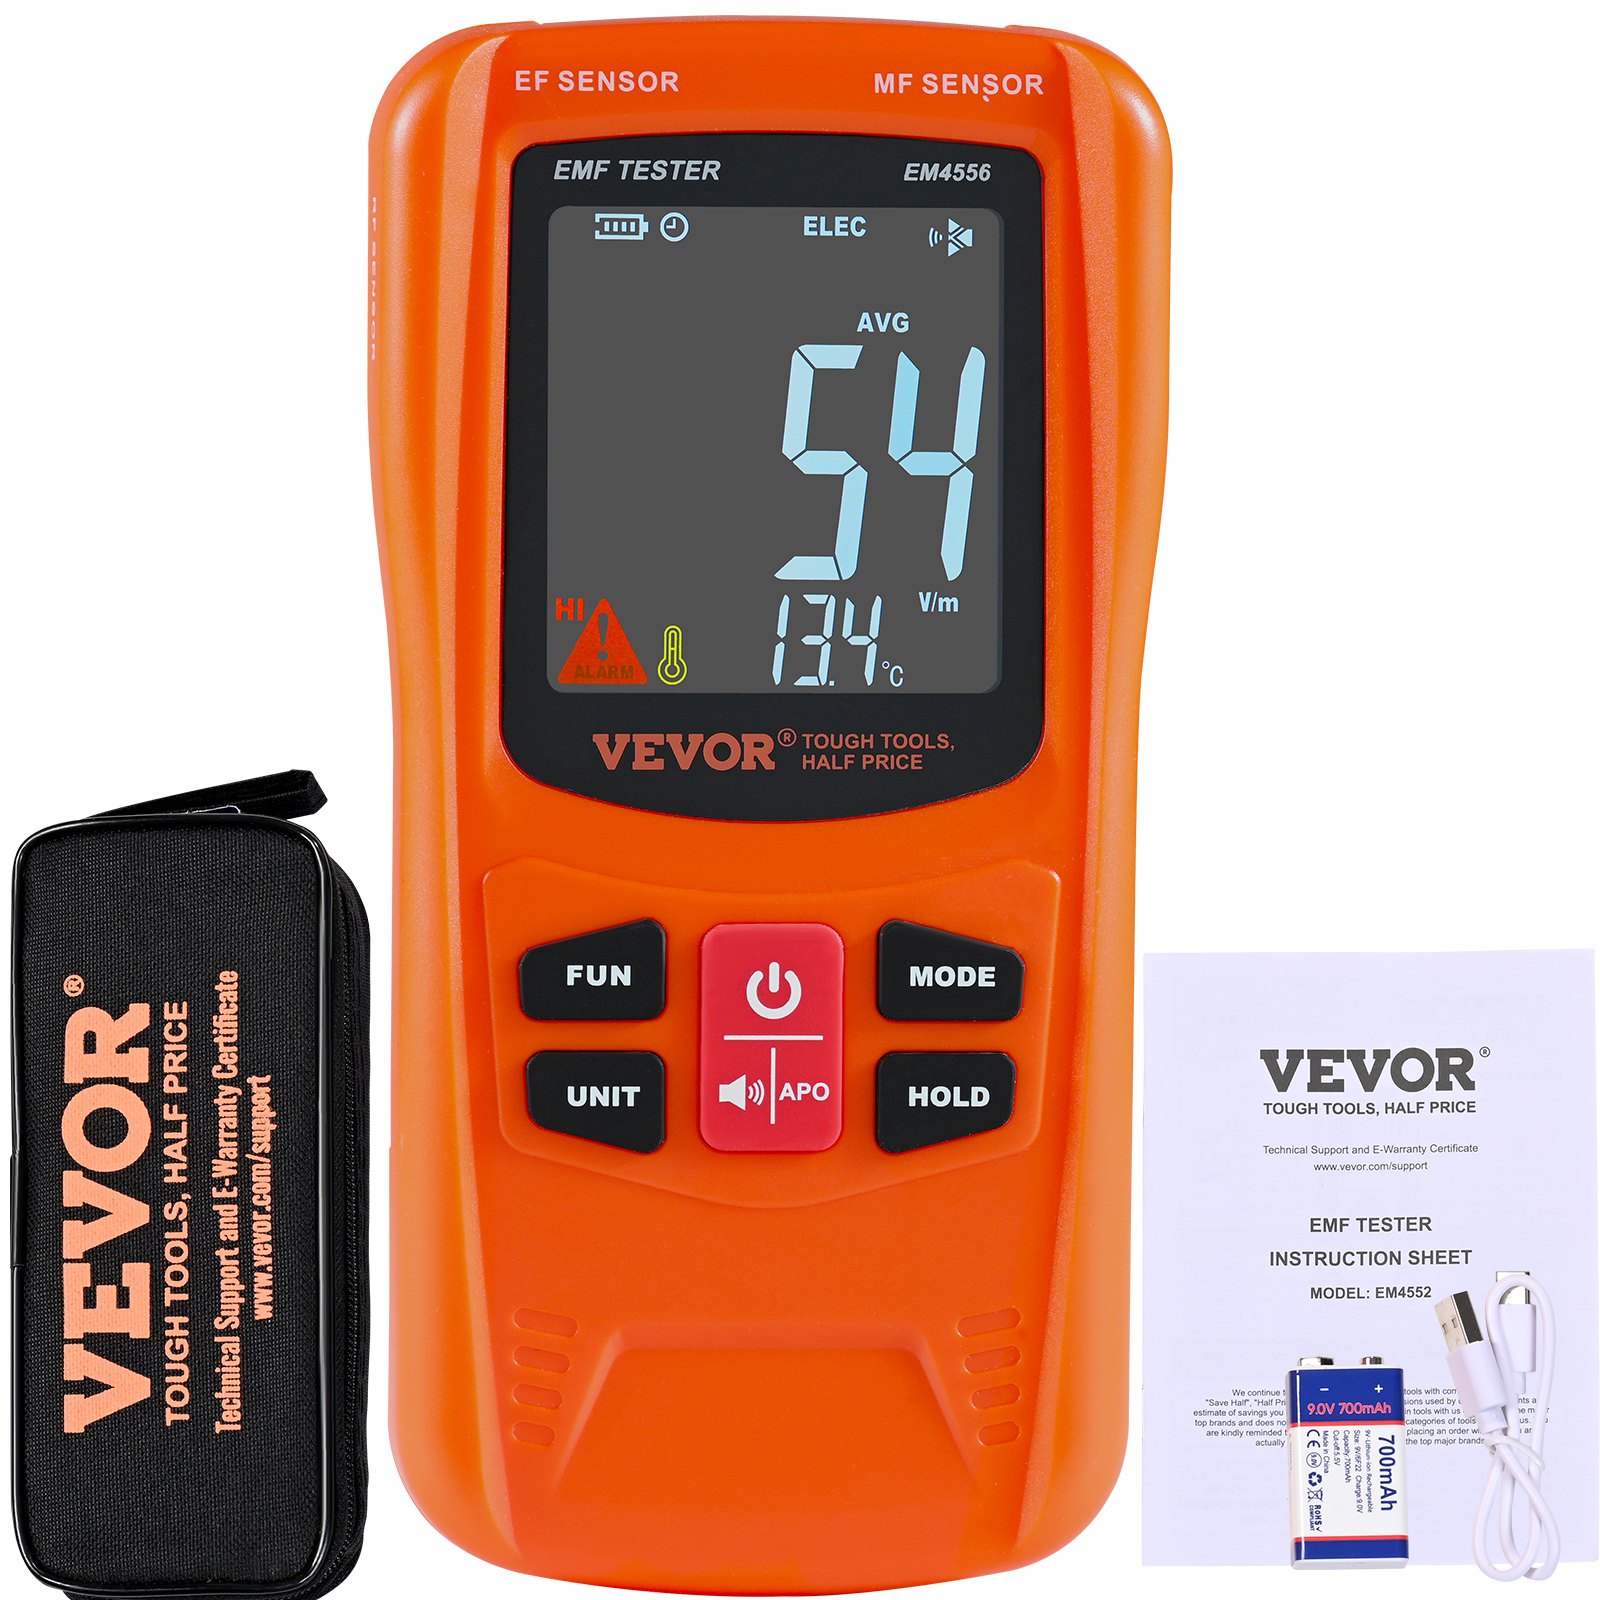
EMF METER ACCESSORIES LIST
- Instruction manual *1
- Storage bag *1
- 9V lithium battery *1
- USB charging cable *1
- Phillips screwdriver*1
Recommended For Your Project
VEVOR 3-in-1 EMF Meter, 5Hz-6GHz Manual


Reviews
There are no reviews yet.