VEVOR US EN
Select the country/region, language, and currency you prefer for shopping.
Delivery to
Your Address
Hello, Sign In
Account & Order
Free Delivery 30-day No-hassle Returns 12-month Warranty
VEVOR Projection Screen 120inch 16:9 Movie Screen Fixed Frame 3D Projector Screen for 4K HDTV Movie Theater Home

Customer Reviews for VEVOR Projection Screen 120inch 16:9 Movie Screen Fixed Frame 3D Projector Screen for 4K HDTV Movie Theater Home

Stationary 120 inch

Customer Reviews

Ratings by Features

  • 4.8
  • 4.7
  • 4.7
  • 4.7
  • See More See Less
74 Review(s)
Clear filters
Joe R. Joe R.
BEST BUDGET SCREEN ON THE MARKET!
DEFINITELY THE BUDGET KING OF PROJECTOR SCREENS! Assembly took about 30-40mins, and was pretty straightforward. No need to drop hundreds on a screen, do yourself a favor and pick one of these up, you wont be disappointed.
Buyer Buyer
Great product
This is one great product. Not sure why this is not prime. Took about 10 days to arrive. Took an hour to assemble for me alone. It is very light weight, so used my teenage kid's help while mounting on the wall. This is one well engineered, carefully designed and apt priced product. Go for it!!!
Daniel E. Marquez Daniel E. Marquez
Putting it together is a breeze!
Loved it,,, right on craftmanship, looks great the material is wrinkle free once stretched,,, the picture became alive 3D Avatar looked amazing and 4K as well... thanks best screen ever....
James James
Pretty easy to assemble
This is a good screen that was pretty easy to assemble. Seller was responsive and helped me out. I would buy from Torren again.
Vevor Customer Vevor Customer
Wonderful gift!
Came along great. Easy installation. Only hard part was lining up the projector at the right angle due to the projector I bought. Highly recommend this screen absolutely amazing.
BMP BMP
Need to buy
Awesome product great quality will like to do a video review
J.A. J.A.
Easy assembly, great picture
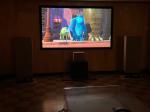
The screen arrived quickly and was well packaged. Although the included assembly instructions are basic, if you watch on-line videos for similar products you will quickly get the gist of it. Once we began the process it all went easily. A key suggestion, however, is to use a better tool than the little allen wrench provided. We used a screwdriver with an appropriately sized hex head bit for the frame bolts and that made the frame assembly much easier. A power screwdriver will work also as long as you don't overdo it. After assembling the frame, we found that rolling out and stretching the screen fabric was much easier than we thought it might be. We started by attaching the screen to a few of the tensioning nuts at one corner, then went to the opposite corner, and worked our way like that around the frame. When done the screen was taut. The hardest part of assembly is adding the center stabilizer bar after the screen is stretched. Go in diagonally as the instructions indicate, but even then it's tough. We carefully used a small tap hammer to move the bar into position.To hang the screen you will need to measure, mark, drill into the wall and insert the mounting screws (and anchors, if needed) that are provided. Do this carefully so that the screen will be level when hung. You want the screw heads to stick out no more than about a half inch from the wall. Other reviewers have noted that it's difficult to align the mounting screws on the bottom. As long as your top screws are very securely fastened in the wall you may not need to use the bottom mounts; we did not. Please note, however, that ours is a 92" screen; larger screens may carry enough extra weight that you should also use the bottom mounts. In any case, if you can locate and screw the top mounting screws into wall studs rather than use drywall or other anchors, that would be ideal.Once your screws are in place you will most likely need two people to hang the screen: one on a step stool to reach behind the screen and place the mounting bracket attached to the top frame of the screen over the mounting screw in the wall, the other to hold the screen from below while that is being done. After you attach the first bracket, move to the other side and attach the other top mounting bracket in the same way. The brackets are designed to move horizontally so that the screen can be adjusted from left to right if needed after it is hung, but this is what makes it necessary for one person to "hand place" the brackets over the screws.If any of this sounds difficult, it really is not. The whole process took us less than a couple hours, and that's mostly because at our age we needed to take a few breaks. Anyone with some basic tools (screwdrivers, a tape measure, a drill and a level) with basic home maintenance skills should be capable of putting this together and hanging it without much difficulty.The screen looks great on the wall, and it provides a terrific image. We are using a 1080p projector that we
John John
Fit and finish was very high quality
Ok, so the directions were a little better than IKEA. However, it wasn't complicated to put together at all. The packaging was fantastic. Hanging it on the wall wasn't the easiest, but neither is a large picture or mirror that you want level from multiple hooks. The overall look is very professional in my opinion.
David Richards David Richards
The border looks very textured and I believe it can take a long time.
The effect of the screen to see the projection is still very good, the design and texture of the frame are very good, the quality is very good, I believe that the future will not worry about for a long time.
Marybeth Jones Marybeth Jones
The effect of watching movies is very good, and it is very good with my projector.
Before using the projector to watch movies are on the wall, but there are some patterns on the wall of my house, which greatly affects the effect of watching movies. I bought this projection screen to solve my problem perfectly. The size is also very good. The effect of watching movies is very good.

People Who Bought This Item Also Bought

TOUGH TOOLS, HALF PRICE