
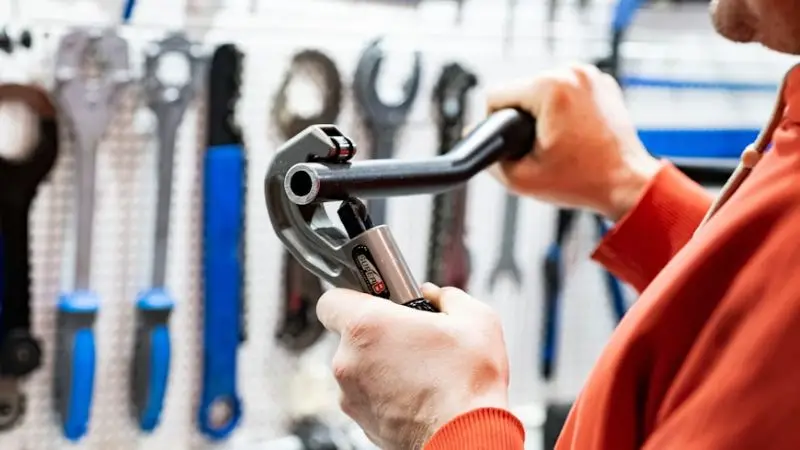
Saatat pelätä uskaltautua ensimmäiseen putkiremonttiisi, mutta kupariputkien puristustyökalu on käytettävissäsi. Kupariputkien puristustyökalu on erittäin yksinkertainen ja tehokas, ja sillä saa aikaan vahvat ja vuotamattomat putkiliitokset ilman juottamista. Tämän avulla... puristustyökalu kupariputkille, voit helposti luoda vahvoja ja vesitiiviitä tiivisteitä. Sen avulla vältät sotkuisen juottamisen ja voit olla varma, että korjauksesi on joka kerta turvallinen ja suojattu. Tämä käyttöopas opettaa sinulle, kuinka käyttää kupariputkien puristustyökalua. Se sisältää kaikki tarvitsemasi tiedot, kuten oikeiden työkalujen ja materiaalien valinnan, sekä vaiheittaiset ohjeet sen varmistamiseksi, että asennat ne oikein. Tiedät, kuinka mitata, leikata, puhdistaa ja liittää kupariputket. Tämä opas takaa, että putkityösi on turvallista, tehokasta ja kestävää, olitpa sitten tekemässä pientä korjausta tai kokonaisvaltaista asennusta.
Keskeiset ostokset
Kupariputkien puristustyökalun tarkoituksena on antaa käyttäjälle lyhyt yleiskatsaus tärkeimmistä mielessä pidettävistä asioista. Se näyttää tärkeimmät vaiheet ja vinkit, jotta käyttäjän ei tarvitse lukea ja opetella kaikkea ulkoa.
- Valmistele tarvitsemasi työkalut ja materiaalit etukäteen. Tarvitset puristustyökalun, kupariputket, puristusrenkaat ja putkileikkurin.
- Mittaa, leikkaa ja purista kupariputket oikein oppaan avulla. Huolellinen valmistautuminen auttaa luomaan tukevia ja vuotamattomia liitoksia.
- Vältä virheitä, kuten renkaan asettamista väärään asentoon tai väärän kokoisen työkalun käyttöä. Tee se askel askeleelta ja testaa jokainen vaihe varmistaaksesi, että putkistosi toimii.
Opas kupariputkien puristustyökaluihin ja materiaaleihin, joita tarvitset
Saatat joutua keräämään muutamia asioita ennen kuin hankit aloittelijalle sopivan kupariputkien puristustyökalun. Et halua muistaa jotain kesken projektisi. Tämä opas tarjoaa tarvittavat työkalut ja materiaalit kupariputkien puristustyökalun onnistuneeseen käyttöön. Varmista nyt, että olet valmis lähtemään putkiseikkailuusi.
Olennaiset LVI-työkalut ja -materiaalit
Nämä tärkeät työkalut on suunniteltu toimimaan keskeisenä osana kokonaisvaltaista putkiasennusta. Ne auttavat käyttäjiä ymmärtämään, että onnistunut putkityö Kyse ei ole vain yhdestä työkalusta. Kyse on oikean työkalujen ja materiaalien yhdistelmän käyttämisestä, joista puristustyökalu on tärkein. Tämä ominaisuus auttaa käyttäjiä helpottamalla ja organisoimalla heidän työtään, sillä sen avulla he voivat valita parhaan kupariputkien puristustyökalun.
Tässä on kätevä tarkistuslista putkiasennuksiasi varten:
- Putkiliitosten puristustyökalu: Se on päätyökalusi, jota käytät puristusrenkaiden kiinnittämiseen ja tiiviiden tiivisteiden luomiseen putkeen.
- Kupariputket: Valitse oikea koko putkityöhösi. Mittaa kahdesti, jotta et hukkaa putkea.
- Puristusrenkaat: Nämä pienet renkaat sopivat putken ympärille ja auttavat lukitsemaan liittimen paikalleen.
- Putkenleikkuri: Tarvitset tätä putken katkaisemiseen oikeaan pituuteen. Siisti leikkaus helpottaa putkityötäsi.
LVI-työkalut ja -tarvikkeet
Tämä ominaisuus auttaa käyttäjiä ymmärtämään, että hyvä LVI-työ edellyttää oikeita työkaluja ja tarvikkeita. Kaikilla tarvikkeilla on oma tarkoituksensa, mutta niitä on käytettävä oikein vahvan ja vuotamattoman lopputuloksen saavuttamiseksi. Se näyttää käyttäjille myös, miten kupariputkien puristustyökalua käytetään helposti. Tämä ominaisuus auttaa käyttäjiä tekemällä heidän työstään suoraviivaisempaa sen sijaan, että he olisivat hämmentyneitä siitä, mitä he tarvitsevat.
Joitakin tarvikkeita ovat seuraavat:
- Jäysteenpoistotyökalu: Kun olet katkaissut putken, käytät tätä tasoittaaksesi karheat reunat. Se pitää putkistosi turvassa ja estää vuodot.
- Putkenpuhdistusharja: Tämä auttaa puhdistamaan putken sisä- ja ulkopuolen. Lika tai roskat voivat pilata puristusliitoksen.
- liittimet: Tarvitset näitä putkien liittämiseen. Varmista, että ne vastaavat kupariputkesi kokoa.
- Tussi tai lyijykynä: Merkitse kohta, josta haluat katkaista putken. Se auttaa sinua pysymään tarkana.
Esittele kaikki putkien puristustyökalutarvikkeesi ennen aloittamista. Se säästää aikaa ja pitää työtilasi järjestyksessä.
Laadukkaiden LVI-työkalujen ja -materiaalien valitseminen
Saatat nähdä kaupoissa putkiliitäntöjä. Ne toimivat aivan kuten putkiliitäntöjen puristustyökalut. Sinun on tarkistettava kupariputkiliitäntöjen hinta ja koko ennen ostamista. Jos haluat putkistosi kestävän, käytä laadukkaita materiaaleja jokaisessa putkiasennuksessa. Se tarkoittaa, että paremmat työkalut ja materiaalit johtavat parempiin tuloksiin, vähemmän ongelmiin ja pidempään kestäviin putkijärjestelmiin. Kupari on loistava valinta, koska se kestää korroosiota ja kestää vuosia. Tämä ominaisuus auttaa käyttäjiä tekemään älykkäämpiä päätöksiä ohjaamalla heitä valitsemaan tuotteita, jotka ovat vahvoja, kestäviä ja hyvin suunniteltuja toimimaan. Kupariputkiliitäntösi sopii tähän ajatukseen tarjoamalla luotettavan tavan luoda turvallisia liitoksia.
Vaiheittainen opas: Kupariputkien puristustyökalun käyttö

Oletko valmis aloittamaan putkityöt? Tämä käyttöohje opettaa sinulle, kuinka käyttää kupariputkien puristustyökalua ammattitaitoisen putkimiehen tavoin. Saat vuotamattomat liitokset ja turvalliset asennukset joka kerta. Käyttöohje korostaa puristusrenkaan oikean asennuksen ja sijoittelun tärkeyttä hyvän tiiviyden varmistamiseksi. Lopuksi puristustesti tarkistaa turvallisuuden, kestävyyden ja ammattimaisen laadun.
Mittaa ja leikkaa kupariputki
Aloita mittaamalla putki mittanauhalla. Tarkista aina ulkohalkaisijan yhteensopivuus liittimien kanssa. Nimelliskoko ei vastaa todellista ulkohalkaisijaa, joten tarkista se kahdesti. Sinun on käytettävä mittanauhaa. putkiston puristustyökalu tai putkileikkuria siistiin ja suorakulmaiseen leikkaukseen. Jos sinulla ei ole leikkuria, rautasaha toimii, mutta pidä leikkaus suorana. Kuinka käyttää kupariputken puristustyökalua? Jos putki on liian lyhyt, se ei yllä liitokseen. Jos se on liian pitkä, se ei välttämättä sovi kunnolla järjestelmään. Tämä ominaisuus auttaa käyttäjiä välttämään näitä ongelmia kannustamalla heitä mittaamaan huolellisesti ennen leikkaamista. Kun käyttäjät mittaavat putken oikein, he vähentävät jätettä.
Pursenpoisto ja putken puhdistus
Leikkaamisen jälkeen ota purseenpoistotyökalu. Poista purseet ja roskat putken reunoista. Putken puhdistaminen varmistaa sitten vuotamattomat liitokset ja estää o-renkaan vaurioitumisen. Käytä putkenpuhdistusharjaa putken sisä- ja ulkopuolen hankaamiseen varmistaaksesi, että pinta on puhdas ja asennusvalmis. Purseenpoistolla putkesta käyttäjät tasoittavat nämä reunat, jotta putki sopii täydellisesti. Paras kupariputkien puristustyökalu keskittyy tärkeään valmisteluvaiheeseen, joka auttaa käyttäjiä luomaan vahvoja putkiliitoksia. Sileä putken reuna mahdollistaa liittimen helpon liukumisen ja oikean asennon.
Aseta liitin paikalleen
Tässä artikkelissa olet oppinut perusteellisesti kupariputkien puristustyökalun käytön aloittelijoille. Työnnä liitin putkeen, kunnes se tuntuu tiukalta. Kupariset puristusliittimet ja puristusrenkaat toimivat parhaiten putkityön puristustyökalun kanssa. Tämä varmistaa, että liitin on kokonaan putken sisällä ja että liitokset ovat tukevat. Kun käyttäjä on mitannut, leikannut, poistanut purseet ja puhdistanut kupariputken, seuraava vaihe on liittimen asettaminen. Liitin on osa, joka yhdistää kaksi putkea tai liittää putken toiseen komponenttiin, kuten venttiiliin tai kalusteeseen. Tämä vaihe saattaa vaikuttaa yksinkertaiselta, mutta sillä on erittäin tärkeä rooli putkityön onnistumisessa.
Aseta puristusrengas paikalleen
Liu'uta ensin puristusrengas putken päälle. Aseta se noin 3–6 mm:n päähän reunasta. Tämä tarkoittaa, että puristusrengas asetetaan oikeaan kohtaan putkessa ennen kuin kiristät sitä puristustyökalulla. Tämä pieni askel vaikuttaa merkittävästi lopullisen liitoksen lujuuteen ja luotettavuuteen. Renkaan tulee peittää liittimen piikit tai harjanteet. Väärin sijoitetut puristusrenkaat voivat aiheuttaa vuotoja tai heikkoja liitoksia. Tämä ominaisuus auttaa käyttäjiä ymmärtämään tarkalleen, mihin ja miten rengas asetetaan, jotta puristusprosessi toimii oikein. Jos puristusrengas ei ole oikein sijoitettu, liitos ei välttämättä ole tukeva.
Käytä puristustyökalua
Ota nyt kupariputken puristustyökalu ja asenna tarvittaessa oikea leuka. Aseta puristustyökalu putkityötä varten renkaan ja liittimen päälle. Puristat puristusrengasta painamalla tasaisesti, kunnes työkalu pysähtyy. Manuaalinen vs. hydraulinen kupariputken puristustyökalu on suunniteltu kohdistamaan tasaista, korkeaa painetta puristusrenkaan ympärille ja puristamaan sen tiukasti putkeen. Yhdellä napakalla painalluksella käyttäjät voivat luoda ammattimaisen liitoksen. Se vähentää virheiden mahdollisuutta ja tekee koko prosessista paljon helpomman, erityisesti aloittelijoille. Tämä auttaa käyttäjiä luomaan vahvoja, vuotamattomia liitoksia, joihin he voivat luottaa.
Tarkista puristusliitäntä
Tarkistaaksesi puristuksen, käytä rakotulkkia tai toiminta-/ei-tulkkia. Vedä sitten putkea ja liitintä varovasti. Jos se pitää tiukasti kiinni, puristusliitokset ovat tukevat. Vuotamattomat liitokset tarkoittavat, että putkiasennuksesi ovat käyttövalmiita. Paras kupariputkien puristustyökalu luo tiiviin tiivistyksen, joka pitää liitoksen tukevasti paikallaan. Sinun kannattaa harjoitella romukupariputkien kanssa ennen kuin ryhdyt varsinaisiin putkityöprojekteihin. Tutustut putkipuristustyökalun ja putkipuristustyökalun käyttöön. Tässä oppaassa selitetään myös, miten puristustyökalua käytetään tasaisella paineella tukevien liitosten luomiseksi.
Yleisiä virheitä, joita tulisi välttää kupariputkien puristamisessa
Kun puristat putkistoa, haluat kaikkien liitosten pitävän kiinnityksen. Pienikin vika voi johtaa vuotoihin tai muihin putkiongelmiin. Tämä opas tunnistaa joitakin sudenkuoppia, joita kannattaa välttää putkistoa puristettaessa. kupariputkien puristaminenOhjeisiin kuuluu, että työkalua ei saa painaa liian kovaa ja että työkalu on asetettava oikein. Keskustelemme yleisimmistä virheistä ja tavoista estää ne.
Väärä renkaan sijoittelu
Jos asetat puristusrenkaat liian lähelle tai liian kauas putken reunasta, tiivistys voi olla huono. Puristusrenkaat tulisi aina liu'uttaa noin 3–6 mm päähän putken päästä. Jos tämä vaihe jää väliin, saatat nähdä vuotoja tai löysiä liittimiä myöhemmin. Aloittelijan kupariputken puristustyökalu voi myös kuoria eristystä väärään pituuteen tai työntää putkea väärin päin liittimeen, mikä johtaa heikkoihin liitoksiin. Se opettaa käyttäjille, mihin puristusrengas asetetaan oikein putkeen, jotta he voivat luoda vahvan, tiiviin ja vuotamattoman liitoksen.
Tässä on joitakin ohjeita, joita voit noudattaa:
- Aseta puristusrenkaat oikeille paikoilleen.
- Työnnä putki kokonaan liittimeen.
- Tarkista kahdesti ennen puristamista.
Väärän työkalun koon käyttäminen
Putkityökalusi on oltava sopiva putken ja puristusrenkaiden kokoon. Jos käytät wrong-koko, saat huonon puristuksen. Tämä voi aiheuttaa viallisia liitoksia, suuremman vastuksen tai jopa tulipalovaaran. Tarkista aina putkityön puristustyökalusi ennen aloittamista. Ammattitaitoinen putkimies ei koskaan ohita tätä vaihetta. Nämä vaiheet opettavat sinulle hyvin, miten käyttää tarpeisiisi sopivaa kupariputken puristustyökalua. Se auttaa käyttäjiä ymmärtämään oikean koon valinnan tärkeyden ennen työn aloittamista, mikä on tärkeä vaihe onnistuneessa putkityössä. Oikean työkalun koon käyttö varmistaa, että puristusrengas puristuu tasaisesti ja tiukasti putken ympärille.
Yli- tai alipuristus
Jos puristat manuaalista vs. hydraulista kuparipuristustyökalua liian kovaa tai liian vähän, putki voi vaurioitua tai jäädä liian löysäksi. Ongelman merkkejä ovat virheellinen kohdistus ja epätasainen paine. Nämä virheet heikentävät liitosta ja voivat ajan myötä aiheuttaa vuotoja. Se opettaa käyttäjille oikean voiman, jotta puristusrengas pitää putken paikallaan. Ja sopii tiukasti vaurioittamatta sitä tai jättämättä sitä liian löysäksi.
Nämä kaksi kohtaa saattavat auttaa sinua:
- Pidä putkityökalu suorassa.
- Käytä tasaista ja tasaista painetta.
Putken ohittamisen valmistelu
Älä koskaan jätä putken puhdistusta tai purseenpoistoa väliin. Jos teet niin, purseet voivat aiheuttaa turbulenssia ja kuluttaa metallia. Tämä johtaa vuotoihin ja järjestelmäongelmiin vuosia myöhemmin. Useimmat kupariputkien vuodot johtuvat huonosta asennuksesta tai vaiheiden ohittamisesta. Huolellinen valmistelu ja vuotojen testaus pitävät liitokset vahvoina. Käytä aikaa jokaiseen putkityöprojektiin, niin liitoksesi kestävät. Jos haluat oppaan kupariputkien puristustyökaluista aloittelijoille, noudata näitä ohjeita.
Voit hallita kupariputkien puristus noudattamalla näitä ohjeita:
- Mittaa, leikkaa ja poista purseet putkesta.
- Aseta puristusrengas ja liitin paikoilleen.
- Käytä työkalua vuotojen tarkistamiseen ja testaamiseen.
Paketoida
Putkityöprojektit ovat myös helpompia, nopeampia ja varmempia käyttämällä puristustyökalua, joka mahdollistaa kupariputkien käytön, erityisesti aloittelijoille. Kun teet oikeat toimenpiteet, on helppo luoda hyviä liitoksia, jotka eivät vuoda. On tärkeää, että oikeat työkalut ja materiaalit on valmisteltu etukäteen sujuvan ja järjestelmällisen työnkulun varmistamiseksi. Lisäksi tulisi välttää yleisiä virheitä, kuten renkaiden väärää sijoittelua. Jokaisen toimenpiteen suunnitteluun ja uudelleentarkasteluun käytetty aika pidentää merkittävästi putkistosi käyttöikää. Harjoittelemalla tulet itsevarmemmaksi ja saavutat myös ammattimaisia tuloksia. Tämä käyttöohje tarjoaa sinulle myös kaiken tarvittavan parhaan kupariputkien puristustyökalun valitsemiseksi, jotta putkityösi voidaan suorittaa turvallisesti ja tehokkaasti. Loppujen lopuksi hidas, huolellinen työ ja oikea menetelmä johtavat kestäviin ja luotettaviin putkiliitoksiin.
UKK
Mistä tiedät, onko puristusliitos varma?
Voit tarkistaa liitoksen mittauslaitteella. Jos rengas sopii, putkistosi on tiivis ja valmis vedelle.
Voiko puristusrenkaita käyttää uudelleen putkitöissä?
Ei, et voi käyttää uudelleen puristusrenkaatKun olet puristanut ne kiinni, ne pysyvät paikoillaan. Käytä aina uutta rengasta jokaisessa putkiremontissa.
Mitä tehdä, jos huomaat vuodon puristamisen jälkeen?
Sulje vesi. Tarkista putkistoliitäntä. Jos löydät löysän renkaan, leikkaa se pois ja asenna uusi liitin ja rengas.


